
There is a specific kind of magic that happens when you stop viewing your house as a list of chores and start seeing it as a living, breathing reflection of your soul. We often get caught up in the ‘someday’—someday we’ll have the perfect garden, someday we’ll renovate the kitchen—but the truth is that a home is built in the quiet rituals of the right now. It’s the way the morning light hits a specific corner where you sip your coffee, or the feeling of soft grass under your feet on a path you laid yourself. It’s about creating a sanctuary that holds you close at the end of a long day.
Lately, I’ve been obsessed with the idea of ‘curated coziness.’ It’s not about spending a fortune at a big-box store; it’s about intentionality. Whether you’re styling a tiny cubicle to keep your creative sparks flying or designing a backyard oasis that feels like a hidden retreat, every small change is a love letter to yourself. This guide is a collection of my favorite ways to infuse personality, warmth, and a touch of whimsy into every square inch of your life.
How to Design Simple Landscaping for a Welcoming Front Yard

Why we love this
A beautifully landscaped front yard is like a warm hug for anyone who pulls into your driveway, offering an instant sense of peace before you even step through the door. We adore this approach because it relies on the sensory harmony of silvery-green lavender, the soft rustle of ornamental grasses, and the grounded feel of natural stone. Imagine the sweet, herbaceous aroma wafting through your windows on a breeze and the visual delight of layered heights that make even a small lot feel like a lush, curated estate.
Essential Elements:
- Native perennial plants (like Lavender, Salvia, or Coneflowers)
- Hardscape materials (river rocks, mulch, or flagstone)
- Defined garden edging (metal, plastic, or stone)
- Solar-powered pathway lighting
- A focal point (a birdbath, a large boulder, or a specimen tree)
How to make it
- Map Your Sunlight: Observe your yard for a full day to identify ‘Full Sun’ (6+ hours) and ‘Shade’ areas. Professional tip: Use a sun-mapping app to ensure you buy plants that will actually thrive in your specific microclimate.
- Define Your Borders: Use a garden hose or spray paint to mark out organic, curved garden beds. Curved lines feel more natural and ‘expensive’ than harsh straight lines. Excavate the grass within these lines using a sharp spade, digging down about 3-4 inches.
- Prepare the Foundation: Lay down a layer of landscape fabric to suppress weeds, then top with 2 inches of nutrient-rich garden soil mixed with compost. This ensures your new plants have a ‘power breakfast’ for their roots.
- The Thriller, Filler, Spiller Method: Place your tallest plants (Thrillers) in the back, medium-height flowering plants (Fillers) in the middle, and low-growing groundcover or trailing plants (Spillers) near the edge. Space them according to their ‘mature width’ tags to avoid overcrowding.
- Mulch and Light: Apply a 3-inch layer of cedar mulch to retain moisture. Finish by staggering solar lights along the path, angling them slightly toward the foliage to create a soft, high-end glow at night.
How to Style a Work Cubicle for Maximum Office Productivity

Why we love this
The standard office cubicle can often feel like a sterile grey box, but with the right styling, it becomes a cockpit of inspiration and calm. We love this because it bridges the gap between professional efficiency and personal comfort, using soft textures and ergonomic ‘wins’ to reduce work-day fatigue. By introducing greenery and warm lighting, you eliminate the harshness of fluorescents, making those eight hours feel less like a grind and more like a focused creative session in your favorite cafe.
Essential Elements:
- Low-light indoor plants (Snake plants or Pothos)
- A small, warm-toned desk lamp
- Ergonomic wrist rests and a vertical mouse
- A decorative ‘notice board’ or grid for mood-boarding
- Textural elements (a small faux-fur rug or a linen chair cushion)
How to make it
- Assess Your Vertical Space: Use ‘cubicle clips’ to hang lightweight items without damaging the fabric walls. Start by hanging a fabric or cork board at eye level to keep your most important tasks and inspiring quotes directly in your line of sight.
- Lighting Layering: Turn off the overhead lights if possible, or use a monitor light bar to reduce glare. Add a small lamp with a 2700K (warm white) bulb to one corner of your desk to create a ‘homey’ pool of light that signals your brain to stay calm.
- The Green Corner: Place a Pothos on top of your filing cabinet or a Snake plant in the corner. These specific plants are ‘unkillable’ and act as natural air purifiers, which can help keep you alert during the mid-afternoon slump.
- Personal Touchstones: Select three items that bring you joy—a ceramic mug, a specific candle (unlit, for the scent), and a framed photo. Group these in a ‘tray’ to keep the desk looking organized rather than cluttered.
- Cable Management: Use adhesive cable clips to route your chargers and computer cords behind the desk legs. A clear, clutter-free surface is the number one visual cue for a focused mind.
How to Create a Patriotic Front Porch for Summer Celebrations

Why we love this
There is something deeply nostalgic and festive about a porch dressed in Americana, evoking memories of sparklers, parades, and ice-cold lemonade. We love this look because it uses a classic palette of navy, cream, and crimson to create a timeless summer vibe that feels both sophisticated and welcoming. The texture of heavy cotton bunting and the sight of a flag waving in the heat of July creates an instant focal point that celebrates community and the joy of the summer season.
Essential Elements:
- Cotton tea-stained American flag bunting
- Red geraniums or blue hydrangeas in galvanized buckets
- Navy and white striped outdoor pillows
- A natural fiber doormat
- White rocking chairs or a wooden bench
How to make it
- Anchor with Bunting: Hang pleated fans or ‘bunting’ along the porch railing or under windows. Use zip ties or small cup hooks for a secure fit. Pro tip: Opt for ‘tea-stained’ or vintage-wash fabrics to avoid a neon-bright look that feels too commercial.
- Floral Foundations: Group three galvanized buckets of varying heights near the steps. Fill them with vibrant red geraniums. Ensure the buckets have drainage holes drilled into the bottom to prevent root rot during summer rainstorms.
- Seating Symmetry: If space allows, place two white rocking chairs facing the street. Layer them with navy blue throw pillows. The contrast of the crisp white against the blue creates that quintessential nautical-patriotic aesthetic.
- The Main Flag: Mount a flag bracket to a porch pillar or beside the front door at a 45-degree angle. Ensure the flag is high enough that it doesn’t touch the floor or any shrubs, following proper flag etiquette.
- Evening Sparkle: Drape a strand of warm white ‘Edison’ style string lights across the ceiling of the porch. At dusk, the warm glow against the red and blue decor creates a magical, celebratory atmosphere.
How to Achieve a Whimsical Apartment Aesthetic for Cozy Living

Why we love this
Whimsical apartment living is all about breaking the rules of ‘modern’ minimalism in favor of things that make your heart skip a beat—think fairy lights hidden in jars, stacked vintage suitcases, and a curated explosion of botanical prints. We love this style because it turns a standard rental into a storybook sanctuary where every object has a soul. The sensory experience is soft and ethereal: the glow of a mushroom lamp, the velvet touch of a thrifted armchair, and the smell of dried lavender hanging from the ceiling.
Essential Elements:
- Fairy lights or ‘curtain’ lights
- Thrifted vintage mirrors and frames
- Indoor vines (like English Ivy or Heartleaf Philodendron)
- Mismatched colorful textiles (velvet, lace, and knits)
- Whimsical decor (mushroom motifs, celestial prints, or brass animals)
How to make it
- Layer Your Lighting: Avoid the ‘big light’ at all costs. Place small lamps of different shapes—like a glass mushroom lamp or a salt lamp—on floor levels and shelves. Drape warm LED fairy lights behind sheer curtains to create a soft, glowing backdrop.
- Vertical Greenery: Since floor space is limited in apartments, use ‘S’ hooks to hang trailing plants from curtain rods. Let the vines grow around the window frame to create a ‘living frame’ effect that brings nature indoors.
- The Gallery of Curiosities: Create a gallery wall using mismatched frames found at thrift stores. Don’t worry about them matching; the more varied the textures (gold filigree, chipped wood, matte black), the more whimsical the result. Mix in dried pressed flowers and small mirrors to add depth.
- Texture Stacking: Throw a lace tablecloth over a modern coffee table, then top it with a heavy velvet runner. This juxtaposition of delicate and heavy textures creates the ‘cluttered-but-cozy’ look essential to this aesthetic.
- Aromatic Accents: Display a collection of vintage glass bottles filled with dried wildflowers or essential oil diffusers. Choose scents like sandalwood or bergamot to ground the airy visual style.
How to Build a Cheap Pool Deck for Backyard Summer Fun

Why we love this
Nothing says ‘summer escape’ quite like a sun-drenched deck next to sparkling water, and you don’t need a massive budget to make it happen. We love this DIY approach because it uses affordable pressure-treated lumber and smart design to transform a basic above-ground pool into a high-end resort experience. There’s a rugged, tactile satisfaction in the feel of warm wood underfoot and the rhythmic sound of water splashing against a stable platform while you lounge with a book.
Essential Elements:
- Pressure-treated 2×4 and 2×6 boards
- Decking screws and galvanized hardware
- Concrete deck blocks (for a floating foundation)
- Leveling gravel or sand
- Exterior wood stain or sealer
How to make it
- Design a ‘Floating’ Frame: Instead of digging deep post holes, use concrete deck blocks placed on a level bed of gravel. This is much cheaper and easier for DIYers. Space the blocks no more than 4 feet apart for maximum stability.
- Leveling the Joists: Place your 2×6 joists into the slots of the deck blocks. Use a 4-foot level to ensure every board is perfectly horizontal. If one side is low, add more gravel under the block; if high, dig out a little soil.
- The Frame Build: Create a rectangular box frame around the pool area you want to cover. Cross-brace the interior of the frame with joists every 16 inches on-center to prevent the deck boards from sagging or bouncing when walked on.
- Laying the Planks: Lay your decking boards across the joists. Use a ‘spacer’ (a 1/4 inch scrap of wood) between each board to allow for water drainage and wood expansion. Drive two screws into every joist intersection to prevent warping.
- Finishing Touches: Sand down any rough edges or splinters. Apply a high-quality UV-resistant stain. This step is crucial; it prevents the sun from turning your cheap lumber gray and brittle within a single season.
How to Plan Fall Baby Shower Themes for a Memorable Celebration

Why we love this
Autumn offers a naturally rich and cozy color palette that is perfect for celebrating a new arrival, blending the crispness of the air with the warmth of a ‘Little Pumpkin’ theme. We love this because it focuses on comfort food, rustic textures like burlap and twine, and the heartwarming aroma of cinnamon and spiced cider. It’s a sensory celebration that feels grounded, intimate, and deeply celebratory, making every guest feel like they are part of a cozy family gathering.
Essential Elements:
- Mini white and orange pumpkins
- Dried corn husks and wheat stalks
- Flannel or plaid table runners
- A ‘hot cocoa’ or ‘waffle’ bar station
- Wood-slice chargers and serving platters
How to make it
- Choose Your Palette: Instead of traditional pastels, go for ‘muted autumn’: sage green, dusty orange, and cream. This looks more sophisticated and ‘viral-ready’ on social media.
- The Centerpiece Anchor: Use a large hollowed-out pumpkin as a vase for a bouquet of sunflowers and eucalyptus. Surround the base with tealight candles nestled in small jars of unpopped popcorn kernels for a rustic, flickering effect.
- Interactive Food Station: Set up a ‘Build Your Own S’mores’ or ‘Hot Cider’ station. Use slow cookers to keep cider warm and provide toppings like cinnamon sticks, star anise, and caramel drizzle. Label everything with handwritten kraft-paper tags.
- Themed Favors: Send guests home with ‘Thank You’ packets of wildflower seeds or mini jars of local honey tied with a piece of flannel ribbon. It’s a sustainable, thematic gift that guests will actually use.
- Cozy Seating: If the weather permits an outdoor shower, drape thick knit blankets over the backs of every chair. It encourages guests to linger, chat, and soak in the crisp autumn air comfortably.
How to Master Vintage Grandma House Aesthetic for Nostalgic Home Decor

Why we love this
Often called ‘Grandmillennial’ style, this aesthetic is a love letter to the curated clutter and cozy nostalgia of our childhood homes, modernized for today. We love it because it celebrates the ‘imperfectly perfect’—the clinking of floral teacups, the intricate patterns of crochet throws, and the timeless elegance of dark wood furniture. It creates a space that feels lived-in and loved, where every floral print and embroidered pillow tells a story of comfort and continuity.
Essential Elements:
- Floral wallpaper or patterned textiles
- Scalloped edges (on furniture or linens)
- Wicker and rattan accents
- Antique brass hardware and frames
- Crocheted or ‘afghan’ style blankets
How to make it
- Start with a ‘Hero’ Pattern: Choose one bold floral print, whether it’s a wallpapered accent wall or a large area rug. The key is to keep the base colors consistent (e.g., shades of dusty rose or sage green) while mixing different patterns.
- The Thrift Hunt: Look for ‘brown furniture’—dark wood end tables or dressers. You can update these with modern brass knobs to bridge the gap between ‘old’ and ‘now.’ A vintage vanity with a round mirror is the ultimate grandma-chic staple.
- Textile Overload: Drape a handmade crochet blanket over the back of a modern sofa. Add throw pillows with ruffles or scalloped edges. This adds the necessary ‘softness’ that defines the aesthetic.
- Curate the ‘Clutter’: Display a collection of mismatched china plates on a wall or in a hutch. Group them by color rather than size to make it look intentional. Add a few crystal bowls filled with hard candies for the full sensory ‘grandma’ experience.
- Botanical Life: Use African Violets or Begonias in ceramic pots. These plants were staples in mid-century homes and add a splash of vintage color and texture to your windowsills.
How to Grow a Hippie Garden with Boho Decor for Outdoor Zen

Why we love this
A hippie garden is less about perfect rows and more about a wild, blooming sanctuary that feeds the soul and the bees. We love this look because it prioritizes the ‘vibe’—the sound of wind chimes, the sight of vibrant wildflowers, and the grounding feeling of a meditation corner surrounded by crystals and macrame. It’s a space where you can kick off your shoes, feel the earth beneath you, and enjoy the kaleidoscopic colors of nature in its most uninhibited form.
Essential Elements:
- Wildflower seed mixes (Zinnias, Poppies, Marigolds)
- Outdoor macrame plant hangers
- Large quartz or amethyst stones for grounding
- A colorful outdoor rug or floor cushions
- Bamboo or copper wind chimes
How to make it
- The Wildflower Meadow: Choose a sunny patch of dirt. Instead of planting individual flowers, scratch the surface of the soil with a rake, scatter a ‘pollinator mix’ of seeds, and lightly press them in. This creates a dense, multi-colored carpet of blooms that requires very little maintenance.
- Vertical Texture: Hang macrame plant holders from tree branches or a pergola. Use ‘hardy’ plants like spider plants or ferns that can handle the outdoor humidity. The swaying movement of the hangers adds a dreamlike quality to the garden.
- Create a ‘Zen’ Zone: Clear a small circular area and lay down a weather-resistant boho rug. Place a few weather-safe floor cushions and surround the area with large stones or crystals to define the space as a meditation or reading nook.
- Upcycled Planters: Use colorful old colanders, painted tires, or vintage tea tins as planters. The more eclectic and mismatched the containers, the more ‘boho’ the garden feels.
- Sensory Soundscape: Hang wind chimes in a spot where they will catch the prevailing breeze. Choose bamboo for a deep, hollow ‘knock’ or copper for a lighter, melodic ‘tinkle.’ This adds an auditory layer of peace to your outdoor retreat.
How to Design Aquarium Setup Ideas for an Underwater Oasis
Why we love this
An aquarium is more than just a pet habitat; it is a living piece of art that brings the tranquil, rhythmic movement of water into your living room. We love this because it offers a unique form of ‘visual meditation’—the gentle sway of live plants, the soft hum of the filter, and the vibrant colors of the fish create a mesmerizing focal point. A well-designed aquascape can transform a dark corner of a room into a glowing, thriving ecosystem that lowers stress and sparks wonder.
Essential Elements:
- High-clarity glass tank
- Live aquatic plants (Anubias, Java Fern, or Amazon Sword)
- Natural substrate (aquarium soil or sand)
- Hardscape materials (Driftwood or Dragon Stone)
- Full-spectrum LED lighting
How to make it
- The ‘Rule of Thirds’ Hardscape: Before adding water, place your largest piece of driftwood or stone slightly to the left or right of the center. This creates a more natural, pleasing composition than a perfectly centered piece. Use ‘Dragon Stone’ for a jagged, mountain-like look.
- Layering Substrate: Slope your sand or soil so it is higher in the back and lower in the front. This ‘forced perspective’ trick makes even a small tank look incredibly deep and vast.
- Planting Strategy: Use long tweezers to tuck live plants into the substrate. Place ‘tall’ plants like Jungle Val in the background and ‘low’ carpeting plants like Monte Carlo in the foreground. Pro tip: Keep the plants moist with a spray bottle while you work to prevent them from drying out before the tank is filled.
- Filling the Tank: Place a small plate on top of your substrate and pour water slowly onto the plate. This prevents the water flow from kicking up the sand and ruining your careful plant placement.
- Cycle and Light: Run your filter for at least 2 weeks (the ‘cycling’ phase) before adding fish to ensure the water chemistry is safe. Set your LED lights on a timer for 8 hours a day to promote plant growth without encouraging too much algae.
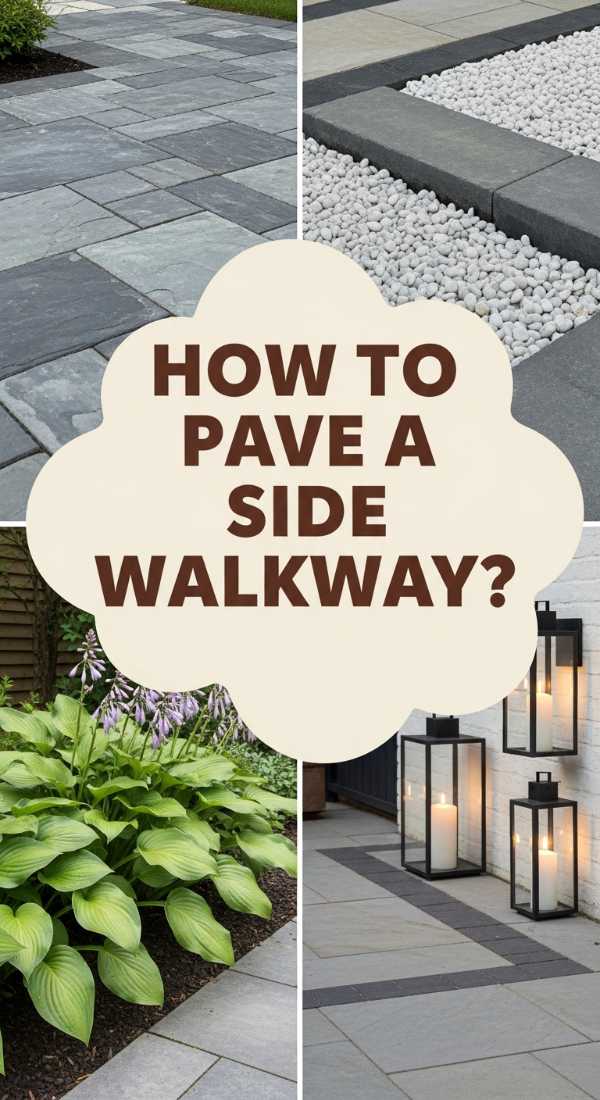
How to Pave a Side House Walkway for Better Curb Appeal
[IMAGE_10]
Why we love this
That neglected, muddy strip on the side of the house is often a wasted opportunity, but a paved walkway turns it into a functional and beautiful journey. We love this project because it provides a ‘clean’ transition between the front and back yards, keeping shoes mud-free and adding a high-end, finished look to your property. The contrast of grey pavers against green grass or white gravel creates a crisp, architectural line that instantly boosts your home’s value and aesthetic appeal.
Essential Elements:
- Concrete pavers or flagstones
- Paver base (crushed stone) and paver sand
- Edging restraints (plastic or metal)
- Plate compactor (can be rented)
- Polymeric sand (for the joints)
How to make it
- Excavation and Grading: Dig out the path area to a depth of 6 inches. Crucial tip: Ensure the ground slopes away from your house foundation at a rate of 1 inch for every 4 feet to prevent water damage to your basement.
- The Base Layer: Fill the trench with 4 inches of crushed stone (paver base). Use a plate compactor to pack it down until it is rock-hard. A solid base is the only way to prevent your walkway from shifting and cracking over time.
- The Sand Bed: Lay down a 1-inch layer of leveling sand over the base. Use a straight 2×4 board to ‘screed’ or smooth the sand perfectly flat. Do not walk on the sand once it is smoothed!
- Setting the Pavers: Start at the most visible end of the walkway and lay your pavers one by one, pressing them firmly into the sand. Use a rubber mallet to tap them into place and ensure they are level with one another.
- Locking the Joints: Sweep polymeric sand into the cracks between the pavers. Once filled, mist the walkway with a garden hose. This special sand hardens like glue, preventing weeds from growing through and keeping the pavers locked in place for years.
Conclusion: Your Home, Your Sanctuary
At the end of the day, crafting a home you never want to leave isn’t about following the latest trends or having the biggest budget. It’s about the small, intentional choices that reflect your personality and support your lifestyle. Whether it’s the quiet joy of a well-paved walkway or the whimsical glow of your apartment living room, these projects are investments in your own happiness. Start small, pick one corner of your world to transform, and watch how it changes the way you feel every time you walk through your front door. Happy nesting!
Frequently Asked Questions
Got questions about elevating your space? Here are a few common queries to help you get started on your home transformation journey.