

The Sculptor’s Secret: Engineering High-Fashion 3D Manicures
Hello, my loves! Welcome back to our little corner of the world, where we take a deep breath and turn our self-care into a masterpiece. There is something so incredibly soulful about looking down at your hands and seeing a reflection of your inner beauty. To me, manicures aren’t just about polish; they are about sculpting a version of ourselves that feels polished, intentional, and loved. Today, I’m pulling back the curtain on my favorite ways to transform your fingertips into high-fashion works of art.
I know life can feel like a whirlwind sometimes, but taking these few moments for your nails is like a soft, cloud-soft embrace for your spirit. Whether you are prepping for your wedding day or just want to feel a little more ‘put together’ while typing away at your desk, these guides are designed to help you engineer that high-fashion look right from the comfort of your favorite armchair. Let’s dive into the magic together, shall we?
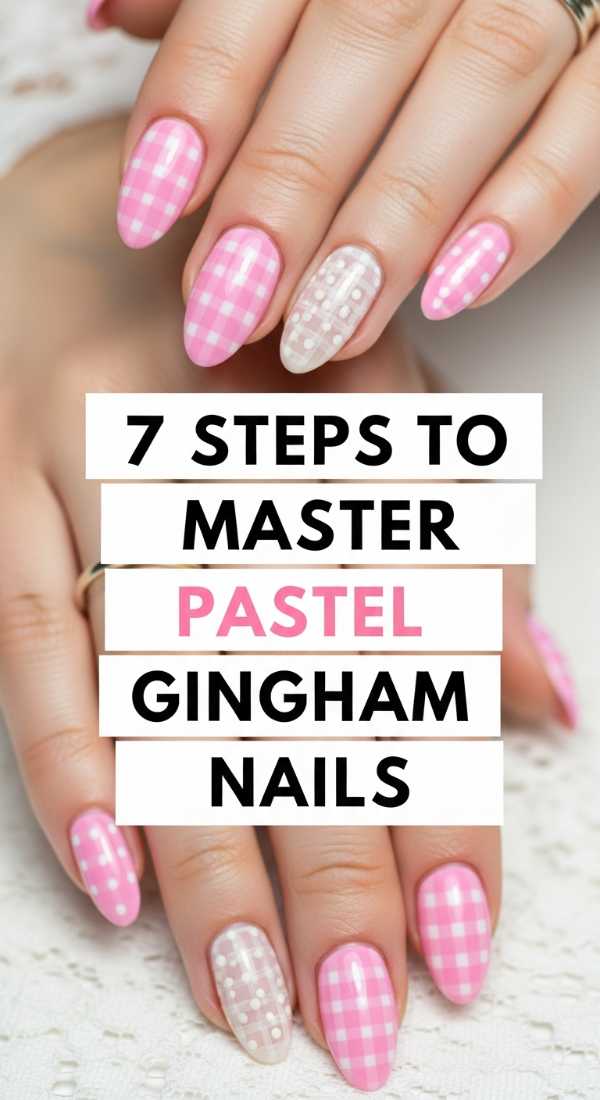
Mastering Pastel Gingham Nails
Why to love these Nails:
These nails are like a spring picnic for your soul. They evoke a sense of nostalgia and sweetness, wrapping your hands in a pattern that is both timeless and trendy. It’s the perfect way to bring a bit of sunshine to even the grayest of days.
Essential Items:
- Pastel base polish (Mint or Lavender)
- White striping polish
- Sheer version of your base color
- Fine detail brush
- Matte or Glossy top coat
How to Prepare:
- Apply two thin coats of your solid pastel base.
- Draw three horizontal white lines across the nail.
- Draw three vertical white lines to create a grid.
- Fill the overlapping squares with a slightly darker shade of your base.
- Add thin, delicate white lines through the center of the grid.
- Clean up the edges with a brush dipped in acetone.
- Seal with your favorite top coat for a flawless finish.
Budget Range
- Essie ‘Mint Candy Apple’ – $10
- Holler and Glow Nail Art Brushes – $6
- Sally Hansen Insta-Dri Top Coat – $7
5 Ways to Achieve Elegant Bridal Nails

Why to love these Nails:
Your wedding day is a tapestry of moments, and your nails should be the threads of elegance that pull it all together. These styles are designed to be timeless, making sure you look back at your photos years from now and still feel that same sense of sophisticated grace.
Essential Items:
- Sheer pink or nude polish
- Fine pearl decals
- Silver or gold micro-shimmer
- Precision tweezers
How to Prepare:
- The Classic Ombre: Sponge a soft white onto a nude base.
- The Pearl Accent: Place a single tiny pearl at the cuticle of your ring finger.
- The Shimmer Veil: Apply a single coat of micro-shimmer over a sheer pink.
- The Lace Detail: Use a stamping plate for a delicate white lace pattern.
- The Minimalist Tip: A very thin, crisp white line at the very edge of the nail.
Budget Range
- OPI ‘Bubble Bath’ – $11
- Nail Art Pearl Studs (Amazon) – $5
- Zoya ‘Leia’ Shimmer – $12
Apply Press On Nails in 4 Minutes

Why to love these Nails:
In our busy lives, we don’t always have hours to spend at a salon. Press-ons are a gift of time! They offer instant gratification and a high-fashion look without the commitment or the cost, letting you switch your vibe as often as you change your outfit.
Essential Items:
- High-quality press-on kit
- Alcohol prep pad
- Nail buffer
- Professional nail glue
How to Prepare:
- Lightly buff the surface of your natural nails to create grip.
- Wipe each nail with alcohol to remove any oils.
- Apply a small dot of glue to both your nail and the press-on.
- Press firmly from the cuticle upward and hold for 15 seconds per nail.
Budget Range
- Static Nails Reusable Pop-On Nails – $16
- Kiss Maximum Speed Nail Glue – $4
- Target Brand Nail Buffers – $2
6 Simple Tips for Perfect Floral Nails

Why to love these Nails:
Floral art is like carrying a secret garden on your fingertips. It’s whimsical, feminine, and surprisingly easy once you know the secret. These tips will help you create a look that feels organic and professional, even if you’ve never picked up a brush.
Essential Items:
- Dotting tools (different sizes)
- Green, yellow, and petal-colored polishes
- Paper plate for mixing
How to Prepare:
- Start with a clean, neutral base.
- Use a large dotting tool to place 5 dots in a circle for petals.
- Use a smaller tool to add a contrasting center dot.
- Vary the size of your flowers for a natural look.
- Add tiny green flicks for leaves.
- Don’t aim for perfection; nature is beautifully irregular.
Budget Range
- Dotting Tool Set (Walmart) – $5
- Olive & June ‘Besties’ Set – $20
- Seche Vite Dry Fast Top Coat – $9
Create Luxury Nude Nails in 3 Layers

Why to love these Nails:
There is nothing more sophisticated than a ‘quiet luxury’ manicure. It’s the ultimate palate cleanser—clean, chic, and incredibly flattering for every skin tone. This three-layer technique ensures depth and a gel-like finish that looks expensive.
Essential Items:
- Ridge-filling base coat
- Sheer ‘your nails but better’ polish
- High-shine gel-effect top coat
How to Prepare:
- Layer 1: Apply the ridge filler to create a perfectly smooth canvas.
- Layer 2: Apply a thin, even coat of your sheer nude polish.
- Layer 3: Seal with a thick, plush layer of gel-effect top coat for that glass finish.
Budget Range
- Londontown Kur Illuminating Nail Concealer – $20
- Essie Gel Setter Top Coat – $10
- Orly Bonder Base Coat – $12
Style Short Nails in 5 Trendy Ways

Why to love these Nails:
Who says you need length for high fashion? Short nails are practical, modern, and incredibly chic. Embracing your natural length allows for bold colors and minimalist designs to truly shine without feeling ‘too much’.
Essential Items:
- Dark, moody polish colors
- Gold foil flakes
- Matte top coat
How to Prepare:
- The Micro-French: Paint a literal hair-thin line at the very edge.
- The Velvet Look: Use a magnetic polish for a 3D shimmering effect.
- The Minimalist Dot: One single black dot at the base of a nude nail.
- The Bold Block: A deep navy or oxblood solid color.
- The Negative Space: Leave a small triangle of bare nail near the cuticle.
Budget Range
- Revlon ColorStay Gel Envy – $9
- Gold Nail Flakes (Etsy) – $4
- Nails.INC Magnetic Polish – $15
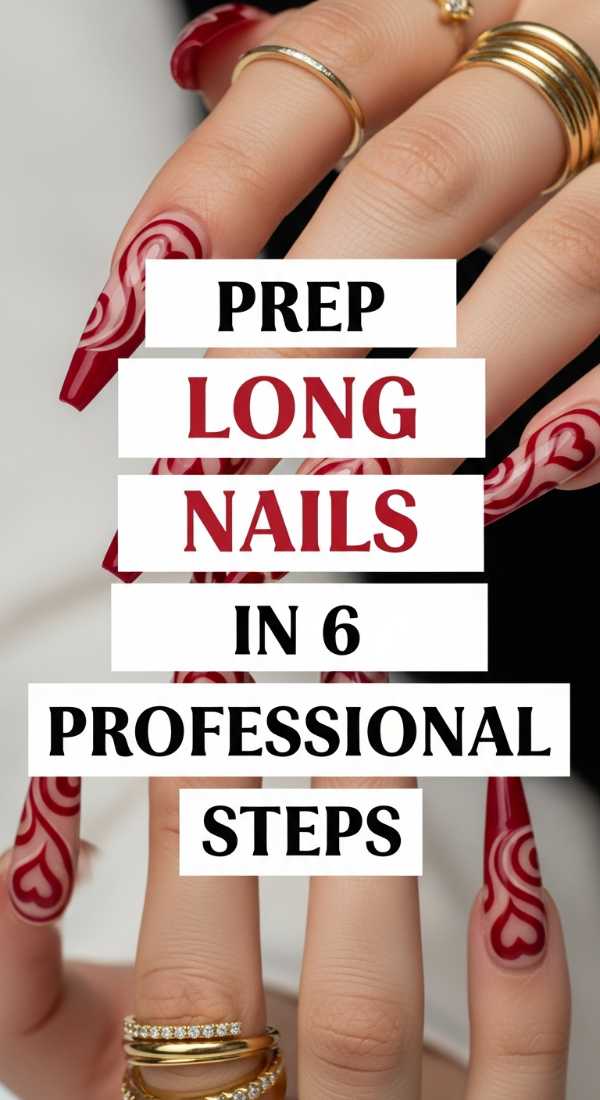
Prep Long Nails in 6 Professional Steps
Why to love these Nails:
Long nails are the ultimate canvas for the ‘Sculptor’s Secret.’ But strength is the foundation of beauty. Prepping them correctly ensures your length stays healthy and your manicure lasts through every hug and every task.
Essential Items:
- Glass nail file
- Cuticle softener
- Nail strengthener/hardener
How to Prepare:
- File in one direction only with a glass file to prevent splitting.
- Apply cuticle softener and gently push back—never cut!
- Clean the under-nail area with a soft brush.
- Apply a nail dehydrator to ensure the polish sticks.
- Use a strengthening base coat specifically for long nails.
- Cap the free edge with polish to prevent lifting.
Budget Range
- Bona Fide Glass Nail File – $10
- Blue Cross Cuticle Remover – $6
- Nailtiques Formula 2 – $18
Paint Cherry Nail Art in 4 Easy Strokes

Why to love these Nails:
Cherry art is the darling of the nail world right now. It’s playful, vintage-inspired, and brings a smile to everyone who sees it. It’s a little pop of joy that says you don’t take life too seriously, but you still value the details.
Essential Items:
- Bright red polish
- Forest green polish
- Thin liner brush
How to Prepare:
- Stroke 1 & 2: Use a dotting tool or brush to make two side-by-side red circles.
- Stroke 3: Use the liner brush to draw two thin green stems meeting at the top.
- Stroke 4: Add one tiny green leaf where the stems meet.
- Optional: A tiny white ‘highlight’ dot on each cherry for 3D depth.
Budget Range
- China Glaze ‘Red-y & Willing’ – $8
- Sinful Colors ‘Envy’ Green – $3
- Beetles Nail Art Liner Brushes – $8
Perfect Your French Tips in 2 Clever Hacks

Why to love these Nails:
The French manicure is the ‘little black dress’ of the nail world. It’s clean and goes with everything. But getting that perfect curve can be stressful! These two hacks take the anxiety out of the process, giving you salon-level results at home.
Essential Items:
- Silicone nail stamper
- French tip guides or rubber bands
How to Prepare:
- The Stamper Hack: Paint white polish onto a silicone stamper and gently press your nail tip into it at an angle.
- The Rubber Band Hack: Wrap a rubber band around your finger to mask off the tip, using the edge as a guide for your polish brush.
Budget Range
- Clear Jelly Stamper – $10
- Orly White Tips Polish – $12
- Stationery Rubber Bands – $2
Pick Nail Polish Ideas in 3 Aesthetic Palettes

Why to love these Nails:
Sometimes the hardest part is just choosing a color! I’ve curated these three palettes to match your mood and the season. Choosing a palette helps your look feel cohesive and engineered for high-fashion impact.
Essential Items:
- A variety of polishes in similar tones
- Swatches or a white piece of paper
How to Prepare:
- The Ethereal Morning: Sage green, cream, and soft taupe.
- The Sunset Glow: Burnt orange, shimmering gold, and terracotta.
- The Midnight Sky: Deep navy, silver glitter, and charcoal grey.
Budget Range
- Lights Lacquer ‘Seasonal Bundles’ – $50
- H&M Beauty Nail Polish – $6 each
- ILNP Boutique Polish – $10
A Moment of Reflection: You are the Masterpiece
My sweet friends, I hope these guides feel like a gentle hand on your shoulder, encouraging you to take that time for yourself. Whether you choose the playful cherries or the sophisticated nudes, remember that the beauty of your nails is just a tiny reflection of the beauty you carry inside. You are the sculptor of your own life, and every little detail—even your manicure—is a testament to how much you care for your journey. Stay soft, stay inspired, and keep shining.
Frequently Asked Questions
You’ve got questions, and I’ve got the answers to keep those tips looking perfect!