
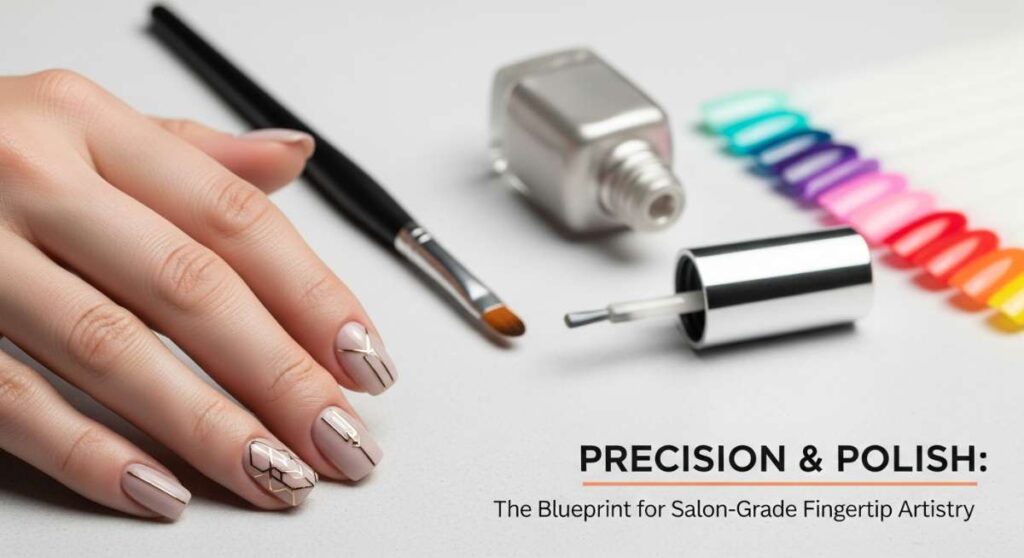
Precision & Polish: The Blueprint for Salon-Grade Fingertip Artistry
Hello, my loves. Pull up a chair and let’s take a deep breath together. There is something so incredibly soul-soothing about the ritual of painting our nails, isn’t there? It’s more than just a pop of color; it’s a moment of quiet, a soft embrace of self-care that tells the world—and ourselves—that we deserve to feel beautiful right down to our fingertips. I’ve always found that when my hands look polished, my heart feels just a little more put-together, too.
In this masterclass, I’m opening up my personal vault of secrets to help you achieve that elusive salon-grade finish right at your cozy kitchen table. Whether you’re sipping a lavender latte or listening to your favorite acoustic playlist, let’s turn your home into a sanctuary of creativity. We’re going to walk through ten different aesthetics together, whispering a little magic into every stroke of the brush.
Remember, my sweet friends, art is never about perfection; it’s about the joy of the process. So, don’t worry if your lines aren’t perfectly straight on the first try. Your hands are creating something unique, and that is where the real beauty lies. Let’s dive into these designs and find the one that speaks to your spirit today.
Perfect Pink Gingham Nails
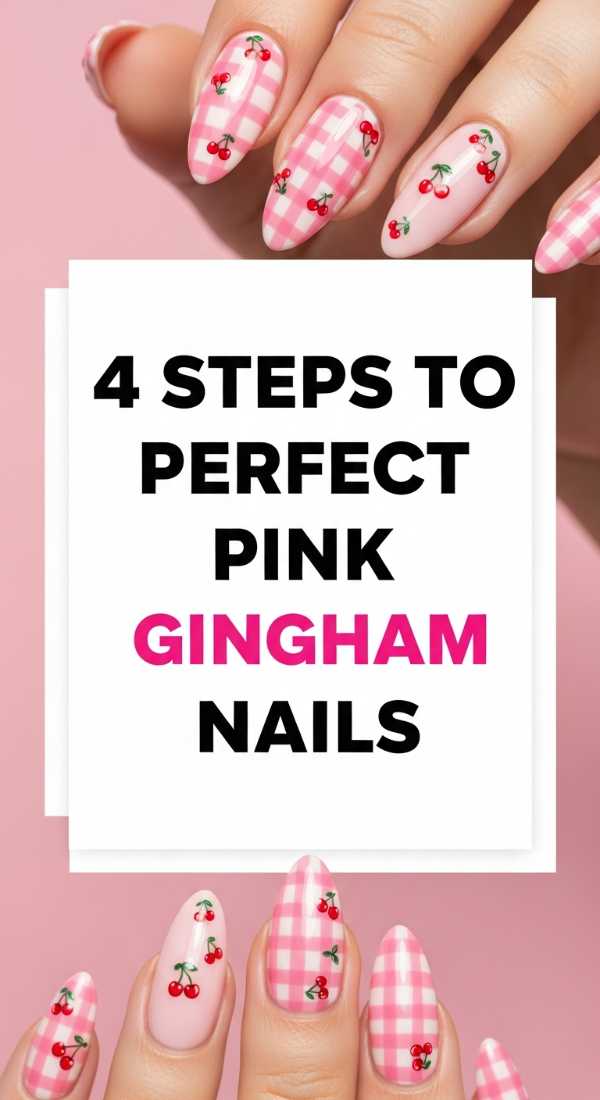
Why to love these Nails:
Oh, my loves, pink gingham is like a sun-drenched picnic in a field of wildflowers. It’s sweet, nostalgic, and brings a touch of vintage charm to your daily life. Every time you look down, you’ll feel a little flutter of joy, as if you’re carrying a piece of a perfect summer afternoon with you.
Essential Items:
- Soft blush pink polish
- Hot pink or rose accent polish
- White striping polish
- Ultra-fine nail art brush
- Glossy top coat
How to Prepare:
- Apply two coats of your soft blush pink as a base and let it dry completely.
- Using your fine brush, paint vertical stripes of the darker pink across each nail.
- Paint horizontal stripes of the same darker pink to create the grid pattern.
- Finish with a glossy top coat to blend the colors into a seamless, fabric-like finish.
Budget Range
- Essie ‘Slippers’ ($10)
- Sally Hansen ‘Hard as Nails’ in Pink ($4)
- Nail Art Brush Set from Amazon ($7)
Easy Ways to Apply Chrome Powder
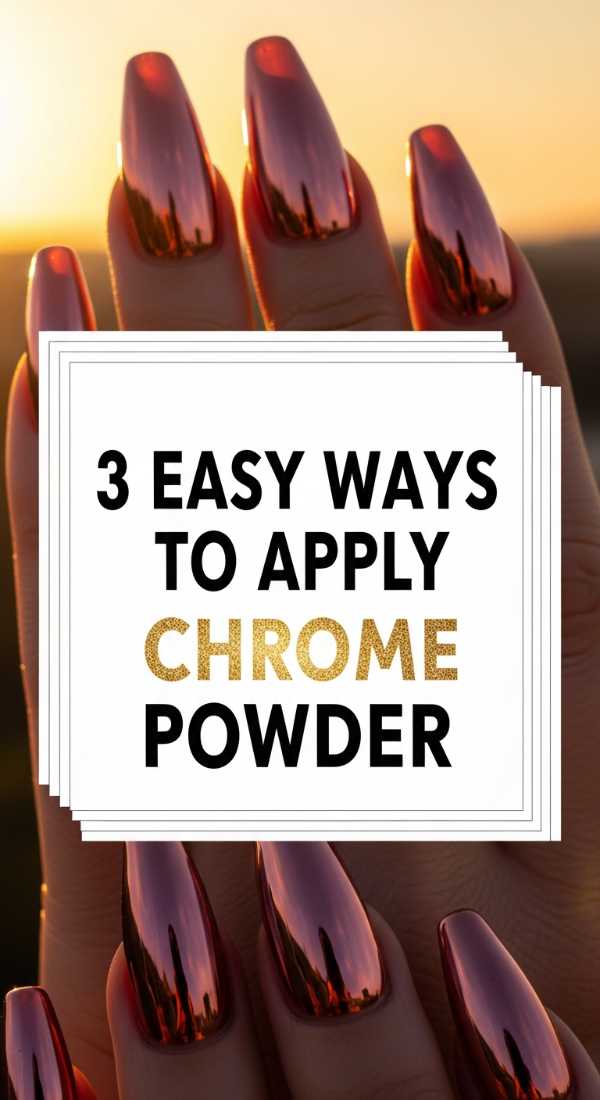
Why to love these Nails:
Chrome nails are like wearing little mirrors on your fingertips. They capture the light in the most ethereal way, giving you a futuristic yet sophisticated glow. It’s for those days when you want to feel a bit more magical, like you’re touching the stars themselves.
Essential Items:
- Black or dark base gel polish
- No-wipe gel top coat
- Chrome pigment powder
- Sponge applicator or silicone tool
- LED/UV lamp
How to Prepare:
- Apply your base color and cure; then apply a no-wipe top coat and cure for only 30 seconds (it should be slightly tacky).
- Dip your sponge into the chrome powder and gently rub it onto the nail surface until it glows.
- Sweep away excess powder with a soft brush and seal with a final layer of top coat.
Budget Range
- Born Pretty Chrome Powder ($6)
- Beetles No-Wipe Top Coat ($8)
- SunUV Mini Lamp ($15)
Secrets for Aesthetic Summer Almond Nails
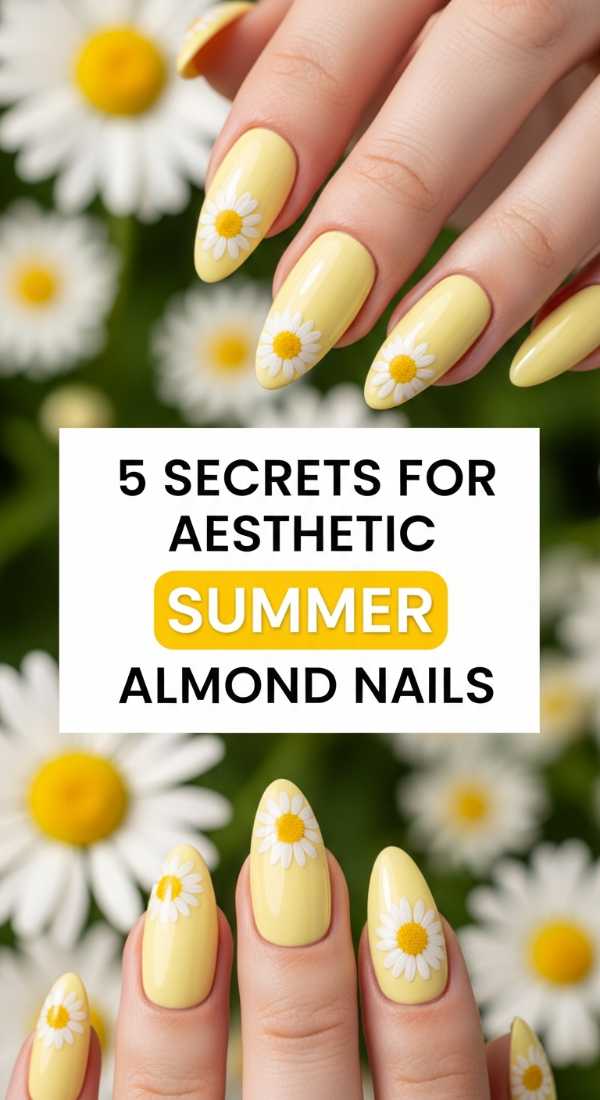
Why to love these Nails:
The almond shape is so incredibly flattering, my loves—it elongates the fingers and adds an instant touch of elegance. In the summer, pairing this shape with soft aesthetics feels like a warm breeze. It’s the ultimate “clean girl” look with a seasonal twist.
Essential Items:
- Nail file (180 grit)
- Nude or milky white polish
- Cuticle oil
- Matte or high-shine top coat
- Floral decals
How to Prepare:
- File the sides of your nails toward the center to create a tapered point, then round off the tip gently.
- Apply a milky nude base to keep the look soft and organic.
- Place a tiny floral decal on the ring finger for a whisper of summer whimsy.
- Hydrate your cuticles with oil to ensure the skin looks as polished as the nails.
- Seal with your preferred top coat.
Budget Range
- OPI ‘Bubble Bath’ ($11)
- Flowery D-File ($3)
- Cuccio Revitalize Cuticle Oil ($7)
Quick Steps for Red Abstract Swirls
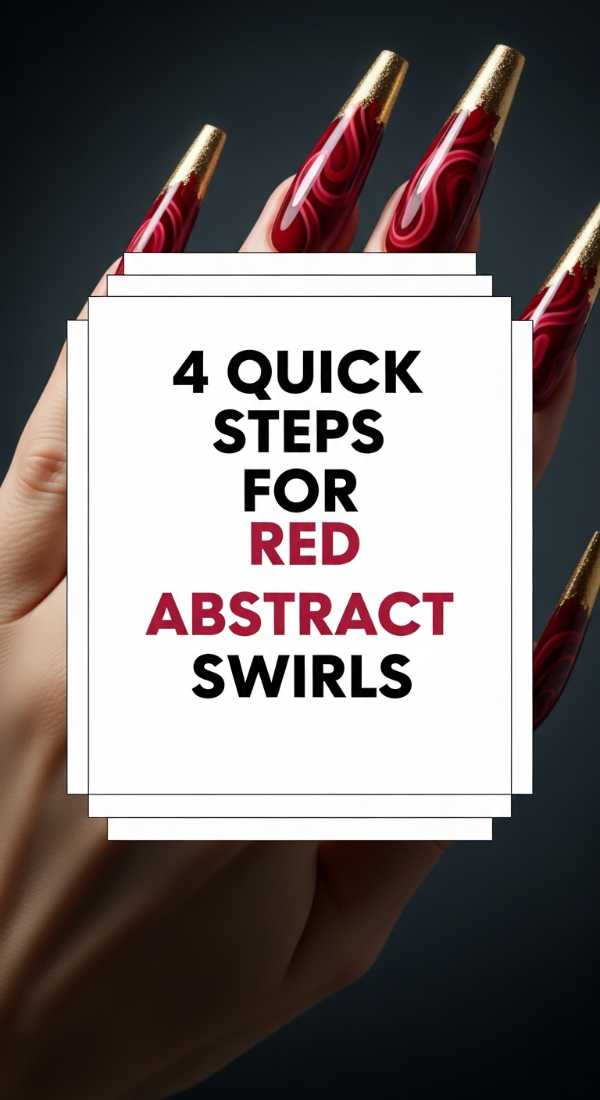
Why to love these Nails:
There is a beautiful, rhythmic energy in abstract swirls. The deep red against a neutral base feels passionate yet controlled. It’s like a dance captured in a single moment, perfect for when you’re feeling bold and creative.
Essential Items:
- Sheer nude base polish
- Deep crimson red polish
- Long-haired detailing brush
- Acetone for cleanup
How to Prepare:
- Start with a clean, sheer base to let the red truly pop.
- Load your long brush with red polish and start from the corner of the nail, dragging it in a fluid ‘S’ shape.
- Add a second, thinner swirl echoing the first for dimension.
- Clean up any edges with a brush dipped in acetone for crisp lines.
Budget Range
- Revlon ‘Cherries in the Snow’ ($6)
- Zoya ‘Naked Glow’ ($12)
- Winstonia Detail Brushes ($8)
Tips for Hand-Painting Mini Ladybugs
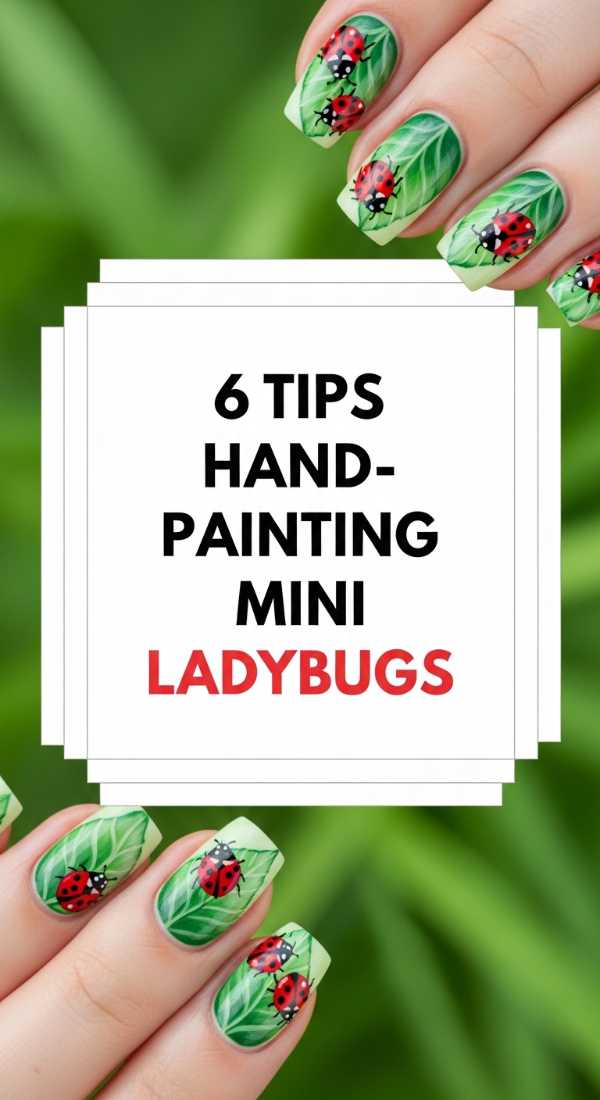
Why to love these Nails:
My loves, these are just pure whimsy! Mini ladybugs are a reminder of nature’s tiny miracles. They bring a smile to your face every time you type or hold a cup of tea. It’s a playful, feminine touch that doesn’t take itself too seriously.
Essential Items:
- Bright red polish
- Black striper or acrylic paint
- Dotting tool
- White polish for eyes
- Clear base coat
How to Prepare:
- Place a large red dot using your dotting tool toward the tip of the nail.
- Use a finer tool to draw a black line down the center and a small black semi-circle at the top for the head.
- Add tiny black dots for the ladybug’s spots.
- Use the smallest dotting tool to add two tiny white eyes on the head.
- Wait for them to dry fully before sealing to avoid smearing.
- Apply a thick layer of top coat.
Budget Range
- Essie ‘Fifth Avenue’ ($10)
- Apple Barrel Acrylic Paint ($1)
- Dotting Tool Set ($5)
Steps to Achieve Classy Bridal Nails
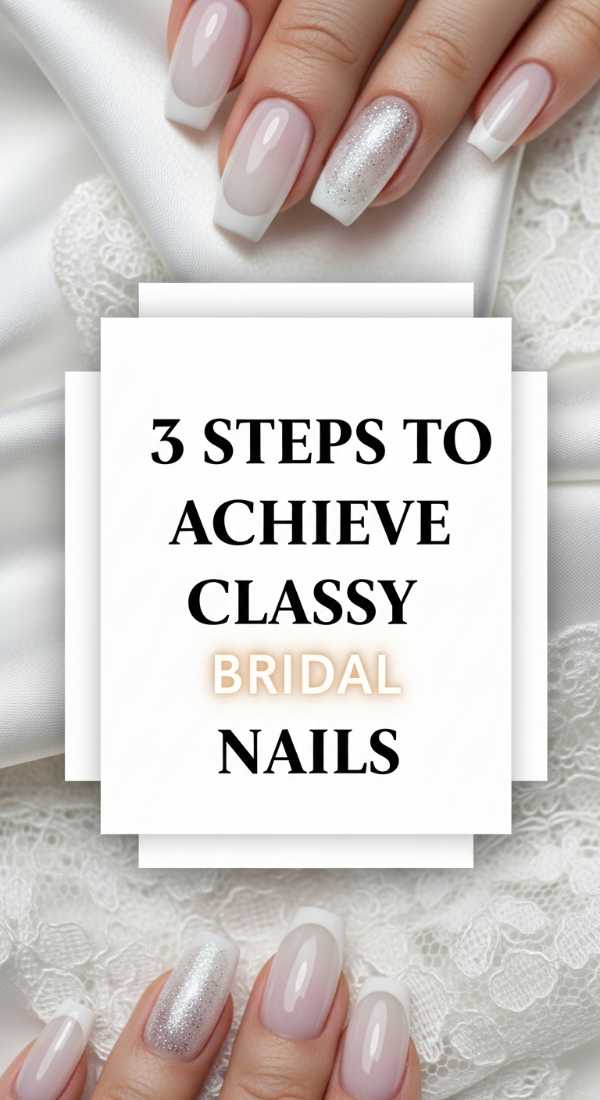
Why to love these Nails:
Whether you’re a bride or just a lover of all things timeless, these nails are a soft whisper of romance. They are clean, sophisticated, and radiate a gentle purity. It’s about celebrating love in its most classic form.
Essential Items:
- Sheer pearl or iridescent polish
- Soft white polish for tips
- Makeup sponge
- Tweezers
- Small pearl accents
How to Prepare:
- Apply two coats of sheer pearl polish for a luminous base.
- Sponge a tiny amount of soft white onto the tips for a diffused ombre effect.
- Carefully place a single micro-pearl at the base of the nail using tweezers.
Budget Range
- OPI ‘Funny Bunny’ ($11)
- Sally Hansen ‘Pearl’ ($5)
- Nail Art Pearls from Etsy ($4)
Ways to Layer Glitter Gel Nails
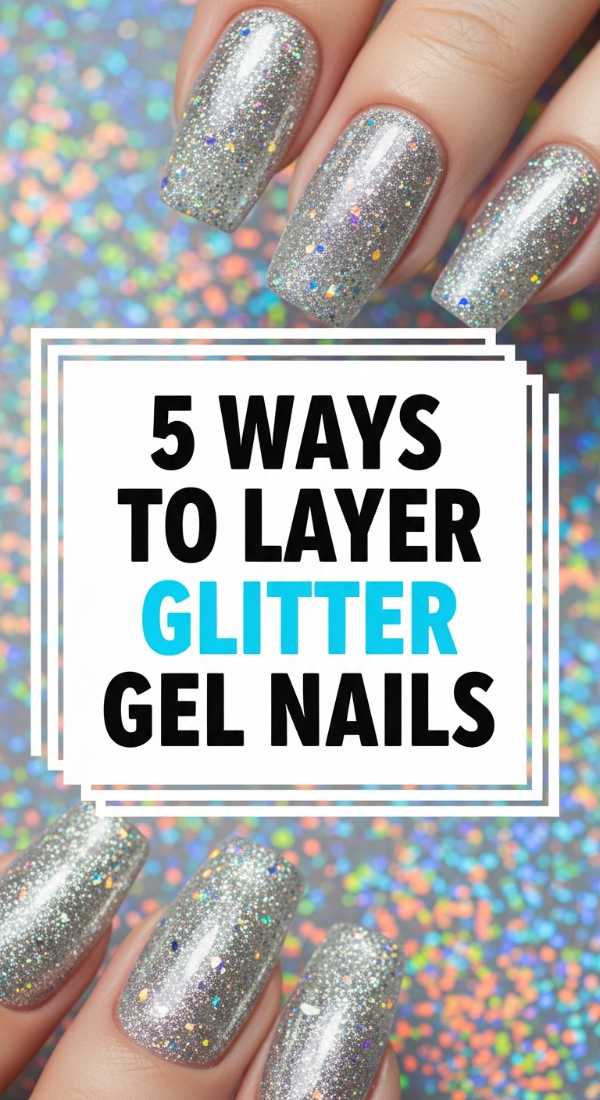
Why to love these Nails:
Layering glitter is like capturing a galaxy. By building the shimmer in stages, you get a depth that a single coat just can’t provide. It’s multi-dimensional and looks different under every light—just like you, my loves.
Essential Items:
- Fine glitter gel
- Chunky hexagonal glitter gel
- Clear builder gel
- UV Lamp
How to Prepare:
- Apply a thin layer of fine glitter and cure.
- Dab chunky glitter specifically in the center or at the tips for a gradient look and cure.
- Encapsulate everything with a layer of clear builder gel to make the surface smooth and glass-like.
- Wipe the inhibition layer and finish with top coat.
- Buff gently if any glitter is sticking out before the final seal.
Budget Range
- Modelones Glitter Gel Set ($15)
- Apres Top Gel ($18)
- Holo Taco ‘Cosmic Unicorn’ ($13)
Steps to Create Cute Cherry Nails
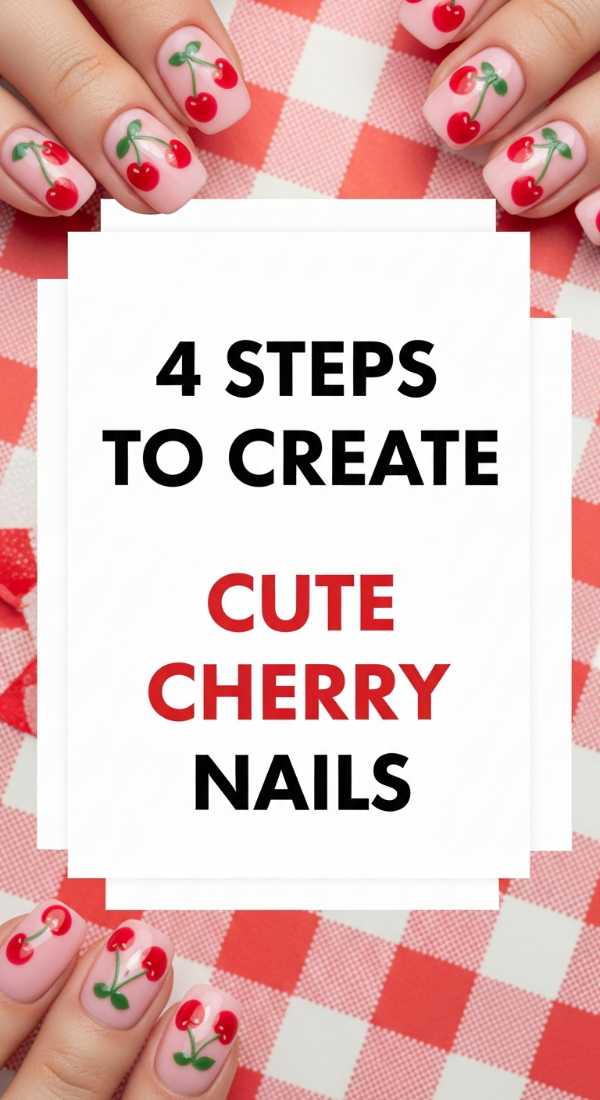
Why to love these Nails:
Cherry nails are the ultimate ‘cottagecore’ accessory. They are juicy, vibrant, and have a lovely retro feel. They remind us to savor the sweetness in life, one little moment at a time.
Essential Items:
- Nude base polish
- Red polish
- Green striper or fine brush
- Large dotting tool
How to Prepare:
- Apply a neutral base to keep the focus on the fruit.
- Use a dotting tool to place two red dots close together for the cherries.
- Draw a thin ‘V’ shaped stem in green connecting the cherries.
- Add a tiny leaf on one side of the stem for extra detail.
Budget Range
- China Glaze ‘Red-y & Willing’ ($8)
- Orly ‘Green Apple’ ($9)
- Sinful Colors ‘Snow Me White’ ($3)
Tips for Shaping Trendy Coffin Nails
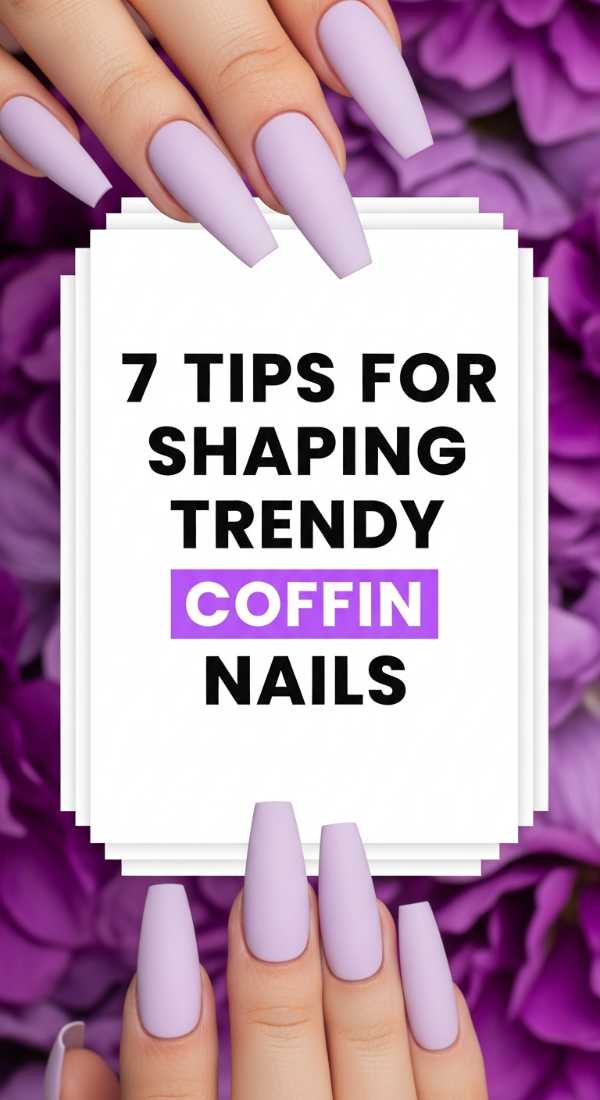
Why to love these Nails:
The coffin shape—or ‘ballerina’ as some call it—is for my loves who want a bit of edge with their elegance. It’s a bold architectural statement that provides a fantastic canvas for any art you choose to layer on top.
Essential Items:
- Heavy-duty nail file (100/180 grit)
- Nail clippers
- Buffing block
- Strengthening base coat
How to Prepare:
- Clip the sides of long nails at an angle toward the tip.
- File the sides straight and narrow.
- File the tip perfectly flat and square.
- Buff the edges so they aren’t sharp but remain crisp in silhouette.
- Check symmetry from the underside of your hand.
- Apply a strengthener to protect the corners.
- Ensure both hands match in length before painting.
Budget Range
- Revlon Nail Clipper ($5)
- Makartt Nail Files ($6 for 10)
- Nailtiques Formula 2 ($15)
Easy Steps for Pastel French Tips
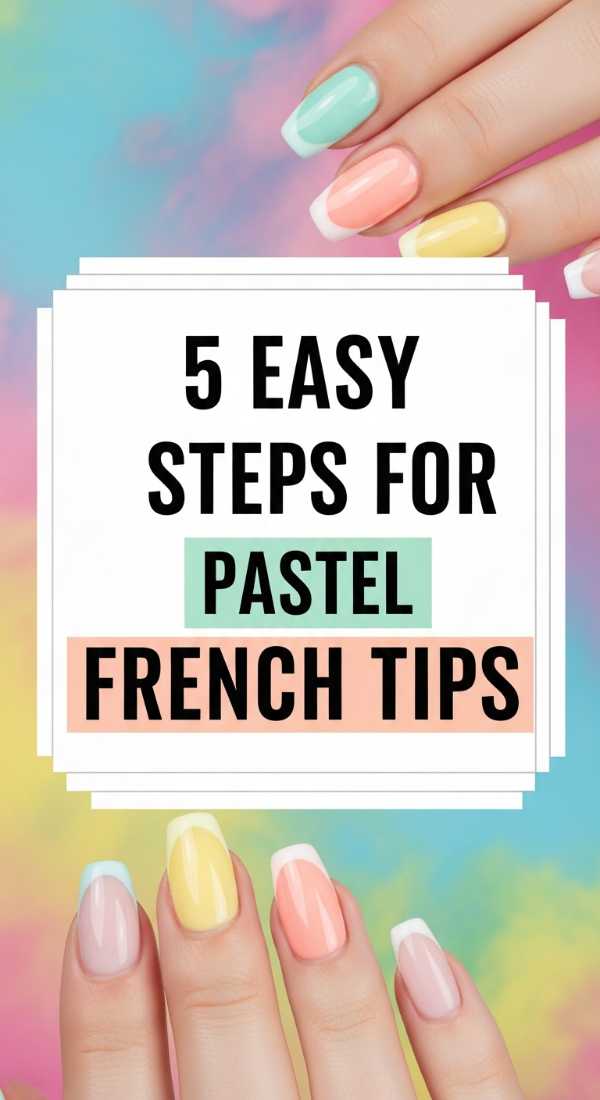
Why to love these Nails:
Traditional French tips get a soft, modern makeover with pastels. It’s like a rainbow seen through a morning mist. It’s playful, yet professional enough for any occasion. A true staple for the modern romantic.
Essential Items:
- Pastel yellow, blue, or lavender polish
- French tip guides or a steady hand
- Cleanup brush
- High-gloss top coat
How to Prepare:
- Apply a clear or light pink base and let it dry.
- Place a guide sticker or use your brush to swipe the pastel color across the very tip of the nail.
- If using a brush, use one single fluid motion from left to right.
- Remove the guide carefully while the polish is still slightly damp.
- Seal with a thick top coat to even out the transition between the base and the tip.
Budget Range
- Essie ‘Pastel Collection’ ($9 each)
- Orly ‘Bonder’ Base Coat ($10)
- French Tip Vinyls ($4)
Finding Your Shine
As we wrap up this little masterclass, my loves, I hope you feel inspired to take some time for yourself tonight. Whether you chose the bold red swirls or the soft bridal pearls, remember that these nails are a reflection of your unique light. Wear them with confidence, let them remind you of your own creativity, and most importantly, let them be a reason to smile every time you catch a glimpse of them. You are a masterpiece, and your hands are just the beginning. Stay beautiful, stay soft, and keep shining.