

The Art of the Outdoor Oasis: Organizing Your Luxury Poolside
There is a specific kind of magic that happens when the sun hits the water just right, casting shimmering diamonds across the surface of a crystal-clear pool. We have all dreamed of that perfect summer afternoon—sipping a chilled glass of rosé, the scent of jasmine blooming nearby, and the soft sound of a fountain trickling in the background. But nothing breaks that spell faster than tripping over a stray inflatable flamingo or searching through a damp pile of towels for one that’s actually dry. Creating a luxury outdoor space isn’t just about the pool itself; it’s about the feeling of effortless serenity that comes when every element has its place.
Transforming your backyard into a five-star resort requires a transition from ‘cluttered patio’ to ‘curated sanctuary.’ When we organize our poolside, we aren’t just tidying up; we are designing an experience for our family and guests. It’s about the tactile joy of a plush, warm towel and the visual calm of a clutter-free horizon. In this guide, I’m sharing my favorite ways to elevate your outdoor organization to match the luxury of your lifestyle, ensuring your summer is spent relaxing, not rearranging.
How to Design Chic Pool Float Storage for a Clutter Free Backyard

Why we love this
There is something inherently joyful about a vibrant pool float, but when they are scattered across the lawn, they lose their whimsical charm. We love this storage solution because it treats your floats like art while keeping them securely tucked away from the wind. Imagine the scent of warm vinyl cooling in the shade and the satisfying sight of a clean pool deck where the only thing touching the ground is your own bare feet. It creates a breathable, organized environment where the colors of your floats actually enhance the landscape rather than cluttering it.
Essential Elements:
- Extra-large weather-resistant wicker or resin baskets
- Heavy-duty mesh liners
- Weighted base inserts to prevent tipping
- UV-protective spray for the storage container
How to make it
- Select a storage vessel that is at least 36 inches in diameter to accommodate oversized floats; ensure it has built-in ventilation holes to prevent moisture buildup and mildew.
- Apply a high-grade UV-protective sealant to the exterior of the basket, ensuring you cover every crevice; allow this to ‘cure’ in a dry, shaded area for at least 6 hours until the surface is no longer tacky.
- Place a heavy paving stone or weighted plate at the bottom of the basket to provide a low center of gravity, which is a critical professional tip for preventing the bin from blowing over during summer afternoon thunderstorms.
- Fold your floats using the ‘deflate and roll’ technique; wait until the vinyl is completely dry to the touch before placing them inside to ensure no ‘sweating’ or sticking occurs within the bin.
How to Create Resort Style Pool Towel Storage for Ultimate Relaxation

Why we love this
Walking out to the pool and seeing a stack of perfectly rolled, fluffy white towels feels like stepping into a spa in the Maldives. This storage method emphasizes the sensory experience of luxury—the soft texture of high-gsm cotton against the skin and the visual rhythm of neatly organized shelves. It eliminates the ‘damp towel’ dread and replaces it with an inviting, hospitality-focused vibe that makes every guest feel pampered and cared for from the moment they step outside.
Essential Elements:
- Multi-tiered teak or powder-coated aluminum shelving unit
- Premium 100% Turkish cotton towels in a uniform color
- Natural cedar blocks to repel insects and add a subtle aroma
- Woven bins for used towel collection
How to make it
- Position your shelving unit in a ‘dry zone’ that is at least 10 feet away from splash areas but within easy arm’s reach of the pool exit point.
- Prep your towels by washing them with a dash of white vinegar to strip away old detergent residue, ensuring they achieve maximum ‘fluffiness’ and absorbency levels.
- Master the ‘resort roll’ by folding the towel in half lengthwise twice, then rolling tightly from one end to the other; your visual cue for success is a firm, uniform cylinder that stands up on its own.
- Stack the towels on the shelves with the ‘seam side’ facing down; leave a 2-inch gap between stacks to allow for air circulation, which prevents that ‘outdoor musty’ smell from developing.
How to Build a Custom Pool Towel Rack for Instant Organization
Why we love this
A custom rack offers a permanent, architectural solution to the age-old problem of wet towels. We love the rustic-meets-modern aesthetic of a wall-mounted rack that utilizes vertical space, leaving your floor area open for movement and lounging. The smell of sun-warmed wood and the sight of towels swaying gently in the breeze create a relaxed, lived-in luxury. It turns a functional necessity into a design feature that feels intentional and sophisticated.
Essential Elements:
- Pressure-treated timber or reclaimed barn wood
- Marine-grade stainless steel hooks (corrosion resistant)
- Outdoor wood stain or weatherproofing sealant
- Heavy-duty masonry anchors and a power drill
How to make it
- Measure and cut your backboard to the desired length, sanding the edges with 120-grit sandpaper until they are smooth to the touch to prevent snags on delicate towel fibers.
- Apply two coats of marine-grade sealant, allowing a 4-hour ‘dry time’ between layers; look for a slight sheen as your visual cue that the wood is fully saturated and protected.
- Space your hooks exactly 8 inches apart; this specific measurement ensures that even the plushest beach towels have enough ‘breathing room’ to dry efficiently without overlapping.
- Secure the rack to a stone or brick wall using a masonry bit on your drill; ensure the anchors are flush with the surface for a professional, high-stability finish that can handle the weight of heavy, wet fabric.
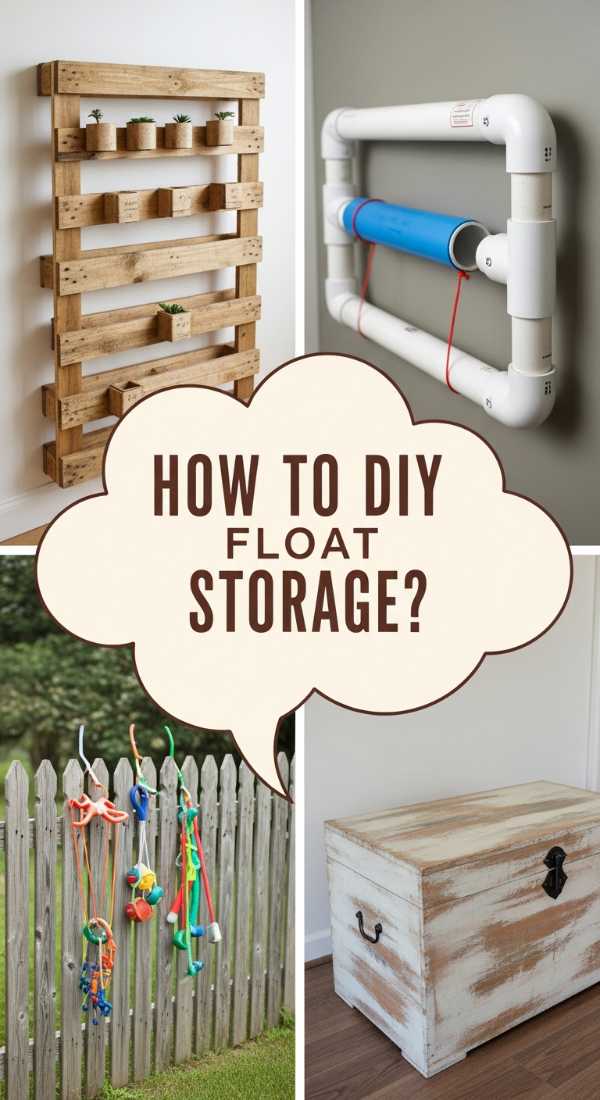
How to Master Pool Float Storage DIY Style for a Personal Touch

Why we love this
DIY storage allows you to customize your organization to fit the exact dimensions of your favorite ‘floatie’ collection. This approach is all about the satisfaction of a tailor-made solution that reflects your personal style. There is a wonderful tactile experience in working with smooth PVC or wood, and the end result is a sturdy, reliable home for your inflatables. It feels personal, clever, and infinitely more stylish than a generic store-bought plastic bin.
Essential Elements:
- Furniture-grade PVC pipes or treated wooden dowels
- PVC cement or waterproof wood glue
- Casters (locking wheels) for mobility
- Outdoor spray paint in a matte or metallic finish
How to make it
- Construct a rectangular base frame using your pipes and 3-way connectors; ensure all joints are dry-fitted first to check for perfect right angles.
- Apply PVC cement to the inside of the connectors and press firmly; hold for 30 seconds until the chemical bond ‘sets’—you will feel the pieces lock into place.
- Build vertical ‘prongs’ at 12-inch intervals to act as dividers for the floats; these should be at least 24 inches high to provide adequate support for larger items.
- Once the structure is built, apply a ‘hammered metal’ spray paint for a high-end look; do this in thin, even coats to avoid drips, which is the professional way to achieve a factory-like finish.
How to Plan Functional Pool Storage for a Seamless Summer Lifestyle
Why we love this
Functional planning is the backbone of a stress-free summer. This is about creating a ‘flow’ in your backyard that feels intuitive. We love this because it removes the ‘mental load’ of hosting; everything from goggles to sunscreen is exactly where you expect it to be. The feeling of reaching into a well-organized deck box and finding exactly what you need without digging is the ultimate luxury of time and headspace. It makes the transition from ‘work mode’ to ‘pool mode’ instantaneous.
Essential Elements:
- Divided deck boxes or storage benches
- Clear, waterproof labeling system
- Small mesh bags for organizing small accessories
- Anti-slip liners for the bottom of storage units
How to make it
- Map out your ‘activity zones’ (e.g., swimming, lounging, dining) and place storage units at the intersection of these paths to minimize ‘travel time’ across the hot deck.
- Sort your items by frequency of use; place daily essentials like sunscreen and goggles in the top ‘easy-access’ tier of your storage bench.
- Group small items into mesh bags before placing them in bins; this ‘bundling’ technique ensures that tiny earplugs or nose clips don’t migrate to the bottom of the box.
- Check the seals on your storage units weekly; a tight, ‘suction-like’ sound when closing is the visual and auditory cue that your items are protected from moisture and pests.
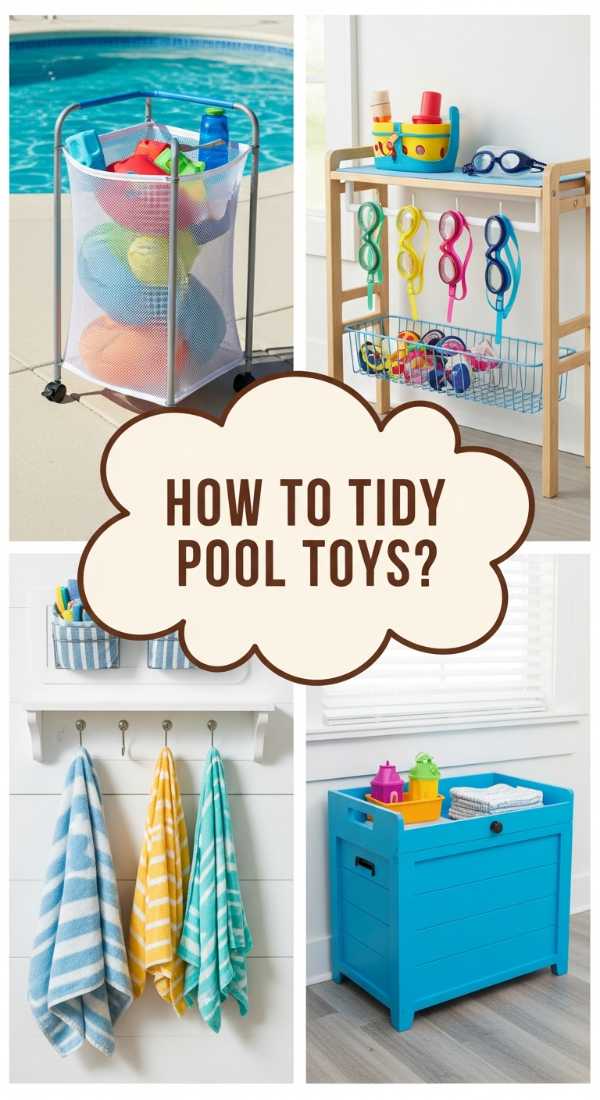
How to Simplify Pool Organization for Stress Free Family Fun

Why we love this
Family time should be about laughter and splashing, not hunting for a missing diving ring. Simplifying organization means creating a system so easy that even the kids can help maintain it. We love the bright, accessible nature of this setup—the cheerful colors of bins and the ease of a ‘grab and go’ station. It fosters a sense of independence for children and a sense of relief for parents, allowing everyone to focus on making memories in the sun.
Essential Elements:
- Open-top rubber or plastic bins with handles
- Color-coded sorting system (one color per child)
- Drainage holes at the bottom of every bin
- Low-profile shelving reachable for children
How to make it
- Select bins with smooth, rounded edges to ensure safety for little hands; use a drill to create five 1/2-inch drainage holes in the bottom of each bin to allow trapped water to escape.
- Assign a specific color to each family member; this ‘visual cue’ allows for instant recognition and accountability for their own gear.
- Teach a ‘one-in, one-out’ rule for toys; this habit-building phase is essential for maintaining the organization throughout a long, busy weekend.
- Sanitize all shared toys once a week using a mild, eco-friendly soap and water solution; allow them to ‘sun-dry’ completely on a flat surface before returning them to their designated bins.
How to Maximize Small Space Pool Storage for a Tiny Patio

Why we love this
You don’t need a sprawling estate to have a luxury experience. Maximizing small spaces is an art form that relies on verticality and multi-purpose furniture. We love how this approach makes a tiny patio feel intimate and curated rather than cramped. The sight of a vertical garden intertwined with towel hooks or a storage ottoman that doubles as a side table is incredibly satisfying. it proves that smart design can overcome any footprint.
Essential Elements:
- Vertical wall-mounted grids or pegboards
- Multi-functional furniture (storage ottomans)
- Over-the-fence hooks or hanging baskets
- Collapsible buckets and bins
- Slimline shelving
How to make it
- Install a heavy-duty wall grid onto an unused vertical surface; use ‘S’ hooks to hang everything from swim fins to mesh bags of toys, keeping the floor space entirely clear.
- Choose furniture with ‘hidden’ compartments; a hollow side table can store a surprising amount of pool chemicals or small pumps while serving as a chic place for your drink.
- Use ‘over-the-fence’ bracket systems to hang large items like skimmer nets or vacuum hoses; this utilizes ‘dead space’ that is usually ignored in small patio layouts.
- Opt for collapsible items for seasonal storage; when the summer ends, these pieces ‘shrink’ down to a fraction of their size, allowing for easy storage in a small closet or under a bed.
How to Style a Boho Pool Towel Rack for Natural Texture

Why we love this
For those who love a more relaxed, ‘earthy’ aesthetic, a boho towel rack is the perfect addition. We love the combination of natural wood textures, the softness of fringe, and the way it blends seamlessly with outdoor greenery. It brings a warm, organic feel to the poolside, smelling faintly of cedar and sun. It’s less about rigid organization and more about a ‘collected’ look that feels effortless and incredibly chic, like a boutique hotel in Tulum.
Essential Elements:
- Bamboo or driftwood decorative ladder
- Jute or macramé hanging pockets
- Linen-blend towels with fringe details
- Potted succulents or hanging air plants
How to make it
- Lean a 6-foot bamboo ladder against a sturdy wall; for safety, ensure the ‘feet’ of the ladder are equipped with non-slip rubber grips to prevent sliding on wet tile.
- Drape towels loosely over the rungs; the ‘technique’ here is to avoid perfection—allow for a slight overlap to create a layered, textured visual effect.
- Incorporate greenery by hanging small macramé planters from the top rung; the contrast between the green leaves and the wood adds a ‘living’ element to your storage.
- Mist the area with a light sandalwood or citrus outdoor spray; this scent layer completes the boho-resort atmosphere, engaging the senses as you reach for your towel.
How to Hide Ugly Pool Equipment with Creative Storage Solutions

Why we love this
Nothing kills a luxury vibe faster than a loud, industrial pool pump or a tangle of blue hoses. We love this solution because it acts as a ‘magic trick’ for your backyard, hiding the mechanical necessities behind a veil of beauty. The relief of looking across your yard and seeing only lush plants or elegant screens is profound. It allows the architecture of your home and the beauty of your landscaping to take center stage, creating a truly immersive escape.
Essential Elements:
- Lattice or slat-wood privacy screens
- Artificial ivy or climbing vines (real or high-quality silk)
- Sound-dampening panels for pump enclosures
- Gravel or river rock for the base area
How to make it
- Measure the height and width of your equipment, adding a 12-inch ‘clearance’ on all sides to allow for airflow and easy access for maintenance—this is a non-negotiable safety step.
- Erect a three-sided screen using horizontal wooden slats; the small gaps between slats allow the pump to ‘breathe’ while completely obscuring it from your sightline.
- Attach sound-dampening foam to the interior of the screen; you will notice a significant ‘noise drop’ as a visual/auditory cue that the insulation is working.
- Plant fast-growing vines like jasmine or clematis at the base; as they climb the lattice, they create a ‘living wall’ that smells divine and hides the equipment even more effectively.
How to Organize an Aesthetic Poolside Station for Summer Hosting
[IMAGE_10]
Why we love this
The ultimate host knows that the secret to a great party is anticipation. An aesthetic poolside station is about having everything your guests might need before they even have to ask. We love the sheer elegance of a curated tray or cart—the sparkle of glassware, the neat rows of high-end sunscreens, and the refreshing aroma of sliced cucumber and mint. It’s a focal point of hospitality that makes everyone feel like a V.I.P. in your home.
Essential Elements:
- Rolling bar cart or stationary side sideboard
- Acrylic or shatterproof serving trays
- Chilled beverage dispensers with infused water
- A collection of high-end sunscreens and cooling mists
How to make it
- Set up your ‘station’ in a shaded area to keep sunscreens and drinks cool; use a heavy-duty acrylic tray as the ‘base’ to catch any condensation or spills.
- Organize sunscreens by SPF level; place them in a neat row from lowest to highest, providing a clear ‘visual menu’ for your guests to choose from.
- Prepare a ‘refreshment zone’ with a large glass dispenser; fill it with ice, filtered water, and fresh mint leaves—the ‘timing’ tip here is to prepare this 30 minutes before guests arrive so the flavors have time to infuse.
- Add a small basket of rolled face towels that have been chilled in a refrigerator; this ‘surprise and delight’ element is the hallmark of professional-grade luxury hosting.
Conclusion
As the sun begins to set and the underwater lights of the pool begin to glow, you will realize that the time spent organizing was the greatest gift you could give yourself. A luxury poolside is more than just a place to swim; it is a retreat from the world, a space where every detail is a reflection of your commitment to beauty and ease. By implementing these storage and styling tips, you have transformed your backyard into a seamless, resort-style sanctuary. Now, all that’s left to do is dive in and enjoy the serenity you’ve created.