
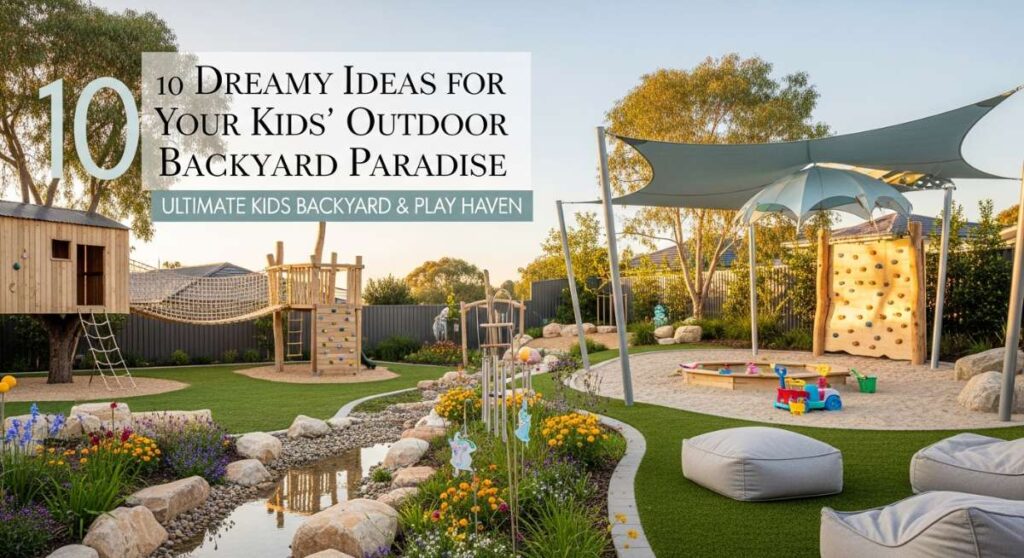
10 Dreamy Ideas for Your Kids’ Outdoor Backyard Paradise
There is a certain kind of magic that only exists in the golden hour of a summer afternoon, watching your children disappear into a world of their own making right in the safety of your backyard. I remember the pure, unadulterated joy of feeling the cool grass between my toes and the wind in my hair as I soared on a creaky tire swing, and I wanted to bottle that feeling for my own little ones. Creating a backyard haven isn’t just about the equipment; it’s about crafting a sanctuary where imagination takes root and the digital world fades into the background.
As parents, we often find ourselves caught between wanting the ‘perfect’ aesthetic and the chaotic reality of play. But what if I told you that you could have both? By blending natural elements with thoughtful design, we can transform a simple patch of lawn into a breathtaking adventure zone that grows with our children. Join me as we explore these ten dreamy ways to build an outdoor paradise that will have your kids begging to stay outside ‘just five more minutes’ every single night.
From the tactile crunch of cedar chips to the whimsical glow of fairy lights nestled in the trees, these ideas are designed to engage every sense. We are going to dive deep into the mechanics of building, the aesthetics of design, and the soul of what makes a play space truly special. Let’s roll up our sleeves and start building the childhood memories they will cherish forever.
How to Design a Natural Outdoor Playground for Organic Play

Why we love this
There is something deeply grounding about a playground that feels like an extension of the forest itself, rather than a plastic intrusion. We love the earthy aroma of damp cedar mulch and the smooth, cool touch of river stones that line the pathways, inviting tiny hands to explore textures. The way the sunlight filters through the canopy and dances across untreated wooden logs creates a serene, dappled environment that calms the spirit while stimulating the mind. It encourages a slower, more intentional pace of play where children learn to balance on uneven surfaces and appreciate the subtle beauty of the natural world around them.
Essential Elements:
- Large landscape boulders for climbing
- Cedar wood chips or engineered wood fiber
- Varying heights of tree stumps (steppers)
- Native non-toxic shrubs and tall grasses
- Untreated hardwood logs
How to make it
- Begin by mapping out a dedicated zone, ensuring you clear away any debris or sharp rocks; use landscape stakes and string to define a fluid, organic shape rather than a rigid rectangle.
- Excavate the area to a depth of at least 8 to 12 inches to allow for proper drainage and a thick layer of safety surfacing, ensuring the base is slightly sloped away from your home’s foundation.
- Install a heavy-duty, commercial-grade landscape fabric over the excavated soil to prevent weed growth while still allowing water to permeate through to the earth below.
- Source and position your ‘anchor’ elements, such as large boulders or heavy logs; bury the bottom third of these items into the ground to ensure they are stable and won’t roll or shift under a child’s weight.
- Arrange tree stumps of varying heights in a winding path to create a ‘stump jump,’ securing them by digging small holes for their bases and backfilling with soil and gravel for a snug fit.
- Fill the entire area with 9 inches of high-quality cedar mulch, which provides a natural scent and excellent impact absorption; rake it level, paying extra attention to the transition zones between the play area and the grass.
How to Build a DIY Kids Playground for Active Afternoons
Why we love this
This is the heartbeat of the backyard, a place where the rhythmic ‘thwack’ of a ball and the melodic creak of a swing set the soundtrack for summer. We love the vibrant energy this space provides, with the scent of fresh-cut grass mingling with the warm, metallic tang of the sun-heated slide. The feeling of smooth, sanded wood undergrip and the rush of cool air against the face during a high-velocity swing creates an exhilarating sensory experience. It’s a space that challenges the body, builds muscle memory, and rewards every successful climb with a view from the top of the world.
Essential Elements:
- Pressure-treated 4×4 and 2×4 lumber
- Heavy-duty swing hangers and chains
- A high-density polyethylene (HDPE) slide
- Rock climbing holds with mounting hardware
- Galvanized bolts, washers, and lag screws
How to make it
- Select a perfectly level site in your yard; if the ground is uneven, use a shovel and a long level on a straight board to grade the area before you begin construction.
- Construct the main A-frame for the swing beam using 4×4 posts, ensuring you use a miter saw to cut precise angles for the top joinery; secure these with heavy-duty carriage bolts and specialized swing-set brackets.
- Build a raised fort platform using 2×4 framing and deck boards; ensure all wood is pre-drilled to prevent splitting and that every screw head is countersunk below the surface to avoid snagging skin or clothing.
- Attach the HDPE slide to the platform using the manufacturer’s specified hardware, ensuring the exit of the slide has a ‘run-out’ area clear of any obstructions.
- Install the swing beam across the A-frame and the fort, using a drill with a long bit to through-bolt the beam for maximum structural integrity; check the beam’s levelness one final time before tightening all nuts.
- Mount the rock climbing holds on a slanted plywood wall attached to the fort side, spacing them according to your child’s reach and ensuring each hold is tightened until it cannot spin.
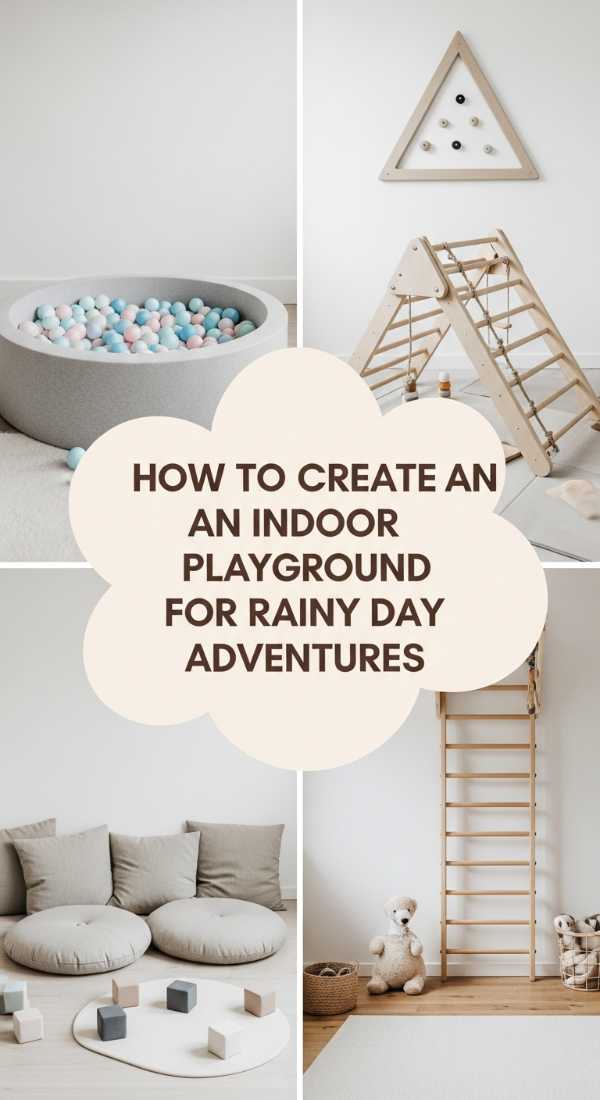
How to Create an Indoor Playground for Rainy Day Adventures

Why we love this
When the clouds roll in and the rain begins its rhythmic drumming on the roof, having an indoor sanctuary becomes a total lifesaver for both parents and kids. We love the cozy, muffled atmosphere of an indoor play zone, where the soft, velvety texture of foam mats meets the sturdy, reliable warmth of birch plywood climbing structures. There is a faint, clean scent of natural wood and the comforting squish of colorful cushions that make this space feel like a giant, safe hug. It’s a place where gravity feels a little lighter and the imagination runs wild even when the world outside is grey and wet.
Essential Elements:
- Pikler triangle or Swedish ladder
- High-density EVA foam floor mats
- Wall-mounted rock climbing panels
- Cotton canvas ceiling swing or ‘pod’
- Soft-play foam blocks and wedges
How to make it
- Identify a corner of a playroom or basement with high ceilings and clear wall space; ensure there are no sharp furniture edges or glass fixtures within a 6-foot radius of the planned equipment.
- Install the EVA foam mats across the entire floor area, interlocking the teeth tightly and using an adhesive tape on the underside if the mats tend to slide on your hardwood or laminate flooring.
- Locate the wall studs using an electronic stud finder and mark them clearly; mount the Swedish ladder or rock climbing panels directly into the studs using heavy-duty lag bolts to ensure they can support the weight of an adult.
- If installing a ceiling swing, find the ceiling joist and install a heavy-duty eye-bolt with a swivel; test the weight capacity by hanging from it yourself before allowing a child to use the swing.
- Set up a ‘soft zone’ with foam wedges and blocks, arranging them to encourage gross motor movements like crawling, rolling, and light jumping.
- Sand down any wooden edges of the equipment with 220-grit sandpaper to ensure a buttery-smooth finish, then wipe down with a damp cloth to remove any fine dust before the first play session.
How to Plan a Backyard Play Area for Kids to Explore Nature
Why we love this
There is a quiet, contemplative joy in watching a child crouch low to the ground to observe the industrious life of an ant or the delicate shimmer of a dragonfly’s wing. We love the way this space smells of crushed mint and damp earth after a light sprinkle, and the tactile wonder of smooth river glass and rough tree bark. This area is a celebration of the small things, where the rustle of leaves in the breeze and the chirping of hidden birds create a natural symphony. It fosters a sense of stewardship and curiosity, turning the backyard into a living laboratory where every stone turned over is a new discovery.
Essential Elements:
- Raised garden beds at kid-height
- A ‘bug hotel’ made of bamboo and pinecones
- Bird feeders and a shallow stone birdbath
- Magnifying stations and nature journals
- Pollinator-friendly plants (Lavender, Marigolds)
How to make it
- Designate a ‘quiet zone’ in a corner of the yard that receives a mix of sun and shade, which will attract the widest variety of local insects and birds.
- Build simple 2×2 foot raised garden boxes using cedar (which is naturally rot-resistant); fill them with a nutrient-rich organic potting mix and let your kids plant high-sensory seeds like fuzzy lamb’s ear or fragrant basil.
- Construct a bug hotel by stacking small wooden pallets or a wooden frame filled with hollow bamboo stalks, dry leaves, and pinecones; place this in a sheltered spot against a fence or wall.
- Install a birdbath on a stable pedestal, ensuring the water is no deeper than two inches to keep it safe for small birds; add a few flat stones that break the surface to give bees a place to land and drink.
- Set up an ‘exploration station’—a weatherproof low table where you provide magnifying glasses, small brushes for dusting off fossils (or cool rocks), and a collection of field guides.
- Mulch the pathways around this area with pine straw or wood chips to keep the area mud-free while maintaining a rustic, forest-floor aesthetic.
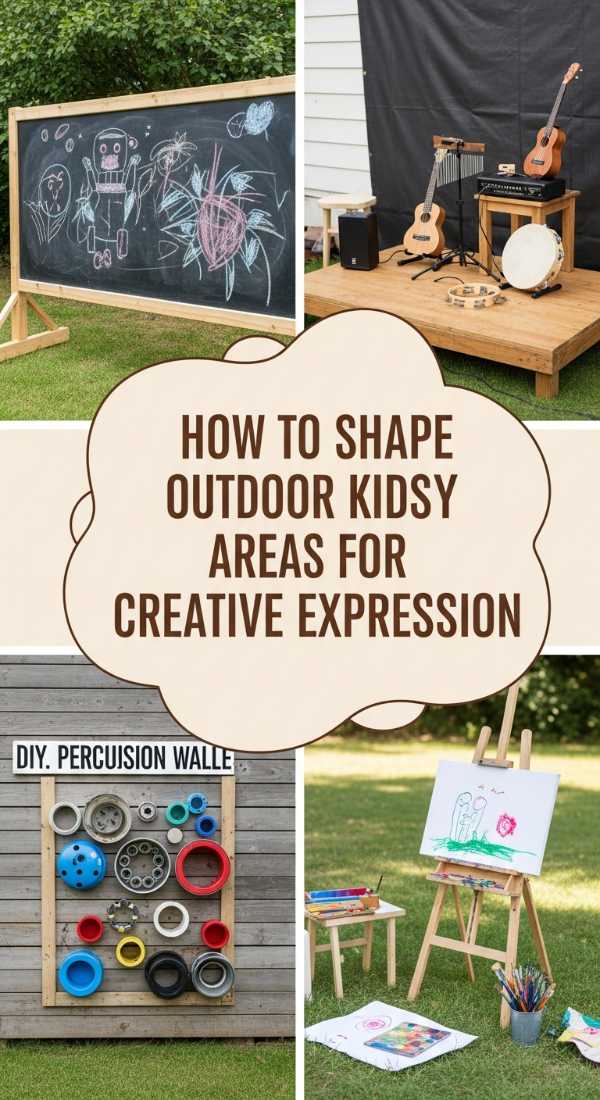
How to Shape Outdoor Kids Play Areas for Creative Expression

Why we love this
The outdoor world is the ultimate canvas, and we love the way this space encourages kids to get wonderfully, gloriously messy without a care in the world. There’s the satisfying ‘shloop’ of a wooden spoon through thick mud in a play kitchen, and the dusty, vibrant smell of oversized chalk as it glides across a dark board in the sun. We love the feeling of cold water splashing into a tray and the sight of colorful ‘potions’ made from flower petals and rainwater. It is a sensory-rich environment where the boundaries between art and play disappear, and the only limit is how far their imagination can stretch.
Essential Elements:
- Weatherproof outdoor chalkboard
- A ‘Mud Kitchen’ with old pots and pans
- Acrylic painting station or easels
- Large plastic tubs for sensory bins (sand, water, beans)
- A stage area made of wooden pallets
How to make it
- Mount a large sheet of exterior-grade plywood painted with specialized chalkboard paint onto a sturdy fence or the side of a shed; ensure you prime the wood first so the paint adheres smoothly.
- Build a mud kitchen using a reclaimed wooden potting bench; cut a hole in the top to drop in a stainless steel mixing bowl as a ‘sink’ and add a few hooks for hanging old whisks and ladles.
- Create a ‘stage’ by leveling a 4×6 area and laying down two heavy-duty pallets side-by-side; cover the tops with smooth decking boards and sand the edges thoroughly to prevent splinters.
- Install a curtain rod between two posts over the stage, using a length of outdoor-rated fabric or an old shower curtain to create a ‘backstage’ feel for performances.
- Set up a sensory table at elbow-height for your children; fill one side with play sand and the other with water, and provide a variety of scoops, funnels, and recycled containers.
- Seal all wooden creative stations with a clear, non-toxic outdoor polyurethane to protect them from the elements while keeping the natural wood grain visible.
How to Make Kids Backyard Ideas for a Dreamy Retreat

Why we love this
Every child needs a place to escape, a secret nook where the world feels small and safe. We love the soft, ethereal glow of solar fairy lights as they twinkle like captured stars against the twilight, and the comforting scent of sun-warmed canvas in a backyard teepee. The feeling of sinking into a pile of outdoor pillows with a favorite book while the crickets begin their evening chorus is pure bliss. It’s a space that prioritizes rest and wonder, offering a gentle transition from the high-energy play of the day to the quiet reflection of the evening.
Essential Elements:
- Canvas teepee or a wooden A-frame tent
- Outdoor-rated string lights (solar or low-voltage)
- Weather-resistant floor cushions and rugs
- A small, low-profile wooden library box
- Sheer curtains or mosquito netting
How to make it
- Choose a flat, well-drained spot, ideally under the protective limbs of a large tree or in a cozy corner of the garden.
- Assemble a canvas teepee using five long bamboo poles tied at the top with thick jute twine; spread the base wide and secure the poles into the ground using small garden stakes.
- Lay down an outdoor rug or a thick layer of artificial turf inside the tent to provide a soft, dry surface that separates the ‘interior’ from the grass.
- Drape high-quality, shatterproof LED string lights along the fence line or weave them through the branches above the retreat; use a timer so they automatically illuminate at dusk.
- Place a weather-resistant storage bin nearby to hold cushions and blankets when they aren’t in use, ensuring they stay dry and free of local critters.
- Add a ‘library’ element by repurposing a small wooden crate; mount it on a post at sitting height and fill it with a rotating selection of adventure books and nature guides.
How to Craft an Outdoor Play Area for Better Coordination
Why we love this
Watching a child master the art of balance is like watching a tiny athlete in training. We love the focused silence of a child navigating a narrow beam and the rhythmic ‘clink-clink’ of metal rings as they swing from one to the next. The smell of fresh pine and the cool, solid grip of powder-coated steel provide a sense of reliability and strength. This space is designed to challenge the vestibular and proprioceptive systems, turning play into a series of small, triumphant victories that build confidence and physical grace with every step and reach.
Essential Elements:
- Adjustable balance beams (low to the ground)
- Monkey bars or overhead ladders
- Agility rings or ‘ninja’ line kits
- Stepping stones or rubber ‘river’ mounds
- Vertical rope ladders
How to make it
- Install a ‘ninja line’ between two mature, sturdy trees; use tree-saver pads to protect the bark and use a heavy-duty ratchet system to tension the line until there is minimal sag.
- Build a low-profile balance beam by securing a 4×4 cedar post to three horizontal 2×4 ‘feet’ using long lag screws; keep the beam no higher than 6 inches off the ground for safety.
- For monkey bars, construct a 7-foot tall frame using 4×4 pressure-treated posts set in concrete footings to ensure there is zero movement or swaying.
- Space the monkey bar rungs 12 inches apart, using galvanized steel pipes; pre-drill the holes in the side rails to a depth of 2 inches and secure each pipe with a screw from the top of the rail.
- Place rubber ‘stepping stones’ in a zig-zag pattern across the grass leading to the coordination zone, encouraging kids to leap and land with precision.
- Add a thick layer (at least 12 inches) of rubber mulch or loose-fill sand directly under all overhead equipment to provide a soft landing for any slips.
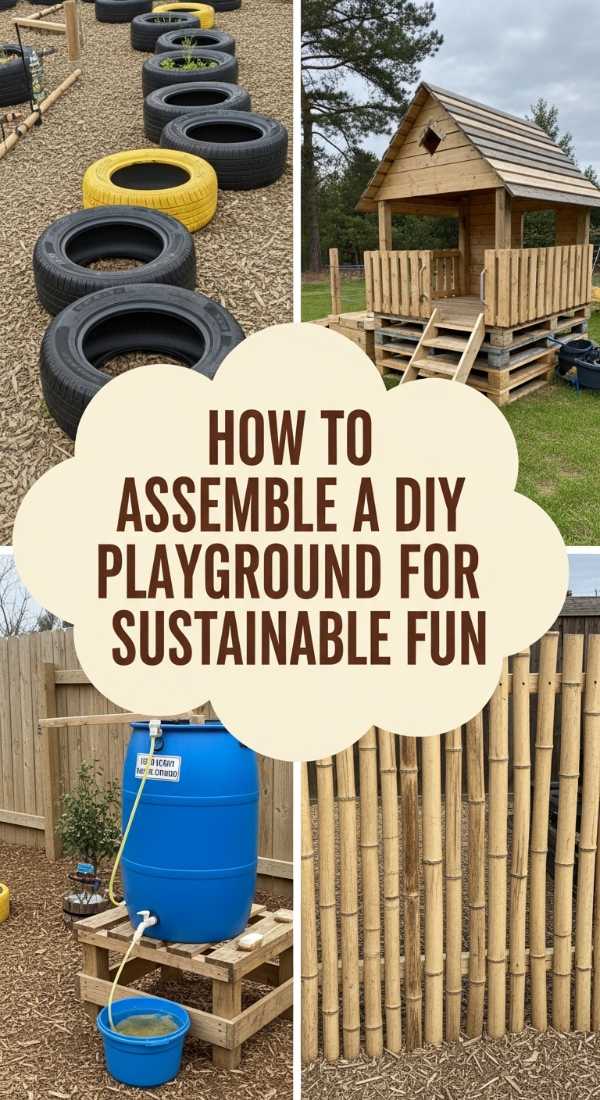
How to Assemble a DIY Playground for Sustainable Fun

Why we love this
There is a unique pride in building something that respects the planet as much as it delights the kids. We love the silver-grey patina of reclaimed wood and the colorful, rugged history of upcycled tires that find a new life as climbing walls. The scent is a mix of old oak and fresh earth, and the texture is wonderfully varied—from the smooth grain of sanded palettes to the grippy, matte surface of recycled rubber. It’s a space that teaches our children that fun doesn’t have to come from a factory, but can be crafted with love, ingenuity, and a little bit of elbow grease.
Essential Elements:
- Heat-treated (HT) shipping pallets
- Recycled tractor or car tires
- Reclaimed barn wood or fencing
- Natural hemp or manila rope
- Non-toxic, milk-based outdoor stains
How to make it
- Source pallets that are stamped with ‘HT’ (Heat Treated), which means they haven’t been chemically fumigated; use a pry bar to remove any loose boards and sand every inch with 80-grit then 120-grit sandpaper.
- Construct a ‘climbing pyramid’ by leaning three pallets against each other in a triangle shape; secure the top joints with heavy-duty hinges and the base with ground anchors.
- Scrub old tires with a degreaser and high-pressure hose; once dry, paint them with colorful, exterior-grade spray paint designed for plastic and rubber.
- Stack the tires in a staggered ‘brick’ pattern and bolt them together using large washers and bolts to create a sturdy climbing wall or a tunnel.
- Create a ‘basket swing’ using a large tractor tire; drill drainage holes in the bottom and use three points of heavy-duty rope to hang it from a strong, horizontal tree limb.
- Finish all wood surfaces with a natural sealer like tung oil or a soy-based stain to protect the material from rot without introducing harsh chemicals into the play environment.
How to Design Backyard Ideas for Kids During Summer Heat
Why we love this
When the sun is beating down and the air feels heavy with heat, the backyard should be an oasis, not an oven. We love the refreshing, fine mist of a cooling system that turns a hot deck into a tropical jungle, and the sharp, clean scent of chlorine-free water splashing over smooth stones. The feeling of cool, wet sand between fingers and the sight of colorful shade sails billowing like sails on a ship provides instant relief. It’s a space where the summer heat is embraced rather than avoided, turning the hottest hours of the day into a celebration of water and shade.
Essential Elements:
- High-density polyethylene shade sails
- Misting system for fences or play structures
- Water play table or a ‘splash pad’ mat
- A shaded sandbox with a lid
- Thermal-resistant outdoor furniture
How to make it
- Identify the path of the sun during the peak hours of 10 AM to 4 PM; install heavy-duty mounting points on your house or dedicated 4×4 posts to hang triangular shade sails over the main play zones.
- Tension the shade sails using turnbuckles so they are taut and don’t flap in the wind; ensure they are angled slightly so rainwater can run off rather than pooling in the center.
- Attach a DIY misting kit along the underside of a pergola or the top rail of a fence; connect it to your garden hose and ensure the nozzles are spaced 2 feet apart for even coverage.
- Build a large sandbox in a permanently shaded area; use cedar planks for the frame and include a ‘bench’ edge where kids can sit without getting their clothes full of sand.
- Fill the sandbox with ‘play sand’ (which is washed and screened) and add a few drops of cinnamon oil to the sand to naturally deter insects.
- Set up a water station using a tiered plastic table; place it on a patch of gravel or a deck to avoid creating a mud pit in the middle of your lawn.
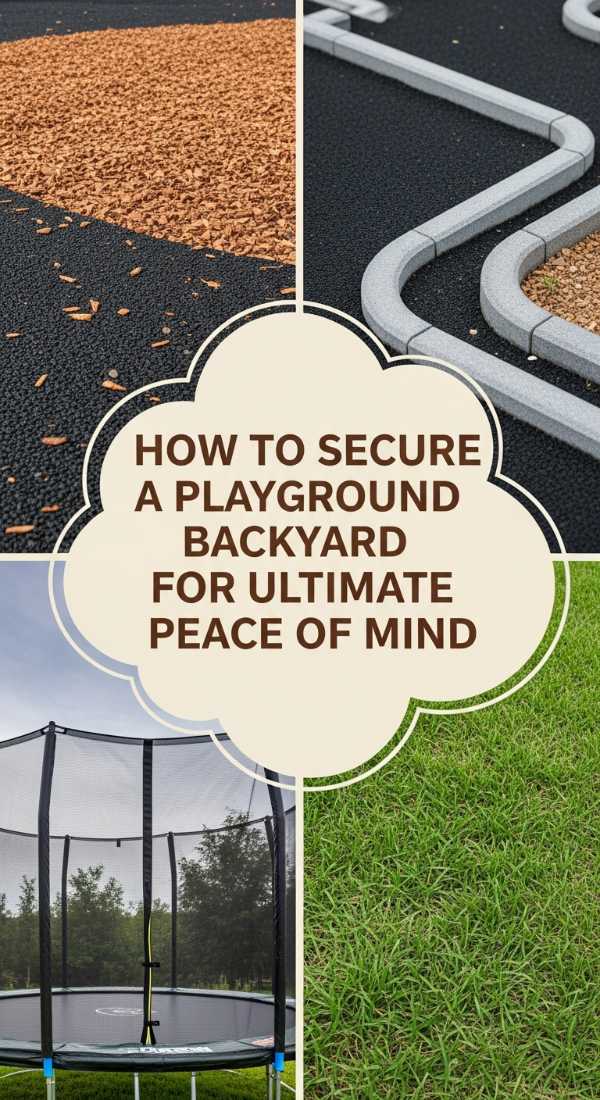
How to Secure a Playground Backyard for Ultimate Peace of Mind
[IMAGE_10]
Why we love this
True relaxation for a parent only happens when you know, deep in your soul, that the environment is as safe as it is fun. We love the solid, ‘thunk’ of a self-closing gate and the soft, forgiving depth of a well-maintained mulch bed that feels like a safety net for every jump. The scent of fresh wood and the sight of rounded, smooth edges on every piece of equipment provide a sense of calm and order. This is the invisible infrastructure of play—the careful planning that allows us to step back, sip our coffee, and let our children explore their limits without constant worry.
Essential Elements:
- Self-closing, lockable pool or yard gates
- Impact-absorbing safety surfacing (Mulch, Rubber, or Turf)
- Rounded edges and recessed hardware
- Perimeter fencing with no climbable horizontal rails
- Non-toxic, kid-safe plantings
How to make it
- Conduct a ‘shakedown’ test on all existing structures; grab every post and rail and shake it vigorously to ensure there is no wobbling or structural fatigue in the wood or metal.
- Install a 5-foot perimeter fence with vertical pickets spaced no more than 3 inches apart to prevent ‘head entrapment’ and ensure there are no footholds for climbing.
- Check all play equipment for ‘pinch points’—areas where small fingers could get caught in chains or hinges; cover swing chains with soft plastisol coating to protect hands.
- Ensure the safety surfacing (like wood chips) extends at least 6 feet in all directions from the play equipment; for swings, the surfacing should extend twice the height of the beam both in front and back.
- Use a router with a 1/2-inch round-over bit on every exposed wooden corner to eliminate sharp edges, then sand the area to a smooth finish.
- Apply ‘grip tape’ to any stairs or rungs that might become slippery when wet, and regularly inspect the ground for any emerging roots or rocks that could become trip hazards.
Conclusion: Your Backyard Adventure Awaits
Building a backyard paradise is an ongoing journey of love, creativity, and a little bit of dirt under the fingernails. Whether you’re constructing a high-energy playground or a quiet nature nook, the goal is always the same: to create a space where your children feel free to be exactly who they are. These memories of outdoor play—the sun on their faces, the wind in their hair, and the thrill of discovery—are the ones that will stick with them for a lifetime. So, take these ideas, make them your own, and watch as your backyard transforms into the most popular destination in the neighborhood.