

We’ve all been there: guests are arriving in twenty minutes, the house is a whirlwind of half-lit candles and fluffed pillows, and you still haven’t figured out the food. There is a specific kind of magic in hosting, a warmth that comes from sharing a beautifully curated spread, but the stress of a complicated menu can quickly dampen that glow. I truly believe that the best gatherings happen when the host is relaxed, and that’s why I’ve fallen head over heels for the viral food board trend. It’s about more than just food; it’s about creating a visual story that invites everyone to dig in and stay a while.
Today, I’m sharing how you can take simple, seasonal ingredients and turn them into gourmet showstoppers that take almost no time to assemble. Whether you’re celebrating a major milestone like a graduation or just the arrival of rhubarb season, these boards are designed to look like you spent hours in a professional kitchen. Grab your favorite wooden platter, a glass of wine, and let’s dive into these ten viral-worthy ideas that will make your next gathering absolutely unforgettable.
Professional Graduation Cake Decorating Tips

Why we love this
There is nothing quite like the pride of seeing a graduate’s face light up when they see a cake that looks like it came from a high-end boutique bakery. We love these professional touches because they add a layer of sophisticated texture—think silky smooth buttercream meets the sharp, clean lines of a graduation cap topper. The aroma of vanilla bean and the shimmer of edible gold dust create a sensory experience that feels both celebratory and deeply personal, making the hard work of the past few years feel truly honored.
Ingredients
- Pre-baked sponge cake
- Professional grade buttercream icing
- Edible gold leaf or gold luster dust
- High-quality fondant (black and school colors)
- Offset spatula and bench scraper
How to make it
- Begin by applying a “crumb coat” to your chilled cake. Use an offset spatula to spread a thin layer of buttercream over the top and sides, sealing in any loose crumbs. Chill for 20 minutes until firm.
- Apply the final layer of frosting. Use a bench scraper held at a 45-degree angle against the cake while spinning a turntable to achieve a perfectly smooth, sharp-edged finish.
- To create the graduation cap, roll out black fondant to 1/4 inch thickness. Cut a square for the mortarboard and a small circle for the base. Let these dry for an hour so they hold their shape before assembling with a dab of water.
- Dilute gold luster dust with a drop of vodka or lemon extract to create a “paint.” Use a fine-tipped brush to delicately paint the edges of the mortarboard or the graduate’s year on the side of the cake.
- For the professional finish, pipe small, uniform beads of frosting around the base of the cake to hide any imperfections where the cake meets the board.
Easy Homemade Rhubarb Jam Guide
Why we love this
This jam is the essence of spring captured in a jar, offering a vibrant, ruby-red hue that looks stunning on any breakfast board. The scent of simmering rhubarb is intoxicating—tart, floral, and sweet all at once—and the texture is thick enough to swirl into yogurt or spread onto a warm, buttery croissant. We love it because it brings a sophisticated, artisanal feel to the table with minimal effort, providing a sharp contrast to rich cheeses and salty crackers.
Ingredients
- 4 cups chopped fresh rhubarb
- 1 1/2 cups granulated sugar
- 2 tablespoons fresh lemon juice
- 1 teaspoon vanilla bean paste
- Pinch of sea salt
How to make it
- In a heavy-bottomed saucepan, combine the chopped rhubarb, sugar, and lemon juice. Let the mixture sit for 30 minutes at room temperature until the rhubarb begins to release its natural juices and the sugar looks wet.
- Place the pan over medium heat. Stir constantly until the sugar is completely dissolved and the mixture begins to bubble gently.
- Increase the heat slightly to reach a simmer. Cook for 12-15 minutes, stirring frequently to prevent sticking. You are looking for the rhubarb to break down into a thick, glossy ribbons.
- To test for doneness, place a small spoonful of jam on a chilled plate; if it wrinkles when pushed with your finger, it is ready.
- Remove from heat and stir in the vanilla bean paste and sea salt. Let it cool completely before transferring to glass jars, where it will continue to set into a spreadable consistency.
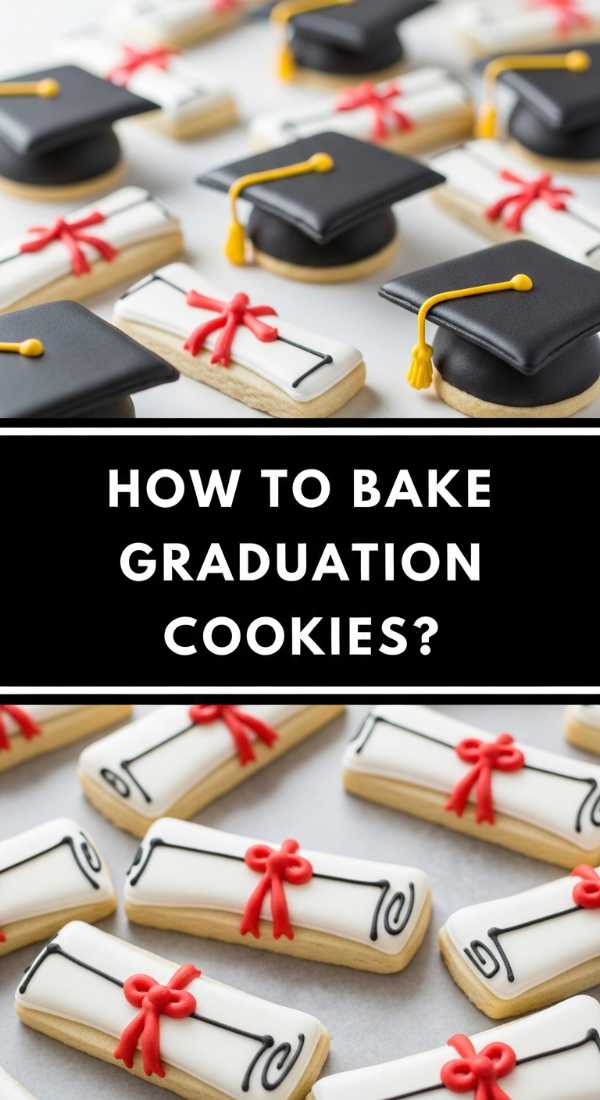
Creative Graduation Cookie Designs

Why we love this
Cookies are the ultimate crowd-pleaser on a food board, and these creative graduation designs add a playful yet elegant touch. We love the contrast between the crisp, buttery snap of a well-baked sugar cookie and the smooth, sweet melt of royal icing. The visual appeal of tiny edible diplomas and graduation caps arranged amongst fresh berries is simply irresistible, offering guests a nostalgic treat that feels elevated through modern color palettes and intricate textures.
Ingredients
- Classic sugar cookie dough
- Royal icing (stiff and flood consistencies)
- Gel food coloring (school colors)
- Small black licorice strings (for tassels)
- Fine edible glitter
How to make it
- Roll your chilled cookie dough to a uniform 1/4 inch thickness. Use diploma and cap-shaped cutters, ensuring the edges are clean for a professional look.
- Bake at 350°F (175°C) for 8-10 minutes until the edges are just barely golden. Let them cool completely on a wire rack; icing a warm cookie will cause the decoration to run.
- Outline the shapes using the stiff consistency royal icing. This creates a “dam” to hold the thinner icing in place.
- Fill in the outlines with the flood consistency icing, using a toothpick to pop any tiny air bubbles and to push the icing into the corners for a seamless finish.
- While the icing is still wet, gently press a small piece of licorice onto the cap to act as a tassel, then sprinkle a dusting of edible glitter for a festive, viral-ready shimmer.
The Ultimate Strawberry Rhubarb Pie

Why we love this
There is something profoundly comforting about a strawberry rhubarb pie, its flaky, golden crust giving way to a bubbling, jammy center that perfectly balances sweet and tart. The aroma of toasted butter and roasting fruit fills the home, creating a cozy, welcoming atmosphere that guests will gravitate toward. It’s the centerpiece of any seasonal board, offering a rustic-glam aesthetic with its deep red filling peeking through a beautifully woven lattice crust.
Ingredients
- Double pie crust (homemade or high-quality store-bought)
- 3 cups sliced strawberries
- 3 cups chopped rhubarb
- 3/4 cup sugar
- 1/4 cup cornstarch
- 1 tablespoon lemon zest
- Egg wash (1 egg beaten with 1 tbsp water)
How to make it
- In a large bowl, toss the strawberries, rhubarb, sugar, cornstarch, and lemon zest. Let this macerate for 15 minutes to allow the cornstarch to begin thickening the juices.
- Roll out the bottom crust and fit it into a 9-inch pie plate. Trim the edges to leave a 1-inch overhang.
- Pour the fruit mixture into the crust, ensuring it is evenly distributed and not mounded too high in the center.
- Cut the second crust into 1-inch strips and weave them over the fruit to create a lattice pattern. Fold the bottom crust overhang over the lattice ends and crimp the edges tightly with your fingers or a fork.
- Brush the entire top with egg wash and bake at 400°F (200°C) for 20 minutes, then reduce the heat to 375°F (190°C) and bake for another 35-40 minutes until the filling is bubbling thick and the crust is a deep golden brown.
Designing Funny Graduation Cakes

Why we love this
Humor is the best way to break the ice at a party, and a funny graduation cake brings a lighthearted joy to the celebration. We love the juxtaposition of a “fancy” cake with a hilarious, relatable message like “I’m 100% done with this.” The soft, pillowy cake paired with witty typography creates a focal point that is as much a conversation starter as it is a delicious dessert, ensuring that the graduate’s personality shines through the gourmet presentation.
Ingredients
- Multi-layer cake (any flavor)
- Smooth fondant or smooth buttercream
- Edible ink markers
- Small plastic “drowning” figurines (optional for ‘sinking in debt’ jokes)
- Alphabet cookie cutters
How to make it
- Ensure your cake is perfectly level and chilled. A cold cake provides a stable surface for writing and adding decorative elements.
- If using fondant, roll it out and drape it over the cake, smoothing it with a fondant smoother to remove all air bubbles and wrinkles for a “blank canvas” look.
- Use alphabet cookie cutters to press light outlines of your funny phrase into the frosting or fondant. This acts as a guide so your lettering doesn’t end up crooked.
- Trace over the outlines with edible ink markers or pipe over them with a very small round tip and dark frosting. Keep the handwriting slightly whimsical for a more modern, viral look.
- Add humorous accents, such as a fondant figure of a student “sleeping” on a book, using a small amount of water or royal icing as glue to secure them to the cake surface.
Fresh Lemon Pesto Tutorial

Why we love this
This lemon pesto is a bright, zingy revelation that adds a pop of color and a burst of freshness to any savory board. The fragrance of freshly slapped basil leaves combined with the sharp, clean scent of lemon zest is instantly energizing. We love its coarse, rustic texture—dotted with toasted pine nuts and salty parmesan—which feels incredibly gourmet when drizzled over roasted vegetables or served as a dip for crusty baguette slices.
Ingredients
- 2 cups fresh basil leaves, packed
- 1/2 cup freshly grated Parmesan cheese
- 1/3 cup toasted pine nuts
- 2 large cloves garlic, minced
- 1/2 cup extra virgin olive oil
- Zest and juice of 1 large lemon
- Salt and pepper to taste
How to make it
- Place the basil leaves, toasted pine nuts, and garlic into a food processor. Pulse several times until the ingredients are coarsely chopped but not yet a paste.
- Add the Parmesan cheese and lemon zest. Pulse 2-3 more times to incorporate.
- While the processor is running on low, slowly drizzle in the extra virgin olive oil in a steady stream. This emulsifies the oil with the greens, creating a lush, creamy texture.
- Stop the processor and stir in the lemon juice by hand. This preserves the bright green color of the basil which can turn brown if over-processed with acid.
- Season with salt and pepper to taste. Serve immediately for the best color and aroma, or store in a jar with a thin layer of olive oil on top to prevent oxidation.
Classic Rhubarb Crumble Recipe

Why we love this
A rhubarb crumble is the ultimate “low effort, high reward” dish for a gathering. We love the textural play between the soft, meltingly tender stalks of tart rhubarb and the crunchy, buttery oat topping. As it bakes, the juices turn into a thick syrup that coats the spoon, and when served warm with a scoop of cold vanilla bean ice cream, it creates a temperature contrast that is purely addictive. It’s rustic, homey, and looks stunning when served in individual ramekins on a wooden board.
Ingredients
- 5 cups rhubarb, cut into 1-inch pieces
- 3/4 cup granulated sugar
- 1 cup all-purpose flour
- 1 cup rolled oats
- 1 cup brown sugar, packed
- 1/2 cup cold unsalted butter, cubed
- 1 teaspoon cinnamon
How to make it
- Preheat your oven to 375°F (190°C). In a large baking dish, toss the rhubarb with the granulated sugar until the pieces are well coated.
- In a separate bowl, combine the flour, oats, brown sugar, and cinnamon. Use your fingers or a pastry cutter to work the cold, cubed butter into the dry ingredients.
- Continue mixing until the topping resembles coarse crumbs with some pea-sized chunks of butter remaining; these chunks are the secret to a crispy, flaky topping.
- Sprinkle the crumble mixture evenly over the rhubarb. Do not press it down, as keeping it loose allows the heat to circulate and crisp up the oats.
- Bake for 35-45 minutes. You are looking for the fruit juices to be bubbling aggressively at the edges and the topping to be a deep, toasted golden brown.
Graduation Cupcake Decorating Ideas

Why we love this
Cupcakes are the perfect portable treat for a graduation board, and these decorating ideas make them look like miniature works of art. We love the versatility—you can play with different heights by using tiered stands on your board. The creamy swirl of frosting topped with a miniature chocolate “degree” scroll creates a delightful visual rhythm that draws the eye, while the bite-sized portions make them easy for guests to grab while mingling.
Ingredients
- Freshly baked cupcakes
- Vanilla or cream cheese frosting
- Ghirardelli chocolate squares (for caps)
- Miniature peanut butter cups
- Red fruit leather (for tassels)
- White fondant strips (for scrolls)
How to make it
- Pipe a generous swirl of frosting onto each cupcake using a large star tip. Start from the outside and spiral inward to create a high, stable peak.
- To make the graduation caps, place a miniature peanut butter cup upside down on the frosting. Use a dab of frosting to secure a chocolate square on top of the peanut butter cup.
- Cut thin strips of red fruit leather and use a tiny drop of water to stick them to the top of the chocolate square, letting them hang over the side like a tassel.
- For the scrolls, roll small strips of white fondant tightly and tie them with a piece of gold sewing thread or a very thin strip of fruit leather.
- Place one scroll or one cap on each cupcake, alternating styles across your board to create visual interest and a professional, themed aesthetic.
Creative Coffee Drink Recipes

Why we love this
No food board is complete without a beverage pairing, and these creative coffee recipes bring a cafe-style luxury to your home. We love the rich, velvety layers of a well-made latte or the refreshing sparkle of a coffee tonic. The scent of freshly ground beans mingling with sweet syrups like lavender or salted caramel provides a sophisticated aromatic backdrop to the meal, making the entire board feel like a curated brunch experience.
Ingredients
- Strong espresso or cold brew concentrate
- Foamed milk (oat, almond, or dairy)
- Artisan syrups (lavender, vanilla, or cardamom)
- Tonic water and ice (for coffee tonics)
- Fresh mint or dried rose petals for garnish
How to make it
- For a viral “Cloud Latte,” fill a glass with ice and add 1-2 tablespoons of your chosen syrup. Pour in 3/4 cup of milk.
- Gently pour 2 shots of espresso over the back of a spoon into the milk. This technique slows the flow and creates distinct, beautiful layers of dark and light.
- For a Coffee Tonic, fill a tall glass with ice, add 4 ounces of tonic water, and a squeeze of lime. Slowly pour 2 ounces of cold brew concentrate over the top. The reaction creates a beautiful effervescent foam.
- Use a handheld milk frother to create a thick, stiff foam from cold milk, and dollop it onto the hot coffee drinks.
- Garnish with a sprig of mint or a dusting of cinnamon to provide a professional finish that mimics the look of a high-end coffee house.
Gourmet Mulberry Dessert Guide
[IMAGE_10]
Why we love this
Mulberries are the hidden gems of the fruit world, and using them in a dessert board adds an air of exclusivity and seasonal charm. We love their deep, complex flavor—somewhere between a blackberry and a grape—and their stunning dark purple juice that acts as a natural dye. Their delicate, elongated shape looks incredibly elegant when draped over a panna cotta or baked into a simple galette, providing a gourmet touch that most guests haven’t experienced before.
Ingredients
- 2 cups fresh mulberries
- 1/4 cup honey or agave nectar
- Fresh sprigs of thyme
- Creamy Greek yogurt or Panna Cotta base
- Toasted pistachios for crunch
How to make it
- Wash the mulberries carefully, as they are very delicate and can bruise easily. If they have long stems, you can leave them on for a rustic look or snip them with kitchen shears.
- In a small bowl, macerate half of the berries with honey and a few thyme leaves. Press them slightly with a fork to release their deep purple juice.
- To serve, place a dollop of thick Greek yogurt or a set panna cotta on your board. Spoon the macerated mulberries and their syrup over the top.
- Garnish with the remaining whole, fresh mulberries to provide a contrast in texture and color.
- Finish with a sprinkle of crushed, toasted pistachios. The green of the nuts against the dark purple of the berries creates a high-contrast, viral-worthy visual that tastes as good as it looks.
The Art of the Final Presentation
Assembling these viral food boards is all about the layers. Start by placing your larger items—like the strawberry rhubarb pie or the graduation cake—as your anchors. Then, fill in the gaps with the jars of rhubarb jam, the lemon pesto, and the plates of cupcakes and cookies. The final touch is always the greenery; tuck in some fresh herbs or edible flowers to make the board feel lush and abundant. Remember, the goal isn’t perfection; it’s about creating a space where people feel invited to share a moment together. Enjoy the process, and your guests certainly will too!