

There is something truly magical about the way food brings us together, especially during the whirlwind of life’s biggest transitions. Whether it’s the bittersweet joy of a graduation or the first tart bite of a spring harvest, these moments deserve more than just a meal—they deserve a celebration that feels intentional, beautiful, and effortlessly cool. I’ve always believed that the best memories are made around a table filled with colors, textures, and flavors that tell a story of growth and new beginnings.
Lately, I’ve been obsessed with the ‘viral food board’ trend because it takes the stress out of hosting while turning every snack into a work of art. It’s not just about the food; it’s about the tactile experience of reaching for a handmade scone or a perfectly iced cookie while sharing a laugh with friends. Today, I’m sharing ten of my favorite ways to elevate your graduation season and spring gatherings with simple, stunning boards that you can put together in no time.
How to decorate graduation cakes?
Why we love this
A graduation cake is the crowning jewel of any commencement party, representing years of hard work and late-night study sessions. We love the way a smooth buttercream finish catches the light, providing a canvas for elegant gold leaf accents or vibrant school colors. The aroma of sweet vanilla and rich cocoa fills the air, creating an atmosphere of pure celebration and achievement. There is something deeply satisfying about the clean snap of a fondant graduation cap and the way a perfectly placed tassel adds a touch of whimsical sophistication to the dessert table.
Ingredients
- Pre-baked layered cake
- Silk-smooth buttercream frosting
- Gold leaf or metallic edible luster dust
- Black fondant for the cap
- Piping bags and decorative tips
- Cardstock or acrylic cake topper
How to make it
- Begin by leveling your cake layers with a serrated knife to ensure a flat surface, then stack them with a generous layer of frosting in between each tier.
- Apply a thin ‘crumb coat’ of buttercream to the entire exterior of the cake and chill for 20 minutes to lock in any loose crumbs for a professional finish.
- Apply a second, thicker layer of frosting using an offset spatula, then use a bench scraper held at a 90-degree angle to the cake to create a perfectly smooth, sharp edge.
- Roll out your black fondant to a 1/4 inch thickness and cut a square for the mortarboard and a small circle for the base, then assemble them with a dab of water.
- Use a piping bag with a fine star tip to create a tassel effect hanging from the cap, and gently press gold leaf onto the sides of the cake using a dry, soft brush for a luxurious, viral-worthy look.
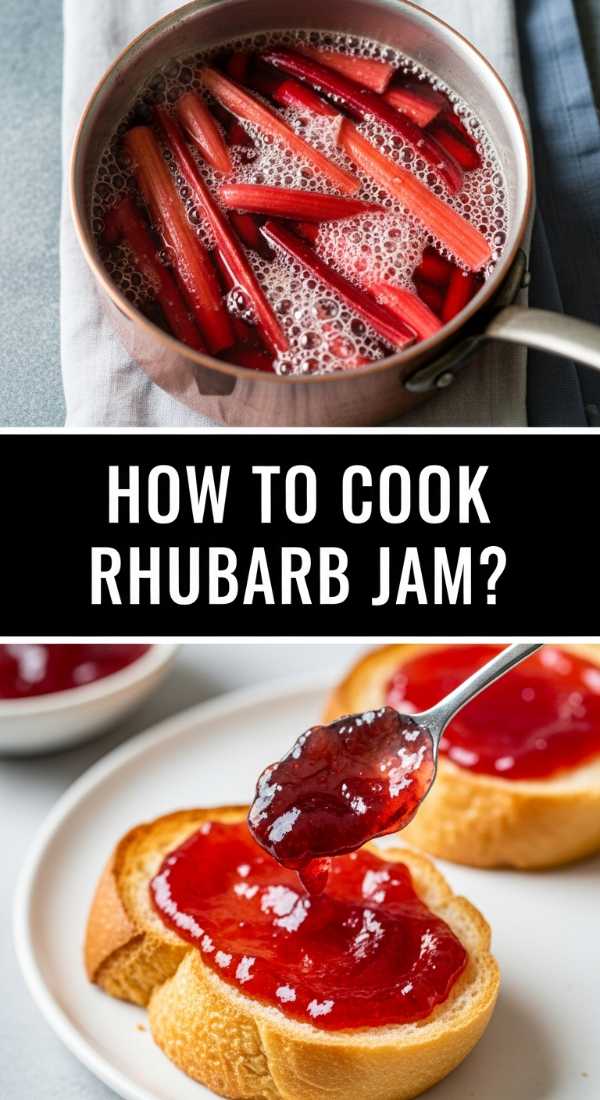
How to cook rhubarb jam?

Why we love this
Rhubarb jam is like capturing the very essence of spring in a glass jar, with its vibrant ruby hue and its perfect balance of tartness and sweetness. As it simmers on the stove, the sharp, bright scent of the stalks mellows into a deep, floral fragrance that makes your entire kitchen feel warm and inviting. The texture is thick and luscious, spreading beautifully over a warm piece of toast or a fresh scone, providing a nostalgic flavor that feels both sophisticated and comforting. It is a sensory delight that reminds us of garden harvests and the simple joy of preserving nature’s bounty.
Ingredients
- 4 cups chopped rhubarb (1-inch pieces)
- 2 cups granulated sugar
- 2 tablespoons fresh lemon juice
- 1 teaspoon lemon zest
- 1/2 teaspoon pure vanilla bean paste
How to make it
- Place your chopped rhubarb and sugar in a large, heavy-bottomed saucepan and toss them together until the rhubarb is evenly coated; let it sit for about 30 minutes to release the juices.
- Turn the heat to medium-low and stir constantly until the sugar has completely dissolved and the mixture begins to look syrupy.
- Increase the heat to medium-high and bring the mixture to a rolling boil, stirring frequently to prevent the bottom from scorching.
- Maintain the boil for 10-15 minutes, or until the mixture reaches 220°F (104°C) on a candy thermometer, which indicates the jam has reached its setting point.
- Stir in the lemon juice, zest, and vanilla paste, then remove from heat and let it cool slightly before transferring into sterilized glass jars for a beautiful addition to any breakfast board.
How to bake graduation cupcakes?

Why we love this
Graduation cupcakes are the ultimate crowd-pleaser, offering a personalized and portable way to celebrate each guest. We love the airy, light-as-a-cloud texture of a perfectly baked sponge topped with a swirl of frosting that matches the graduate’s school colors. The sight of a dozen cupcakes lined up on a board, each topped with a miniature edible diploma, creates an instant focal point that is as adorable as it is delicious. The scent of sweet cream and toasted sugar creates an irresistible draw, making these the first things to disappear from any viral food board.
Ingredients
- 2 1/2 cups all-purpose flour
- 1 1/2 cups sugar
- 1 cup unsalted butter, softened
- 3 large eggs, room temperature
- 1 cup whole milk
- 2 teaspoons baking powder
- Assorted food coloring
- White chocolate melts (for diplomas)
How to make it
- Preheat your oven to 350°F (175°C) and line a cupcake tin with high-quality paper liners that won’t fade during the baking process.
- In a large bowl, cream the softened butter and sugar together for at least 3-5 minutes until the mixture is pale, light, and incredibly fluffy.
- Add the eggs one at a time, beating well after each addition to ensure the batter remains emulsified and airy.
- Alternately add the dry ingredients and the milk in three parts, beginning and ending with the flour, and mixing on low speed just until combined to avoid overworking the gluten.
- Fill each liner about two-thirds full and bake for 18-22 minutes until a toothpick inserted in the center comes out clean; once cooled, frost with school-colored swirls and top with a rolled white chocolate ‘diploma’ tied with a thin ribbon.
How to make rhubarb pie?

Why we love this
There is nothing quite as rustic and soul-warming as a homemade rhubarb pie, with its golden-brown, flaky crust and its bubbling, jewel-toned filling. The aroma of butter and tart fruit wafting from the oven is enough to make anyone feel at home, evoking memories of Sunday dinners and family gatherings. We love the contrast between the crisp, salty pastry and the soft, tangy fruit that melts in your mouth with every bite. It’s a classic dessert that commands attention on a food board, especially when served with a dollop of cold, whipped cream that slowly melts into the warm filling.
Ingredients
- Double pie crust (homemade or store-bought)
- 5 cups sliced rhubarb
- 1 1/4 cups sugar
- 1/4 cup cornstarch
- 1 tablespoon unsalted butter, cubed
- 1 egg (for egg wash)
- Coarse sugar for sprinkling
How to make it
- Roll out your bottom pie crust on a lightly floured surface and gently press it into a 9-inch pie plate, leaving an overhang for crimping.
- In a large mixing bowl, toss the sliced rhubarb with the sugar and cornstarch until every piece is coated, allowing it to sit for 10 minutes so the juices can thicken.
- Pour the rhubarb mixture into the prepared crust and dot the top with the small cubes of butter to add richness and a silky mouthfeel.
- Place the second crust over the top (either whole or cut into strips for a lattice design), trim the edges, and crimp the borders tightly to seal in the juices.
- Brush the top with a beaten egg wash, sprinkle with coarse sugar, and bake at 400°F (200°C) for 20 minutes before lowering the temp to 350°F for another 30-40 minutes until the crust is golden and the filling is bubbling through the vents.
How to ice summer cookies?
Why we love this
Summer cookies are all about brightness and joy, and the icing is where the magic really happens. We love the smooth, satin finish of royal icing and the way it can be transformed into intricate floral patterns or vibrant citrus slices. The subtle crunch of the dried icing against the soft, buttery cookie creates a texture that is incredibly satisfying. These cookies are a visual feast, bringing a pop of seasonal color to your board that feels like a summer garden in bloom. The sweet, almond-tinged scent of the icing makes every bite feel like a special treat.
Ingredients
- Baked sugar cookies
- 4 cups powdered sugar
- 3 tablespoons meringue powder
- 1/2 cup warm water
- Gel food coloring (neon and pastel shades)
- Fine-tipped piping bags
How to make it
- Whip the powdered sugar, meringue powder, and water together in a stand mixer for about 7-10 minutes until stiff peaks form; this creates the base for your ‘outline’ icing.
- Divide the icing into bowls and tint with gel colors, then thin some of it out with drops of water until it reaches ‘flood’ consistency (it should disappear back into itself after 5-10 seconds).
- Pipe a border around the edge of your cookie with the stiff icing to create a dam that prevents the thinner icing from spilling over.
- Fill the center with the flood icing using a toothpick to pop any tiny air bubbles and spread the icing to the edges for a glass-like finish.
- Let the cookies dry for at least 6-8 hours before adding fine details like flower petals or lettering with the stiff icing for a professional, viral-ready aesthetic.
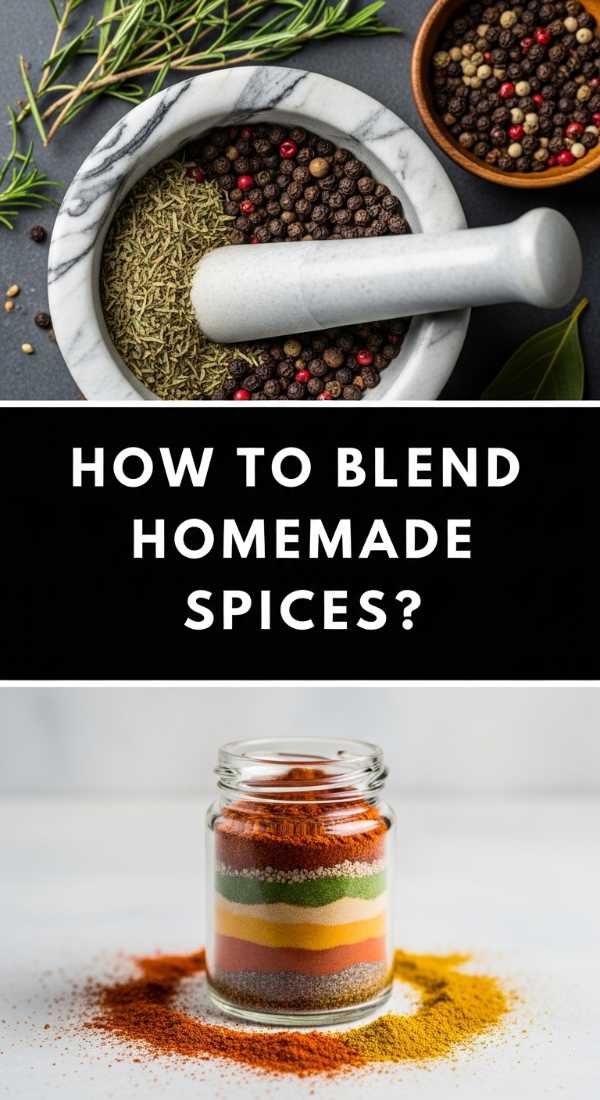
How to blend homemade spices?
Why we love this
There is a deep, earthy satisfaction in blending your own spices, as it allows you to customize flavors to your exact palate. We love the way the kitchen fills with the heady, aromatic scents of toasted cumin, smoked paprika, and dried herbs, creating an olfactory experience that is both grounding and exciting. The textures vary from fine powders to coarse, cracked peppercorns, giving your food boards an artisanal feel. Using fresh, home-blended spices elevates even the simplest dish, providing a depth of flavor that store-bought jars simply cannot match. It’s the secret ingredient that makes your cooking stand out.
Ingredients
- Whole cumin seeds
- Whole coriander seeds
- Dried oregano and thyme
- Smoked paprika
- Garlic powder and onion powder
- Sea salt and black peppercorns
How to make it
- Begin by lightly toasting your whole seeds (cumin and coriander) in a dry skillet over medium heat for 2-3 minutes until they become incredibly fragrant and slightly darker.
- Allow the toasted seeds to cool completely, then grind them in a dedicated spice grinder or use a mortar and pestle for a more rustic, coarse texture.
- In a small glass bowl, combine the freshly ground seeds with the dried herbs, paprika, and powders, whisking them together to ensure an even distribution.
- Taste the blend and adjust the salt or heat levels as desired, ensuring the balance of smoky, herbal, and salty notes is perfect for your needs.
- Store the blend in an airtight glass jar away from direct sunlight to maintain the potency of the essential oils for up to six months.
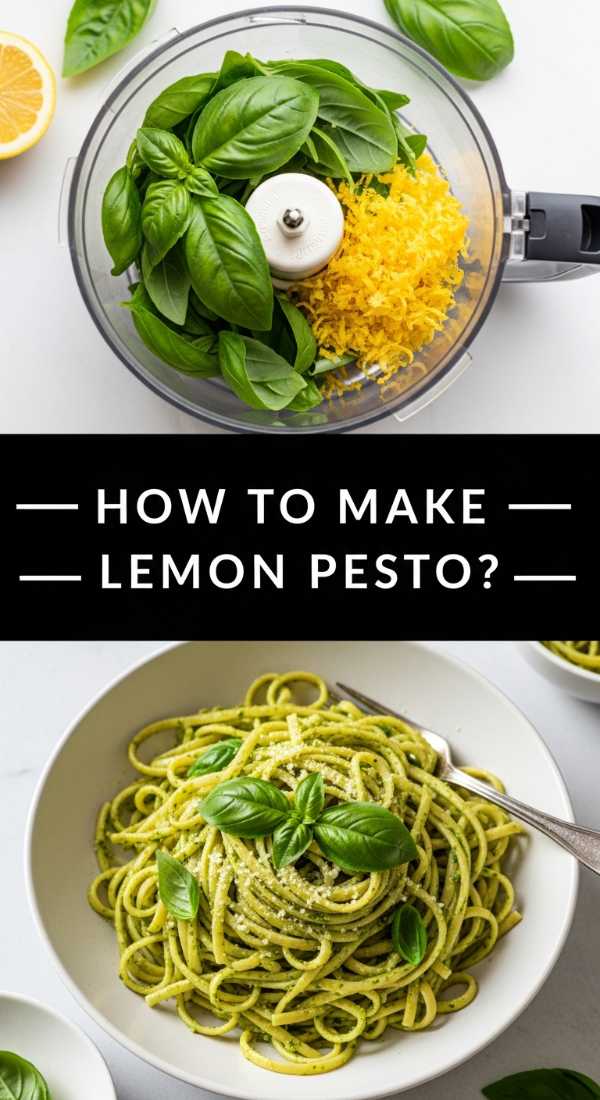
How to make lemon pesto?

Why we love this
Lemon pesto is a bright, zesty twist on the traditional recipe that feels like sunshine in a bowl. We love the vibrant, neon-green color and the way the citrus notes cut through the richness of the parmesan and pine nuts. The aroma is a refreshing blend of peppery basil and sharp lemon zest, instantly waking up your senses and making your mouth water. It’s incredibly versatile, acting as a dip, a spread, or a pasta sauce that brings a sophisticated, gourmet touch to any food board. Each bite is a burst of freshness that perfectly complements grilled vegetables or crusty bread.
Ingredients
- 2 cups fresh basil leaves, packed
- 1/2 cup freshly grated Parmesan cheese
- 1/3 cup toasted pine nuts
- 2 cloves garlic, peeled
- Juice and zest of 1 large organic lemon
- 1/2 cup high-quality extra virgin olive oil
- Salt and pepper to taste
How to make it
- Place the toasted pine nuts and garlic cloves into a food processor and pulse several times until they are finely minced but not yet a paste.
- Add the fresh basil leaves, lemon zest, and Parmesan cheese to the processor; pulse again in short bursts to break down the leaves while keeping some texture.
- With the motor running on a low setting, slowly drizzle in the extra virgin olive oil in a steady stream to create a creamy, emulsified sauce.
- Add the lemon juice at the very end to preserve its bright, acidic punch, and season generously with salt and freshly cracked black pepper.
- Transfer the pesto to a small serving bowl on your food board, drizzling a little extra oil on top to prevent oxidation and keep that brilliant green color.
How to brew fun coffee?
Why we love this
Coffee shouldn’t just be a caffeine fix; it should be an experience, and ‘fun’ coffee is all about layers, foam, and indulgence. We love the visual appeal of a glass filled with ombre gradients of espresso and milk, topped with a thick, velvety cloud of cold foam. The aroma of freshly ground beans mixed with swirls of caramel or vanilla creates a cafe-quality atmosphere right in your own home. It’s the perfect companion to a dessert board, offering a bitter contrast to sweet treats. Holding a beautifully crafted iced coffee with colorful straws makes any morning feel like a special occasion.
Ingredients
- 2 shots of dark roast espresso or 1/2 cup cold brew concentrate
- 1 tablespoon salted caramel or lavender syrup
- 1 cup milk of choice (oat milk froths beautifully)
- Ice cubes (coffee-flavored ice cubes are a pro tip!)
- Whipped cream or cold foam
How to make it
- Start by drizzling your flavored syrup along the inside walls of a tall glass to create those viral-worthy drips and swirls.
- Fill the glass to the brim with ice; using large, clear cubes will keep the drink cold longer without diluting the flavor too quickly.
- Pour your cold milk or oat milk over the ice, leaving about two inches of space at the top of the glass for the coffee and foam.
- Slowly pour the espresso or cold brew over the back of a spoon onto the milk; this technique slows the flow and creates a distinct, beautiful layered effect.
- Top with a dollop of hand-whisked cold foam (made by frothing cold milk with a splash of syrup) and a sprinkle of cinnamon or cocoa powder for a professional finish.
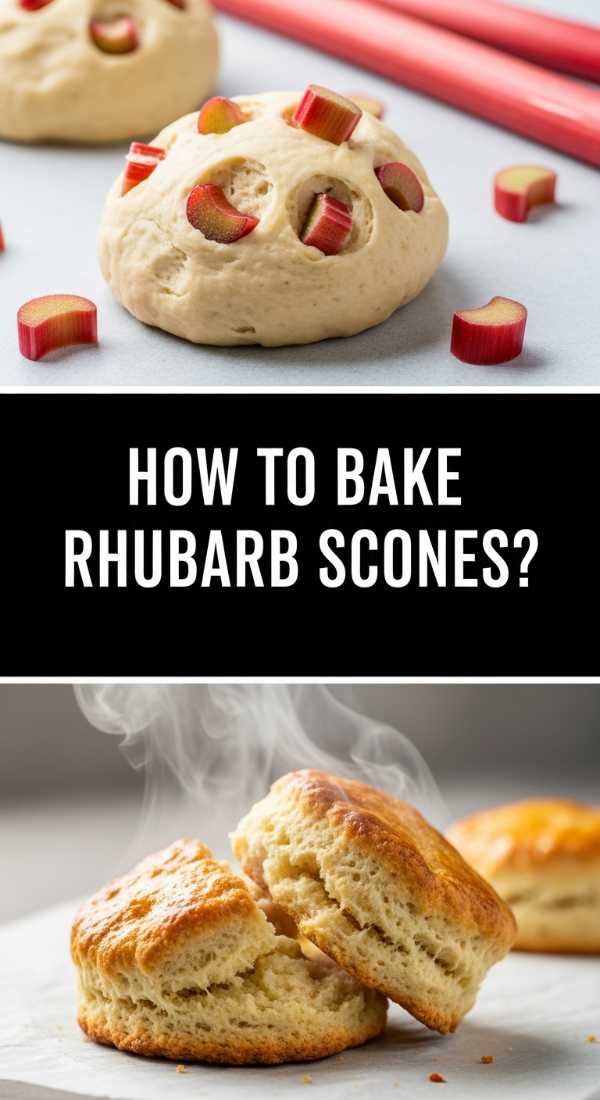
How to bake rhubarb scones?

Why we love this
Rhubarb scones are the ultimate teatime luxury, offering a crumbly, buttery exterior and a soft, tender heart studded with tart fruit. We love how the bits of rhubarb soften in the oven, creating little pockets of jam-like intensity that contrast with the sweet, biscuit-like dough. The scent of baking butter and fruit is incredibly nostalgic, drawing everyone to the kitchen before they’re even out of the oven. These scones look stunning on a wooden board, especially when finished with a drizzle of simple glaze and a sprinkle of sparkling sugar. They are the epitome of elegant, seasonal baking.
Ingredients
- 2 cups all-purpose flour
- 1/2 cup granulated sugar
- 1 tablespoon baking powder
- 1/2 cup cold unsalted butter, cubed
- 1/2 cup heavy cream (plus more for brushing)
- 1 cup fresh rhubarb, finely diced
- 1 teaspoon vanilla extract
- Coarse sanding sugar
How to make it
- Whisk the flour, sugar, and baking powder together in a large bowl, then use a pastry cutter or your fingertips to work the cold butter into the flour until it resembles coarse crumbs with some pea-sized chunks remaining.
- Gently fold in the finely diced rhubarb, ensuring the pieces are coated in flour so they don’t all sink to the bottom of the scones.
- Make a well in the center and pour in the heavy cream and vanilla, mixing with a fork just until a shaggy dough forms; be careful not to overwork it, as cold butter is key to flakiness.
- Turn the dough onto a floured surface, pat it into a 1-inch thick circle, and cut into 8 wedges using a sharp knife or a bench scraper.
- Place the wedges on a parchment-lined sheet, brush the tops with a little extra cream, sprinkle with sanding sugar, and bake at 400°F (200°C) for 15-18 minutes until the edges are a light golden brown.
How to style graduation cookies?
[IMAGE_10]
Why we love this
Styling graduation cookies is where you can truly let your creativity shine, turning simple treats into personalized tokens of celebration. We love the look of elegant calligraphy writing out ‘Class of 2024’ or the detailed texture of a tiny diploma tied with a real string of frosting. The visual impact of a coordinated color palette—matching the grad’s cap and gown—makes these cookies feel bespoke and thoughtful. They add a layer of sophistication to your food board, acting as edible decorations that guests will be hesitant to eat because they look so perfect. It’s the ultimate way to say ‘congratulations’ with style.
Ingredients
- Set of baked and base-iced sugar cookies
- Edible gold luster dust and lemon extract (for paint)
- Black and white royal icing (stiff consistency)
- Fine-tipped food markers
- Tweezers for placing tiny sprinkles
How to make it
- Ensure your base icing is completely hard (dried for at least 12 hours) before you begin styling, otherwise, the markers or paint will sink into the surface.
- Mix a small amount of gold luster dust with a few drops of lemon extract to create a metallic ‘paint,’ then use a food-safe brush to add elegant accents to the edges of the cookies.
- Use a fine-tipped food marker to write names, dates, or encouraging words like ‘Dream Big’ in your best cursive or block lettering.
- Pipe small graduation caps or diplomas using stiff royal icing, then use tweezers to place tiny metallic pearls or stars for an extra touch of sparkle.
- Arrange the finished cookies on your board in a cascading pattern or nested among fresh flowers to create a high-end, viral-worthy display that celebrates the graduate in style.
Conclusion
Creating these viral food boards is about more than just the aesthetic—it’s about the joy of sharing something handmade with the people you love. Whether you’re celebrating a big graduation milestone or simply enjoying the first flavors of the season, these recipes bring a touch of magic to the table. I hope these tips inspire you to get creative in the kitchen and host a gathering that feels as beautiful as it tastes. Happy hosting!