

There’s something truly magical about the way food can turn a simple afternoon into a core memory. I remember the first time I set out a massive, overflowing board for my friends—the gasps of delight, the immediate clicking of cameras for Instagram, and then that beautiful, chaotic silence that happens when everyone is just really enjoying a good meal. It’s not just about the food; it’s about the curated experience of colors, textures, and flavors that invite everyone to dig in together.
The “Simple Food Board” craze has taken over our feeds for a reason: it’s the ultimate low-stress way to host without losing your mind in the kitchen. Whether you’re leaning into the ‘butter squishy’ trend or stacking up grilled seasonal favorites, these boards are all about celebrating the season’s bounty. Let’s dive into my five favorite ways to master this viral trend and make your next gathering absolutely unforgettable.
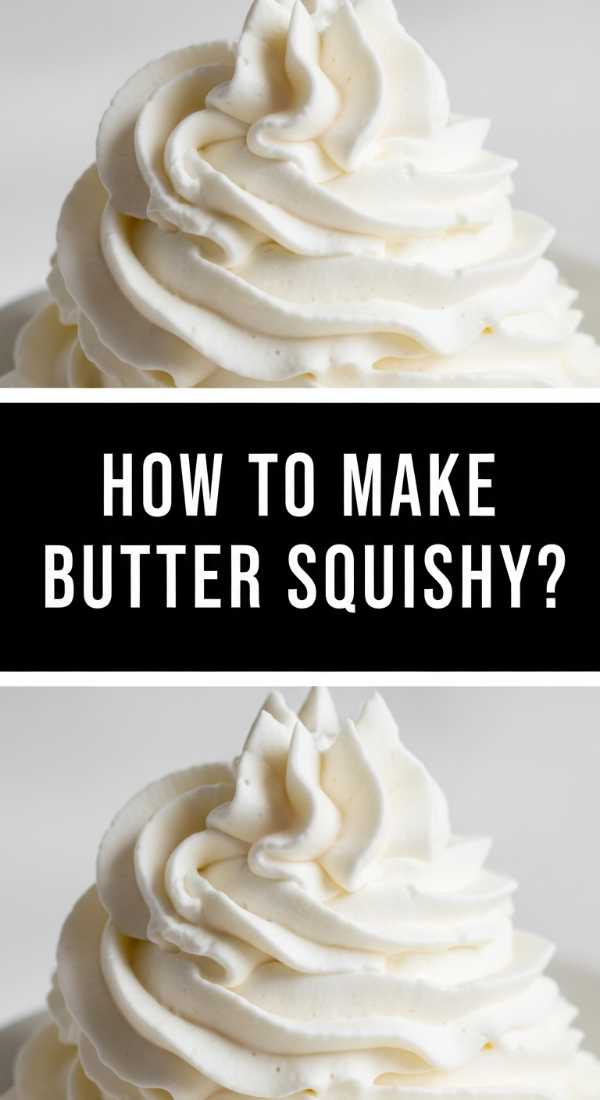
Mastering the Viral Butter Squishy Board

Why we love this
There is nothing quite as decadent as the silky, velvety texture of high-quality butter spread artfully across a wooden board. When you dive in with a warm piece of sourdough, the butter yields like a cloud, carrying with it the crunch of flaky sea salt, the floral sweetness of honey, and the earthy aroma of fresh thyme. It’s a tactile, sensory explosion that feels incredibly fancy despite being one of the easiest things to assemble. The way the light catches the ripples of the butter makes it an instant center-piece for any aesthetic gathering.
Ingredients
- 2 sticks of high-quality European-style salted butter (room temperature)
- 2 tablespoons local wildflower honey
- 1 tablespoon flaky sea salt (Maldon is best)
- 1 bunch fresh thyme or rosemary
- Zest of one organic lemon
- Edible flowers (optional for garnish)
- Warm baguette or crusty sourdough slices
How to make it
- Temper the butter: Ensure your butter has been sitting at room temperature for at least 2-3 hours. It should be soft enough that your finger leaves an indentation with no resistance, but it should not be greasy or melting.
- Create the base: Using a small offset spatula or the back of a decorative spoon, take a tablespoon of butter and ‘swoop’ it onto a clean wooden or marble board. Repeat this in a rhythmic pattern, creating peaks and valleys that look like waves.
- Layer the aromatics: Evenly sprinkle the flaky sea salt over the peaks. The salt adds a necessary crunch to the fatty butter. Micro-plane the lemon zest directly over the board to release the citrus oils.
- Drizzle and herb: Warm the honey for 5 seconds in the microwave so it runs easily. Drizzle it in a zig-zag pattern across the butter. Pull the tiny leaves off the thyme sprigs and scatter them generously.
- Serve: Arrange warm bread around the edges of the board. Advise guests to ‘scoop’ rather than spread to keep the aesthetic intact throughout the night.
The Ultimate Spicy Rotel Cheesy Dip Board

Why we love this
This is the ultimate comfort food that brings everyone to the table with its nostalgic, savory aroma. The smell of browned sausage mingling with melted, gooey cheese and the slight acidic zing of canned tomatoes and green chilies is absolutely intoxicating. Each bite is a warm, velvety hug, offering a perfect balance of spice and creaminess that pairs beautifully with the salty crunch of a corn chip. It’s the kind of dish that disappears in minutes because nobody can stop at just one dip.
Ingredients
- 1 lb spicy ground breakfast sausage or chorizo
- 16 oz block of processed cheese (like Velveeta), cubed
- 2 cans (10 oz each) Rotel diced tomatoes and green chilies
- 1/2 cup heavy cream (for silkiness)
- 1/4 cup chopped fresh cilantro
- Large bag of thick-cut tortilla chips
- Sliced jalapeños for extra heat
How to make it
- Brown the protein: In a large skillet over medium-high heat, crumble the sausage. Use a wooden spoon to break it into very small pieces. Cook until deeply browned and slightly crispy—this ‘Maillard reaction’ provides the deep savory base for the dip. Drain all but 1 tablespoon of the fat.
- Melt the cheese: Reduce the heat to low. Add the cubed cheese and the cans of Rotel (do not drain the liquid; the juice is essential for flavor). Stir constantly with a silicone spatula to prevent the bottom from scorching.
- Emulsify: Once the cheese is 75% melted, stir in the heavy cream. This keeps the dip dip-able even as it cools slightly on the board. Continue stirring until the mixture is completely smooth and uniform in color.
- Simmer and Set: Let the dip simmer on the lowest heat setting for 5 minutes, allowing the flavors to marry. You should see small bubbles around the edges but no rolling boil.
- Assemble the board: Pour the hot dip into a ceramic bowl placed in the center of a large board. Surround with piles of tortilla chips, lime wedges, and extra cilantro. Serve immediately while the cheese is at its peak ‘stretchy’ consistency.
Fresh Summer Strawberry Pie Dessert Board

Why we love this
There is nothing that says ‘summer’ quite like the vibrant, ruby-red glow of a fresh strawberry pie. The crust is buttery and flaky, shattering with every forkful, while the filling is a celebration of sun-ripened berries that burst with sweet juice. The aroma is a heavenly mix of toasted flour and macerated fruit, topped with a cloud of vanilla bean whipped cream. It is light enough for a hot evening but rich enough to feel like a true indulgence, making it the perfect focal point for a sweet-themed board.
Ingredients
- 2 pints fresh strawberries, hulled and sliced
- 1 pre-baked 9-inch deep-dish pie crust
- 1 cup granulated sugar
- 3 tablespoons cornstarch
- 1 cup water
- 1/2 teaspoon vanilla extract
- Fresh whipped cream and mint leaves for garnish
How to make it
- Prepare the crust: Blind bake your pie crust until it is a deep golden brown. Professional tip: brush the inside of the hot crust with a beaten egg white to create a moisture barrier, ensuring it stays crispy once the fruit is added.
- Create the glaze: In a saucepan over medium heat, whisk together sugar, cornstarch, and water. Stir constantly until the mixture comes to a boil. It will turn from cloudy to translucent and thick. Boil for 1-2 minutes until it reaches a gel-like consistency.
- Incorporate flavor: Remove the glaze from the heat and stir in the vanilla extract and 1/2 cup of crushed strawberries to give the glaze its natural pink hue.
- Fold the fruit: Gently fold the remaining fresh strawberry slices into the glaze. Use a rubber spatula to ensure every berry is evenly coated without crushing the fruit.
- Chill and set: Pour the mixture into the cooled pie crust. Refrigerate for at least 4 hours. The pie is ‘done’ when the filling doesn’t jiggle when the pan is lightly shaken. Slice and place on a board surrounded by extra berries and small bowls of whipped cream.
Vibrantly Grilled Fresh Veggie Board
Why we love this
Grilling vegetables transforms them into something entirely new, bringing out a natural sweetness and a complex smoky char that you simply can’t get in the oven. Imagine the snap of a perfectly grilled asparagus stalk or the creamy center of a charred zucchini slice, all seasoned with zesty lemon and coarse salt. The colors on the board—deep purples, bright greens, and charred oranges—make it look like a piece of edible art. It’s a healthy, refreshing way to eat that feels substantial and satisfying.
Ingredients
- 2 large zucchinis, sliced into planks
- 1 bunch thick asparagus, ends trimmed
- 2 bell peppers (red and yellow), quartered
- 1 red onion, sliced into thick rounds
- 1/4 cup olive oil
- 2 tablespoons balsamic glaze
- Garlic powder, salt, and black pepper
How to make it
- Prep the grill: Pre-heat your grill to medium-high heat (about 400°F). Clean the grates thoroughly and lightly oil them using a paper towel dipped in vegetable oil held with tongs to prevent sticking.
- Seasoning: Toss all vegetables in a large bowl with the olive oil, garlic powder, salt, and pepper. Ensure every inch is coated; the oil is what creates the beautiful grill marks.
- Strategic Grilling: Place the densest vegetables (onions and peppers) on the grill first. Cook for 4-5 minutes per side. Add the zucchinis and asparagus for the last 3-4 minutes, as they cook much faster and can become mushy if left too long.
- The Visual Cue: Look for distinct, dark brown grill lines and a slight softening of the vegetable’s structure. They should be ‘al dente’—tender but with a slight bite remaining.
- Finish: Arrange the veggies on a large slate board. Drizzle with balsamic glaze and sprinkle with fresh parsley. The heat from the veggies will slightly wilt the herbs, releasing their fragrance just as you serve.
The Refreshing Summer Salad Board

Why we love this
Instead of a bowl where the best toppings always fall to the bottom, a salad board ensures every single bite is perfectly balanced. The crunch of fresh romaine, the pop of juicy cherry tomatoes, and the creamy tang of feta cheese are spread out for all to see. It’s cold, crisp, and incredibly hydrating on a sweltering afternoon. The aroma of fresh basil and a sharp lemon vinaigrette acts as a wake-up call for the senses, making it the perfect light accompaniment to any viral food spread.
Ingredients
- 3 heads of Little Gem or Romaine hearts
- 1 pint heirloom cherry tomatoes, halved
- 1 English cucumber, thinly sliced
- 1/2 cup crumbled feta or goat cheese
- 1/2 cup toasted pine nuts or sunflower seeds
- Lemon-Tahini or Balsamic Dressing
- Fresh cracked black pepper
How to make it
- The Base Layer: Wash and thoroughly dry your greens. Any moisture will make the board slippery and the salad soggy. Tear the leaves into bite-sized pieces and scatter them across the board as a thick, fluffy bed.
- Layering Textures: Place the cucumber slices and tomatoes in clusters rather than a random scatter. This ‘grouping’ technique is a professional styling secret that makes the board look more curated and less messy.
- Adding the ‘Gems’: Sprinkle the feta cheese and toasted nuts over the top. The white of the cheese against the greens makes the board ‘pop’ visually.
- Dressing Technique: Do not dress the salad on the board. Instead, place 2-3 small ramekins of different dressings directly on the board. This prevents the greens from wilting and allows guests to customize their flavor profile.
- Final Touch: Add a final generous crack of black pepper and a few whole basil leaves across the top. Serve with tongs so guests can build their own perfect plate.
Conclusion
Mastering the viral food board craze is all about embracing the beauty of communal eating. By focusing on high-quality ingredients and thoughtful presentation, you can turn a simple meal into an event. Whether you’re swooping butter for a butter board or layering a crisp summer salad, remember that the best part is the conversation that happens while everyone is reaching for their favorite bite. Happy hosting!