

5-Minute Viral Food Boards That Will Wow Your Guests
There is nothing quite like the feeling of opening your door to friends and family, the air filled with laughter and the anticipation of a shared meal. We’ve all been there, though—scrambling in the kitchen while the party happens without us. That’s why I’ve become completely obsessed with the ‘viral food board’ trend. It’s about more than just cheese and crackers; it’s about creating a visual and sensory experience that brings people together without keeping you tied to the oven all night.
Today, I’m sharing my favorite ways to elevate the classic grazing concept using seasonal stars like tart rhubarb and celebratory graduation treats. These ideas are designed to be assembled in minutes, yet they look like they were plucked straight from a professional stylist’s portfolio. Whether you’re celebrating a milestone or just a sunny Tuesday, these boards are your secret weapon for effortless hosting.
The magic lies in the details—the pop of a fresh berry, the shimmer of gold leaf, and the aroma of freshly brewed coffee. Let’s dive into these ten viral-inspired ideas that will make your next gathering absolutely unforgettable. From sweet to savory, there is something here for every palate and every occasion!
How to decorate graduation cakes?

Why we love this
Decorating a graduation cake for a dessert board is all about capturing that triumphant sense of accomplishment through edible art. We love the way gold leaf catches the light, mimicking the shimmer of a tassel, while the contrast of smooth, velvety buttercream against architectural toppers creates a centerpiece that demands attention. The aroma of sweet vanilla and the sight of delicate, piped borders evoke a sense of tradition and celebration that makes every guest feel the significance of the achievement.
Ingredients
- Pre-baked layered cake
- Silk or velvet buttercream frosting
- Edible gold leaf
- Miniature graduation cap toppers
- Custom acrylic name sign
- Fresh sprigs of baby’s breath
How to make it
- Begin by applying a ‘crumb coat’ of frosting to your chilled cake; this thin layer seals in crumbs. Refrigerate for 20 minutes until firm.
- Apply a generous second layer of buttercream. Use a metal offset spatula held at a 45-degree angle to smooth the sides, spinning the turntable slowly for a professional, glass-like finish.
- Using sterilized tweezers, carefully press small flakes of edible gold leaf onto the lower third of the cake, creating a ‘scattered’ or ‘organic’ look that climbs upward.
- Place your custom name sign or ‘Class of 2024’ topper slightly off-center to create visual interest and height.
- Nestle the miniature graduation cap on the opposite side of the topper and tuck a few sprigs of baby’s breath around the base of the cake to soften the edges and add a touch of elegance.
How to bake rhubarb pie?
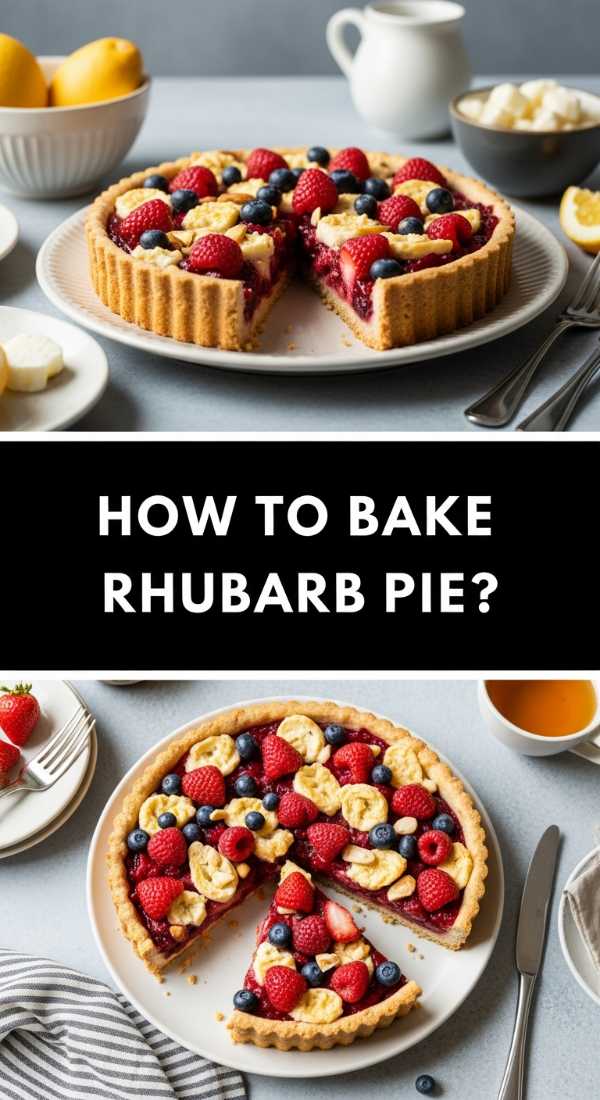
Why we love this
Rhubarb pie is the ultimate herald of spring, offering a sophisticated balance of bracing tartness and deep, caramelized sweetness. As it bakes, the kitchen fills with the scent of buttery, flaky pastry and the fruity, almost floral aroma of the red stalks softening into a jammy bliss. Each bite offers a satisfying crunch from the sugar-dusted lattice crust, followed by the smooth, tender texture of the vibrant pink filling that dances on the tongue.
Ingredients
- Double pie crust dough (chilled)
- 5 cups chopped fresh rhubarb
- 1 1/4 cups granulated sugar
- 1/4 cup cornstarch
- 1 tablespoon cold butter, cubed
- 1 egg (for wash)
- Coarse sparkling sugar
How to make it
- Preheat your oven to 400°F (200°C) and place a baking sheet on the bottom rack to catch any drips.
- Roll out the bottom crust and fit it into a 9-inch pie plate. Trim the edges, leaving a 1-inch overhang.
- In a large bowl, toss the chopped rhubarb with sugar and cornstarch until every piece is evenly coated; the sugar will begin to draw out the juices almost immediately.
- Pour the mixture into the crust and dot the top with the cold butter cubes to add richness and a glossy sheen to the filling.
- Roll out the second crust and cut into 1-inch strips. Weave a lattice pattern over the top, crimping the edges to seal. Brush with beaten egg and sprinkle heavily with sparkling sugar.
- Bake at 400°F for 20 minutes, then reduce heat to 350°F and bake for another 35-45 minutes until the crust is deep golden brown and the filling bubbles thick and slow.
How to make graduation cupcakes?

Why we love this
Graduation cupcakes are the perfect ‘grab-and-go’ addition to a viral food board, offering individual portions of joy. We love the whimsical touch of the chocolate ‘caps’ and the way they stand like a tiny, edible army of achievers. The texture of a moist, chocolate sponge paired with a rich peanut butter or caramel frosting creates a decadent experience that feels both playful and sophisticated, making them a hit for both kids and adults alike.
Ingredients
- 12 baked dark chocolate cupcakes
- Chocolate ganache or dark frosting
- Square chocolate bars (like Ghirardelli)
- Miniature peanut butter cups
- Sour belt candy (cut into thin strips)
- M&Ms or small round candies
How to make it
- Frost each cupcake with a flat, even layer of chocolate ganache to create a stable base for the ‘cap’.
- Unwrap the miniature peanut butter cups and place them upside down in the center of each cupcake; these serve as the base of the mortarboard.
- Apply a tiny dot of frosting to the top of the peanut butter cup and press a chocolate square firmly on top, ensuring it is level.
- Cut a 1-inch strip of sour belt candy to act as the tassel. Use a tiny dab of frosting to attach one end to the center of the chocolate square.
- Finish by placing an M&M or a small candy bead directly over the end of the tassel in the center of the square to mimic the button on a graduation cap.
How to cook rhubarb jam?
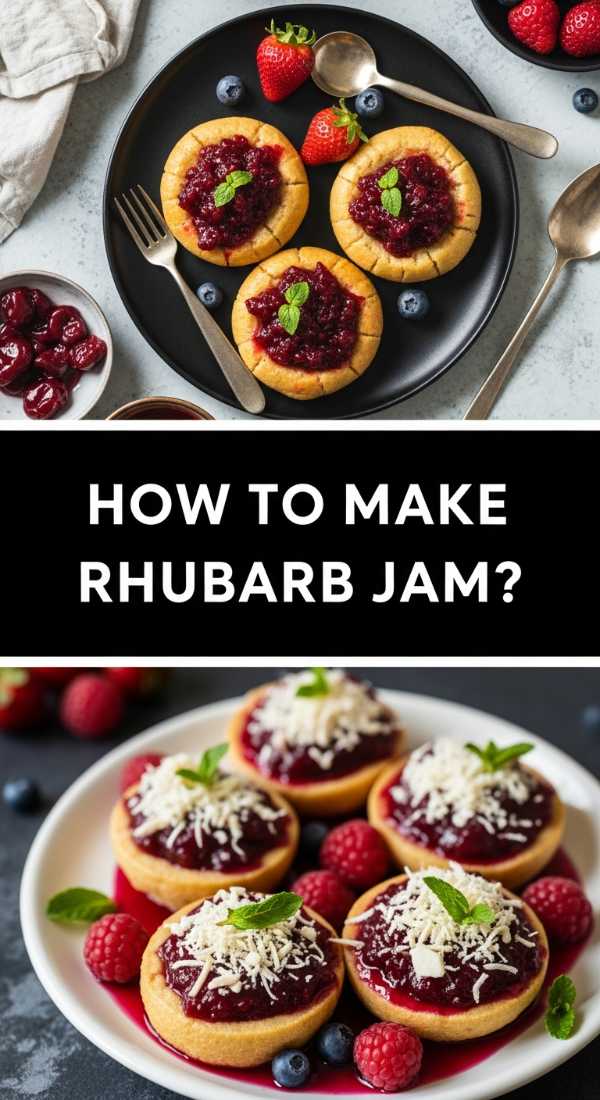
Why we love this
Cooking rhubarb jam feels like capturing sunshine in a jar. The process is a sensory delight as the stiff, fibrous stalks transform into a glowing, ruby-red nectar right before your eyes. The aroma is sharp and bright, mellowing into a sweet-tart fragrance as it simmers. We love spreading this thick, jewel-toned jam over warm scones or swirling it into yogurt; its vibrant acidity provides a refreshing contrast to creamy textures.
Ingredients
- 2 lbs fresh rhubarb, cut into 1/2 inch pieces
- 3 cups granulated sugar
- 2 tablespoons lemon juice
- 1 teaspoon vanilla bean paste
- A pinch of salt
How to make it
- In a large, heavy-bottomed pot, combine the rhubarb, sugar, and lemon juice. Let it sit for 30 minutes until the rhubarb begins to release its natural moisture and forms a syrup.
- Place the pot over medium heat and stir constantly until the sugar has completely dissolved to prevent scorching.
- Bring the mixture to a rolling boil. Use a spoon to skim off any foam that rises to the surface for a clearer, brighter jam.
- Reduce the heat to medium-low and simmer for 20-25 minutes. You are looking for a thick, syrupy consistency; it will pass the ‘plate test’ when a small dollop wrinkles when pushed with a finger.
- Stir in the vanilla bean paste and salt during the final minute of cooking. Pour into sterilized jars and allow to cool completely before sealing.
How to design graduation cookies?

Why we love this
Designing graduation cookies is an exercise in creativity and celebration. We love the crisp snap of a perfectly baked sugar cookie paired with the smooth, matte finish of royal icing. These cookies act as edible keepsakes, allowing you to incorporate school colors and personal motifs. The process of piping intricate designs is meditative, and the result is a stunning, coordinated set that adds a customized, high-end feel to any food board.
Ingredients
- Sugar cookie dough (cut into diplomas and caps)
- Royal icing (stiff and flooding consistencies)
- Gel food coloring in school colors
- Fine-tip piping bags
- Edible silver or gold dust
How to make it
- Bake your cookies and ensure they are completely cool; any residual warmth will cause the icing to melt and bleed.
- Outline the diploma and cap shapes using ‘stiff’ consistency icing and a small round tip. This creates a dam to hold the thinner icing.
- ‘Flood’ the center of the cookies with the thinner consistency icing. Use a toothpick or scribe tool to pop any air bubbles and ensure the icing reaches the edges of your outline.
- Let the base layer dry for at least 4-6 hours. Once hard, use the stiff icing to pipe ‘2024’ or the student’s name over the top for a 3D effect.
- For the diploma cookies, pipe a small ‘ribbon’ in the center using a contrasting color. If using edible dust, mix a drop of vodka with the dust and paint it onto the dried icing for a metallic shine.
How to bake rhubarb crumble?

Why we love this
Rhubarb crumble is the cozy, rustic cousin of the pie, and we love it for its effortless charm. The contrast between the bubbling, molten fruit and the crunchy, buttery oat topping is a match made in heaven. As it bakes, the oats toast to a nutty brown, and the cinnamon-spiced aroma wafts through the house, promising comfort. It’s the kind of dish that invites everyone to grab a spoon and dig in right from the board.
Ingredients
- 6 cups rhubarb, sliced into 1-inch chunks
- 3/4 cup sugar
- 1 cup old-fashioned oats
- 1 cup all-purpose flour
- 1 cup brown sugar (packed)
- 1/2 cup cold salted butter, cubed
- 1 teaspoon cinnamon
How to make it
- Preheat your oven to 375°F (190°C) and lightly grease a shallow baking dish that will fit onto your serving board.
- Toss the rhubarb with the 3/4 cup of granulated sugar and spread it evenly across the bottom of the dish.
- In a separate bowl, combine the oats, flour, brown sugar, and cinnamon. Use a pastry cutter or your fingers to rub the cold butter into the dry ingredients until large, pea-sized crumbs form.
- Sprinkle the crumble mixture generously over the rhubarb, making sure not to pack it down; you want it light and airy so it crisps up properly.
- Bake for 35-40 minutes. You will know it is ready when the fruit juices are bubbling vigorously at the edges and the topping is a deep, golden brown. Serve warm with a scoop of vanilla bean ice cream.
How to make fancy coffee?
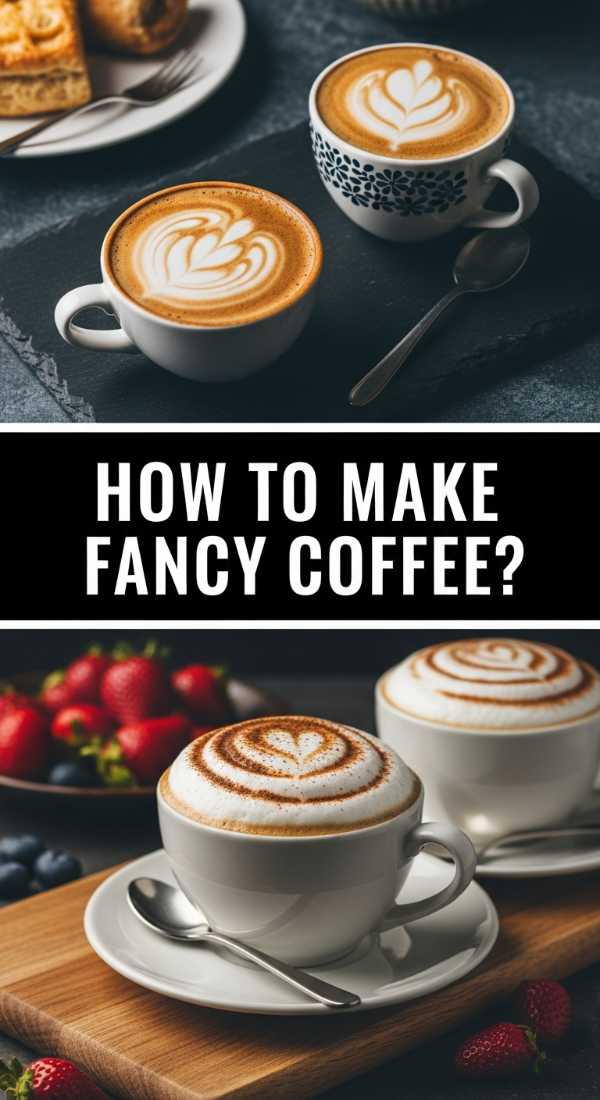
Why we love this
Adding ‘fancy coffee’ to a food board turns a simple snack into a sophisticated brunch or dessert experience. We love the ritual of it—the hiss of the milk frother, the rich, earthy scent of freshly ground beans, and the visual beauty of layered espresso and cream. It provides a warm, caffeinated hug that balances the sweetness of the surrounding pastries, making the board feel like a complete, curated cafe experience in the comfort of your home.
Ingredients
- Double shot of espresso or strong cold brew concentrate
- 1 cup whole milk or oat milk
- 1 tablespoon lavender or vanilla syrup
- Dried culinary rose petals or cinnamon dust
- Ice (if serving cold)
How to make it
- Start with a high-quality espresso base. If making an iced latte, fill a tall glass with large ice cubes that won’t melt too quickly and dilute the flavor.
- Pour your syrup of choice into the bottom of the glass. Stir in the hot espresso or cold brew concentrate to ensure the syrup is fully integrated.
- Froth your milk using a handheld frother or a steam wand. For the best texture, froth until the milk is doubled in volume and has a ‘micro-foam’ consistency similar to wet paint.
- Slowly pour the milk over the coffee. If pouring into a hot drink, use a spoon to hold back the foam, then dollop the foam on top at the end.
- Finish with a delicate garnish of dried rose petals or a light dusting of cinnamon through a stencil for that ‘viral cafe’ aesthetic.
How to style graduation cakes?

Why we love this
Styling is where a simple cake becomes a viral masterpiece. We love how the addition of non-edible elements like fresh florals or structured ribbons can transform the cake’s silhouette. It’s about creating a story on the plate—using height, texture, and color to celebrate the graduate’s journey. A well-styled cake doesn’t just sit on the board; it anchors the entire display, drawing the eye and serving as the perfect backdrop for photos.
Ingredients
- Finished graduation cake
- Fresh eucalyptus or seasonal greens
- Silk ribbons in school colors
- Acrylic cake stand or wooden slice
- Micro-LED fairy lights (optional)
How to make it
- Place your cake on a stand that provides height. If your board is flat, use a wooden slice or an inverted bowl underneath a plate to create levels.
- Wreath the base of the cake stand with fresh eucalyptus. The dusty green color provides a beautiful, organic contrast to the structured lines of the cake.
- Take two long strands of silk ribbon and tie a loose, elegant bow around the base of the cake stand, letting the ‘tails’ of the ribbon drape onto the board.
- If serving in the evening, weave a strand of micro-LED fairy lights through the greenery at the base to give the display a magical, glowing effect.
- Ensure the ‘front’ of your cake—the side with the most decorations—is facing the primary angle where guests will be standing to maximize the visual impact.
How to make lemon pesto?
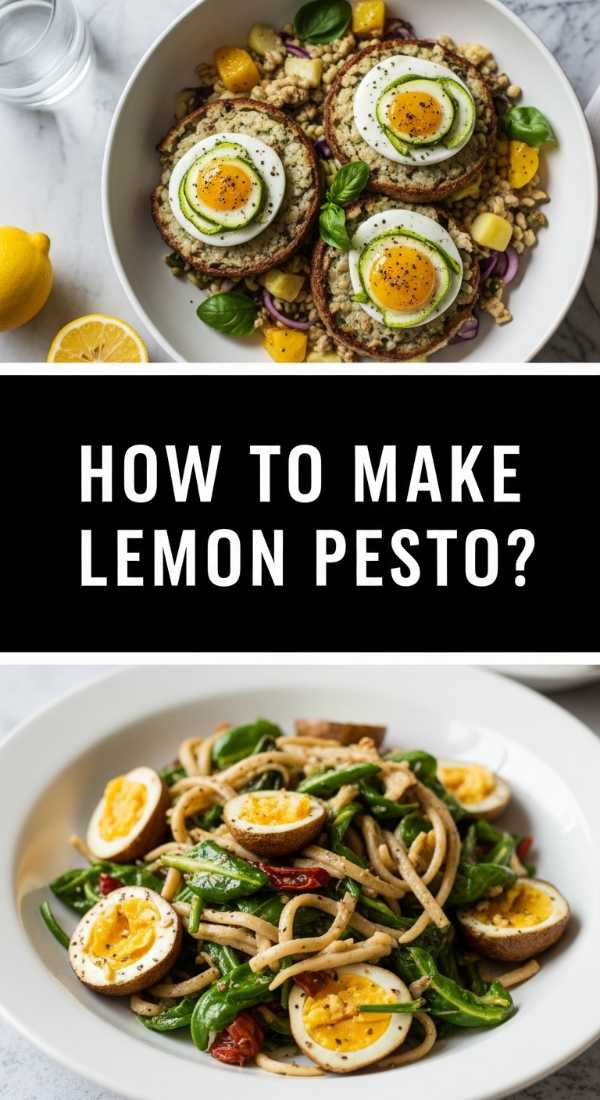
Why we love this
Lemon pesto is a vibrant, zesty departure from the traditional basil version, and it brings a sun-drenched Mediterranean feel to any savory board. We love the bright, citrusy punch that cuts through the richness of cheeses and charcuterie. The texture is coarse and rustic, filled with the crunch of toasted pine nuts and the salty bite of Parmigiano-Reggiano. Its golden-green hue is visually stunning, making it look as fresh as it tastes.
Ingredients
- 2 cups fresh basil leaves, packed
- 1/2 cup extra virgin olive oil
- 1/3 cup toasted pine nuts
- 2 cloves garlic
- 1/2 cup grated Parmigiano-Reggiano
- Zest and juice of 2 large lemons
- 1/2 teaspoon sea salt
How to make it
- Toast the pine nuts in a dry pan over medium heat for 2-3 minutes until they are fragrant and golden. Watch them closely, as they can burn in seconds.
- In a food processor, pulse the basil, garlic, and toasted pine nuts until they are coarsely chopped.
- While the processor is running on low, slowly drizzle in the olive oil in a steady stream. This emulsifies the oil and creates a creamy, consistent texture.
- Add the lemon zest, lemon juice, and sea salt. Pulse a few more times to combine; adding the acid at the end helps keep the basil from oxidizing and turning brown.
- Transfer to a bowl and fold in the grated cheese by hand. This ensures the cheese maintains some texture rather than being completely pulverized.
How to cook with mulberries?

Why we love this
Mulberries are the hidden gems of the berry world, and cooking with them is an exercise in deep, dark, and delicious flavors. We love their unique, elongated shape and the way they stain everything they touch with a beautiful, royal purple hue. Their flavor is a complex mix of blackberry and plum with a honey-like finish. When cooked down into a compote for a food board, they offer a sophisticated sweetness that pairs perfectly with soft cheeses like brie or camembert.
Ingredients
- 3 cups fresh mulberries (stems removed)
- 1/4 cup honey or maple syrup
- 1 tablespoon balsamic glaze
- 1 teaspoon fresh thyme leaves
- Zest of half an orange
How to make it
- Carefully wash the mulberries and snip off the small green stems with kitchen shears. This is a labor of love but ensures a better texture in the final dish.
- Place the berries in a small saucepan over medium-low heat. Add the honey and a splash of water to get the juices flowing.
- Simmer gently for 10-12 minutes. You don’t want the berries to completely disintegrate; they should be soft and surrounded by a thick, dark syrup.
- Stir in the balsamic glaze and fresh thyme. The balsamic adds a sophisticated acidity that balances the mulberries’ natural sugar, while the thyme adds an earthy note.
- Remove from heat and stir in the orange zest. Serve the warm compote in a small ceramic bowl in the center of a cheese board, surrounded by crackers and slices of baguette.
Conclusion
Creating these viral food boards is more than just a culinary task; it’s an act of love and creativity that transforms a simple gathering into a memorable event. By focusing on fresh, seasonal ingredients and adding a few professional styling touches, you can create a spread that is as beautiful to look at as it is delicious to eat. Remember, the best part of any board is the conversation it sparks and the joy it brings to your guests. So, grab your favorite platter, try out these tips, and let your creativity shine!
Frequently Asked Questions
Find answers to common questions about hosting and board assembly below.