

5-Minute Viral Food Boards You Can Make Tonight
There is something inherently magical about gathering around a table where the food is as beautiful as the conversation. I remember the first time I hosted a dinner and felt that paralyzing panic of wanting everything to be perfect but having absolutely no time to spend hours in the kitchen. We’ve all been there—the clock is ticking, the guests are arriving, and you want to offer something that feels intentional and warm without losing your sanity in the process.
That is why I have become completely obsessed with the ‘viral board’ trend. It’s not just about cheese and crackers anymore; it’s about creating a curated experience that invites people to dig in and stay a while. Whether you are celebrating a big milestone like a graduation or just trying to make a Tuesday night feel like a special occasion with some seasonal rhubarb treats, these ideas are designed to bring that ‘wow’ factor with minimal stress and maximum flavor.
Today, I’m sharing my absolute favorite ways to elevate your hosting game, from the tart zing of homemade rhubarb jam to the perfect graduation-themed centerpiece. These aren’t just recipes; they are building blocks for memories. So, grab your favorite wooden board and let’s dive into these simple, stunning ideas that you can actually pull off tonight.
How to design graduation cakes
Why we love this
There is nothing quite like the silky, velvet-smooth finish of a perfectly designed graduation cake to signal a moment of massive achievement. When you slice into a dense, vanilla-bean sponge layered with airy buttercream, the aroma of toasted sugar fills the room, instantly evoking feelings of pride and celebration. We love this because it combines the structural elegance of a professional centerpiece with the nostalgic, buttery comfort of a home-baked treat, making the graduate feel like the true star of the show.
Ingredients
- Two 8-inch round sponge cakes
- 4 cups vanilla bean buttercream
- Black fondant for the ‘mortarboard’
- Golden edible luster dust
- Food-grade tassel
- Fresh berries for garnish
How to make it
- Level your chilled cake layers using a serrated knife to ensure a perfectly flat surface for stacking.
- Place the first layer on a rotating cake stand and apply a generous half-inch layer of buttercream, spreading it evenly to the edges with an offset spatula.
- Apply a ‘crumb coat’—a very thin layer of frosting over the entire exterior—and chill the cake for 20 minutes until the frosting is firm to the touch.
- Apply the final thick layer of buttercream, using a bench scraper held at a 45-degree angle to create smooth, crisp sides while the turntable spins.
- Roll out the black fondant to a 1/4-inch thickness, cut a 4-inch square, and place it on a small fondant cylinder to create the graduation cap shape.
- Paint the edges of the fondant ‘cap’ with edible gold luster dust mixed with a drop of lemon extract for a metallic finish.
- Place the cap on top of the cake, attach the tassel, and surround the base with fresh berries for a pop of color.
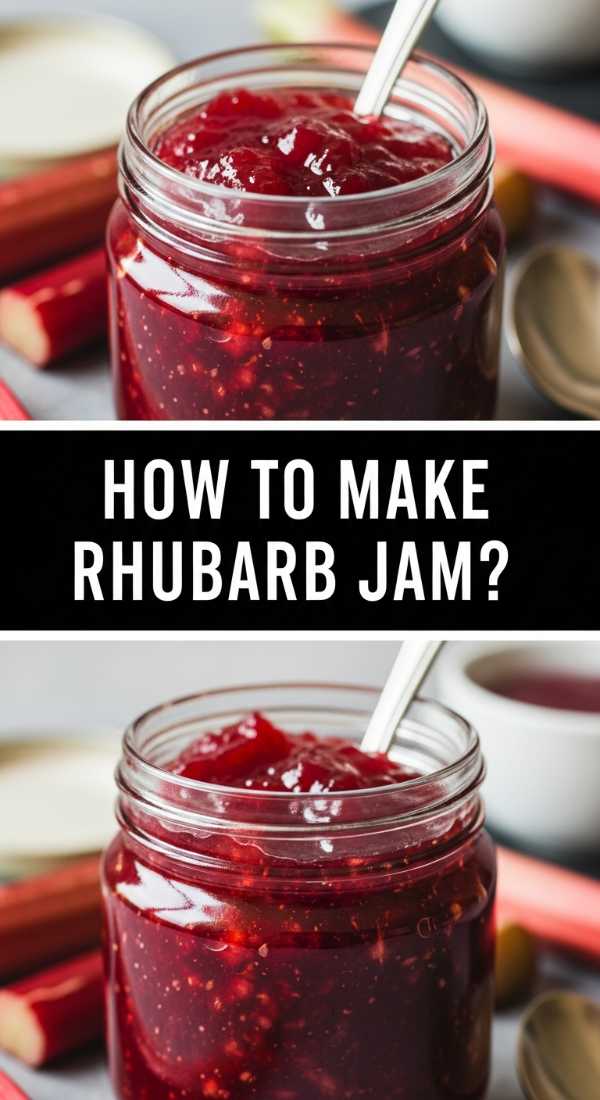
How to make rhubarb jam

Why we love this
This jam is like bottling up the very essence of spring—a vibrant, ruby-red concoction that balances a sharp, electric tartness with a deep, honeyed sweetness. As it simmers on the stove, your kitchen fills with a bright, fruity fragrance that is both refreshing and comforting. We love spreading this over a warm, crusty baguette; the way the jam glows in the light and provides that perfect ‘zing’ against creamy butter is an experience that makes any breakfast feel like a luxury.
Ingredients
- 4 cups fresh rhubarb, chopped into 1/2 inch pieces
- 1.5 cups granulated sugar
- 1 tablespoon fresh lemon juice
- 1 teaspoon vanilla bean paste
- A pinch of sea salt
How to make it
- In a heavy-bottomed stainless steel saucepan, combine the chopped rhubarb, sugar, and lemon juice.
- Let the mixture sit at room temperature for about 30 minutes until the sugar begins to draw the moisture out of the rhubarb, creating a natural syrup.
- Place the pan over medium heat and bring to a gentle simmer, stirring frequently with a wooden spoon to prevent the sugar from scorching.
- Cook for 15-20 minutes, or until the rhubarb has completely broken down and the mixture has thickened to a glossy, jam-like consistency.
- To check for doneness, place a small spoonful on a chilled plate; if it wrinkles when pushed with your finger, it is ready.
- Stir in the vanilla bean paste and salt during the last minute of cooking to preserve their delicate aromatic profiles.
- Carefully pour the hot jam into sterilized glass jars, leaving 1/4 inch of headspace, and allow to cool completely before sealing.
How to bake graduation cupcakes

Why we love this
Graduation cupcakes offer the perfect individual indulgence, featuring a moist, tender crumb that practically melts on the tongue. They are the ultimate party food because they require no plates or forks, allowing guests to mingle while enjoying a handheld masterpiece. We love the contrast between the rich, dark chocolate base and the whimsical, festive toppers that turn a simple dessert into a personalized tribute to the graduate’s hard work and bright future.
Ingredients
- 1.5 cups all-purpose flour
- 1 cup cocoa powder
- 2 large eggs
- 1 cup whole milk
- 1/2 cup melted butter
- High-quality chocolate squares for ‘caps’
- Sour belt candies for ‘tassels’
How to make it
- Preheat your oven to 350°F (175°C) and line a cupcake tin with festive gold or black liners to set a celebratory tone.
- Whisk your dry ingredients in one bowl and your wet ingredients in another, then fold them together gently until just combined—do not overmix, or the cupcakes will be tough.
- Fill each liner about two-thirds full to allow for a perfect domed top that isn’t too tall for decorating.
- Bake for 18-22 minutes; look for a slight spring-back when the center is touched and a toothpick comes out clean.
- While the cupcakes cool on a wire rack, prepare the toppers by placing a flat chocolate square onto a small chocolate truffle using a dab of melted chocolate as glue.
- Attach a thin strip of sour belt candy to the top of the chocolate square to mimic a tassel.
- Pipe a swirl of frosting onto each cooled cupcake and gently press the chocolate ‘cap’ on top.
How to bake rhubarb pie

Why we love this
There is a rustic, timeless beauty to a rhubarb pie, with its golden-brown, flaky lattice crust revealing glimpses of bubbling, crimson filling underneath. The aroma is heavenly—a mix of toasted butter and the sharp, clean scent of cooking fruit that makes your mouth water instantly. We love the way the buttery pastry shatters upon impact, giving way to a filling that is thick, jammy, and unapologetically tart, creating a sensory experience that defines seasonal baking at its best.
Ingredients
- Double pie crust (homemade or store-bought)
- 5 cups sliced rhubarb
- 1.25 cups sugar
- 1/4 cup cornstarch
- 1 tablespoon butter, cubed
- 1 egg (for egg wash)
- Coarse sugar for sprinkling
How to make it
- Roll out the bottom crust on a lightly floured surface and drape it over a 9-inch pie plate, leaving an inch of overhang.
- In a large bowl, toss the rhubarb with sugar and cornstarch until every piece is evenly coated; the cornstarch is vital for thickening those juices.
- Pour the filling into the crust and dot the top with small cubes of butter to add richness to the sauce.
- Roll out the second crust and cut into 1-inch strips, weaving them over the top of the filling to create a traditional lattice pattern.
- Crimp the edges of the pie tightly to seal in the steam and prevent the juices from bubbling over the sides.
- Brush the lattice with a beaten egg wash and sprinkle generously with coarse sugar for a professional, sparkling finish.
- Bake at 400°F for 20 minutes, then reduce heat to 350°F and bake for another 30-40 minutes until the crust is deep golden and the filling is thick and bubbling.
How to decorate summer cookies

Why we love this
Summer cookies are like little canvases of edible sunshine, bringing a bright and cheerful energy to any gathering. The snap of a crisp sugar cookie followed by the sweet, smooth texture of royal icing is purely addictive. We love the vibrant palettes of lemon yellows, seafoam greens, and sunset oranges that make these cookies look almost too good to eat, turning a simple baking project into a creative outlet that captures the carefree spirit of the season.
Ingredients
- Batch of chilled sugar cookies
- Royal icing in multiple colors
- Piping bags and small round tips
- Edible gold leaf or sprinkles
- Toothpicks for marbling
How to make it
- Outline your cookie shapes (like suns, citrus slices, or flowers) with a medium-consistency icing, creating a ‘dam’ to hold the rest of the icing.
- Wait about 2-3 minutes for the outline to set slightly before ‘flooding’ the center with a thinner consistency icing of the same color.
- Use a toothpick to pop any tiny air bubbles and to gently nudge the icing into the corners for a perfectly smooth surface.
- For a marbled look, drop small dots of a contrasting color into the wet icing and drag a toothpick through them in a swirling motion.
- Let the base layer dry completely (usually 4-6 hours or overnight) before adding fine details like citrus segments or flower petals on top.
- Add a touch of edible gold leaf or iridescent sprinkles while the detail icing is still wet for a bit of summer shimmer.
- Allow the cookies to air-dry in a cool, dry place until the icing is hard enough to stack without smudging.
How to host Italian dinner

Why we love this
An Italian dinner is less about the food and more about the feeling of ‘la dolce vita’—the sweet life of slow eating and long conversations. The air is heavy with the scent of roasted garlic, fresh basil, and simmering tomatoes, creating an atmosphere that feels instantly welcoming and warm. We love this because it encourages a family-style approach to dining, where large platters of pasta and carafes of wine are passed around, breaking down barriers and making everyone feel like part of the family.
Ingredients
- Fresh pasta (pappardelle or rigatoni)
- Extra virgin olive oil
- San Marzano tomatoes
- Fresh mozzarella and basil
- Assorted Italian meats (Prosciutto, Salami)
- Crusty focaccia bread
How to make it
- Start by setting the mood: dim the lights, put on some light jazz or Italian opera, and set the table with a simple linen runner and unscented candles.
- Prepare an ‘Antipasto’ board first, featuring thin ribbons of prosciutto, hunks of parmesan cheese, and marinated olives to greet guests as they arrive.
- Boil a large pot of heavily salted water—it should taste like the sea—to cook your pasta to a perfect ‘al dente’ texture.
- In a wide skillet, sauté minced garlic in high-quality olive oil until fragrant, then add crushed San Marzano tomatoes and simmer until the sauce thickens and deepens in color.
- Toss the pasta directly into the sauce, adding a splash of starchy pasta water to emulsify the ingredients into a silky coating.
- Serve the pasta in large, warmed ceramic bowls, garnishing with torn basil leaves and a final drizzle of olive oil.
- Finish the evening with a simple platter of fresh fruit or a tray of espresso to keep the conversation flowing late into the night.
How to make rhubarb crumble

Why we love this
Rhubarb crumble is the ultimate comfort dessert, offering a satisfying play of textures that delights with every bite. The bottom layer is soft, tart, and jammy, while the topping provides a buttery, cinnamon-spiked crunch that contrasts perfectly. We love serving this hot from the oven with a massive scoop of cold vanilla bean ice cream; as the cream melts into the warm fruit, it creates a rich, custard-like sauce that makes this simple dish feel like a five-star indulgence.
Ingredients
- 6 cups chopped rhubarb
- 1/2 cup granulated sugar
- 1 cup rolled oats
- 1 cup brown sugar
- 3/4 cup all-purpose flour
- 1/2 cup cold butter, cubed
- 1 teaspoon cinnamon
How to make it
- Toss the rhubarb with the granulated sugar and spread it evenly into a buttered 9×13 inch baking dish.
- In a separate bowl, combine the oats, brown sugar, flour, and cinnamon, stirring to ensure the spices are evenly distributed.
- Using your fingertips or a pastry cutter, rub the cold butter cubes into the oat mixture until it resembles coarse crumbs with some pea-sized lumps of butter remaining.
- Squeeze handfuls of the crumble together to create larger ‘nuggets’ of topping, which will result in more texture once baked.
- Sprinkle the topping evenly over the rhubarb, making sure not to pack it down, so that air can circulate and create a crisp finish.
- Bake at 375°F (190°C) for 35-45 minutes, or until the fruit juices are bubbling up around the edges and the topping is a deep golden brown.
- Let it rest for 10 minutes before serving to allow the juices to thicken slightly.
How to build graduation boards

Why we love this
Graduation boards are the crown jewel of any party spread, offering an abundant, visual feast that celebrates the sheer variety of life’s next chapters. They are incredibly versatile, allowing you to mix savory cheeses with sweet graduation-themed treats in a way that feels playful yet sophisticated. We love the interactive nature of a board; it invites guests to graze and customize their plates, making the celebration feel relaxed, abundant, and full of life.
Ingredients
- Selection of 3 cheeses (Brie, Sharp Cheddar, Gruyere)
- Graduation-themed cookies or cupcakes
- Grapes, strawberries, and dried apricots
- Crackers and mini breadsticks
- Nuts and dark chocolate pieces
- Small ‘diploma’ scrolls made of rolled parchment
How to make it
- Select a large wooden or marble board as your base and place your largest items first, like the cheeses and any small bowls for dips or nuts.
- Position your ‘hero’ items—the graduation cupcakes or cookies—in different sections of the board to act as focal points.
- Create ‘rivers’ of crackers and breadsticks that wind through the cheeses, providing a sense of movement and flow to the design.
- Fill in the larger gaps with clusters of fresh grapes and strawberries, ensuring that the colors are spread out evenly across the board.
- Tuck in smaller items like almonds, dried fruit, and chocolate pieces to fill every single empty space; an abundant board looks much more appetizing than one with gaps.
- Add decorative elements, like small rolled parchment ‘diplomas’ tied with ribbon, to reinforce the graduation theme.
- Garnish with sprigs of fresh mint or edible flowers for a final touch of professional elegance before serving.
How to make fun coffee

Why we love this
There is a special kind of joy in turning a daily caffeine ritual into a ‘fun coffee’ experience that feels like a treat from a high-end cafe. The sight of swirling caramel, the thick cloud of frothed milk, and the rich aroma of freshly brewed espresso can instantly lift your mood. We love this because it’s a low-cost way to practice self-care, turning five minutes in the kitchen into a moment of pure, decadent bliss that tastes as good as it looks.
Ingredients
- 2 shots of strong espresso or 1/2 cup cold brew concentrate
- 1 cup milk of choice (oat milk froths beautifully)
- 2 tablespoons caramel or vanilla syrup
- Whipped cream
- Chocolate shavings or cinnamon for dusting
How to make it
- Start by drizzling your syrup down the inside walls of a clear glass to create those viral ‘syrup streaks’ that look so beautiful.
- Fill the glass with ice if you’re making an iced version, or pre-warm the glass with hot water for a warm latte.
- Froth your milk using a handheld milk frother or an espresso machine steam wand until you have a thick, micro-foam consistency that holds its shape.
- Brew your espresso directly into the glass (for a hot drink) or pour it slowly over the ice to create distinct layers.
- Gently pour the frothed milk over the coffee; if done slowly, the milk will settle under the coffee, creating a stunning gradient effect.
- Top with a generous swirl of whipped cream, ensuring it sits proudly above the rim of the glass.
- Finish with a sprinkle of chocolate shavings or a dash of cinnamon, and serve with a long spoon or a glass straw.
How to bake rhubarb scones
[IMAGE_10]
Why we love this
Rhubarb scones are the quintessential afternoon tea treat, boasting a crumbly, buttery texture that provides the perfect backdrop for pockets of tart, tender fruit. There’s something incredibly satisfying about the way a scone yields to a dollop of thick clotted cream and a spoonful of jam. We love the rustic, craggy edges that get perfectly crisp in the oven, offering a delightful crunch that gives way to a soft, cream-enriched center that isn’t too sweet.
Ingredients
- 2 cups all-purpose flour
- 1/3 cup sugar
- 1 tablespoon baking powder
- 1/2 cup cold salted butter, grated
- 1 cup fresh rhubarb, finely diced
- 2/3 cup heavy cream (plus extra for brushing)
- 1 teaspoon vanilla extract
How to make it
- Whisk together the flour, sugar, and baking powder in a large bowl to ensure the leavening agent is perfectly distributed for a high rise.
- Grate the cold butter directly into the flour mixture and use a fork to toss it gently; grating the butter ensures even distribution without overworking the dough.
- Fold in the finely diced rhubarb, making sure the pieces are coated in flour so they don’t sink or clump together.
- Make a well in the center and pour in the heavy cream and vanilla, stirring with a fork until a shaggy dough just begins to form.
- Turn the dough onto a lightly floured surface and gently pat it into a 1-inch thick disc—do not knead it, or the scones will become tough and bread-like.
- Cut the disc into 8 wedges using a sharp knife or a bench scraper, and place them on a parchment-lined baking sheet with space between them.
- Brush the tops with a little extra heavy cream and bake at 400°F (200°C) for 15-18 minutes until the tops are golden and the scones have doubled in height.
The Joy of Simple Hosting
At the end of the day, the best part of any ‘viral’ food board or homemade treat isn’t the aesthetic—it’s the way it makes people feel. Whether you’re celebrating a graduate’s journey or simply the arrival of spring rhubarb, these recipes prove that you don’t need a professional kitchen to create something extraordinary. So tonight, take five minutes, assemble something beautiful, and enjoy the magic of sharing a meal with the people you love.