

We’ve all been there—that frantic twenty minutes before guests arrive where you realize the snacks you planned look a bit… beige. But what if I told you that the secret to a viral-worthy, Pinterest-perfect spread isn’t a fleet of professional caterers or a three-day prep schedule? It’s all about the humble vegetable, transformed by the magic of high heat and a little bit of kitchen confidence. Today, we are mastering the ‘Ultimate No-Fail Food Board’ using the power of roasting to create textures and flavors that will have your friends reaching for their phones to snap a photo before they even take a bite.
The beauty of a vegetable-forward board is the sheer vibrancy it brings to your table. We’re moving past raw carrot sticks and cold ranch dip. We’re talking about charred, crispy edges, honey-glazed sweetness, and the kind of deep, caramelized flavors that only happen when a hot oven works its magic. Whether you’re hosting a cozy weekend brunch or a sophisticated evening wine night, these techniques will turn simple produce into the star of the show. Let’s dive into the art of the roast.
How to roast seasonal vegetables

Why we love this
There is something inherently soul-soothing about a pan of seasonal vegetables glistening under the oven light, their vibrant colors deepening into rich, jewel-toned hues. The aroma that fills your kitchen is nothing short of intoxicating—a heady mix of earthy sweetness and the savory scent of toasted herbs that promises a meal made with love. Each bite offers a satisfying contrast between the tender, melt-in-your-mouth interior and the slightly charred, crispy edges that hold all the concentrated flavor of the harvest. It’s a rustic, beautiful way to celebrate the changing seasons on a single plate, making even the simplest weeknight feel like a special occasion.
Ingredients
- 2 lbs mixed seasonal vegetables (butternut squash, Brussels sprouts, parsnips)
- 3 tbsp high-quality extra virgin olive oil
- 1 tsp sea salt
- 1/2 tsp cracked black pepper
- 2 sprigs fresh rosemary or thyme
How to make it
- Begin by preheating your oven to 425°F (220°C). This high temperature is essential to ensure the vegetables roast and brown rather than steaming in their own moisture.
- Prep your vegetables by cutting them into uniform 1-inch pieces. Consistency is the secret to ensuring every bite is cooked perfectly at the same time; if pieces vary too much in size, the small ones will burn while the large ones remain crunchy.
- Place the vegetables in a large mixing bowl and drizzle with olive oil. Use your hands to toss them thoroughly, ensuring every crevice is coated in oil, which acts as the heat conductor for that perfect golden finish.
- Spread the vegetables onto a heavy-duty rimmed baking sheet. Crucial tip: Do not crowd the pan. There should be visible space between each piece of vegetable to allow the hot air to circulate.
- Roast for 25-35 minutes, tossing once halfway through. Look for the visual cue of deep golden-brown edges and a fork-tender center. Remove from the oven and serve immediately while the textures are at their peak.
How to make crispy broccoli

Why we love this
If you think you don’t like broccoli, it’s likely because you haven’t experienced it transformed into these crispy, popcorn-like florets that shatter with a delightful crunch. The high heat of the oven turns the delicate tips of the broccoli into savory, charred blossoms while the stems remain tender and sweet. It’s a sensory experience that balances the bitter notes of the brassica with a nutty, toasted finish that is utterly addictive. This isn’t just a side dish; it’s a snackable, viral-worthy component that adds incredible height and texture to any food board.
Ingredients
- 2 large heads of broccoli, cut into small florets
- 4 tbsp avocado oil (high smoke point)
- 1 tsp garlic powder
- 1/2 tsp kosher salt
- Optional: Zest of one lemon
How to make it
- Preheat your oven to 450°F (230°C). A very hot oven is the only way to achieve the ‘crispy’ factor without overcooking the interior into a mushy state.
- Ensure your broccoli florets are completely dry. If you wash them, use a salad spinner or pat them down with a lint-free towel; moisture is the enemy of crispiness as it creates steam.
- In a bowl, toss the florets with avocado oil, garlic powder, and salt. Avocado oil is preferred here because it can handle the 450-degree heat without smoking or breaking down.
- Arrange the florets on a pre-heated baking sheet. Placing the veggies on a hot pan gives them an immediate sear on the bottom.
- Roast for 15-20 minutes. You are looking for the tips of the florets to turn dark brown, almost black in some spots. This char is where the ‘crispy’ flavor lives. Finish with a zest of lemon for a bright, acidic pop.
How to glaze roasted carrots

Why we love this
These glazed carrots are the epitome of elegance, boasting a glossy, shimmering finish that looks like it came straight out of a high-end bistro kitchen. The natural sugars in the carrots are amplified by a touch of honey or maple syrup, creating a sticky, decadent coating that clings to every inch of the root vegetable. As they roast, the glaze thickens and caramelizes, offering a complex flavor profile that is simultaneously earthy, sweet, and deeply savory. They provide a beautiful pop of bright orange to your food board, inviting guests to experience the luxurious side of simple garden produce.
Ingredients
- 1 lb slender bunch carrots, tops trimmed to 1 inch
- 2 tbsp melted butter or olive oil
- 2 tbsp honey or pure maple syrup
- 1/2 tsp sea salt
- A pinch of red pepper flakes
How to make it
- Set your oven to 400°F (200°C). This slightly lower temperature (compared to broccoli) prevents the sugars in the glaze from burning before the carrots are tender.
- Whisk together your melted butter, honey, salt, and red pepper flakes in a small bowl until fully emulsified.
- Lay the carrots on a parchment-lined baking sheet. The parchment is a ‘pro-tip’ here because the honey glaze will get sticky and can be difficult to clean off a bare metal pan.
- Brush half of the glaze onto the carrots, ensuring they are well-coated. Roast for 15 minutes.
- Remove the pan, brush the remaining glaze onto the carrots, and flip them over. Roast for another 10-15 minutes until the carrots are tender when pierced with a knife and the glaze is bubbling and thick.
How to make vegetable soup

Why we love this
There is nothing more comforting than a steaming bowl of vegetable soup, where the essence of the garden is captured in a rich, velvety broth that warms you from the inside out. By using roasted vegetables as the base, the soup takes on a depth of flavor that raw vegetables simply cannot replicate—a smokiness and a concentrated sweetness that feels sophisticated and layered. The aroma of simmering onions, carrots, and garlic creates an atmosphere of home and hearth, making it the perfect liquid accompaniment to a crusty loaf of bread on your viral food board. It’s a hug in a bowl, refined for the modern palate.
Ingredients
- 4 cups roasted mixed vegetables (carrots, onions, squash)
- 4 cups high-quality vegetable stock
- 2 cloves roasted garlic
- 1 tsp dried thyme
- Salt and pepper to taste
How to make it
- Begin by roasting your base vegetables (carrots, onions, and squash) at 400°F until they are deeply browned and soft. This ‘pre-roasting’ step is what sets viral soup recipes apart from the bland versions.
- Transfer the roasted vegetables and any juices from the pan into a large heavy-bottomed pot or a Dutch oven.
- Add the vegetable stock and roasted garlic. Bring the mixture to a gentle simmer over medium heat. Do not let it reach a rolling boil, as this can dull the vibrant flavors of the roasted produce.
- Use an immersion blender to puree the soup directly in the pot until it reaches a silky-smooth consistency. If you prefer a rustic soup, only blend half of the mixture.
- Taste and adjust seasoning with salt, pepper, and a splash of cream or coconut milk if you want added decadence. Serve in small cups as part of your food board presentation.
How to perfect roasted vegetables

Why we love this
Perfectly roasted vegetables are the hallmark of a confident home cook, offering a masterclass in the balance of temperature, timing, and seasoning. When done right, each piece is a tiny miracle of texture: a crisp, savory exterior that gives way to a creamy, succulent interior that tastes like the very best version of itself. The visual appeal is undeniable, with deep browns and charred ambers that suggest a level of culinary skill that is actually quite easy to achieve once you know the secrets. Mastering this technique ensures that every component of your viral food board is a standalone star.
Ingredients
- Any variety of firm vegetables (potatoes, cauliflower, beets)
- 3 tbsp fat (duck fat, tallow, or olive oil)
- Flaky sea salt
- Fresh cracked black pepper
How to make it
- The first secret to perfection is the ‘Dry Phase.’ Ensure your vegetables are bone-dry before the oil ever touches them. Use a paper towel to remove every drop of moisture to prevent steaming.
- Preheat your baking sheet in a 425°F oven. Adding vegetables to a hot surface creates an immediate sear, which prevents sticking and starts the browning process instantly.
- Use enough oil to coat, but not drown. The vegetables should look shiny, but there shouldn’t be a pool of oil at the bottom of the bowl.
- Give them space! Arrange the vegetables in a single layer with at least a half-inch of space between them. If they touch, they steam; if they are separate, they roast.
- Trust the timer but use your eyes. Roast until the bottoms are dark golden brown before you even think about flipping them. This usually takes at least 20 minutes of undisturbed heat.
How to season roasted broccoli
Why we love this
Seasoning is the bridge between a simple side dish and a viral sensation, and when it comes to roasted broccoli, the possibilities for flavor explosion are endless. By layering seasonings both before and after roasting, you create a complex taste profile that hits every part of the palate—salty, spicy, acidic, and savory. The way the spices nestle into the charred florets ensures that every bite is a concentrated burst of flavor that keeps guests coming back for more. It transforms a basic green vegetable into a sophisticated delicacy that anchors the savory section of your food board with style.
Ingredients
- 1 lb broccoli florets
- 2 tbsp olive oil
- 1 tsp smoked paprika
- 1/2 tsp red pepper flakes
- 2 tbsp grated parmesan cheese
- Juice of 1/2 lemon
How to make it
- Toss the broccoli florets with olive oil, smoked paprika, and red pepper flakes before roasting. The paprika will toast in the oven, releasing a deep, smoky aroma that permeates the vegetable.
- Roast at 425°F (220°C) for 18-22 minutes until the edges are crispy and charred.
- Immediately upon removing the pan from the oven, while the broccoli is still sizzling, sprinkle the grated parmesan cheese over the top. The residual heat will melt the cheese into the nooks and crannies of the florets.
- Squeeze fresh lemon juice over the entire tray. The acidity cuts through the richness of the oil and cheese, brightening the entire flavor profile.
- Toss gently to combine the melted cheese and lemon juice, then transfer to your food board immediately for the best texture.
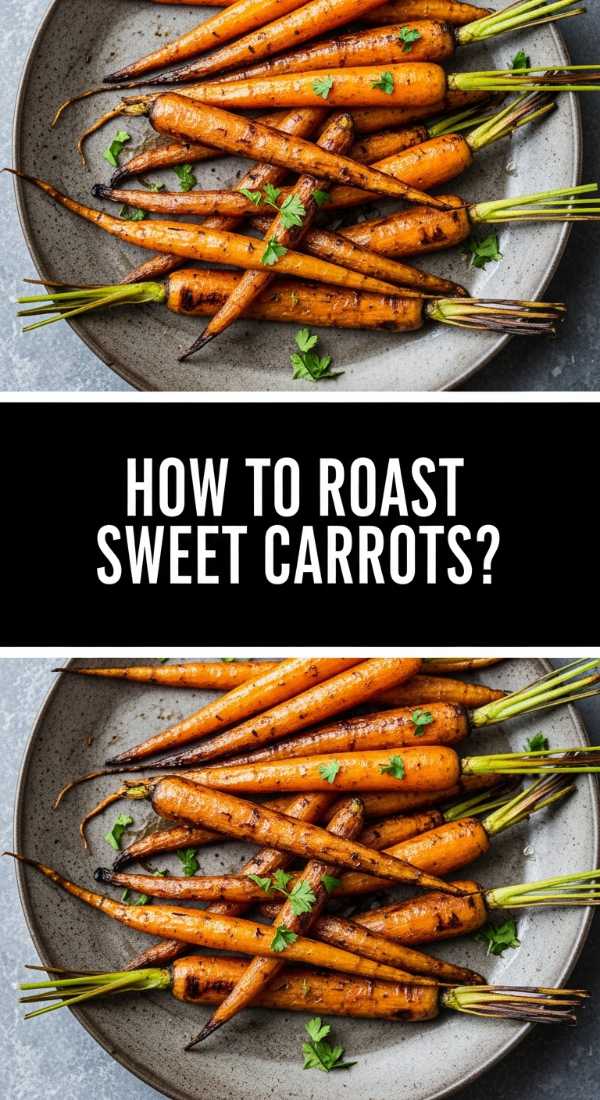
How to roast sweet carrots

Why we love this
Roasting sweet carrots is like making nature’s candy; the process of slow-roasting draws out the intrinsic sugars until they reach a state of caramelized perfection. These carrots aren’t just sweet, though—they carry an earthy depth that makes them feel substantial and sophisticated rather than just a sugary snack. Their tender, yielding texture makes them a joy to eat, especially when paired with creamy dips or sharp cheeses on a food board. The way they glisten under the light adds a touch of culinary ‘jewelry’ to your spread, making the entire board look expensive and thoughtfully prepared.
Ingredients
- 1 lb carrots (peeled and sliced into rounds or batons)
- 1 tbsp maple syrup
- 1 tbsp brown sugar
- 2 tbsp melted coconut oil
- 1/4 tsp cinnamon
How to make it
- Preheat your oven to 375°F (190°C). For ‘sweet’ carrots, a slightly lower temperature is better to allow the sugars to caramelize slowly without the bitterness of charring.
- In a bowl, combine the carrots with coconut oil, maple syrup, brown sugar, and a hint of cinnamon. The cinnamon adds a warmth that complements the natural carrot flavor beautifully.
- Spread the carrots in a single layer on a parchment-lined baking sheet. Ensure they are not overlapping to allow for even heat distribution.
- Roast for 30-40 minutes. Because of the lower temperature and the sugar content, you want to give them time to become very tender and for the glaze to set into a tacky, sweet coating.
- Check for a ‘glossy’ appearance and a slight wrinkling of the carrot skin—this is the visual cue that the sugars have concentrated perfectly.
How to roast soup vegetables

Why we love this
Roasting vegetables specifically for soup is a game-changer that adds a layer of ‘umami’ and smoke that boiling simply cannot achieve. This technique allows you to use larger, more rustic cuts of vegetables, letting the oven do the hard work of breaking down fibers and intensifying flavors before they even hit the pot. The scent of onions and garlic roasting together is the ultimate ‘welcome home’ aroma, signaling a meal that is hearty, healthy, and deeply flavorful. It’s the foundational secret of every viral soup recipe, providing a rich base that makes the final dish taste like it’s been simmering for days.
Ingredients
- 3 large carrots, 2 onions, 4 stalks celery
- 1 head of garlic (top sliced off)
- 3 tbsp olive oil
- Salt and pepper
How to make it
- Preheat your oven to 400°F (200°C). Prepare your vegetables by cutting them into large, chunky pieces—size matters less here than in other roasting techniques because they will eventually be blended.
- Drizzle the vegetables heavily with olive oil and season generously with salt and pepper. Place the head of garlic on a piece of foil, drizzle with oil, wrap it up, and place it on the tray with the other veggies.
- Roast for 45 minutes. You are looking for ‘hard’ roasting here—dark brown spots on the onions and soft, caramelized carrots are the goals.
- The garlic is done when the cloves are soft and can be squeezed out of their skins like paste. This ‘roasted garlic paste’ is the secret ingredient for the best soup texture.
- Once roasted, let the vegetables cool slightly before transferring them to your stock pot. This ensures you don’t lose any of the flavorful oils or caramelized bits (fond) stuck to the pan—deglaze the pan with a little water to get every bit!
How to caramelize roasted vegetables

Why we love this
Caramelization is the chemical magic that happens when heat meets sugar, and in the world of roasted vegetables, it is the ultimate goal for flavor-seekers. This process transforms ordinary produce into something extraordinary, with a rich, mahogany-colored exterior and a taste that is deeply sweet and savory all at once. The texture becomes slightly chewy and intensely flavorful, providing a satisfying ‘bite’ that stands up beautifully against soft cheeses or creamy dips on a board. It’s the difference between a ‘good’ vegetable and one that guests will be talking about long after the party is over.
Ingredients
- 2 lbs root vegetables (onions, beets, sweet potatoes)
- 4 tbsp balsamic vinegar
- 2 tbsp brown sugar
- 3 tbsp olive oil
- 1 tsp sea salt
How to make it
- Preheat your oven to 400°F (200°C). To achieve true caramelization, you need a balance of heat and time; too hot and they burn, too low and they just soften.
- The secret to deep caramelization is a touch of added sugar and acidity. Whisk the balsamic vinegar and brown sugar together with the olive oil before tossing with your vegetables.
- Place the vegetables on a dark-colored baking sheet if possible, as dark metal absorbs more heat and promotes faster browning.
- Roast for 40-50 minutes, turning every 15 minutes. This frequent turning ensures that all sides of the vegetables come into contact with the hot pan and the concentrated glaze.
- Look for a ‘syrupy’ appearance on the vegetables and a deep, dark brown color. The vegetables should look slightly shrunken as their moisture has evaporated, leaving behind concentrated flavor.
How to roast balsamic vegetables
[IMAGE_10]
Why we love this
Balsamic roasted vegetables offer a sophisticated tang and a stunning, dark aesthetic that makes any food board look instantly more high-end. The vinegar reduces in the heat of the oven, transforming from a thin liquid into a thick, syrupy glaze that coats each piece in a mouth-watering combination of sweet and tart. It’s a bold flavor profile that pairs exceptionally well with salty elements like prosciutto or feta cheese, creating a balanced and exciting eating experience. The deep, dark glaze provides a beautiful visual contrast to lighter elements on your board, making it as pleasing to the eye as it is to the tongue.
Ingredients
- 1 lb Brussels sprouts or bell peppers
- 3 tbsp balsamic glaze (or reduced balsamic vinegar)
- 2 tbsp olive oil
- 2 cloves minced garlic
- 1/2 tsp salt
How to make it
- Preheat your oven to 425°F (220°C). High heat is necessary to reduce the balsamic quickly and create that signature sticky coating.
- Toss your vegetables with olive oil, garlic, and salt first. Do not add the balsamic yet, as the high sugar content can cause it to burn if it’s in the oven for the entire duration.
- Roast the vegetables for about 15-20 minutes until they are nearly tender and starting to brown.
- Remove the tray and drizzle the balsamic glaze over the vegetables, tossing well to coat every piece.
- Return to the oven for a final 5-8 minutes. Watch closely! The goal is for the balsamic to bubble and thicken into a glaze that sticks to the vegetables, not to let it turn into a burnt crust. Serve immediately for a glossy, viral look.
Conclusion
Creating a viral food board is less about following a strict recipe and more about embracing the textures and colors of perfectly roasted vegetables. By mastering these ten techniques, you have a toolkit that allows you to transform any seasonal produce into a show-stopping centerpiece. Remember, the key is high heat, plenty of space on the pan, and the confidence to let those edges get a little charred. Now, grab your favorite wooden board, arrange your roasted masterpieces, and get ready for the compliments to roll in!