

Say ‘I Do’ to Style: The Ultimate Guide to Fun Bridal Nails
Hi, my sweet loves! There is something so incredibly heart-fluttering about the weeks leading up to your wedding day. Between the floral arrangements and the dress fittings, it’s easy to get swept up in the big details, but today, I want to talk about that tiny, shimmering detail that will be front and center when you finally say those two magical words: your bridal nails. Your hands are going to be holding your bouquet, wiping away happy tears, and showing off that gorgeous new ring, so they deserve a little extra love and a whole lot of style.
I believe your wedding nails should feel like a cloud-soft embrace—delicate, personal, and a reflection of the joy radiating from your soul. Whether you’re a minimalist who loves a clean glow or a daring bride who wants a touch of whimsy, this guide is my little love letter to you. Let’s find the perfect look that makes you feel like the most beautiful version of yourself as you walk toward your forever.
5 Easy Steps to Fun Bridal Nails
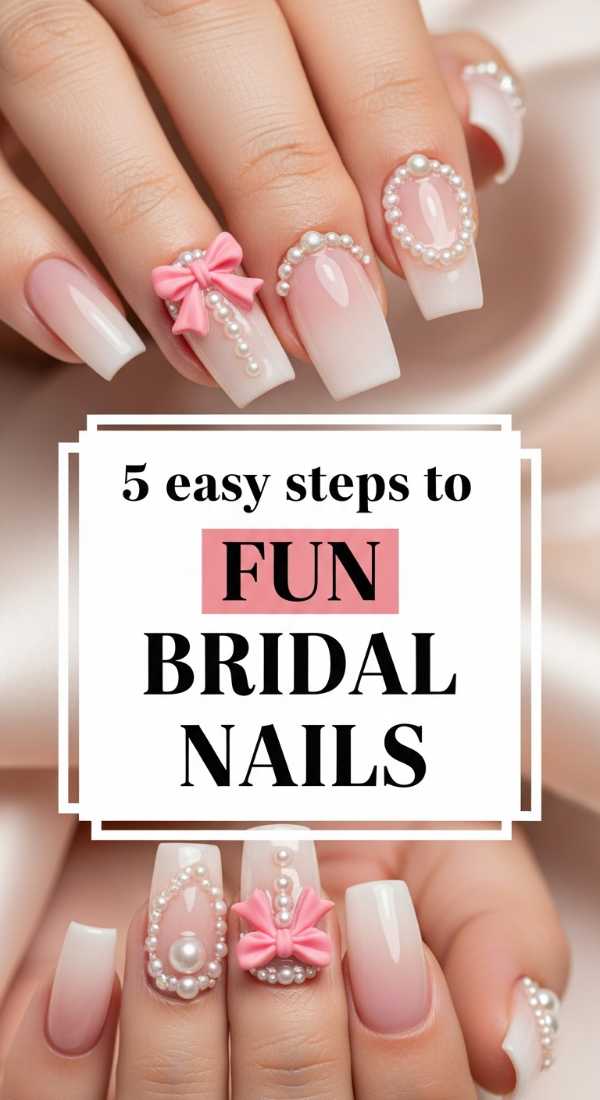
Why to love these Nails:
Oh, my loves, these nails are all about bringing a playful spirit to your classic bridal look. We’re moving beyond the traditional French tip and embracing subtle textures and tiny pops of personality that make your heart skip a beat every time you look down at your bouquet.
Essential Items:
- Sheer peach or blush polish
- Iridescent top coat
- Fine-line nail brush
- Tiny pearl decals
- Nail glue
How to Prepare:
- Cleanse your nails with a gentle remover to ensure a smooth canvas.
- Apply a base coat to protect your natural nail.
- Paint two thin layers of your chosen sheer blush shade.
- Use the fine-line brush to add tiny dots of iridescent polish near the cuticle.
- Place one pearl decal on your ring finger and seal everything with a high-shine top coat.
Budget Range
- Essie ‘Sugar Daddy’ Polish: $9.00
- Nail Art Pearl Kit: $6.00
- Seche Vite Top Coat: $10.00
Paint Short Bridal Nails in 3 Phases

Why to love these Nails:
Short nails are so incredibly chic and practical! They give off an ‘effortlessly elegant’ vibe that feels modern and approachable. This three-phase approach ensures they look polished and purposeful, even with less length to work with.
Essential Items:
- Nail file (glass preferred)
- Milky white polish
- Cuticle oil
How to Prepare:
- Phase 1: Shape the nails into a soft oval to elongate the look of the fingers.
- Phase 2: Apply two coats of a milky, semi-translucent white for a clean, ‘clean-girl’ aesthetic.
- Phase 3: Massage a drop of cuticle oil into each finger for a healthy, bridal glow.
Budget Range
- OPI ‘Funny Bunny’: $11.00
- Glass Nail File: $8.00
- CND SolarOil: $13.00
Master Bridal Nails Square Shape in 4 Moves

Why to love these Nails:
There is a bold, structural beauty in a square shape that I just adore. It’s sophisticated and provides the perfect ‘frame’ for your engagement ring. It’s a timeless choice for the bride who wants her nails to look strong and polished.
Essential Items:
- Straight-edge nail clippers
- Buffing block
- Neutral taupe polish
- Strengthening base coat
How to Prepare:
- Clip the nails straight across in one clean movement.
- File the edges lightly to remove any sharpness while maintaining the square line.
- Buff the surface gently to create a mirror-smooth base.
- Apply your taupe polish, ensuring even coverage from edge to edge.
Budget Range
- Revlon Nail Clippers: $5.00
- Zoya ‘Chantal’ Polish: $12.00
- Orly Bonder Base Coat: $12.00
Get Simple Bridal Nails in 5 Minutes

Why to love these Nails:
For my busy brides who are juggling a million things, this 5-minute magic is for you! It’s all about enhancing your natural beauty with a ‘your nails but better’ finish that looks stunning in photos without the salon wait time.
Essential Items:
- Tinted nail strengthener
- Quick-dry spray
- Buffer
How to Prepare:
- Give your nails a quick 30-second buff to bring out their natural shine.
- Push back cuticles gently with a soft towel.
- Apply one coat of tinted strengthener for a hint of pink.
- Apply a second coat immediately.
- Mist with quick-dry spray and you are ready to go!
Budget Range
- Olive & June ‘Pink Goldfish’: $9.00
- Elegant Touch Quick Dry Spray: $7.00
- Sally Hansen Cuticle Pusher: $4.00
Style Bridal Nails Wedding Ready in 6 Steps

Why to love these Nails:
This process is like a mini-spa day for your hands. It’s about more than just the color; it’s about the ritual of preparing yourself for the most beautiful day of your life. These steps ensure your hands feel soft and your nails look absolutely royal.
Essential Items:
- Exfoliating hand scrub
- Moisturizing mask
- Champagne-toned polish
- Gold foil flakes
How to Prepare:
- Exfoliate your hands to reveal glowing skin.
- Apply a hydrating mask for 10 minutes.
- Apply a ridge-filling base coat.
- Paint two coats of champagne shimmer.
- Dab a tiny bit of gold foil onto the tips for a ‘dipped in gold’ effect.
- Finish with a gel-effect top coat for longevity.
Budget Range
- Lush ‘Salt and Peppermint’ Scrub: $15.00
- ILNP ‘Birthday Suit’ Polish: $10.00
- Nail Gold Foil Set: $5.00
3 Ways to Embellish Fun Bridal Nails

Why to love these Nails:
Sometimes, we just want a little extra sparkle, don’t we? Embellishments are like the jewelry for your nails. These three methods allow you to add texture and light-catching elements that will shimmer as you exchange rings.
Essential Items:
- Swarovski crystals (tiny)
- Silver striping tape
- Fine glitter dust
How to Prepare:
- Option 1: Place a single crystal at the base of the ring finger for a ‘hidden’ sparkle.
- Option 2: Use silver tape to create a thin vertical line down the center for a modern, elongated look.
- Option 3: Dust fine glitter over the tips of a wet top coat for a soft ombre effect.
Budget Range
- Small Crystal Mix: $8.00
- Nail Art Striping Tape: $4.00
- Holotaco ‘Reflective’ Topper: $13.00
Prep Short Bridal Nails for Your Big Day in 7 Steps
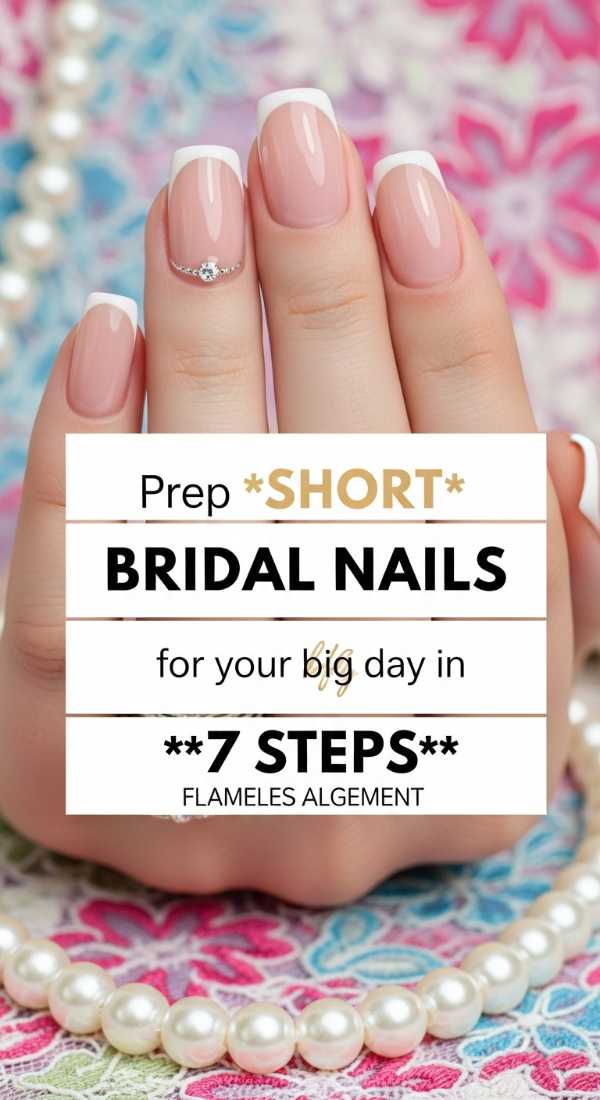
Why to love these Nails:
Prep is the secret ingredient to any lasting look. For short nails, the focus is on the health of the nail bed and the surrounding skin. This 7-step routine ensures your hands look manicured and intentional, no matter the length.
Essential Items:
- Cuticle remover gel
- Wooden orange sticks
- Hand cream with SPF
- Glass file
How to Prepare:
- Apply cuticle remover and wait 60 seconds.
- Gently push back cuticles with the orange stick.
- File nails into a uniform rounded-square shape.
- Wash hands thoroughly to remove oils.
- Apply an SPF hand cream to prevent any redness from sun exposure.
- Apply a nourishing base coat.
- Finish with a clean, clear gloss for a healthy glow.
Budget Range
- Blue Cross Cuticle Remover: $6.00
- Supergoop! Hand Screen: $14.00
- Essie ‘Good to Go’ Top Coat: $10.00
Build Bridal Nails Square with 5 Luxury Tips

Why to love these Nails:
Luxury is a feeling, and these tips are designed to give you that high-end, salon-quality finish right at home. The square shape, when executed with precision, looks incredibly expensive and sophisticated for a formal wedding.
Essential Items:
- High-quality ridge filler
- Full-coverage cream polish (nude)
- Precision cleanup brush
- Acetone
How to Prepare:
- Apply the ridge filler to create an even, porcelain-like surface.
- Paint the first coat of nude cream polish, leaving a tiny gap at the cuticle.
- Apply the second coat, focusing on capping the square edges to prevent chipping.
- Dip the cleanup brush in acetone to create a perfect, crisp line around the cuticle.
- Finish with a thick, ‘plumping’ top coat for a gel-like look.
Budget Range
- Butter London ‘Nail Foundation’: $18.00
- Deborah Lippmann ‘Gel Lab Pro’ Polish: $20.00
- Pure Acetone: $5.00
4 Secrets to Simple Bridal Nails that Shine

Why to love these Nails:
Sometimes the most ‘quiet’ looks are the loudest. These secrets are all about achieving that ‘lit-from-within’ glow that looks angelic under the soft lights of a wedding venue. It’s simple, refined, and utterly romantic.
Essential Items:
- Pearl-essence polish
- Lavender-tinted base (to brighten)
- Glow-enhancing top coat
How to Prepare:
- Secret 1: Use a lavender base to neutralize any yellowing in the natural nail.
- Secret 2: Apply a single, very thin coat of pearl polish for a sheer shimmer.
- Secret 3: Double-coat the top coat for extra depth.
- Secret 4: Ice your nails (dip in cold water) after 5 minutes to set the shine instantly.
Budget Range
- Londontown ‘Kur’ Illuminator: $20.00
- Chanel ‘Le Vernis’ (Sheer): $32.00
- Bowl of ice water: Free!
Create Bridal Nails Wedding Glam in 3 Easy Steps

Why to love these Nails:
Are you a glam girl at heart? This look is for the bride who wants to make a statement. It’s high-shine, high-impact, and totally photo-ready, yet it’s surprisingly simple to achieve when you focus on the right products.
Essential Items:
- Silver holographic polish
- Full-coverage white base
- Luxe top coat
How to Prepare:
- Apply a solid white base to make the colors pop.
- Layer a holographic ‘crushed diamond’ polish over the top.
- Seal with the thickest top coat you have for a glass-like finish.
Budget Range
- OPI ‘Alpine Snow’: $11.00
- KBShimmer Holographic Polish: $12.00
- Seche Vive Gel Effect: $12.00
Wrapping Your Big Day Dreams in Sparkle
As you prepare to walk down that aisle, remember that these small details—like the shade of your polish or the shape of your nails—are just reflections of the beautiful light you already carry. Whether you chose a simple glow or a glam shimmer, your hands are now ready to hold the hand of your partner as you begin your new life together. I hope this guide made you feel a little more pampered and a lot more excited for your big day. You are going to be a breathtaking bride, my loves! Sending you all my heart and a sprinkle of wedding magic.
Frequently Asked Questions
- How far in advance should I do my bridal nails?
- I always recommend doing your nails 1-2 days before the wedding. This ensures they are fresh and chip-free, but gives you one less thing to worry about on the actual morning of the ceremony!
- Should my toe nails match my finger nails?
- They don’t have to be identical, my love! A beautiful way to coordinate is to stay in the same color family—perhaps a solid version of your bridal color on your toes if your fingers have embellishments.
- What if I chip a nail on the wedding morning?
- Don’t panic! Always keep your ’emergency kit’ (the polish and top coat you used) in your bridal bag. A quick dab and a layer of top coat will fix it in seconds.
- Can I wear dark colors for bridal nails?
- Absolutely! While soft tones are traditional, a deep burgundy or a classic red can look incredibly stunning and sophisticated, especially for winter or evening weddings.