

Polish Perfection: Your Complete Guide to Bridal Nail Art
Oh, my loves, is there anything more magical than that fleeting, heart-fluttering moment when you first see your ring glimmering in the soft morning light? As you prepare to walk down the aisle, every little detail feels like a whispered promise of the life you’re about to build. From the delicate lace of your veil to the scent of your bouquet, your bridal look is a reflection of your soul’s softest corners.
Today, I want to hold your hand—literally!—as we dive into the world of bridal nail art. Your hands will be at the center of so many precious memories: holding your partner’s hand during the vows, slicing that beautiful cake, and of course, showing off that new sparkle. Let’s find the perfect shade and shape that makes you feel like the radiant, ethereal queen you truly are.
Whether you’re dreaming of something classic and timeless or a look that’s a bit more playful and ‘you,’ I’ve curated the ultimate gallery to inspire your big day. Let’s get you polished to perfection, darling.
The Ultimate Bridal Nail Gallery: 5 Easy Steps for Fun Bridal Nails
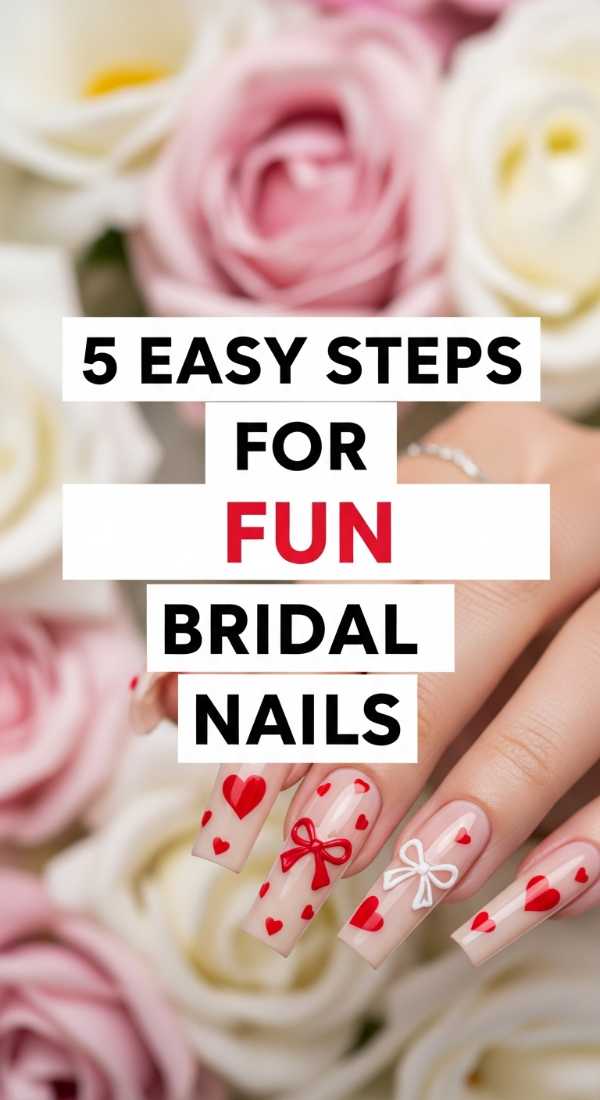
Why to love these Nails:
Sometimes, your wedding day just needs a little extra sparkle and a dash of your vibrant personality! Fun bridal nails are all about breaking tradition just enough to show off your joyful spirit. They bring a playful energy to your photos and make every ‘cheers’ feel like a celebration of your unique love story.
Essential Items:
- Holographic top coat
- Tiny star or heart decals
- A soft peach base polish
- Precision tweezers
- High-shine gel top coat
How to Prepare:
- Apply a nourishing base coat to protect your natural nails.
- Paint two thin layers of your peach base and let dry completely.
- Use tweezers to carefully place your decals on the ring finger.
- Apply a light dusting of holographic shimmer over the tips.
- Seal the magic with a thick layer of high-shine top coat.
Budget Range
- Essie ‘Birthday Girl’ Polish – $10.00
- Olive & June Nail Art Stickers – $8.00
- Sally Hansen Insta-Dri Top Coat – $7.00
4 Ways to Style Short Bridal Nails

Why to love these Nails:
There is a quiet, understated elegance in short nails that I just adore. They feel practical yet incredibly sophisticated, allowing your natural beauty (and that gorgeous ring!) to take center stage. Plus, you won’t have to worry about a single snag while you’re dancing the night away!
Essential Items:
- Glass nail file
- Cuticle oil (lavender scented)
- Sheer milky white polish
- Rose gold striping tape
How to Prepare:
- Shape nails into a soft round or oval using the glass file.
- Soak cuticles and gently push them back for a clean canvas.
- Apply two coats of sheer milky white for a ‘your nails but better’ look.
- Add a single horizontal line of rose gold tape near the base for a modern touch.
Budget Range
- OPI ‘Funny Bunny’ Polish – $11.50
- Flowery Glass Nail File – $5.00
- Cuccio Revitalize Oil – $9.00
3 Techniques for Bridal Nails Square

Why to love these Nails:
Square nails offer such a clean, modern architecture that feels both bold and grounded. They provide a wonderful wide canvas for intricate designs while maintaining a structural look that photographs beautifully against a crisp white gown.
Essential Items:
- Professional grit nail file
- Creamy ivory polish
- Matte top coat
- White acrylic paint and fine brush
How to Prepare:
- File straight across the top and lightly soften the corners.
- Apply a base of creamy ivory and allow to set.
- Use the fine brush to paint delicate lace patterns on the corners.
Budget Range
- Zoya ‘Abby’ Polish – $12.00
- Artelll Detail Brush Set – $12.00
- CND Vinylux Matte Top Coat – $10.50
6 Tips to Achieve Simple Bridal Nails

Why to love these Nails:
Simple nails are like a soft cloud—weightless, beautiful, and effortlessly dreamy. This look is for the bride who wants to feel like herself, only slightly more polished. It’s the ultimate choice for a minimalist or boho-chic wedding aesthetic.
Essential Items:
- Buffing block
- Nude polish matching your skin undertone
- Quick-dry spray
- Moisturizing hand mask
How to Prepare:
- Start with a hydrating hand mask the night before.
- Buff nails to a natural shine before applying any color.
- Apply one thin coat of nude polish.
- Focus on the edges to ensure no streaking occurs.
- Finish with quick-dry spray for an instant set.
- Always carry a small bottle of lotion for photo-ready hands.
Budget Range
- Deborah Lippmann ‘Fashion’ Polish – $20.00
- Aveeno Repairing Hand Mask – $4.00
- Butter London Quick Dry Drops – $18.00
5 Methods to Master Bridal Nails Wedding

Why to love these Nails:
This is the quintessential ‘wedding’ look—the one that feels like royalty. It combines tradition with high-end salon techniques to ensure your manicure lasts through the ceremony, the reception, and well into your honeymoon bliss.
Essential Items:
- UV/LED Lamp (if doing gel)
- Soft pink gel builder
- Pearl pigments
- Lint-free wipes
- Alcohol cleanser
How to Prepare:
- Cleanse the nail plate thoroughly with alcohol.
- Apply a base gel and cure under the lamp.
- Build a slight apex with the soft pink gel for strength.
- Rub pearl pigment over the cured surface for a ‘glazed’ effect.
- Seal with a no-wipe top gel and cure one last time.
Budget Range
- SUNUV LED Nail Lamp – $25.00
- Gelish Harmony Polish – $15.00
- Chrome Pearl Powder – $9.00
4 Steps to Create Coquette Bridal Nails
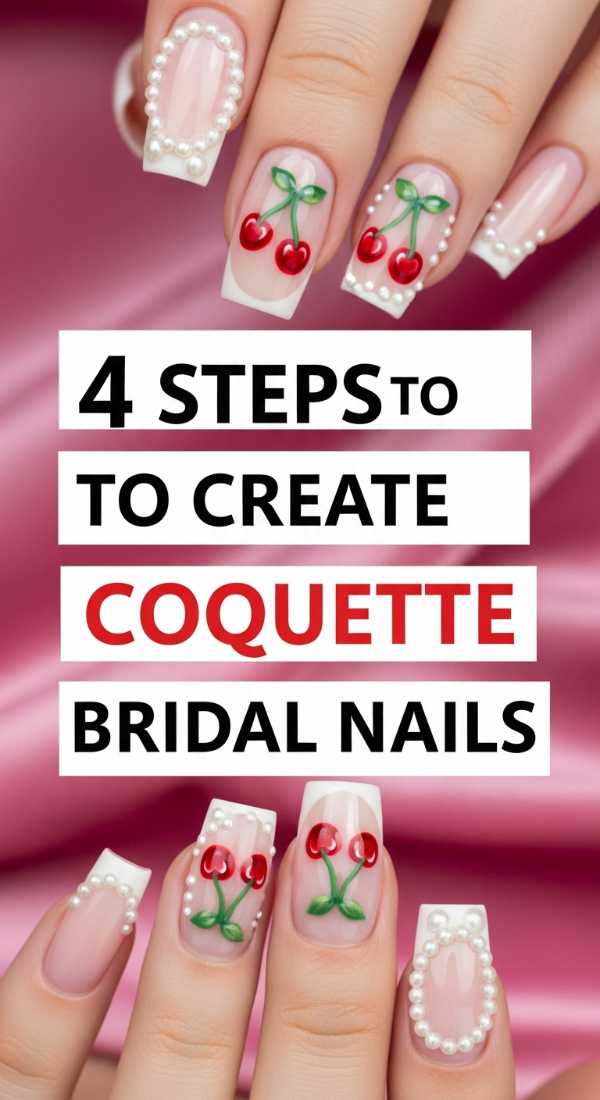
Why to love these Nails:
Oh, my romantic souls, this one is for you! Coquette nails are all about the ‘soft girl’ aesthetic—think bows, pearls, and everything sweet. It’s a whimsical, feminine style that feels like a love letter to your inner child on your most grown-up day.
Essential Items:
- Tiny 3D resin bows
- Pale pink shimmer polish
- Nail glue
- Dotting tool
How to Prepare:
- Paint a base of pale pink shimmer.
- Use a dotting tool to create tiny ‘pearl’ dots around the cuticle.
- Apply a small drop of glue to the ring finger and press on the resin bow.
- Apply top coat around the charms, not over them, to keep their detail.
Budget Range
- Chanel ‘Ballerina’ Polish – $32.00
- 3D Nail Charm Kit – $6.00
- Makartt Nail Glue – $8.00
3 Easy Guides for Classic Bridal Nails

Why to love these Nails:
The classic French manicure or a solid ‘Marshmallow’ white never goes out of style. It’s the Audrey Hepburn of nail art—sophisticated, timeless, and perfectly balanced. It goes with every dress style imaginable!
Essential Items:
- French tip guides or stickers
- Opaque white polish
- Sheer pink polish
- Clean-up brush
How to Prepare:
- Apply the sheer pink base and let it dry.
- Place the tip guides slightly below the free edge.
- Swipe the opaque white across the tips and peel the guides immediately.
Budget Range
- Orly White Tips Polish – $9.50
- Essie ‘Marshmallow’ – $10.00
- Pure Color 9 Clean Up Brush – $15.00
7 Tricks for Elegant Bridal Nails Square

Why to love these Nails:
Elegant square nails bring a level of ‘boss bride’ energy that I absolutely love. It’s about sharp lines softened by luxurious textures. This look is perfect for a black-tie city wedding or a high-fashion ceremony.
Essential Items:
- Silver leaf flakes
- Deep nude polish
- Long-wear top coat
- Cuticle remover gel
- Hand cream with SPF
- Tweezers
- Fine grit buffer
How to Prepare:
- Use cuticle remover to get a perfect, clean nail bed.
- Apply the deep nude polish in two coats.
- Randomly place silver leaf flakes on two accent nails.
- Press them flat with a dry finger.
- Apply two coats of top coat to ensure a smooth finish.
- Always use SPF hand cream to keep skin looking young in photos.
- Buff the edges daily leading up to the wedding.
Budget Range
- Dior Vernis Nude Polish – $30.00
- Silver Leaf Sheet Kit – $7.00
- Supergoop Hand Screen – $14.00
5 Hacks for Trendy Bridal Nails Wedding

Why to love these Nails:
For my trend-setters! This look incorporates what’s hot right now—think ‘clean girl’ aesthetics and ‘glazed donut’ finishes. It’s the perfect way to look back at your photos and remember exactly what the vibe was when you said ‘I do’.
Essential Items:
- Iridescent topper
- Cold-toned beige polish
- Matte-to-gloss ombre sponge
- Precision liner brush
- Cuticle serum
How to Prepare:
- Apply the beige polish as your foundation.
- Use the sponge to dab the iridescent topper on the tips only.
- Use the liner brush to create a tiny ‘v’ at the cuticle with shimmer.
- Massage serum into cuticles for a healthy glow.
- Finish with a high-gloss top coat.
Budget Range
- Lights Lacquer ‘Paper Snow’ – $13.00
- Mooncat ‘Curse of Rebirth’ – $16.00
- L’Occitane Shea Oil – $20.00
4 Ways to Perfect Simple Bridal Nails

Why to love these Nails:
Simple doesn’t mean boring, loves! It means perfected. This look is about the health of the nail and a singular, stunning color that complements your skin tone flawlessly. It’s calm, serene, and utterly beautiful.
Essential Items:
- Nail strengthener base
- Creamy champagne polish
- Glass shine top coat
- Ergonomic nail file
How to Prepare:
- Apply strengthener for a week prior to the wedding.
- File nails into a uniform ‘squoval’ shape.
- Apply two thin, even coats of champagne polish.
- Apply the glass shine top coat for a mirror-like finish.
Budget Range
- Nail Envy Strengthener – $19.00
- OPI ‘Chiffon-d of You’ – $11.50
- Seche Vite Dry Fast Top Coat – $10.00
A Beautiful Beginning
My dearest loves, as you choose your bridal nail art, remember that the most important thing you’ll wear that day is your joy. Whether you choose a shimmering coquette bow or a simple, sheer nude, let it be a reflection of the happiness bubbling up inside you. Your hands are about to embark on the most beautiful journey of a lifetime—may they always be held with tenderness and love. Congratulations on your upcoming wedding, and may your day be as polished and perfect as you are!
Frequently Asked Questions
Q: How far in advance should I get my bridal manicure?
A: For regular polish, the day before is best. For gel or acrylics, 2-3 days before the wedding ensures they are fresh but gives you time to get used to the length!
Q: Should my toe nails match my finger nails?
A: They don’t have to be identical! A common trend is to have a slightly darker or more opaque version of your finger color on your toes, or a classic ‘something blue’ on your pedicured feet.
Q: What if I break a nail on the morning of the wedding?
A: Don’t panic! Always keep a small ’emergency kit’ with a nail file, the specific polish color you used, and some nail glue in your bridal suite.