
Have you ever walked into a room and felt like the walls were whispering a story? There is a profound magic in transforming a house into a home, and it usually starts with those vast, blank canvases we call walls. For years, I stared at the beige plaster in my own living room, feeling like something was missing—not just a picture, but a soul. It wasn’t until I started experimenting with textures, heirlooms, and nature that the space finally began to breathe back at me.
Decorating your walls is about so much more than filling space; it’s about curate-ing an environment that reflects your journey, your heritage, and your dreams. Whether you are looking to create a tranquil outdoor escape or a vibrant, culturally-rich sanctuary indoors, the right wall decor acts as the heartbeat of your design. Today, we’re going beyond the basic frame to explore how you can elevate your surroundings with intention and style.
How to Style Outdoor Wall Decor for a Serene Patio Sanctuary

Why we love this
There is nothing quite like the sensory symphony of a patio sanctuary, where the scent of blooming jasmine mingles with the earthy aroma of damp terracotta. When you add layers to your outdoor walls, you create an enclosed embrace that feels like a secret garden hidden away from the world’s noise. The cool touch of wrought iron against a sun-warmed stone wall provides a tactile contrast that is deeply grounding, while the sight of flickering candlelight against a textured surface invites you to breathe deeper and linger longer into the twilight hours.
Essential Elements:
- Weather-resistant metal wall art or medallions
- Wall-mounted outdoor lanterns or sconces
- Vertical wall planters with trailing ivy or succulents
- Large outdoor mirrors to reflect greenery
- Cedar wood slats for a natural backdrop
How to make it
- Begin by cleaning the exterior wall surface thoroughly with a stiff brush and mild detergent to ensure any mounting hardware will be secure and free from debris.
- Measure the vertical and horizontal center of your patio wall, marking it lightly with chalk to create a visual anchor for your primary piece of decor.
- Install heavy-duty masonry anchors or siding hooks, ensuring you choose hardware specifically rated for the weight of your items and the material of your home’s exterior.
- Mount your central element—perhaps a large metal sunburst or a reclaimed wood lattice—at eye level (approximately 57 to 60 inches from the patio floor).
- Flank the central piece with wall-mounted planters, spacing them evenly to create a balanced, symmetrical look that draws the eye upward.
- Check for visual balance by stepping back 10 feet; the decor should feel integrated with your patio furniture, creating a cohesive outdoor room effect.
How to Arrange Patio Wall Decor Outdoor for the Most Charming Garden Vibe

Why we love this
A charming garden vibe is all about whimsy and the feeling of nature reclaiming its territory in the most beautiful way possible. Imagine the delicate clinking of metal butterflies in a soft breeze and the sweet, grassy scent of a well-tended lawn rising to meet your senses as you admire your handiwork. This style of decor brings a playful energy to the space, utilizing rustic textures like weathered zinc and rusted iron that look even better as they age and develop a natural patina over time.
Essential Elements:
- Galvanized metal wall buckets
- Aged trellis panels
- Solar-powered fairy lights
- Ceramic bird wall sculptures
- Antique garden tools for a rustic touch
How to make it
- Select a focal wall that receives a mix of sun and shade to highlight the different textures of your metal and ceramic pieces throughout the day.
- Lean a tall, weathered trellis against the wall, securing it with hidden U-brackets at the top to provide a structural base for climbing plants like clematis.
- Stagger galvanized buckets at varying heights along the trellis or wall, using a level to ensure the brackets are perfectly horizontal before drilling.
- Fill the buckets with lightweight potting soil and trailing plants, ensuring there is adequate drainage so the metal doesn’t rust prematurely from standing water.
- Intertwine solar-powered copper wire lights through the trellis, tucking the solar panel in a spot that receives at least six hours of direct sunlight.
- Observe the arrangement from your favorite seating spot; the goal is to create a lush, layered look where the decor feels like it has grown naturally into the space.
How to Display Family Photos Wall Decor for a Heartwarming Home Gallery

Why we love this
There is a unique warmth that radiates from a wall covered in the faces of those you love; it’s the visual scent of nostalgia, like old library books and Sunday morning pancakes. Walking past a well-curated family gallery feels like a warm hug, offering a tactile connection to your history through the texture of embossed mats and the smooth grain of wooden frames. It transforms a sterile hallway into a living museum of laughter, milestones, and the quiet beauty of everyday moments that make life worth living.
Essential Elements:
- Uniform frames for a clean look or eclectic frames for character
- Acid-free photo mats in cream or white
- High-quality printed photographs in various sizes
- A spirit level and measuring tape
- Brown kraft paper for templating
How to make it
- Trace each of your frames onto brown kraft paper and cut them out, labeling each template with the photo it represents to make the layout process stress-free.
- Use painter’s tape to arrange the paper templates on your wall, experimenting with a tight grid for a modern look or a sprawling, organic cloud for a cozy feel.
- Ensure the center of the entire gallery sits at roughly 58 inches high, which is the standard museum height for optimal viewing comfort.
- Drive your nails or screw your hooks directly through the paper templates once you are satisfied with the arrangement, then simply pull the paper away.
- Carefully hang your framed photos, using a small level on top of each frame to ensure they are perfectly straight and haven’t shifted during the hanging process.
- Add a final touch by using adhesive putty on the bottom corners of the frames to prevent them from tilting when people walk by or doors close nearby.
How to Incorporate Mexican Wall Decor for a Vibrant and Cultural Living Space

Why we love this
Stepping into a room adorned with Mexican wall decor is like an explosion of joy for the senses, filled with the spicy aroma of dried chilies and the vibrant hum of a bustling market. The textures are incredibly rich—from the cool, glazed smoothness of hand-painted Talavera tiles to the intricate, raised embroidery of Otomi textiles framed behind glass. It’s a style that celebrates life in high definition, using bold pigments and traditional craftsmanship to turn an ordinary living space into a festive sanctuary of culture.
Essential Elements:
- Hand-painted Talavera ceramic plates
- Framed Otomi hand-embroidered fabric
- Pressed tin (Hojalata) mirrors or sacred hearts
- Traditional woven baskets (Canastas)
- Wrought iron sconces
How to make it
- Choose a bold accent color from your room’s palette to serve as the “anchor color” that will tie the diverse textures of the Mexican decor together.
- Arrange a collection of Talavera plates on the floor first, mixing geometric patterns with floral motifs to create a balanced but energetic cluster.
- Use specialized wire plate hangers that grip the edges of the ceramics securely without damaging the glaze, ensuring they are tight before lifting.
- Mount a large, framed piece of Otomi fabric as the centerpiece, using a UV-protective glass to prevent the vibrant threads from fading in the sunlight.
- Integrate pressed tin elements (Milagros or mirrors) around the plates to reflect light and add a metallic shimmer that breaks up the matte textures of the fabric.
- Adjust the lighting in the room to highlight the 3D quality of the ceramic and tin, using warm-toned bulbs to enhance the earthy reds and bright yellows of the decor.
How to Craft Tree Branch Wall Decor for a Whimsical Nature Inspired Aesthetic

Why we love this
Bringing the outdoors in with tree branch wall decor creates a serene, whimsical atmosphere that smells faintly of cedar and dried moss. The rough, craggy texture of natural bark provides a stunning contrast to smooth, painted walls, offering a visual reminder of the grounding power of the forest. It is a design choice that feels both ancient and modern, providing a delicate silhouette that dances with shadows when the sun hits it, turning your room into a peaceful woodland retreat.
Essential Elements:
- A large, cured fallen branch (birch or driftwood work best)
- Fine-grit sandpaper
- Clear matte sealant
- Fishing line or heavy-duty jute twine
- Small LED fairy lights or hanging air plants
How to make it
- Select a branch that is structurally sound and has been thoroughly dried (cured) to ensure it doesn’t warp or attract pests once inside your home.
- Lightly sand any sharp or splintering areas with fine-grit sandpaper, being careful to preserve the natural character and texture of the bark.
- Apply a thin coat of clear matte sealant to the wood to protect it from moisture and to give it a finished, professional look without making it appear shiny.
- Locate the studs in your wall using a stud finder, as a large branch can be surprisingly heavy and requires a solid anchor point.
- Loop heavy-duty jute twine or clear fishing line around the branch in two or three places, then hang it from sturdy hooks screwed directly into the studs.
- Adorn the smaller twigs of the branch with lightweight air plants or a strand of warm LED fairy lights, ensuring the wires are tucked neatly behind the wood.
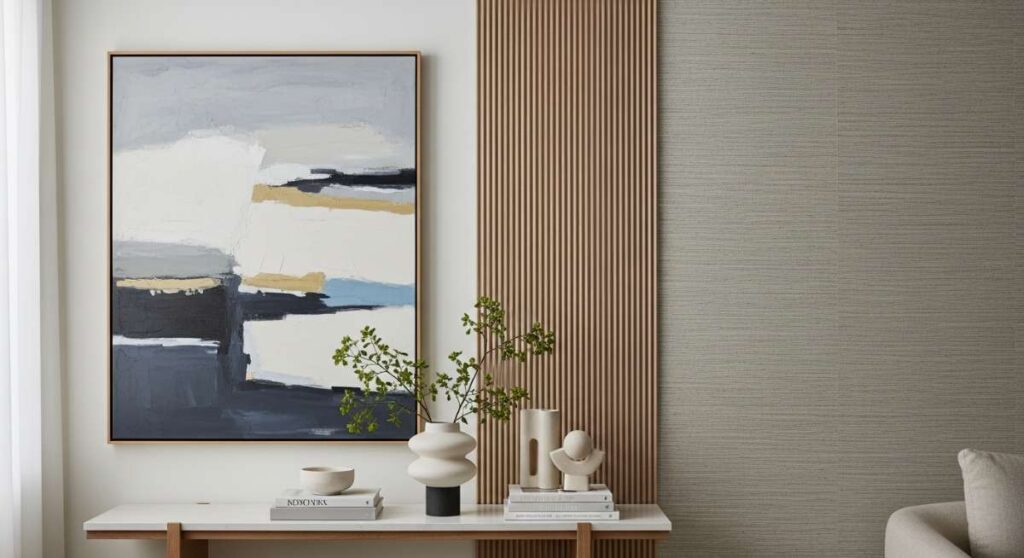
How to Choose Wall Decorations for a Polished and Professional Interior Look

Why we love this
A polished and professional interior relies on the power of restraint and the luxury of high-quality materials, creating an atmosphere that feels as crisp as a fresh linen suit. The texture of a large-scale oil painting or a heavy, brushed-brass frame adds a layer of quiet sophistication that speaks volumes without shouting. It’s about the feeling of order and intentionality, where every piece has room to breathe and the subtle aroma of expensive wax and clean air permeates the environment.
Essential Elements:
- Large-scale minimalist canvas art
- Brushed metal or high-end wood frames
- Sconces with adjustable arms for accent lighting
- Architectural wall panels or molding
- Neutral-toned abstract sculptures
How to make it
- Identify the “power wall” of the room—usually the wall directly opposite the entrance—to serve as the primary location for your most impactful piece.
- Select art that is scaled correctly; for a professional look, the decor should take up about 60-75% of the available wall space above a piece of furniture.
- Install picture lights or adjustable sconces above the art to provide dedicated illumination, which elevates the piece from a simple decoration to a curated feature.
- Maintain a consistent color story by choosing frames that match the hardware already present in the room, such as door handles or light fixtures.
- Use a laser level to ensure all pieces are perfectly aligned, as even a slight tilt can break the illusion of professional precision and order.
- Clean the glass and frames with a microfiber cloth to remove all fingerprints, ensuring the polished surfaces catch the light flawlessly.
How to Personalize Dorm Wall Decor for the Ultimate Cozy Student Retreat
![]()
Why we love this
Dorm life can often feel cold and institutional, but personalizing your walls turns a standard room into a cozy retreat that smells like vanilla candles and fresh laundry. Soft textures like woven tapestries and felt garlands dampen the harsh acoustics of cinderblock walls, creating a cocoon of comfort where you can truly relax. It’s a space for self-expression, where every polaroid and postcard serves as a tactile reminder of home and the new adventures you are embarking upon.
Essential Elements:
- Large fabric tapestries or macrame hangings
- Removable adhesive hooks (Command hooks)
- String lights with photo clips
- Grid wire boards for notes and photos
- Washi tape in various patterns
How to make it
- Clean the dorm walls with rubbing alcohol before applying any adhesive hooks; this is a professional secret for ensuring the hooks stay up all semester.
- Hang a large fabric tapestry first to cover the maximum amount of “beige” wall space, using clips on the hooks so you don’t have to poke holes in the fabric.
- Layer a string of warm-toned fairy lights over the tapestry to add depth and a soft glow that makes the room feel much larger and more inviting.
- Create a “memory zone” using a wire grid board, attaching photos, concert tickets, and schedules with colorful mini-clothespins.
- Use washi tape to create “faux frames” around posters; it adds a pop of color and style without the weight or expense of real frames.
- Step back and check that the layout doesn’t feel too cluttered; leaving a small amount of white space helps the room feel organized rather than chaotic.
How to Install Skateboard Wall Decor for a Cool and Urban Room Transformation

Why we love this
Skateboard wall decor brings a raw, urban energy into a room, celebrating the grit and creativity of street culture with the faint, nostalgic scent of grip tape and maple wood. The sleek, curved lines of the decks provide a modern architectural element, while the vibrant graphics offer an ever-changing gallery of contemporary art. It’s a tactile way to showcase your passions, turning functional equipment into a high-impact design statement that feels both edgy and incredibly curated.
Essential Elements:
- Graphic skateboard decks (new or vintage)
- Skateboard wall mounts (vertical or horizontal)
- A power drill and wall anchors
- A spirit level
- Microfiber cloth for polishing
How to make it
- Decide on the orientation of your decks; vertical mounting is great for high ceilings, while horizontal mounting works perfectly above a bed or desk.
- Measure the distance between the truck holes on the skateboard deck to ensure your wall mount aligns perfectly with the pre-drilled holes in the wood.
- Mark your wall using a template or by holding the mount in place, ensuring you use a level to keep a series of boards perfectly aligned in a row.
- Drill pilot holes and insert sturdy wall anchors, as skateboard decks are made of dense maple and require more support than a standard picture frame.
- Attach the mounts to the wall and slide the decks on, securing them with the provided hardware (usually T-bolts or specialized nuts).
- Wipe down the graphics with a dry microfiber cloth to remove any dust or fingerprints, making the colors and designs pop against the wall surface.
How to Hang Fan Wall Decor for an Elegant and Airy Texture Update

Why we love this
Fan wall decor is the ultimate way to introduce soft, organic movement to a room, reminiscent of a gentle tropical breeze and the subtle rustle of dried palm leaves. The texture is breathtakingly intricate, with woven bamboo and silk offering a delicate play of light and shadow that feels incredibly sophisticated. It’s a design choice that adds volume without weight, creating an airy, breathable aesthetic that transforms a flat wall into a dynamic work of art.
Essential Elements:
- Large decorative folding fans (Bamboo, silk, or paper)
- Small clear command hooks or finishing nails
- Fishing line for invisible hanging
- A handheld steamer (for silk fans)
- Delicate dusting brush
How to make it
- If using silk or fabric fans, use a handheld steamer to gently remove any creases from being folded, allowing the material to hang perfectly flat and smooth.
- Open the fans fully and determine the “arc” you want to create; a staggered arrangement of three fans usually creates the most pleasing visual flow.
- Attach a small loop of clear fishing line to the back of the fan’s outer ribs; this allows the fan to hang flush against the wall without visible hardware.
- Place a clear adhesive hook on the wall, hidden behind where the top center of the fan will sit, and hang the fishing line loop carefully.
- Use a tiny piece of double-sided mounting putty on the bottom corners of the fan to keep it from swaying or closing due to air currents in the room.
- Dust the fans weekly with a soft, long-bristled brush to maintain the vibrancy of the colors and the integrity of the delicate weaving.
How to Explore Bedroom Wall Decor Ideas for a Dreamy and Restful Sleep Environment
[IMAGE_10]
Why we love this
In the bedroom, wall decor should feel like a soft exhale, filled with the soothing scents of lavender linen spray and the quiet comfort of a plush rug. Soft textures like oversized macrame hangings or framed botanical prints bring a sense of natural peace that lowers the heart rate and prepares the mind for rest. It’s about creating a visual lullaby where the colors are muted, the materials are organic, and the overall feeling is one of total, unconditional serenity.
Essential Elements:
- Large-scale macrame or woven wall hangings
- Botanical prints in light wood frames
- Soft LED backlit panels
- Floating shelves for small plants and candles
- Textured wallpaper or fabric panels
How to make it
- Choose a color palette based on “cool” tones—soft blues, sage greens, or warm sands—to promote a psychological sense of calm and relaxation.
- Hang a large, soft-textured woven piece directly above the headboard; this acts as a visual anchor and adds a layer of acoustic softening to the room.
- Install floating shelves at a height that is easily reachable from the bed but high enough to avoid accidental bumps, ensuring they are level.
- Place a few trailing plants, like Pothos, on the shelves to introduce living green textures that help purify the air while you sleep.
- Incorporate soft, indirect lighting behind your wall art to create a gentle glow that eliminates harsh shadows and prepares your eyes for sleep.
- Review the space from your pillow; the view from your bed should be clutter-free and balanced, providing a peaceful last sight before you close your eyes.
The Final Touch: Your Walls, Your Story
Elevating your walls is a journey of discovery, a way to turn the structure of your home into a reflection of your soul. Whether you choose the vibrant energy of cultural decor or the quiet peace of nature-inspired branches, remember that your home is a living thing that grows with you. Don’t be afraid to experiment, to layer, and to change things up as your style evolves. Your walls are waiting—go make them beautiful!