

Charms, Shells, and Neon: 5 Tropical 3D Junk Nail Ideas for Your Next Vacay
Hello my loves! Can you feel it? That warm, salty breeze is calling our names, and I can practically smell the coconut sunscreen in the air. As we get ready to jet off to our tropical paradises, I wanted to share something that has been making my heart flutter lately: the maximalist, sun-drenched magic of 3D junk nails. It’s like carrying a little piece of the ocean and the sunset right on your fingertips.
You know me—I’m all about those soft, cloud-like moments, but sometimes your soul just needs a splash of neon and a handful of tiny seashells to feel truly alive. These designs aren’t just manicures; they are tiny wearable scrapbooks of your dream vacation. Let’s dive into these candy-colored waters together and find the perfect set to accompany your favorite bikini and that oversized sun hat you adore.
7 steps to master multi colored nails

Why to love this recipe:
This approach is like a rainbow dancing on your hands. Multi-colored nails allow you to express every single facet of your vibrant personality without having to choose just one shade. It’s playful, energetic, and perfectly mirrors the chaotic beauty of a tropical botanical garden.
Essential Ingredients:
- 5-10 different neon and pastel gel polishes
- High-shine top coat
- Lint-free wipes
- Nail dehydrator
- UV/LED Lamp
How to Prepare:
- Sanitize and prep your natural nails by gently pushing back cuticles.
- Apply a dehydrator and a base coat, then cure for 60 seconds.
- Select a unique color for each finger on both hands.
- Apply the first thin layer of color to each nail and cure.
- Apply a second layer for full opacity and cure again.
- Apply a glossy top coat to seal the vibrant pigment.
- Finish with a nourishing mango-scented cuticle oil.
Budget Range
- Beetles Neon Gel Polish Set ($20)
- SunUV LED Lamp ($25)
- Cuccio Revitalizing Cuticle Oil ($10)
5 ways to style colorful junk nails
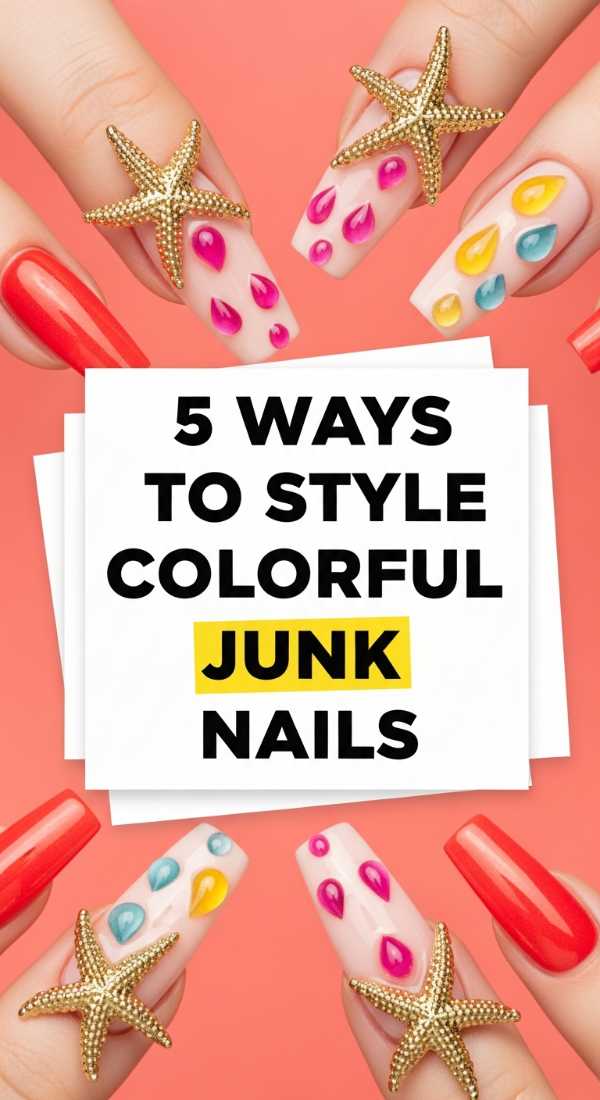
Why to love this recipe:
Styling junk nails is all about balance and confidence. When your nails are this loud, they become the main character of your outfit. It’s an effortless way to make even a simple white linen dress look like a high-fashion editorial moment.
Essential Ingredients:
- Stacked gold rings
- A vibrant sarong
- Sheer beach cover-ups
- Confidence and a smile
- A matching pedicure
How to Prepare:
- Pair your nails with chunky gold rings to elevate the ‘junk’ aesthetic.
- Wear a neutral-toned beach dress to let the neon charms pop.
- Coordinate one specific charm color with your swimwear.
- Use your nails as a conversation starter at the poolside bar.
- Take plenty of hand-focused ‘drink-holding’ photos for the ‘gram.
Budget Range
- H&M Multi-pack Gold Rings ($12)
- ASOS Linen Blend Sarong ($25)
- Target Crochet Cover-up ($30)
4 secrets for mixing different color nails

Why to love this recipe:
Mixing colors can feel intimidating, but when done right, it creates a harmonious symphony. These secrets ensure your nails look curated and artistic rather than accidental, giving you that ‘expensive boutique’ vibe.
Essential Ingredients:
- Color wheel chart
- Matte and gloss top coats
- Detailing brushes
- Mixing palette
How to Prepare:
- Choose a ‘hero’ color that appears on at least three nails.
- Use complementary colors (opposites on the wheel) for high-contrast drama.
- Mix textures by making one nail matte and the rest high-gloss.
- Incorporate one ‘neutral’ pop like a soft sandy beige to ground the neons.
Budget Range
- Modelones Matte Top Coat ($8)
- Nail Art Mixing Palette ($5)
- Saviland Detail Brush Set ($12)
3 techniques for ombre two color nails

Why to love this recipe:
Ombre nails remind me of a perfect sunset where the orange sky melts into the deep purple sea. It’s a soft, romantic way to wear bright colors that feels sophisticated and dreamy.
Essential Ingredients:
- Makeup sponges
- Liquid latex (for skin protection)
- Two contrasting neon polishes
How to Prepare:
- The Sponge Method: Apply both colors to a sponge and dab onto the nail.
- The Brush Blend: Use a fan brush to blur the meeting point of two wet polishes.
- The Sugar Blend: Use dipping powders to create a seamless vertical gradient.
Budget Range
- Wedge Makeup Sponges ($4)
- Pueen Latex Tape ($9)
- Kiara Sky Dip Powder Starter Kit ($40)
6 steps for shaping colorful stiletto nails

Why to love this recipe:
Stiletto nails are the ultimate ‘baddie’ vacay shape. They elongate your fingers and provide a massive canvas for all those 3D charms and shells we love so much.
Essential Ingredients:
- 100/180 grit nail file
- Nail clippers
- Buffing block
How to Prepare:
- Mark the exact center of your nail tip with a dot of polish.
- File the sides at a steep angle toward that center point.
- Ensure both sides are symmetrical and sharp.
- Soften the very tip slightly so it doesn’t snag on your swimsuit.
- Buff the surface to ensure a smooth application of color.
- Dust off excess debris before starting your polish.
Budget Range
- Makartt Zebra Nail Files ($8)
- Flowery Blue Buffer Blocks ($6)
- Tweezerman Nail Clippers ($12)
8 tips for long lasting colourful acrylic nails

Why to love this recipe:
There is nothing worse than a chipped nail on day two of your trip. These tips ensure your tropical masterpiece stays flawless from the first flight to the final sunset.
Essential Ingredients:
- Professional grade acrylic powder
- EMA Monomer
- Primer/Bonder
How to Prepare:
- Properly dehydrate the nail plate to prevent lifting.
- Use an acid-free primer for a double-sided tape effect.
- Apply acrylic in three zones for maximum strength.
- Cap the free edge with clear acrylic or top coat.
- Avoid using your nails as tools (no opening soda cans!).
- Wear gloves if you are doing any pre-vacay cleaning.
- Apply cuticle oil twice daily to keep the acrylic flexible.
- Schedule a fill-in every 2-3 weeks religiously.
Budget Range
- Mia Secret Acrylic System ($35)
- Young Nails Protein Bond ($15)
- Sally Hansen Vitamin E Oil ($7)
Create 10 looks with colorful nail inspo

Why to love this recipe:
Sometimes we just need a mood board! This variety pack of ideas ensures you’ll never run out of inspiration, whether you’re feeling like a mermaid or a jungle queen.
Essential Ingredients:
- Assorted 3D charms
- Glitter mixes
- Foil flakes
How to Prepare:
- The ‘Mermaid Tail’: Teal scales and pearl charms.
- The ‘Sunset Palms’: Pink to orange ombre with black palm silhouettes.
- The ‘Fruit Punch’: Tiny 3D fimo clay slices of watermelon and lime.
- The ‘Ocean Floor’: Clear gel with embedded real mini shells.
- The ‘Neon Leopard’: Electric yellow with pink 3D spots.
- The ‘Golden Hour’: Champagne gold glitter with white 3D flowers.
- The ‘Tropical Leaf’: Deep green base with 3D monsterra leaf charms.
- The ‘Pool Party’: Translucent blue ‘water droplet’ 3D effects.
- The ‘Hibiscus Dream’: Hand-painted florals with rhinestone centers.
- The ‘Disco Coconut’: Holographic white with silver star charms.
Budget Range
- Fimo Fruit Slices Bulk Pack ($7)
- Real Mini Sea Shells for Nails ($9)
- Nail Art Foil Gold/Silver ($6)
5 hacks for layering multicolor nails

Why to love this recipe:
Layering is the secret to depth. It makes your nails look like a 3D piece of art rather than just a flat surface, giving them that ‘professional salon’ complexity at home.
Essential Ingredients:
- Sheer ‘jelly’ polishes
- Stickers or decals
- Fine glitter
How to Prepare:
- The ‘Sandwich’ Hack: Polish, sticker, then a sheer ‘jelly’ coat on top.
- The ‘Glitter Gradient’: Apply chunky glitter only at the cuticle over a solid color.
- The ‘Depth Hack’: Place 3D charms at different levels of the top coat layers.
- The ‘Marble Twist’: Drop two colors into a top coat and swirl on the nail.
- The ‘Matte-Gloss Contrast’: Layer glossy 3D ‘droplets’ over a matte base.
Budget Range
- Zoya Jelly Polish ($12)
- Etsy Nail Decal Sheets ($5)
- Holo Taco Unicorn Skins ($13)
Apply your color street nails in 3 steps

Why to love this recipe:
If you’re short on time before your flight, this is your lifesaver. You get the intricate designs of a pro without the hours in a chair, leaving more time for packing!
Essential Ingredients:
- Color Street nail strips
- Alcohol prep pads
- Nail file
How to Prepare:
- Clean each nail thoroughly with an alcohol prep pad to remove oils.
- Peel the strip, align it with your cuticle, and press down firmly.
- Fold the excess over the tip and file it off in a downward motion.
Budget Range
- Color Street Main Collection ($11-$14)
- 91% Isopropyl Alcohol ($3)
Make your nails colorful with 4 3D charms

Why to love this recipe:
This is where the ‘junk’ in junk nails truly shines! Adding 3D elements creates texture and a playful, tactile experience that is so incredibly trendy right now.
Essential Ingredients:
- Resin seashells
- Miniature resin fruits
- Tiny gummy bear charms
- Pearl half-beads
- Strong nail glue or rhinestone gel
How to Prepare:
- Apply a thick dollop of rhinestone glue to your finished (cured) color.
- Place a large charm (like a shell) in the center.
- Surround the large charm with smaller pearls or crystals.
- Cure under the lamp for double the recommended time to ensure it’s stuck!
Budget Range
- Makartt Rhinestone Glue ($10)
- Mixed 3D Resin Charm Bag ($12)
- Bulk Flatback Pearls ($8)
Stay Sun-Kissed and Stylish
I hope these ideas spark a little bit of tropical joy in your heart, my loves! Whether you go for the full 3D ‘junk’ look or a simple neon ombre, remember that your nails are an extension of your beautiful, adventurous spirit. Pack your bags, grab your favorite SPF, and let your hands do the talking this vacation. Sending you so much love and golden rays!