

Designing Your Days: Aesthetic Living for the Modern Soul
We often find ourselves racing through life, catching glimpses of beauty only in the curated squares of our social media feeds, while our own surroundings feel like an afterthought. But what if your daily life—the space where you drink your morning coffee and the desk where you tackle your biggest dreams—felt like a sanctuary designed specifically for your soul? Lifestyle design isn’t about perfection; it’s about intentionality. It’s about choosing textures that make you sigh with relief and organizing your world so that your energy can flow toward the things that truly matter.
In this guide, we are exploring the art of the aesthetic home and the functional life. From the quiet rustle of a well-landscaped yard to the nostalgic warmth of a vintage-inspired living room, every corner of your existence is an opportunity for a masterpiece. Let’s dive into how you can transform the mundane into the magical, one thoughtful detail at a time, creating a home that doesn’t just look good, but feels like a warm embrace at the end of a long day.
How to Achieve Simple Landscaping for a Welcoming Front Yard

Why we love this
There is something profoundly grounding about pulling into your driveway and being greeted by a lush, intentional landscape that whispers ‘welcome home.’ This simple approach focuses on the sensory delight of soft green textures against the earthy aroma of fresh mulch and the structured elegance of perennial blooms. We love how it balances the raw beauty of nature with a clean, modern symmetry that requires minimal upkeep but provides maximum visual impact for the modern soul who craves serenity from the moment they step out of their car.
Essential Elements:
- Low-maintenance perennial shrubs (like Boxwoods or Hydrangeas)
- Hardwood mulch in a dark espresso or natural cedar tone
- Defined stone or plastic edging
- Solar-powered pathway lighting
- A focal point specimen tree (like a Japanese Maple)
How to make it
- Begin by clearing the area of all weeds and old debris, ensuring the soil is level and sloped slightly away from your home’s foundation to prevent drainage issues.
- Lay down a heavy-duty landscape fabric to suppress future weed growth, securing it with garden staples every 12 inches. This saves you hours of maintenance later.
- Position your larger ‘anchor’ plants first, keeping them at least 2 feet away from the house to allow for air circulation and growth. Dig holes twice as wide as the root ball to encourage root expansion.
- Incorporate smaller flowering perennials in groups of three or five; odd numbers create a more natural, rhythmic aesthetic that is pleasing to the eye.
- Apply a 3-inch layer of high-quality mulch over the entire bed, taking care not to pile it directly against the stems or trunks of your plants (the ‘mulch volcano’ effect), which can cause rot.
- Install your solar lights at even intervals along the path, angling them slightly toward the foliage to create a soft, upward glow during the twilight hours.
How to Organize an Office Desk Setup for a Productive Work Cubicle

Why we love this
A cluttered desk is a cluttered mind, and in the fast-paced world of modern work, your cubicle should be an oasis of focus. We adore this setup because it prioritizes ergonomic flow and visual minimalism, using soft textures and warm lighting to combat the sterile feel of traditional office spaces. The gentle hum of productivity becomes a symphony when your tools are exactly where they should be, surrounded by personal touches that inspire rather than distract, making the nine-to-five feel like a creative journey rather than a chore.
Essential Elements:
- A large, felt or leather desk mat
- Monitor riser with built-in storage
- A warm-toned LED desk lamp
- Vertical file organizers
- A small, hardy indoor plant (like a Pothos or Snake Plant)
How to make it
- Clear everything off your desk and wipe down all surfaces with a microfiber cloth to create a fresh, clean slate for your new design.
- Place your monitor riser in the center of your line of sight; your eyes should hit the top third of the screen when sitting upright to prevent neck strain.
- Position your desk mat directly in front of you; this defines your primary ‘work zone’ and provides a soft, tactile surface for your wrists and mouse.
- Organize your essential stationary into the monitor riser’s drawers or a small acrylic tray, keeping only what you use daily within arm’s reach to minimize visual noise.
- Route all cables through a cable management sleeve or under-desk tray, securing them with Velcro ties so they are hidden from view but easily accessible.
- Add your ‘soul’ element—a small plant or a framed photo—to the corner furthest from your dominant hand to provide a mental break without crowding your movement.
How to Create JBL Speakers Wallpapers for a High Tech Aesthetic

Why we love this
For the tech enthusiast, the aesthetic isn’t just about the physical space—it’s about the digital one, too. We love the sleek, industrial vibe of JBL-inspired wallpapers because they celebrate the intersection of high-fidelity sound and modern graphic design. The deep blacks, vibrant neons, and crisp geometric lines of a speaker-themed background evoke a sense of energy and rhythm, turning your smartphone or desktop into a testament to your love for crisp audio and cutting-edge style.
Essential Elements:
- High-resolution stock photos of speaker drivers or mesh textures
- Graphic design software (like Canva or Photoshop)
- A color palette featuring ‘JBL Orange’ and charcoal grey
- Lens flare or ‘glow’ overlays
- Geometric shape brushes
How to make it
- Select a high-resolution image of a speaker’s texture, focusing on the intricate patterns of the metallic mesh or the smooth curve of the woofer cone.
- Open your design software and set the canvas size to your device’s specific resolution (e.g., 1170 x 2532 for iPhone 13 Pro) to ensure a crisp, non-pixelated finish.
- Apply a subtle gradient overlay, transitioning from a deep obsidian black to a dark slate blue, which adds depth and makes the speaker elements pop.
- Use a ‘Circular Marquee’ tool to highlight the speaker’s driver, then apply an outer glow effect in a vibrant neon orange or cool cyan to mimic the look of an active, powered-on device.
- Incorporate abstract sound wave lines using a thin brush tool, varying the opacity so they appear to be vibrating off the ‘speaker’ on the screen.
- Export the file as a high-quality PNG and set it as your wallpaper, choosing ‘Perspective Zoom’ to give the tech elements a 3D feel when you move your phone.
How to Construct a Cheap Pool Deck for a Luxurious Summer Retreat

Why we love this
There is nothing quite like the feeling of sun-warmed wood beneath your feet as you step toward a shimmering pool on a hot July afternoon. This project is a favorite because it proves that luxury is a feeling, not a price tag. By using affordable materials with a high-end finish, you can create a poolside sanctuary that smells of cedar and sunscreen, offering a stable, splinter-free surface for lounging that elevates an above-ground pool into a high-end resort experience right in your backyard.
Essential Elements:
- Pressure-treated 2x4s and 4x4s
- Composite or pressure-treated deck boards
- Deck screws and galvanized joist hangers
- Pre-mixed concrete pier blocks
- High-quality UV-resistant wood stain
How to make it
- Measure the height and circumference of your pool, then mark out a perimeter for the deck that allows for at least 4 feet of walking space around the edge.
- Set your concrete pier blocks every 4 feet, ensuring they are perfectly level with one another using a long spirit level and a straight board.
- Construct the outer frame using 2×4 pressure-treated lumber, attaching it to the 4×4 posts set into the pier blocks with heavy-duty lag bolts.
- Install your joists 16 inches apart ‘on center’ using joist hangers; this spacing is critical to ensure the deck boards don’t flex or sag over time.
- Lay your deck boards perpendicular to the joists, using spacers (or a carpenter’s pencil) to maintain a consistent 1/8-inch gap for water drainage and wood expansion.
- Sand the entire surface with 80-grit sandpaper to remove any stamps or rough spots, then apply two coats of a semi-transparent stain in a ‘Golden Oak’ or ‘Driftwood’ finish to achieve that expensive, sun-drenched look.
How to Use Vinyl Lattice Panels for Sophisticated Garden Privacy

Why we love this
Privacy is the ultimate luxury in a modern home, and vinyl lattice panels offer a crisp, architectural way to define your boundaries. We love how the light filters through the diamond patterns, creating dancing shadows across your patio stones while shielding you from the prying eyes of neighbors. It’s a clean, white-picket-fence aesthetic that feels both timeless and incredibly practical, especially when paired with climbing vines that add a layer of soft, living green to the rigid structure.
Essential Elements:
- Heavy-duty vinyl lattice sheets (diamond or square pattern)
- Vinyl u-channel molding for the edges
- Pressure-treated 4×4 posts or existing porch pillars
- Stainless steel screws with white caps
- Fast-growing climbers like Jasmine or Clematis
How to make it
- Measure the open spaces between your porch posts or garden stakes, and cut your lattice panels to size using a circular saw with a fine-toothed blade to prevent cracking.
- Slide the cut lattice panels into the vinyl u-channel molding; this hides the raw edges and gives the installation a professional, finished appearance.
- Pre-drill small holes through the molding and lattice every 12 inches; this is vital as vinyl expands and contracts with temperature changes, and tight screws will cause the panels to warp.
- Secure the framed panels to your support posts using the stainless steel screws, making sure the panel is perfectly plumb (vertically straight) using a level.
- Snap the decorative white screw caps over the heads of the screws to make the hardware invisible.
- Plant your climbing vines at the base of the lattice, gently weaving the first few tendrils into the holes to encourage them to grow upward and create a natural green screen.
How to Design Summer Table Centerpieces for a Fresh Party Look

Why we love this
A summer table should feel like an invitation to linger over cold drinks and good conversation. We love this design style because it brings the vibrancy of a sun-soaked garden indoors. Imagine the zestful scent of sliced citrus mingling with the delicate fragrance of field flowers, all anchored by the rustic texture of a linen runner. It’s a feast for the eyes before the food even arrives, capturing the ephemeral, golden essence of the season in a way that feels effortless and wildly chic.
Essential Elements:
- Clear glass cylinder vases of varying heights
- Slices of lemons, limes, and oranges
- Fresh eucalyptus or fern fronds
- White hydrangeas or yellow Billy Balls
- Unscented floating tea lights
How to make it
- Start with a clean, light-colored linen table runner to provide a textured base that catches the light and grounds your centerpiece.
- Fill your glass vases with water, then carefully slide thin slices of citrus down the inside walls; they will stick to the glass and create a bright, patterned look that hides the flower stems.
- Trim your floral stems at a 45-degree angle under running water to ensure maximum hydration, then tuck them into the center of the vases.
- Interspace the vases with smaller ‘bud vases’ containing single sprigs of eucalyptus to create a tiered, lush look along the length of the table.
- Add a final touch of magic by placing floating tea lights on top of the water in the larger vases; the flame will reflect off the water and the citrus for a warm, shimmering effect.
- Scatter a few loose citrus leaves or small flower petals directly onto the runner to create a ‘wild’ and organic feel that avoids looking too stiff.
How to Curate a Whimsical Apartment Aesthetic for a Magical Home
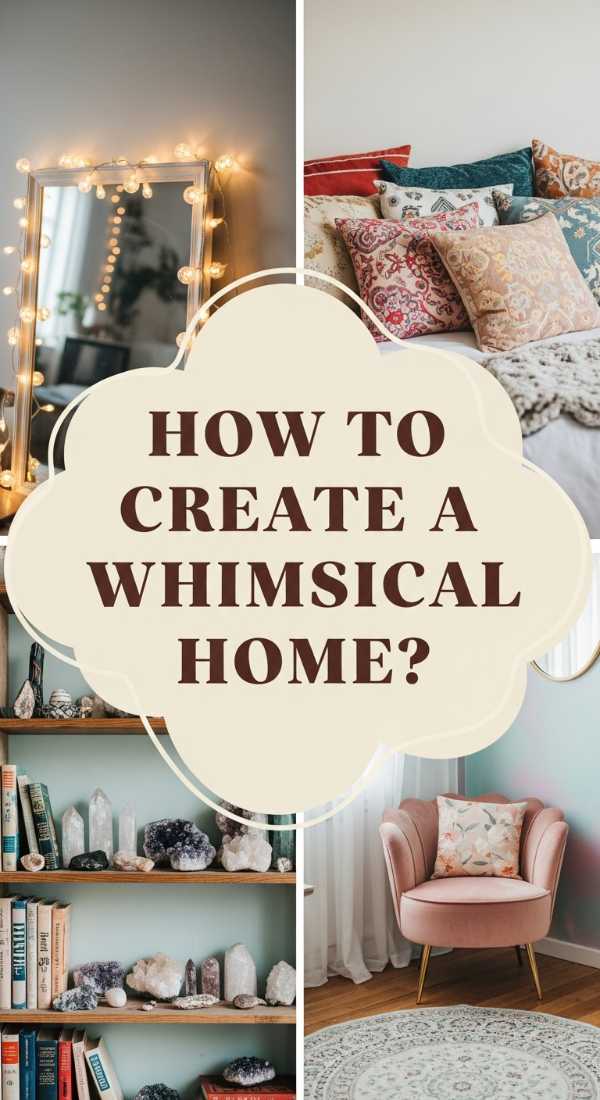
Why we love this
The whimsical aesthetic is a love letter to your inner child, a space where the rules of ‘adulting’ don’t apply. We love this look because it prioritizes wonder—think soft fairy lights casting a warm glow over velvet furniture, and shelves filled with curiosities that spark joy. It’s about creating a home that feels like it’s tucked away in a storybook, where every corner holds a surprise and the atmosphere is thick with a sense of enchantment and cozy mystery.
Essential Elements:
- Strands of warm-white ‘starry’ fairy lights
- Mismatched vintage-style rugs
- Potted plants with trailing vines
- Antique brass mirrors and frames
- Velvet throw pillows in jewel tones
How to make it
- Drape your fairy lights along the ceiling perimeter or weave them through a floor-to-ceiling bookshelf to create a soft, ethereal ‘canopy’ of light that replaces harsh overheads.
- Layer your rugs by placing a large, neutral jute rug down first, then angling a smaller, colorful Persian-style rug on top to add depth and a bohemian, storied feel.
- Group your collections—be it vintage clocks, crystals, or old books—on open shelving, using glass cloches to cover special items, which instantly gives them a magical, ‘museum of wonders’ vibe.
- Hang an oversized antique mirror opposite your main window; this not only bounces light but adds a sense of depth that makes the apartment feel like it’s expanding into another realm.
- Incorporate ‘hanging’ elements, like macramé plant holders or paper lanterns at varying heights, to draw the eye upward and utilize the vertical space for a cozy, enclosed feeling.
- Finish the room with a signature scent, like sandalwood or vanilla, to anchor the whimsical visuals with a grounding, comforting olfactory experience.
How to Perfect an Aquarium Setup for a Calming Focal Point

Why we love this
An aquarium is more than just a pet habitat; it is a living piece of art that brings the tranquil pulse of the underwater world into your living room. We love the way the gentle bubble of the filter and the rhythmic movement of the fish create an instant meditative state. The combination of vibrant green aquatic plants against dark, craggy stones offers a visual richness that is both sophisticated and deeply relaxing, making it the perfect ‘slow-living’ focal point for a modern soul.
Essential Elements:
- Rimless glass tank for a modern look
- Nutrient-rich aquatic substrate (soil)
- Dragon stone or Seiryu stone for hardscaping
- Low-light plants like Anubias or Java Fern
- High-quality LED light with a ‘sunset’ mode
How to make it
- Place your tank on a perfectly level, reinforced stand away from direct sunlight to prevent algae blooms and ensure the weight is distributed evenly.
- Slope your substrate from the back to the front (about 3 inches in the back to 1 inch in the front); this creates an optical illusion of greater depth in the tank.
- Position your ‘hardscape’—the stones and driftwood—according to the ‘Rule of Thirds.’ Avoid placing the largest stone in the dead center; instead, offset it to create a more natural, dynamic flow.
- Attach your ‘epiphyte’ plants (like Anubias) to the stones or wood using a tiny drop of cyanoacrylate gel (super glue), as these plants rot if their roots are buried in soil.
- Fill the tank slowly by pouring water over a dinner plate placed on the substrate; this prevents the water flow from disturbing your carefully placed soil and plants.
- Set your LED light to a 7-hour daily timer, utilizing a ‘ramp-up’ and ‘ramp-down’ feature to mimic natural sunlight, which reduces stress for the fish and keeps the aesthetic natural.
How to Master the Vintage Grandma House Aesthetic for Ultimate Comfort

Why we love this
Often called ‘Grandmacore,’ this aesthetic is the ultimate antidote to the cold, sterile minimalism of the last decade. We love it for its unapologetic embrace of comfort and nostalgia—the scent of cinnamon tea, the weight of a handmade crochet blanket, and the charm of floral patterns that remind us of simpler times. It’s a style that feels lived-in and loved, where every object has a history and the primary goal is to make every guest feel like they’ve just been given a warm hug.
Essential Elements:
- Crochet or knit ‘granny square’ blankets
- Floral wallpaper or patterned textiles
- Antique wooden side tables with doilies
- A collection of mismatched porcelain teacups
- Warm, ‘yellow’ lighting from pleated-shade lamps
How to make it
- Start with a base of warm wood furniture; look for pieces with turned legs and a slightly worn patina that suggests they’ve been passed down through generations.
- Introduce ‘clashing’ patterns by pairing a floral sofa with a striped rug, keeping the color palette consistent (like dusty roses, sage greens, and creams) to ensure it feels curated, not chaotic.
- Drape a handmade crochet throw over the back of your favorite armchair; the tactile, chunky texture is a hallmark of this aesthetic and invites immediate relaxation.
- Create a ‘gallery wall’ of vintage botanical prints or embroidered hoops, using varied frames in gold and dark wood to give the wall a sense of collected history.
- Display your ‘treasures’—like a glass candy dish or a stack of old letters—on lace doilies to protect the furniture and add that quintessential delicate touch.
- Switch out any cool-toned lightbulbs for ‘soft white’ or ‘amber’ Edison bulbs to bathe the room in a nostalgic, candlelight-style glow.
How to Select Fall Baby Shower Themes for a Memorable Gathering

Why we love this
Autumn is a season of harvest and new beginnings, making it a poetic backdrop for celebrating a new life. We love fall baby shower themes because they lean into the richness of the season—the burnt oranges of falling leaves, the velvet texture of mini pumpkins, and the cozy aroma of hot apple cider. It’s a time to gather close and celebrate ‘the little pumpkin’ or a ‘woodland wonder’ in an environment that feels as bountiful and warm as the love for the arriving little one.
Essential Elements:
- Color palette: Terracotta, mustard, and sage green
- Natural accents: Pinecones, dried wheat, and velvet pumpkins
- A DIY ‘Cider Bar’ with cinnamon sticks
- Invitations with watercolor forest animal motifs
- Customized ‘Seed Packet’ party favors
How to make it
- Select a cohesive theme like ‘A Little Pumpkin is on the Way’ or ‘Cozy Woodland Creatures’ to guide all your decor and stationery choices.
- Create a focal point ‘gift area’ using a vintage wooden crate filled with hay and topped with a variety of heirloom pumpkins in muted whites and greens.
- Set up a self-serve drink station featuring warm apple cider in a slow cooker and chilled pear juice, garnished with fresh rosemary sprigs for an upscale seasonal touch.
- Design your tablescapes using a burlap runner and scattered dried leaves, placing small bundles of cinnamon sticks tied with twine at each place setting to fill the air with a spicy, fall scent.
- Organize a ‘Baby’s First Library’ activity where guests bring a signed book instead of a card, which fits perfectly with the cozy, indoor-autumn vibe.
- Send guests home with a ‘nurturing’ favor, such as a small succulent in a terra cotta pot or a jar of local honey, symbolizing the growth and sweetness of the new arrival.
Conclusion: Designing a Life You Love
Designing your days is a continuous journey of discovery. Whether you are planting a garden that will bloom for years to come or simply rearranging your desk to catch the afternoon light, these small acts of curation add up to a life well-lived. Your home is the canvas for your modern soul—keep painting it with the colors and textures that make you feel truly alive. Until next time, keep dreaming, keep designing, and keep making space for the magic in the everyday.