

Digital Pastels and Chrome Petals: May 2026’s Hottest Manicures
Hello, my loves! Can you feel it? That soft, golden shift in the air that tells us May has finally arrived? It’s that magical bridge between the shy blossoms of early spring and the heat of the coming summer. This month, I’m finding myself so inspired by the way technology and nature are dancing together—think the iridescent shimmer of a digital screen meeting the soft, velvet touch of a fresh peony. It’s a season of renewal, and there is no better way to celebrate our blooming selves than with a fresh set of nails that tells our story.
I’ve spent the last few weeks playing with textures, from milky glazes that feel like a morning mist to 3D chrome details that look like droplets of liquid silver. My heart is so full sharing these trends with you. Whether you’re heading to a graduation, a picnic under the weeping willows, or just want to feel a little more like yourself when you look down at your keyboard, I’ve curated these looks just for you. Let’s dive into our May manicure journey together.
The Sculpted Garden: 5-Step 3D Florals

Why to love this recipe:
This look is for the dreamers. It brings a tactile, high-fashion dimension to your fingertips, making your hands feel like a living piece of art. It’s that perfect mix of futuristic chrome and vintage botanical grace that defines May 2026.
Essential Ingredients:
- Sheer pink builder gel
- Clear 3D sculpture gel
- Chrome pigment powder (silver or rose gold)
- Detailing brush
- UV/LED Lamp
How to Prepare:
- Apply two coats of sheer pink builder gel as your base and cure.
- Using a detailing brush, pick up a small bead of 3D sculpture gel and place it in the center of the nail.
- Slowly pull the gel outward into five petal shapes to form a flower; cure for 60 seconds.
- Gently rub chrome powder over the raised petals using a sponge applicator.
- Seal the entire design with a high-shine top coat and a final cure.
Budget Range
- Savvy: Beetles 3D Molding Gel ($8.99)
- Luxe: Aprés Nail Artist Gel ($22.00)
- Finishing Touch: Born Pretty Chrome Powder ($6.50)
The Neon Horizon: 4-Step Colorful French Tips

Why to love this recipe:
We are taking the classic French and giving it a high-energy boost! These tips are all about joy and vibrancy. It’s a crisp, clean look that adds a pop of digital lavender or electric lime to your everyday outfit without being overwhelming.
Essential Ingredients:
- Nude or ‘Your Nails But Better’ base polish
- Selection of bright pastel gel liners
- French tip guide stickers (optional)
- Glossy top coat
How to Prepare:
- Apply your neutral base color and cure or dry completely.
- Using a thin liner brush, trace a smile line across the free edge of each nail using a different vibrant color for each finger.
- Fill in the tip area carefully, ensuring the color is opaque.
- Apply a thick layer of glossy top coat to level the surface and add shine.
Budget Range
- Savvy: Modelones Gel Liner Set ($12.99)
- Luxe: Bio Seaweed Gel Unity Series ($18.00 per bottle)
- Finishing Touch: Seche Vite Fast Dry Top Coat ($9.95)
Perfect Ten: The Spring Pastel Palette

Why to love this recipe:
Why choose one shade when you can have the whole garden? This ‘skittles’ style manicure uses ten distinct pastel shades to create a harmonious, soft rainbow. It’s whimsical, approachable, and looks absolutely darling in photos.
Essential Ingredients:
- 10 different pastel polishes (mint, lemon, lilac, etc.)
- Matte top coat (optional for a velvet look)
- Nail strengthener
How to Prepare:
- Prep all ten nails with a strengthening base coat.
- Assign one specific pastel shade to each finger, starting from the left pinky to the right pinky.
- Apply two thin, even coats of each color to ensure a streak-free finish.
- Wait three minutes between coats to prevent bubbling.
- Finish with a matte or glossy top coat depending on your mood.
Budget Range
- Savvy: Sally Hansen Insta-Dri Pastel Collection ($5.49 each)
- Luxe: Olive & June Spring Set ($56.00 for the set)
- Finishing Touch: OPI Matte Top Coat ($11.49)
The Cloud Walk: 3-Step Milky White
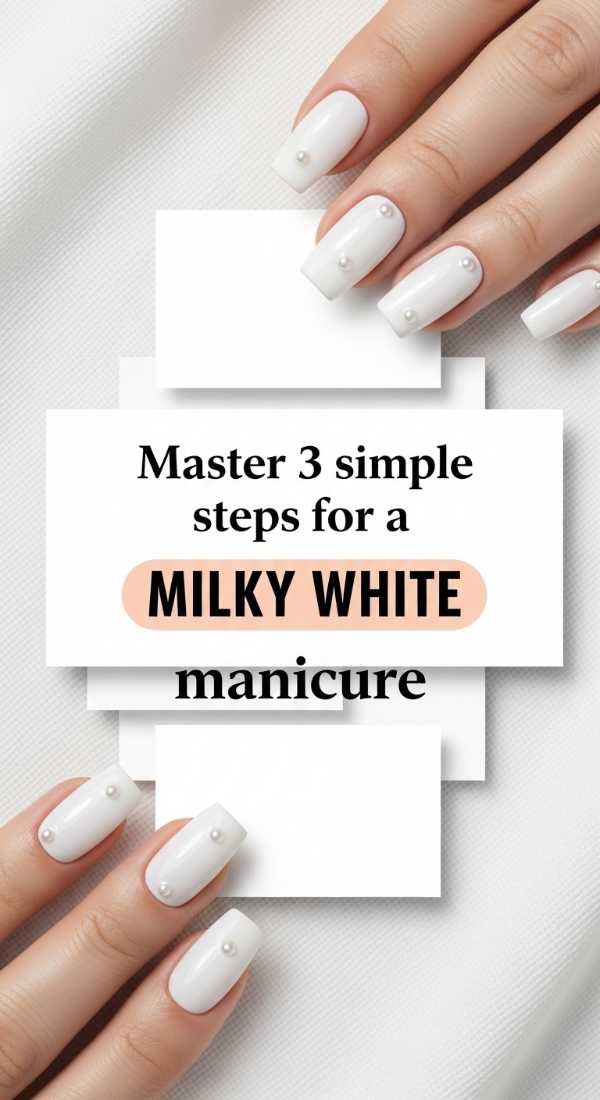
Why to love this recipe:
There is something so incredibly soothing about a milky white manicure. It’s the ‘clean girl’ aesthetic evolved for 2026—soft, translucent, and incredibly sophisticated. It makes your hands look elongated and effortlessly chic.
Essential Ingredients:
- Semi-sheer milky white polish
- Ridge-filling base coat
- Plumping top coat
How to Prepare:
- Apply a ridge-filling base coat to create a perfectly smooth canvas.
- Apply two thin layers of milky white polish, keeping the strokes long and steady to avoid streaks.
- Lock it in with a plumping top coat to give that gel-like, voluminous finish.
Budget Range
- Savvy: Essie ‘Marshmallow’ ($10.00)
- Luxe: Cirque Colors ‘Milkshake’ ($12.50)
- Finishing Touch: Dior Abricot Base Coat ($30.00)
The Meadow Muse: 6 Dreamy Wildflower Nails

Why to love this recipe:
This design is like a picnic for your hands. We focus on six accent designs across both hands, featuring tiny, hand-painted wildflowers that look like they were gathered from a May meadow. It’s delicate, feminine, and deeply nostalgic.
Essential Ingredients:
- Pale blue or sage green base color
- Dotting tool
- Acrylic paints or gel pots in white, yellow, and pink
- Fine detail brush
How to Prepare:
- Paint all nails your chosen soft base color.
- Choose three nails on each hand to be your ‘meadow’ accents.
- Use a dotting tool to place five white dots in a circle to create daisy petals.
- Add a tiny yellow dot in the center of each flower.
- Use your fine brush to add ‘stems’ and tiny leaves in a soft green.
- Top with a clear coat to protect your handiwork.
Budget Range
- Savvy: Eclat Dotting Tool Set ($6.00)
- Luxe: Kupa Artfinity Gel Pods ($15.00)
- Finishing Touch: Zoya Anchor Base Coat ($12.00)
The May Glow: 2-Color Aura Nails

Why to love this recipe:
Aura nails are all about capturing your energy. By blending two colors—perhaps a soft coral and a digital violet—you create a hazy, ethereal glow that emanates from the center of the nail. It feels soulful and modern.
Essential Ingredients:
- Two contrasting pastel gel colors
- Small makeup sponge or airbrush tool
- Protective liquid latex for cuticles
How to Prepare:
- Apply your primary base color to the entire nail and cure.
- Dab your second color onto the center of a makeup sponge and lightly press it into the middle of the nail.
- Blend the edges outward while the gel is wet to create a soft gradient effect; cure and repeat for depth.
Budget Range
- Savvy: Wedge Makeup Sponges ($3.00)
- Luxe: Markartt Professional Airbrush Kit ($45.00)
- Finishing Touch: Unt Ready for Takeoff Liquid Tape ($15.00)
The Mermaid Heirloom: 12 Luxury Pearls

Why to love this recipe:
Pearls are the ultimate symbol of timeless luxury. By adding 12 tiny, flat-back pearls across your manicure, you create a look that is both regal and avant-garde. It’s perfect for those May garden weddings or tea parties.
Essential Ingredients:
- Pack of 12 (or more) multi-sized flat-back pearls
- Nail charm glue or thick resin
- Wax pencil picker
- Icy lavender base polish
How to Prepare:
- Apply your base polish and let it dry or cure completely.
- Apply a tiny dot of nail glue where you want each pearl to sit.
- Using the wax pencil, pick up a pearl and press it firmly into the glue.
- Repeat until you have distributed 12 pearls across your set (perhaps 3 on thumb, 2 on index, etc.).
- Apply top coat *around* the pearls (not over them) to keep their luster.
Budget Range
- Savvy: Rhinestone/Pearl Picker Tool & Gem Set ($9.99)
- Luxe: Swarovski Crystal Pearls ($25.00)
- Finishing Touch: Makartt Rhinestone Glue ($10.99)
The Jetsetter: 10 Vacation Nails in 20 Minutes
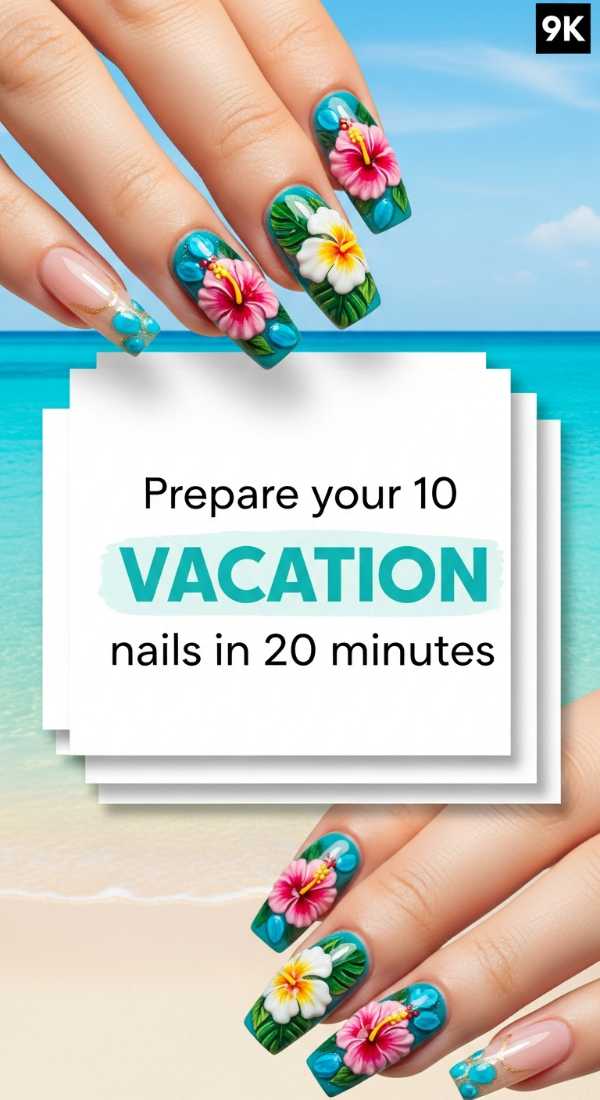
Why to love this recipe:
We don’t always have hours to spend at the salon before a May getaway. This ‘recipe’ uses high-quality press-ons to give you a perfect, durable 10-nail set in under 20 minutes. It’s the ultimate travel hack for the busy babe.
Essential Ingredients:
- High-quality press-on nail kit
- Alcohol prep pads
- Nail file and buffer
- Brush-on nail glue
How to Prepare:
- Buff the surface of your natural nails and wipe with alcohol to remove oils.
- Size the press-ons to each of your 10 fingers before applying glue.
- Apply a thin layer of glue to both your natural nail and the back of the press-on.
- Press and hold each nail for 30 seconds to ensure a bubble-free bond.
Budget Range
- Savvy: Kiss Bare but Better Press-Ons ($8.99)
- Luxe: Static Nails Reusable Pop-On Manicure ($20.00)
- Finishing Touch: Londontown Kur Nourishing Cuticle Oil ($20.00)
Golden Hour: 5 Butter Yellow Nails

Why to love this recipe:
Butter yellow is *the* color of 2026. It’s warmer than lemon but softer than mustard. Painting five nails in this creamy, sun-drenched shade is an instant mood booster that looks incredible against denim and white linen.
Essential Ingredients:
- Cream-finish butter yellow polish
- White base coat (to make the yellow pop)
- High-gloss top coat
How to Prepare:
- Apply one coat of white polish first—this acts as a primer so the yellow looks vibrant, not streaky.
- Apply two coats of butter yellow polish, ensuring you cap the free edge of the nail.
- Finish with a glossy top coat to mimic the look of sunshine on petals.
Budget Range
- Savvy: Revlon Enamel in ‘Buttercup’ ($6.00)
- Luxe: Chanel Le Vernis in ‘Pastel Yellow’ ($32.00)
- Finishing Touch: Glisten & Glow Top Coat ($9.00)
Metamorphosis: 4 Butterfly Graduation Designs

Why to love this recipe:
Graduation is all about spreading your wings. These four butterfly designs (placed on the ring and middle fingers of each hand) symbolize growth and the beauty of change. It’s a sentimental and striking choice for the Class of 2026.
Essential Ingredients:
- Butterfly nail decals or stamps
- Iridescent glitter polish
- Tweezers
How to Prepare:
- Paint a base of iridescent glitter on the four chosen accent nails.
- Use tweezers to carefully place a butterfly decal in the center of each of those four nails.
- Press down firmly to ensure no air bubbles are trapped.
- Apply two layers of top coat to ‘sandwich’ the decal for a long-lasting finish.
Budget Range
- Savvy: Maniology Nail Stamping Plate ($8.00)
- Luxe: Deco Miami Nail Art Stickers ($12.00)
- Finishing Touch: Holo Taco Linear Holo Top Coat ($13.00)
Bloom Where You Are Planted
As we wrap up our May nail journey, I want you to remember that your hands are the tools with which you create your life. Whether they are sparkling with chrome petals or soft with milky white tones, they are beautiful because they are yours. Take these trends, twist them, make them your own, and most importantly, enjoy the process of self-care. You deserve this little moment of peace in your day. Until next time, stay glowing!
Frequently Asked Questions
How can I make my 3D gel nails last longer?
The key is prep! Ensure your nail plate is completely dehydrated with alcohol or a primer before applying the 3D gel. Also, make sure you are using a strong, dedicated nail glue or builder gel to anchor any heavy textures.
Are pearls practical for everyday wear?
They can be! If you use a high-quality resin and avoid snagging them on knitwear, they can last up to two weeks. I recommend using flat-back pearls rather than round ones for a more secure fit.
What is the best way to prevent yellow polish from looking streaky?
Yellow is notoriously tricky. Always start with a white base coat; it gives the yellow something to ‘grip’ and prevents the natural nail color from making the yellow look dull or uneven.
Can I achieve the aura look with regular nail polish?
It is harder than with gel, but possible! Use the sponge method while the base color is still slightly tacky, and work quickly. You might need to apply a few thin layers of the sponge-dabbed color to get that perfect hazy effect.