
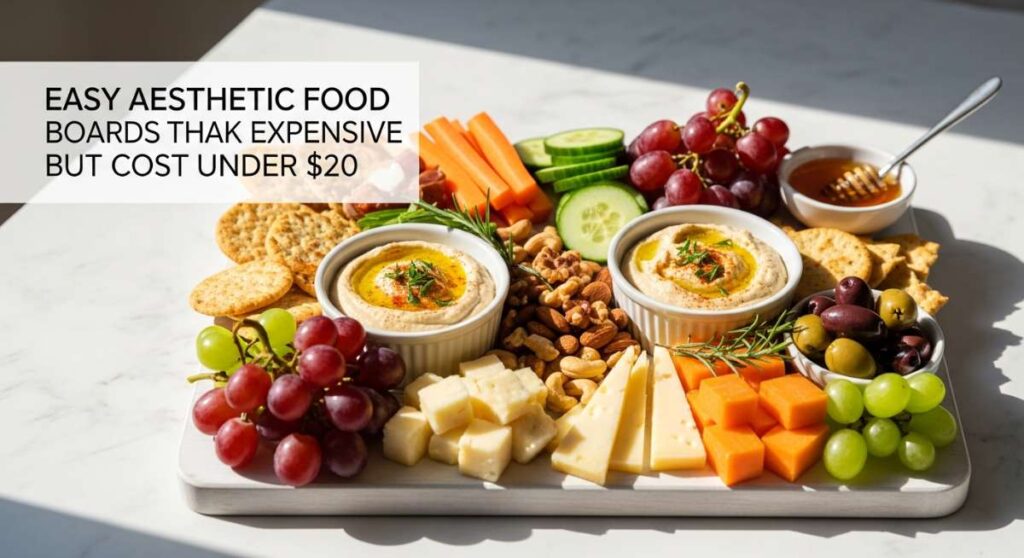
We have all been there—scrolling through Pinterest or TikTok, staring at those breathtaking food boards that look like they belong in a luxury magazine. It’s easy to feel like you need a million dollars and a professional catering team to host a gathering that feels special, but I have a secret for you: the most viral, aesthetic spreads are often the simplest ones. It is all about the presentation, the textures, and a little bit of heart.
Creating an expensive-looking food board is more about the ‘vibe’ than the price tag. By focusing on seasonal ingredients and a few homemade touches, you can create a centerpiece for under $20 that will have your friends reaching for their phones to take a photo before they even take a bite. Today, I am sharing my favorite budget-friendly recipes and tips to help you master the art of the aesthetic food board without breaking the bank.
How to make strawberry pie?

Why we love this
There is nothing quite like the scent of a fresh strawberry pie cooling on the counter to make a house feel like a home. This pie is a celebration of texture—the way the flaky, buttery crust shatters against the jammy, sweet-tart filling is pure magic. Each bite is filled with the vibrant, sun-ripened aroma of berries, balanced by a hint of lemon zest that keeps it bright. It feels like a slice of pure summer nostalgia, perfect for centering a dessert board surrounded by whipped cream and fresh mint.
Ingredients
- 2 1/2 cups all-purpose flour
- 1 cup cold unsalted butter, cubed
- 1 teaspoon salt
- 1 tablespoon sugar
- 6 cups fresh strawberries, hulled and halved
- 3/4 cup granulated sugar
- 1/4 cup cornstarch
- 1 tablespoon lemon juice
- 1 egg (for egg wash)
How to make it
- Start by making the crust: Pulse flour, salt, and 1 tablespoon of sugar in a food processor. Add cold, cubed butter and pulse until it looks like coarse crumbs. Slowly add ice water (1 tablespoon at a time) until the dough just holds together. Divide into two discs, wrap in plastic, and chill for at least 60 minutes. Cold fat is the key to a flaky crust!
- Preheat your oven to 425°F (220°C). On a lightly floured surface, roll out one disc of dough and drape it over a 9-inch pie plate. Trim the edges, leaving a 1-inch overhang.
- In a large bowl, toss the strawberries with 3/4 cup sugar, cornstarch, and lemon juice. Let them sit for 10 minutes to macerate—this allows the juices to release and the cornstarch to begin its thickening work.
- Pour the berry mixture into the crust. Roll out the second disc of dough and place it over the top (or cut into strips for a lattice). Crimp the edges tightly to seal in those precious juices.
- Brush the top with a beaten egg wash and sprinkle with a little extra sugar for a professional, glittering finish.
- Bake at 425°F for 15 minutes to set the crust, then reduce the heat to 375°F and bake for another 40-50 minutes. Look for a deep golden crust and thick, bubbling juices as your visual cue that it is done.
How to make rotel dip?

Why we love this
Rotel dip is the ultimate crowd-pleaser because it hits every single savory note you crave: salty, creamy, spicy, and deeply satisfying. When served in a beautiful ceramic bowl in the middle of a food board, its molten, velvety texture looks incredibly inviting. The aroma of seasoned beef and roasted green chilies instantly signals that the party has started. It’s the kind of dip that disappears in minutes because it feels so indulgent yet so approachable.
Ingredients
- 1 lb Velveeta cheese, cubed
- 1 can (10 oz) Ro-Tel Diced Tomatoes and Green Chilies
- 1 lb ground beef or breakfast sausage
- 1/2 teaspoon taco seasoning
- Fresh cilantro for garnish
- Tortilla chips for serving
How to make it
- Begin by browning your ground beef or sausage in a large skillet over medium-high heat. Use a spatula to break the meat into very small, uniform crumbles. This ensures every bite of the dip has a consistent texture.
- Once the meat is fully cooked and no longer pink, drain the excess grease thoroughly. Too much fat will cause the dip to separate later. Season the meat with taco seasoning for extra depth.
- Turn the heat down to low. Add the cubed Velveeta cheese to the skillet. It is vital to keep the heat low here; if the cheese gets too hot too fast, it can become grainy or scorched.
- Pour in the can of Ro-Tel (including the juices!). Stir constantly with a wooden spoon as the cheese begins to melt into a silky, orange lava.
- Continue stirring until the mixture is completely smooth and the tomatoes and chilies are evenly distributed.
- Transfer to a warm serving bowl immediately. Garnish with chopped cilantro to add a pop of green that makes the dish look high-end. Serve with sturdy chips that can handle the weight of the dip.
How to pack beach snacks?
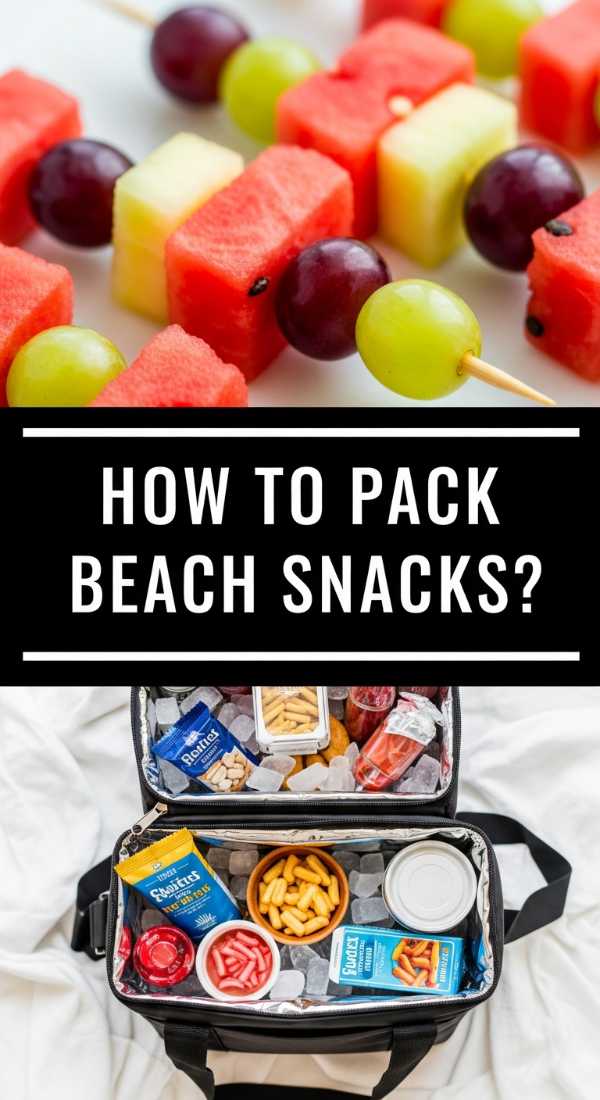
Why we love this
Packing beach snacks is an art form that transforms a simple day in the sand into a luxurious picnic. We love this because it’s about crisp, refreshing flavors that cut through the heat of the sun. Imagine the snap of a cold cucumber, the saltiness of a pretzel, and the burst of a chilled grape while you hear the waves crashing. By packing things aesthetically in clear containers, you create a “snack-scape” that stays sand-free and looks like a professional catering spread.
Ingredients
- Hard cheeses (cheddar or gouda)
- Grapes and sliced melon
- Dry crackers and pretzels
- Individual hummus cups
- Beef jerky or turkey sticks
- Sparkling water cans
How to make it
- Strategy is everything when packing for the beach. Start by choosing a high-quality insulated cooler bag. Use frozen water bottles as your ice packs; they keep things cold and provide a freezing cold drink once they melt.
- Prepare your produce by washing and drying it thoroughly. Moisture is the enemy of a beach snack, as it leads to sogginess. Slice melons into wedges and keep grapes on the stem for easy grabbing.
- Use rigid, airtight acrylic containers. This prevents the snacks from getting crushed by the weight of drinks and keeps the wind-blown sand out of your food.
- Pack your “heavy” items like drinks and dips at the bottom. Place your delicate items like crackers and soft fruits at the very top.
- For an aesthetic look, create “snack boxes” (bento style) where you portion out cheese, nuts, and fruit into individual servings. This prevents cross-contamination and makes it easy to pass out to friends.
- Always include a separate small bag for trash and plenty of wet wipes to clean salty, sandy hands before eating.
How to bake butter bread?

Why we love this
There is a specific kind of magic in a loaf of butter bread—it’s that golden, shimmering crust and the soft, pillowy interior that pulls apart in delicate strands. The aroma alone, a heavenly mix of toasted yeast and rich dairy, can fill a whole house with warmth. It feels expensive and artisanal, but the ingredients are humble. Adding a loaf of homemade butter bread to a food board provides a rustic, high-end anchor that invites everyone to tear off a piece and enjoy.
Ingredients
- 4 cups bread flour
- 1 packet (2 1/4 tsp) active dry yeast
- 1 1/2 cups warm milk (110°F)
- 6 tablespoons unsalted butter, softened
- 2 tablespoons honey
- 1 1/2 teaspoons salt
- Extra melted butter for brushing
How to make it
- In a large bowl, whisk the warm milk and honey. Sprinkle the yeast on top and let it sit for about 5-10 minutes until it becomes foamy. If it doesn’t foam, your yeast might be old, and you’ll need to restart.
- Add 2 cups of flour and the salt to the mixture. Stir until a shaggy dough forms. Add the softened butter one tablespoon at a time, incorporating it fully before adding the next.
- Gradually add the remaining flour. Turn the dough onto a floured surface and knead for 8-10 minutes. You are looking for the ‘windowpane test’—the dough should be smooth and elastic enough to stretch thin without tearing.
- Place the dough in a greased bowl, cover with a damp cloth, and let it rise in a warm, draft-free spot for about 1 hour or until doubled in size.
- Punch the dough down to release air. Shape it into a loaf and place it into a greased loaf pan. Let it rise again for 30-45 minutes.
- Bake in a preheated oven at 350°F (175°C) for 30-35 minutes. The top should be a deep golden brown and the loaf should sound hollow when tapped. Immediately brush the hot crust with melted butter for that signature soft, shiny finish.
How to prep camping meals?

Why we love this
Camping meals bring a sense of adventure to the table, combining the smoky char of an open flame with the comfort of a home-cooked dinner. Prepping these meals ahead of time takes the stress out of outdoor cooking, allowing you to focus on the stars and the fire. We love the contrast of hearty proteins and charred vegetables, all seasoned to perfection. When prepped correctly, these meals look like gourmet campfire cuisine, proving that you don’t need a kitchen to eat like royalty.
Ingredients
- Pre-marinated chicken or steak tips
- Chopped potatoes and carrots
- Bell peppers and onions, sliced
- Olive oil and butter pats
- Heavy-duty aluminum foil
- Dry spice rub (garlic powder, paprika, salt, pepper)
How to make it
- The key to successful camping meals is ‘The Foil Pack.’ Start by chopping all your vegetables into uniform, bite-sized pieces at home. This ensures they cook at the same rate as the meat.
- Marinate your protein in a gallon-sized freezer bag with oil and spices. This tenderizes the meat while it’s in the cooler, deepening the flavor profile.
- Assemble your packs on large sheets of heavy-duty foil. Place a portion of meat and a handful of veggies in the center. Add a pat of butter and a splash of olive oil to keep things moist under the high heat of the fire.
- Fold the foil tightly using a ‘double-fold’ technique: bring the long sides together and fold down twice, then fold the ends in tightly to create an airtight seal. This traps steam, which cooks the food faster.
- Label each pack with a permanent marker. Store them in the coldest part of your cooler.
- When ready to cook, place the packs on a grate over hot coals (not direct flames, which will burn the bottom). Cook for 20-25 minutes, flipping once halfway through. Open carefully to avoid the hot steam!
How to make cucumber salad?

Why we love this
This cucumber salad is the ultimate palate cleanser—crisp, cold, and incredibly vibrant. We love the way the thin, translucent slices of cucumber soak up the tangy vinaigrette, creating a refreshing crunch that is perfect for a summer food board. The addition of red onions provides a sharp bite, while fresh dill adds an earthy, aromatic finish. It’s a simple dish that looks sophisticated and bright, adding a necessary freshness to a spread of heavier cheeses or meats.
Ingredients
- 3 large English cucumbers
- 1/2 red onion, very thinly sliced
- 1/2 cup white wine vinegar
- 2 tablespoons sugar
- 1 teaspoon salt
- 1/4 cup fresh dill, chopped
- Black pepper to taste
How to make it
- Start with English cucumbers because they have thinner skins and fewer seeds, which results in a better texture. Use a mandoline slicer to get paper-thin rounds. Consistency is key for that ‘expensive’ look.
- Place the sliced cucumbers in a colander and sprinkle with salt. Let them sit for 15 minutes. This draws out excess water, ensuring your salad stays crunchy and the dressing doesn’t get watered down.
- While the cucumbers drain, whisk together the vinegar, sugar, and black pepper in a small bowl until the sugar is completely dissolved.
- Pat the cucumbers dry with a paper towel and place them in a large glass bowl. Add the thinly sliced red onions.
- Pour the dressing over the vegetables and toss gently to coat. Fold in the fresh chopped dill.
- Let the salad chill in the refrigerator for at least 30 minutes before serving. This allows the flavors to meld and the cucumbers to become slightly pickled. Serve in a shallow white bowl for maximum aesthetic appeal.
How to grill fresh vegetables?

Why we love this
There is an inherent beauty in grilled vegetables—the bold char marks, the deepened colors, and the concentrated sweetness that only comes from high-heat caramelization. We love how grilling transforms humble produce like zucchini and asparagus into something that feels like a main event. The smoky aroma and the tender-crisp texture make these a stellar addition to any food board, especially when drizzled with a glossy balsamic glaze or a sprinkle of flaky sea salt.
Ingredients
- Assorted veggies (asparagus, bell peppers, zucchini, red onion)
- 3 tablespoons olive oil
- 2 cloves garlic, minced
- 1 teaspoon dried oregano
- Salt and cracked black pepper
- Balsamic glaze for drizzling
How to make it
- Preheat your grill to medium-high heat (about 400°F). Make sure the grates are clean and lightly oiled to prevent sticking.
- Prep your vegetables by cutting them into large, flat pieces. Keep asparagus whole, slice zucchini into long planks, and cut peppers into wide strips. Larger pieces are easier to manage on the grill and look more rustic-chic.
- In a large bowl, toss the vegetables with olive oil, minced garlic, oregano, salt, and pepper. Ensure every piece is thinly and evenly coated—this promotes even browning.
- Place the vegetables on the grill. Do not overcrowd the grates, or they will steam rather than sear.
- Grill for 3-5 minutes per side. Use tongs to check for those iconic dark char marks. The goal is to have the vegetables softened but still possessing a slight “snap” when bitten.
- Remove from the grill and arrange them artfully on a wooden board. Drizzle with balsamic glaze while they are still warm so the flavors soak in.
How to cook summer meals?

Why we love this
Summer meals are all about ease and the celebration of the season’s bounty. We love this approach because it emphasizes minimal time over a hot stove and maximum time enjoying the long, golden evenings. These meals are light, colorful, and rely on the natural sweetness of fresh produce. By keeping flavors clean and using techniques like quick-searing or raw assemblies, you create a food board that feels effortless, breezy, and incredibly high-end.
Ingredients
- 1 lb pasta (like fusilli or gemelli)
- 1 jar high-quality pesto or fresh basil
- 1 pint cherry tomatoes, halved
- 8 oz fresh mozzarella pearls
- Fresh lemon juice
- Toasted pine nuts
How to make it
- Boil a large pot of heavily salted water. Cook your pasta until it is ‘al dente’—firm to the bite. Before draining, reserve 1/2 cup of the starchy pasta water.
- In a large serving bowl, mix your pesto with a squeeze of fresh lemon juice to brighten the color and flavor.
- Add the hot pasta to the bowl and toss. If the sauce is too thick, add a tablespoon or two of the reserved pasta water to create a silky emulsion that clings to the noodles.
- Let the pasta cool to room temperature. This is the secret to a great summer meal; it shouldn’t be piping hot, but rather refreshing.
- Gently fold in the halved cherry tomatoes and mozzarella pearls. The heat from the pasta should slightly soften the cheese without melting it completely.
- Top with toasted pine nuts for a crunch and extra basil leaves. Serve on a large platter as the centerpiece of your food board, surrounded by crusty bread.
How to make party dip?

Why we love this
A layered party dip is a visual masterpiece that offers a different experience with every scoop. We love the architectural beauty of the layers—the creamy base, the colorful veggies, and the dusting of cheese on top. It’s a sensory delight, combining cool, creamy textures with the crunch of fresh toppings. It’s the ultimate social food, designed for sharing and dipping, making it the perfect focal point for a budget-friendly but gorgeous entertaining board.
Ingredients
- 16 oz cream cheese, softened
- 1 cup sour cream
- 1 packet taco seasoning or dry ranch mix
- 2 cups shredded lettuce
- 1 cup diced tomatoes
- 1/2 cup black olives, sliced
- 1 cup shredded cheddar cheese
How to make it
- In a medium bowl, use a hand mixer to blend the softened cream cheese, sour cream, and seasoning packet. Whip it until it is light and airy. This makes it easier to dip into without breaking your chips.
- Spread the cream cheese mixture into an even layer at the bottom of a shallow glass dish or on a rimmed board. Use an offset spatula to smooth the surface for a clean, professional look.
- Chill this base layer for at least 30 minutes. This firms it up so the subsequent layers don’t sink in.
- Layer the shredded lettuce next, followed by the diced tomatoes. Make sure to pat the tomatoes dry with a paper towel first to prevent the dip from becoming watery.
- Scatter the black olives and shredded cheese evenly over the top.
- For the most aesthetic presentation, leave a small border of the creamy base visible around the edges. Serve with a variety of colorful crackers or vegetable batons.
How to make tomato salad?

Why we love this
Tomato salad is the epitome of garden-to-table elegance. We love it because it relies entirely on the quality of the ingredients; when you use heirloom tomatoes in shades of purple, yellow, and deep red, the dish looks like a piece of art. The smell of fresh basil mixed with the acidity of balsamic vinegar is intoxicating. It’s juicy, vibrant, and feels incredibly luxurious, despite being one of the most affordable dishes to assemble during the summer months.
Ingredients
- 4 large heirloom tomatoes (different colors)
- 1 cup cherry tomatoes, halved
- 1/4 cup red onion, thinly sliced
- Fresh basil leaves, torn
- 2 tablespoons extra virgin olive oil
- 1 tablespoon thick balsamic glaze
- Flaky sea salt and cracked black pepper
How to make it
- Slice your large heirloom tomatoes into thick rounds or irregular wedges. A mix of shapes makes the salad look more organic and high-end.
- Arrange the tomato slices on a large, flat platter. Scatter the halved cherry tomatoes into the gaps to create a sense of abundance.
- Tuck the thinly sliced red onions in between the tomatoes.
- The seasoning timing is crucial: sprinkle the tomatoes generously with flaky sea salt and pepper and let them sit for 5 minutes. This draws out the tomato’s natural juices, which mix with the oil to create a built-in dressing.
- Drizzle the extra virgin olive oil and the balsamic glaze in a zig-zag pattern across the entire platter.
- Finish by scattering plenty of torn fresh basil over the top. Do not chop the basil with a knife, as this can bruise the leaves; tearing them releases the oils and looks more rustic. Serve at room temperature for the best flavor.
Conclusion: The Art of the Affordable Board
Hosting a beautiful gathering doesn’t have to be a financial burden. By focusing on these simple, high-impact recipes, you can create a viral-worthy food board that feels curated and expensive. Remember, the secret lies in the details—the fresh herbs, the intentional layering, and the warmth of sharing homemade food. Whether it’s a beach day or a backyard summer dinner, these aesthetic spreads prove that luxury is a feeling, not a price tag.