

Electric Expressions: DIY Vibrant Maximalist Nail Art Step-by-Step
Hello, my beautiful loves! I am so incredibly happy you’ve found your way into my little corner of the world today. I was sitting by my window this morning, watching the sunlight dance across my own mismatched, glittery fingertips, and I felt this overwhelming wave of gratitude for the way we choose to express ourselves. Our hands do so much for us—they hold tea mugs, they hug our dear ones, and they create magic. Why shouldn’t they be a vibrant canvas of pure, unadulterated joy?
Maximalism isn’t just a trend; it’s a soft embrace of every part of your personality that refuses to be quiet. It’s about saying ‘yes’ to every color that makes your heart skip a beat and ‘yes’ to the textures that make you feel alive. Today, I’ve curated a collection of my favorite electric expressions to help you transform your nails into tiny masterpieces. Let’s dive into this rainbow together, shall we?
Create colorful junk nails in 7 simple steps

Why to love this recipe:
Colorful junk nails are the ultimate love letter to your inner child. They celebrate the beautiful mess of life by piling on everything that makes you smile—from tiny bears to shimmering pearls. It’s a texture-rich experience that turns your hands into a literal party that never ends.
Essential Ingredients:
- Clear builder gel
- Assorted 3D nail charms (bows, hearts, stars)
- Neon gel polishes
- Fine-tipped tweezers
- UV/LED Lamp
- High-gloss top coat
- Small rhinestones
How to Prepare:
- Apply a vibrant base color of your choice and cure.
- Map out where you want your largest charms to sit on each nail.
- Apply a dollop of builder gel to the nail surface.
- Using tweezers, press your 3D charms into the gel.
- Fill in the gaps with smaller rhinestones or pearls.
- Flash cure for 10 seconds to set, then full cure for 60 seconds.
- Seal the edges of the charms (not the tops!) with a top coat for longevity.
Budget Range
- Modelones 3D Nail Charm Kit ($12)
- Saviland Builder Gel ($9)
- Beetles Neon Gel Polish Set ($15)
Design 5 colorful stiletto nails for summer
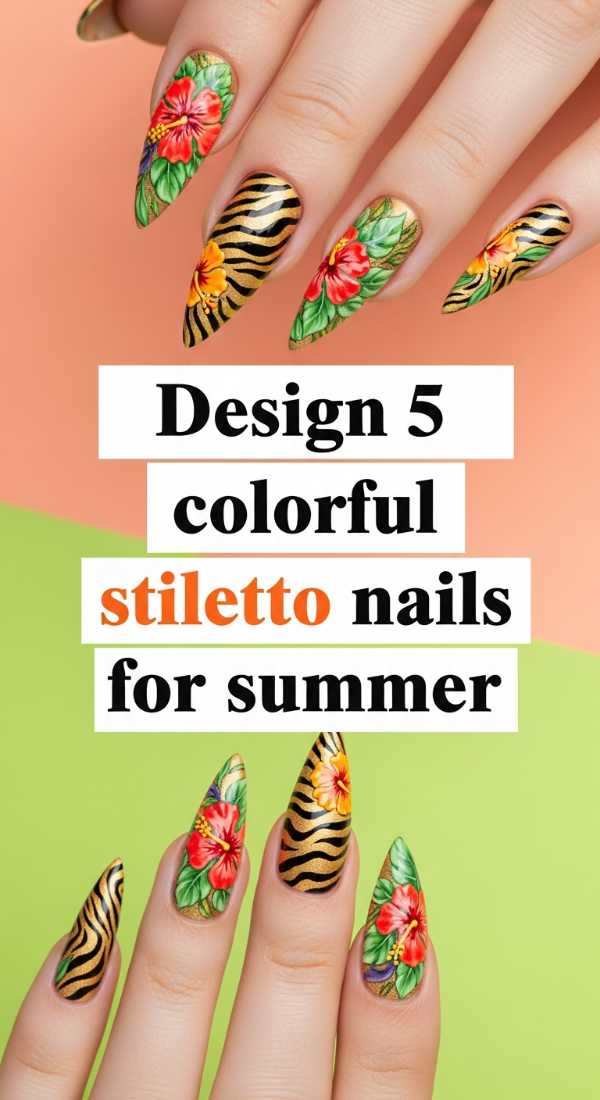
Why to love this recipe:
The stiletto shape is all about confidence and grace, and when you pair it with summer’s hottest hues, it’s absolutely unstoppable. These five designs focus on the heat of the season—think sunsets, tropical blooms, and cooling ocean waves all at your fingertips.
Essential Ingredients:
- Stiletto nail tips or forms
- Neon pink, orange, and turquoise polish
- Gold foil flakes
- Detailing brush
- Matte top coat
How to Prepare:
- Shape your extensions into a sharp, elegant stiletto point.
- Apply a different neon base to each nail to represent summer vibes.
- On the thumb, paint a swirling sunset gradient.
- Use gold foil on the ring finger for a sun-kissed accent.
- Add delicate tropical leaf silhouettes using a detailing brush on the index finger.
Budget Range
- Makartt Stiletto Nail Tips ($10)
- Essie Summer Collection ($9 per bottle)
- Nail Art Gold Foil Flakes ($6)
Apply multi colored nails with 4 pro techniques

Why to love this recipe:
Ever wonder how the pros get those perfectly crisp lines and seamless transitions? This recipe breaks down the ‘how-to’ of multi-colored excellence. It’s like having a masterclass in your own living room, giving you the power to create professional-grade art while sipping your favorite latte.
Essential Ingredients:
- Liquid latex (for skin protection)
- Nail stamping plate
- Makeup sponges
- Striping tape
- High-quality pigment polishes
How to Prepare:
- The Sponge Method: Dab three colors onto a sponge and press onto the nail for a soft gradient.
- The Tape Method: Use striping tape to create geometric blocks of contrasting colors.
- The Stamping Method: Use a plate to layer vibrant patterns over a solid base.
- The Marbling Method: Drop polish into water, swirl, and dip your nail for a unique psychedelic look.
Budget Range
- Pueen Nail Stamping Kit ($18)
- Holic Liquid Latex ($8)
- Winstonia Striping Tape Set ($7)
Master two color nails in 3 easy minutes

Why to love this recipe:
Mastering two-color nails in 3 easy minutes is perfect for my busy loves who still want that electric spark without the time commitment. It’s the ‘less is more’ approach to maximalism—high contrast, high impact, and incredibly chic for any occasion.
Essential Ingredients:
- Two highly contrasting polishes (e.g., Electric Blue and Lemon Yellow)
- Quick-dry top coat
- Angled clean-up brush
How to Prepare:
- Paint one half of the nail vertically with your first color in one smooth stroke.
- Immediately paint the second half with your contrasting color, slightly overlapping the middle.
- Apply a quick-dry top coat to blend the center line and add instant shine.
Budget Range
- OPI Infinite Shine Duo ($20)
- Seche Vite Fast Dry Top Coat ($9)
Shape 6 colourful acrylic nails like a pro
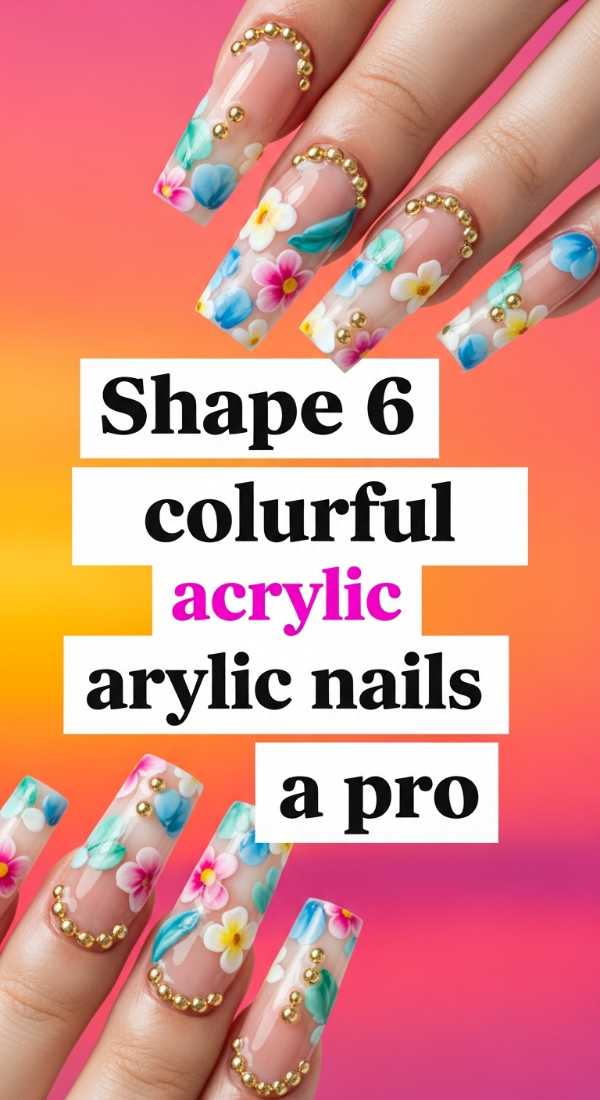
Why to love this recipe:
There is something so meditative about shaping acrylics. This tutorial focuses on the architecture of the nail, ensuring your colorful creations have the perfect foundation. It’s about building strength and beauty simultaneously, giving you a professional finish that lasts weeks.
Essential Ingredients:
- Acrylic powder (colored or clear)
- Monomer liquid
- Acrylic brush (Size 8 or 10)
- 100/180 grit nail files
- Buffer block
How to Prepare:
- Prep the natural nail and apply your primer.
- Place a bead of colored acrylic at the free edge to set the length.
- Apply a second bead at the apex for structural strength.
- Place a smaller bead near the cuticle, feathering it down softly.
- Once dry, file the sidewalls and tip to your desired shape (Square, Almond, or Coffin).
- Buffer to a smooth finish before adding your final pops of color.
Budget Range
- Mia Secret Professional Acrylic Kit ($25)
- Pana Professional Nail Files ($8)
Paint 8 colorful nail designs for your vacation

Why to love this recipe:
Vacation is the time to let your soul fly, and these eight designs are your boarding pass to paradise. Whether you’re heading to a beach or a bustling city, these looks are designed to match the energy of exploration and the joy of new horizons.
Essential Ingredients:
- Pastel and Bright polish set
- Dotting tools
- Fine liner brush
- Fruit-themed nail decals
- Iridescent glitter
How to Prepare:
- Design 1-2: Create ‘Citrus Slices’ using orange and lime hues with a dotting tool.
- Design 3-4: Paint ‘Ocean Waves’ using three shades of blue and a liner brush.
- Design 5-6: Apply ‘Poolside Sparkle’ with chunky iridescent glitter over a white base.
- Design 7-8: Use ‘Sunset Ombre’ techniques combined with tiny palm tree decals.
Budget Range
- Gellen Gel Polish Set ($16)
- Nail Art Dotting Tool Set ($5)
- Fruit Nail Art Decals ($7)
Blend multicolor nails using 5 smooth steps

Why to love this recipe:
Blending is an art form that feels like painting a watercolor sky. This recipe teaches you how to soften the lines between your favorite colors, creating a ‘dreamscape’ effect on your nails. It’s soft, it’s ethereal, and it’s deeply comforting to look at.
Essential Ingredients:
- Wedge-shaped makeup sponges
- Base coat (preferably white to make colors pop)
- Coordinating polish trio
- Clean-up brush with acetone
How to Prepare:
- Apply a solid white base coat and let it dry completely.
- Paint stripes of your three colors directly onto the makeup sponge.
- Lightly bounce the sponge onto the nail, moving it slightly up and down to blur the lines.
- Repeat for a second layer once the first is dry to increase intensity.
- Clean the edges of your skin with a brush dipped in acetone for a sharp finish.
Budget Range
- Sally Hansen Xtreme Wear White ($4)
- Bulk Makeup Sponges ($6)
- Pure Acetone ($5)
Apply color street nails flawlessly in 3 steps

Why to love this recipe:
For my loves who are always on the go but refuse to sacrifice style, this is your magic trick. Color Street strips offer intricate designs and vibrant colors in a dry-strip format. It’s maximalism without the dry time, giving you a flawless manicure in minutes.
Essential Ingredients:
- Color Street nail strips
- Alcohol prep pads
- Nail file
How to Prepare:
- Cleanse your nails thoroughly with an alcohol prep pad to remove oils.
- Peel the strip, center it on your nail, and press down firmly from the cuticle to the tip.
- Fold the excess over the edge and use a nail file in a downward motion to remove the surplus.
Budget Range
- Color Street Mixed Mani Sets ($13)
- Standard Manicure Prep Kit ($5)
Style different color nails for 7 summer days

Why to love this recipe:
This is for the fashionistas who view their nails as the ultimate accessory. Why settle for one look when you can have a week’s worth of inspiration? This guide ensures your electric expressions match your summer wardrobe perfectly, every single day.
Essential Ingredients:
- A rainbow of 7 different polishes
- Small mixing palette
- Top and Base coats
How to Prepare:
- Monday: Bold Monochrome (Electric Blue).
- Tuesday: Mismatched ‘Skittles’ Mani (different color on every finger).
- Wednesday: Neon French Tips.
- Thursday: Half-and-half vertical split.
- Friday: Glitter gradient over a bright base.
- Saturday: Floral accents on two fingers.
- Sunday: Soft pastel rainbow to reset for the week.
Budget Range
- Zoya Rainbow Nail Polish Set ($30)
- Nail Art Palette ($4)
Get colorful nail inspo with 10 vibrant looks

Why to love this recipe:
Sometimes we just need a spark to light the fire of creativity. This curated list of ten looks is designed to be your visual mood board. From ‘Cyberpunk Neon’ to ‘Boho Rainbow,’ there is a vibe here for every mood and every beautiful soul.
Essential Ingredients:
- Inspiration photos
- Various textures (matte, gloss, chrome)
- Assorted nail gems
How to Prepare:
- Browse the 10 looks: 1. Holographic Rain, 2. Neon Checkerboard, 3. Aura Nails, 4. 3D Jelly Drops, 5. Abstract Swirls, 6. Velvet Cat Eye, 7. Pop Art Comics, 8. Tie-Dye Dream, 9. Chrome Rainbow, 10. Crystal Galaxy.
- Pick the look that resonates with your current energy.
- Gather your tools and recreate the magic!
Budget Range
- Born Pretty Chrome Powder ($8)
- Jelly Gel Polish Set ($12)
Embrace Your Inner Glow
My sweet friends, I hope these tutorials fill you with as much excitement as they fill me. Remember, nail art isn’t about perfection; it’s about the feeling you get when you look down and see something that reflects your unique light. Don’t be afraid to mix these recipes, break the rules, and make them your own. You are a masterpiece in progress, and your nails are just one of the many ways you tell the world who you are. Go forth and shine in every color of the rainbow!