

Elevate Your Every Day: The Ultimate Guide to Lifestyle & Home Chic
There is a profound magic in the way our surroundings influence our souls. We often think of ‘home’ as a place where we store our things, but in reality, it is the canvas upon which we paint the rhythm of our lives. When we take the time to curate our spaces with intention—from the way the morning light hits a perfectly placed plant to the tactile comfort of a vintage throw—we are telling ourselves that our daily peace is worth the effort.
This guide is born out of a passion for finding beauty in the mundane and turning the ordinary into the extraordinary. Whether you are looking to reclaim your productivity in a cramped cubicle or transform your backyard into a sun-drenched sanctuary, these ideas are designed to spark joy and foster a sense of belonging in every corner of your world. Let’s dive into the art of living beautifully, one intentional detail at a time.
How to Design Simple Front Yard Landscaping for Instant Curb Appeal

Why we love this
There is something deeply satisfying about pulling into your driveway and feeling an immediate sense of pride and calm. Simple landscaping focuses on clean lines and sustainable beauty, blending the earthy scent of fresh mulch with the vibrant, waxy textures of evergreen shrubs. It transforms a standard exterior into a welcoming gateway that feels both manicured and natural, offering a visual ‘deep breath’ for you and your guests before you even reach the front door.
Essential Elements:
- Low-maintenance evergreen shrubs (like Boxwood or Juniper)
- Hardwood mulch in a dark espresso or black finish
- Solar-powered LED path lights
- Natural stone edging or pavers
- A focal point specimen tree (like a Japanese Maple or Magnolia)
How to make it
- Begin by clearing all existing weeds and debris from your targeted flower beds, ensuring you have a completely clean slate to work with.
- Use a garden hose or spray paint to mark out soft, flowing curves for your bed edges; avoid rigid straight lines to create a more organic and professional look.
- Dig a trench about 3 inches deep along your marked lines and install your stone edging, ensuring each piece is level and firmly packed with soil to prevent shifting.
- Amend your soil with organic compost to a depth of 6 inches, ensuring your new plants have the nutrient-rich foundation they need to thrive.
- Place your largest plants first (the ‘anchors’) and step back to check the symmetry from the street before digging your holes twice as wide as the root balls.
- Once plants are in the ground, apply a thick 3-inch layer of mulch across the entire bed, keeping it away from the direct base of the plant stems to prevent rot.
- Finish by spacing your solar lights evenly along the edge, pushing them firmly into the ground to provide a warm, inviting glow at dusk.
How to Curate an Office Desk Setup for a Productive Work Cubicle

Why we love this
A curated workspace is the ultimate tool for mental clarity, acting as a physical extension of your focus. When your desk is organized, the air feels lighter, and the tactile sensation of a smooth desk mat combined with the soft, warm light of a task lamp can drastically reduce the stress of a deadline. It’s about creating a sensory environment that smells of fresh espresso and feels like a professional sanctuary, where every tool has its place and productivity happens by design, not by accident.
Essential Elements:
- Large felt or vegan leather desk mat
- Ergonomic laptop stand or monitor riser
- Minimalist cable management clips
- A small, hardy indoor plant (like a Snake Plant or Pothos)
- Neutral-toned desk organizers
How to make it
- Start by completely clearing your desk of all items, including computers and cables, then wipe down the entire surface with a microfiber cloth and a mild cleaner.
- Place your large desk mat in the center; this defines your primary work zone and provides a soft, warm texture for your forearms and mouse.
- Set up your monitor or laptop on a riser so the top of the screen is at eye level, which immediately improves your posture and reduces neck strain.
- Route all power and data cables through the back of the desk, using adhesive clips or sleeves to hide them from view and prevent the visual ‘noise’ of tangled wires.
- Arrange your most-used items (pens, notebooks) on your dominant-hand side using a tiered organizer to maximize vertical space without cluttering the horizontal plane.
- Introduce a small desk plant in a ceramic pot to add a touch of life and improve air quality, placing it in a corner that doesn’t interfere with your arm movement.
- Adjust your lighting so that you have a warm task light hitting your paperwork at a 45-degree angle, minimizing glare and creating a cozy, focused atmosphere.
How to Style JBL Speakers for a Seamless Minimalist Tech Vibe
Why we love this
Sound is the invisible architecture of a room, and styling your tech should be as intentional as styling your furniture. Integrating high-quality JBL speakers into a minimalist aesthetic allows the sleek, matte textures of the hardware to complement your decor rather than distract from it. The experience is one of pure, crisp audio that seems to emanate from the very walls, creating a sophisticated atmosphere that feels modern, tech-forward, yet incredibly warm and inviting.
Essential Elements:
- JBL Bluetooth or bookshelf speakers
- Floating wooden or acrylic shelves
- Neutral-colored acoustic foam panels (optional for sound quality)
- Small decorative objects (like a ceramic vase or a single art book)
- Velcro cable ties
How to make it
- Select a location for your speakers that is at ear level when seated, as this provides the best acoustic performance for a minimalist listening lounge.
- Install floating shelves with hidden brackets to create the illusion that your speakers are hovering, maintaining the clean lines essential to a minimalist look.
- Place the speakers at a slight ‘toe-in’ angle, pointing them toward your primary seating position for a focused soundstage that fills the room.
- Conceal any necessary power cords by running them through a slim cord cover painted the exact color of your wall, or tuck them behind furniture legs using Velcro ties.
- Balance the tech by placing one or two non-electronic items nearby, such as a matte ceramic vessel or a small textured sculpture, to soften the ‘gadget’ feel.
- Use a level to ensure your shelves and speakers are perfectly horizontal; in minimalist design, even a slight tilt can disrupt the visual harmony of the room.
- Calibrate your sound settings via the JBL app, ensuring the bass levels are adjusted for your specific room size to prevent any vibrating or muffled tones.
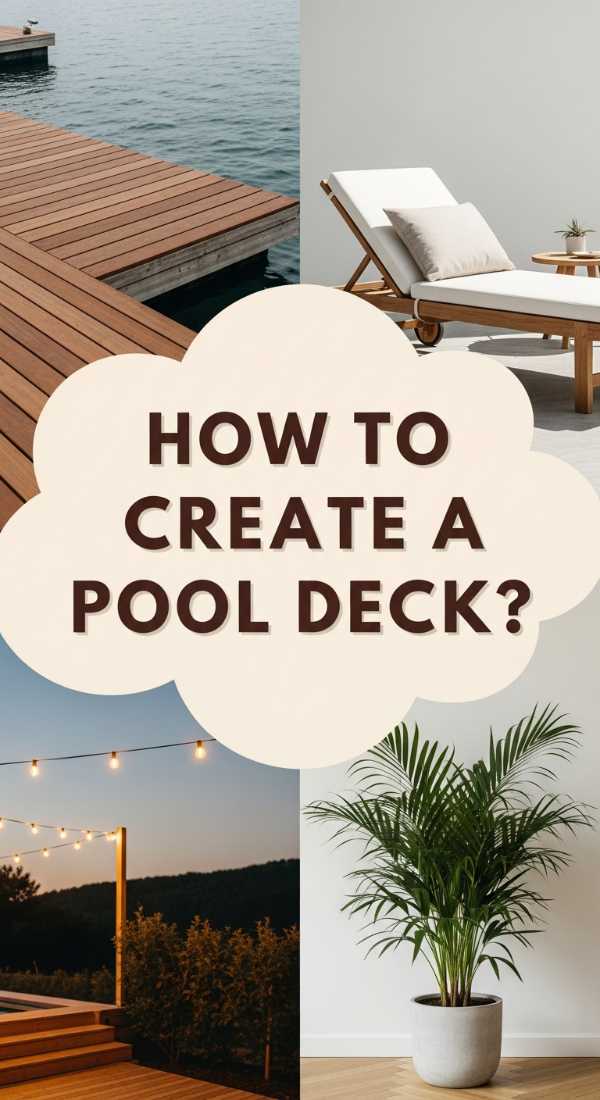
How to Build a Cheap Pool Deck for Your Ultimate Summer Oasis
Why we love this
There is nothing quite like the feeling of sun-warmed wood beneath your bare feet and the refreshing scent of chlorine in the air on a Saturday afternoon. Building a budget-friendly pool deck turns an ordinary above-ground pool into a luxurious destination, offering a dedicated space for lounging with an ice-cold lemonade. It creates a seamless transition from the grass to the water, giving your backyard the upscale, resort-style atmosphere of an expensive summer retreat without the heavy price tag.
Essential Elements:
- Pressure-treated 2×4 and 2×6 lumber
- Concrete deck blocks
- Galvanized deck screws
- Weather-resistant wood stain
- Sanding block or power sander
How to make it
- Measure the height of your pool and mark the ground around it to determine the footprint of your deck, ensuring you leave at least a 2-inch gap from the pool wall.
- Level the ground where your concrete deck blocks will sit, using a shovel to remove sod and a layer of gravel to ensure a stable, non-sinking foundation.
- Place your deck blocks and insert your 4×4 pressure-treated posts, using a long level to make sure every post is perfectly vertical and aligned with its neighbors.
- Install your outer rim joists and then fill in the inner joists every 16 inches, securing them with galvanized screws to create a rock-solid structural frame.
- Lay your deck boards across the top, using a spacer (like a large nail) to ensure even gaps between the boards for water drainage and wood expansion.
- Sand the entire surface of the wood with 80-grit sandpaper to remove any splinters or rough edges, making it safe for bare feet and smooth to the touch.
- Apply two coats of a high-quality, UV-resistant wood stain in a light cedar or weathered grey finish, allowing 24 hours of drying time between coats for maximum durability.
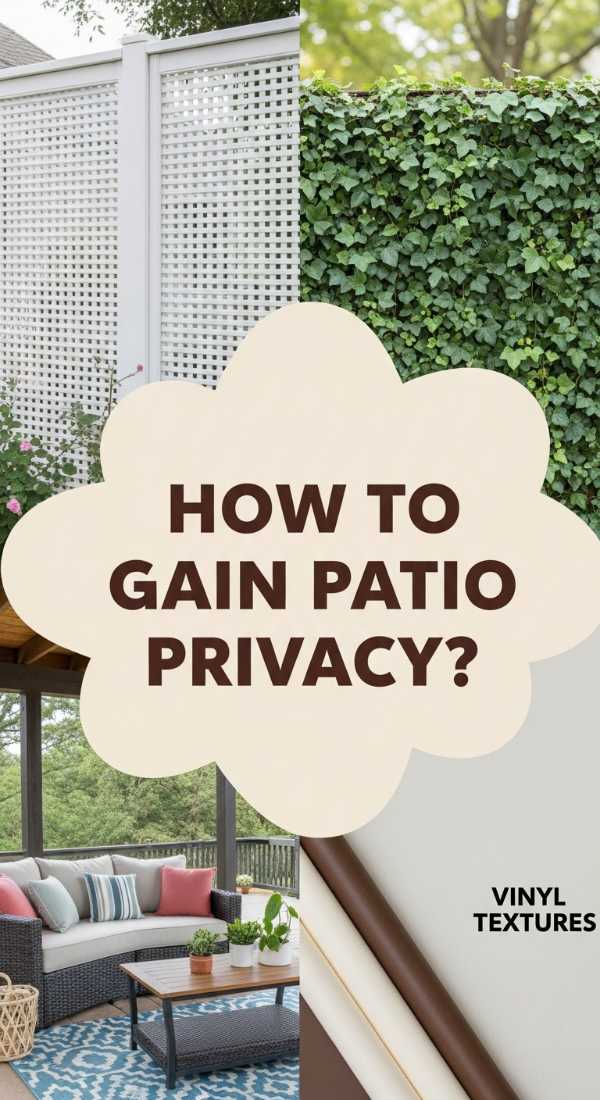
How to Install Vinyl Lattice Panels for Elegant Outdoor Privacy

Why we love this
Privacy is the ultimate luxury in an outdoor space, and vinyl lattice offers a delicate, airy way to achieve it. We love how the geometric patterns create a dance of light and shadow on your patio, while the crisp white or wood-grain texture adds a layer of architectural interest. It’s the perfect backdrop for climbing roses or ivy, turning a basic fence or deck underside into a lush, private garden room that smells of jasmine and feels like a secret escape from the outside world.
Essential Elements:
- 4’x8′ Vinyl lattice panels
- Vinyl U-channel molding and H-channel connectors
- Stainless steel screws with matching caps
- Power drill and circular saw (with a fine-tooth blade)
- Measuring tape
How to make it
- Measure the opening you wish to cover and subtract 1/4 inch from all sides to allow for the natural expansion and contraction of the vinyl in different temperatures.
- Cut your vinyl lattice panels to size using a circular saw with a fine-tooth blade, ensuring you cut slowly to avoid cracking the plastic material.
- Slide the U-channel molding onto the edges of your panel; this provides a finished, professional look and adds structural rigidity to the flexible lattice.
- Pre-drill holes through the U-channel and the lattice every 12 inches, making the holes slightly larger than the screws to allow the panel to ‘float’ inside the frame.
- Attach the panels to your wooden posts or deck frame using stainless steel screws, being careful not to over-tighten them, which can cause the vinyl to warp.
- Use H-channel connectors if you are joining two panels side-by-side to create a seamless, continuous transition between the geometric patterns.
- Snap on decorative screw caps that match the color of your lattice to hide the hardware and give your privacy wall a clean, high-end finish.
How to Create Summer Table Centerpieces for an Enchanting Garden Party

Why we love this
A beautiful centerpiece is the heartbeat of a garden party, drawing people together over shared plates and lively conversation. We love the sensory overload of fresh-cut peonies mixed with the herbal aroma of sprigs of rosemary and mint. The sight of flickering candlelight reflecting off vintage glassware creates an enchanting, ethereal atmosphere that makes even a simple lunch feel like a grand celebration of the season’s bounty and the warmth of friendship.
Essential Elements:
- Low-profile ceramic or wooden troughs
- Floral foam or a ‘chicken wire’ frog
- Seasonal blooms (Dahlias, Zinnias, or Hydrangeas)
- Fresh herbs (Eucalyptus, Mint, or Rosemary)
- Unscented tea lights or tapered candles
How to make it
- Select a low-profile vessel so that guests can easily see each other across the table; soak your floral foam in water until it is fully saturated before placing it in the container.
- Start by creating a lush ‘base’ of greenery, using your herbs and eucalyptus to spill over the edges of the vessel, hiding the rim and adding a fragrant foundation.
- Incorporate your largest ‘hero’ flowers (like Hydrangeas) in a triangular pattern to establish the shape and volume of the arrangement.
- Fill in the gaps with smaller, more delicate blooms like Zinnias or spray roses, vary the heights of the stems to create a natural, ‘just-picked’ garden look.
- Ensure you are turning the arrangement as you work so it looks beautiful and balanced from every angle of the dining table.
- Tuck in a few sprigs of berries or interesting textures like dried grasses to add a whimsical, boho-chic element to the classic floral display.
- Nestle tea lights in glass votives between the greenery, ensuring they are placed safely away from any flammable petals to provide a soft, flickering glow.
How to Decorate a Whimsical Apartment for a Dreamy Urban Escape

Why we love this
In the heart of a bustling city, a whimsical apartment serves as a portal to a more magical reality. It’s about the soft touch of velvet furniture, the sparkle of sun-catchers throwing rainbows across the walls, and a color palette that feels like a sunset in the clouds. This style celebrates the joy of the unexpected—a mix of patterns and textures that shouldn’t work together but do, creating a space that feels imaginative, cozy, and deeply personal.
Essential Elements:
- Sheer iridescent curtains
- Velvet floor pillows in jewel tones
- Fairy lights or neon wall art
- Curated ‘curiosity’ shelves with crystals and vintage trinkets
- Removable floral wallpaper
How to make it
- Identify one wall as your focal point and apply a removable, large-scale floral or celestial wallpaper to set a bold, whimsical tone for the entire room.
- Layer your window treatments by hanging heavy velvet drapes over sheer iridescent panels; this creates a rich, textured look that filters city light into a soft glow.
- Swap out standard hardware on your cabinets and dressers for mismatched vintage brass or ceramic knobs to add a touch of ‘found’ character to modern furniture.
- Arrange a gallery wall that combines traditional art with 3D objects, such as antique mirrors, hanging dried flowers, or decorative plates.
- Incorporate lighting at various levels—use floor lamps with warm bulbs, string lights draped over bookshelves, and a small neon sign for a playful pop of color.
- Mix and match your textiles by pairing a sleek leather sofa with a chunky knit throw and silk pillows, creating a tactile experience that invites you to lounge.
- Place prisms or sun-catchers in your sunniest window to fill the space with dancing light patterns during the golden hour, enhancing the magical atmosphere.
How to Arrange Aquarium Setup Ideas for a Calming Living Space

Why we love this
An aquarium is a living piece of art that brings the serene energy of the water indoors. The gentle hum of the filter and the rhythmic movement of fish through vibrant green plants create a meditative focal point that naturally lowers stress levels. We love how the cool blue light and the organic textures of driftwood and river stones add a sense of life and motion to a quiet room, making your living space feel like a sophisticated, tranquil underwater gallery.
Essential Elements:
- Rimless glass aquarium tank
- Natural substrate (sand or fine gravel)
- Spider wood or Malaysian driftwood
- Live aquatic plants (Anubias or Java Fern)
- High-CRI LED lighting
How to make it
- Thoroughly rinse your substrate under cold water until the runoff is clear, then slope it from the back to the front of the tank to create visual depth and a sense of scale.
- Position your driftwood or large rocks following the ‘Rule of Thirds,’ placing the main focal point slightly off-center to create a more natural and pleasing composition.
- Affix ‘epiphyte’ plants like Anubias to your driftwood using clear fishing line or aquarium-safe glue, as these plants thrive when their roots are exposed to the water flow.
- Fill the tank slowly by pouring water over a small plate placed on the substrate; this prevents the force of the water from disturbing your carefully placed décor.
- Install a high-quality LED light and set it on a timer for 8 hours a day to mimic a natural day-night cycle, which promotes plant growth and fish health.
- Add a thin layer of floating plants (like Duckweed or Frogbit) to the surface to diffuse the light and create a beautiful ‘dappled’ effect throughout the water column.
- Allow the tank to ‘cycle’ for at least two weeks, testing the water parameters regularly before introducing fish to ensure the environment is stable and safe.
How to Embrace a Vintage Grandma House Aesthetic for a Cozy Nostalgic Home

Why we love this
The ‘Grandmacore’ aesthetic is a warm hug in interior design form. It’s the smell of cinnamon and old paper, the sight of intricate lace doilies on dark wood tables, and the comfort of a home that feels ‘lived-in.’ We love how this style rejects the coldness of modern minimalism in favor of heirlooms, floral patterns, and a maximalist approach to comfort. It’s about creating a space where every item has a history and every corner invites you to curl up with a cup of tea and a good book.
Essential Elements:
- Scalloped-edge linens and lace runners
- Floral-patterned upholstery or wallpaper
- Gallery wall of mismatched vintage frames
- Antique porcelain teacups and saucers
- Heavy, knitted patchwork quilts
How to make it
- Scour local thrift stores and estate sales for solid wood furniture with ornate carvings; don’t worry about matching wood tones, as a variety of finishes adds to the charm.
- Layer your textiles by placing a lace runner over a solid linen tablecloth, and stacking multiple quilts at the foot of your bed for a rich, storied look.
- Display your ‘pretties’—group vintage porcelain, brass candlesticks, and old books on open shelving or inside a glass-fronted hutch to create visual interest.
- Choose a color palette based on ‘dusty’ tones: muted rose, sage green, and mustard yellow provide a nostalgic foundation that feels authentic to the era.
- Hang cafe curtains on the bottom half of your windows to allow light in while maintaining the cozy, enclosed feeling of a traditional country kitchen.
- Incorporate fresh flowers in simple glass jars or antique pitchers, focusing on ‘old-fashioned’ varieties like Carnations, Sweet Peas, or Lilacs.
- Introduce the scent of the aesthetic by using beeswax candles or simmering a pot of water with apple slices and cinnamon sticks on the stove.
How to Plan Fall Baby Shower Themes for a Warm Seasonal Celebration
[IMAGE_10]
Why we love this
Autumn is the season of harvest and new beginnings, making it a poetic time to celebrate a new arrival. A fall baby shower feels like a cozy embrace, filled with the aroma of pumpkin spice and the golden glow of harvest decor. We love the tactile richness of burlap, velvet pumpkins, and dried corn husks, which together create a celebration that is grounded, warm, and deeply festive—perfect for honoring a growing family amidst the changing leaves.
Essential Elements:
- Miniature white and heirloom pumpkins
- Burlap table runners and twine accents
- Dried pampas grass or wheat stalks
- Apple cider bar with cinnamon sticks
- Warm-toned balloons (terracotta, cream, and sage)
How to make it
- Select a theme that leans into the season, such as ‘A Little Pumpkin is on the Way’ or ‘Our Little Woodland Wonder,’ to guide your color and decor choices.
- Set up a DIY beverage station with hot apple cider and cocoa, providing toppings like caramel drizzle, whipped cream, and cinnamon sticks for a sensory treat.
- Create a stunning photo backdrop using a mix of terracotta and cream balloons interspersed with dried maple leaves and gold-painted vines.
- Use hollowed-out pumpkins as natural vases for seasonal floral arrangements, filling them with sunflowers, mums, and deep red oak leaves.
- Design a ‘thank you’ station with small jars of local honey or maple syrup tied with twine, offering guests a sweet piece of the season to take home.
- Plan a menu of warm comfort foods, such as butternut squash soup shooters and mini apple pies, to keep the autumnal theme consistent through every bite.
- Incorporate soft textures like plaid wool blankets draped over chairs to ensure guests feel cozy and comfortable throughout the celebration.
Conclusion: Your Home, Your Masterpiece
Creating a lifestyle that feels both chic and authentic is not about following every trend—it’s about choosing the elements that resonate with your unique story. Whether you’re adding a simple lattice for privacy or meticulously planning a whimsical urban escape, the goal is to build a life that feels as good as it looks. Remember, the most beautiful homes are those that are filled with intention, warmth, and the people (and pets!) you love. Go forth and design a world that inspires you every single day.