
From Basic to Brilliant: Professional Blue and White Nail Art You Can Do Yourself
Hello, my loves! I’m sitting here wrapped in my favorite knit cardigan, watching the soft morning light dance across my desk, and I just had to share something special with you. You know those moments when you look down at your hands and just wish they felt a little more… like *you*? We all lead such busy lives, rushing from one thing to the next, but I’ve found that taking thirty minutes to create something beautiful on my fingernails is like a warm, cloud-soft embrace for the soul.
There is something so timeless about the pairing of blue and white. It’s the color of the sprawling summer sky, the delicate patterns on vintage porcelain, and the rhythmic crashing of ocean waves. It’s sophisticated yet soothing. Today, I want to hold your hand—metaphorically, of course—and walk you through how to turn your nails into a professional-looking canvas, right from the comfort of your own cozy nook.
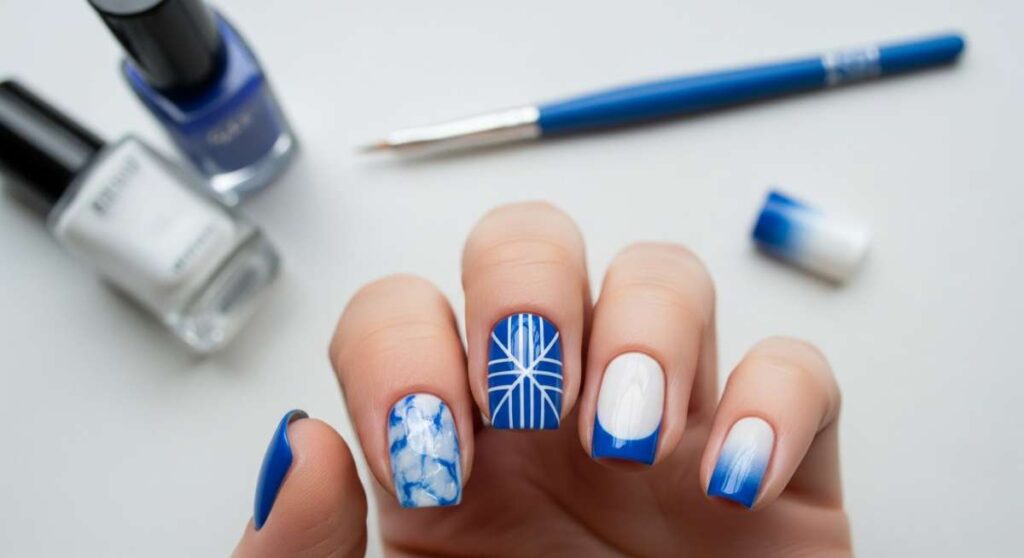
6 Easy Steps for Blue and White Nails

Why to love this Design:
There is something so deeply calming about the rhythm of painting your own nails, isn’t there, my loves? These six steps take you from a blank canvas to a serene blue and white abstract masterpiece that looks like you spent hours at a high-end salon.
Essential Elements:
- Cobalt blue polish
- Opaque white polish
- Thin detailing brush
- Glossy top coat
How to Prepare:
- Cleanse nails with alcohol to remove oils.
- Apply a clear base coat to prevent staining.
- Paint two thin layers of white polish as your base.
- Dip your brush in blue and create three organic wavy lines.
- Fill in one corner with solid blue.
- Seal with a high-shine top coat.
Budget Range
- Essie ‘Butler Please’ – $10
- OPI ‘Alpine Snow’ – $11
- Nail Art Brush Set (Amazon) – $6
4 Simple Tips for Light Blue and White Nails
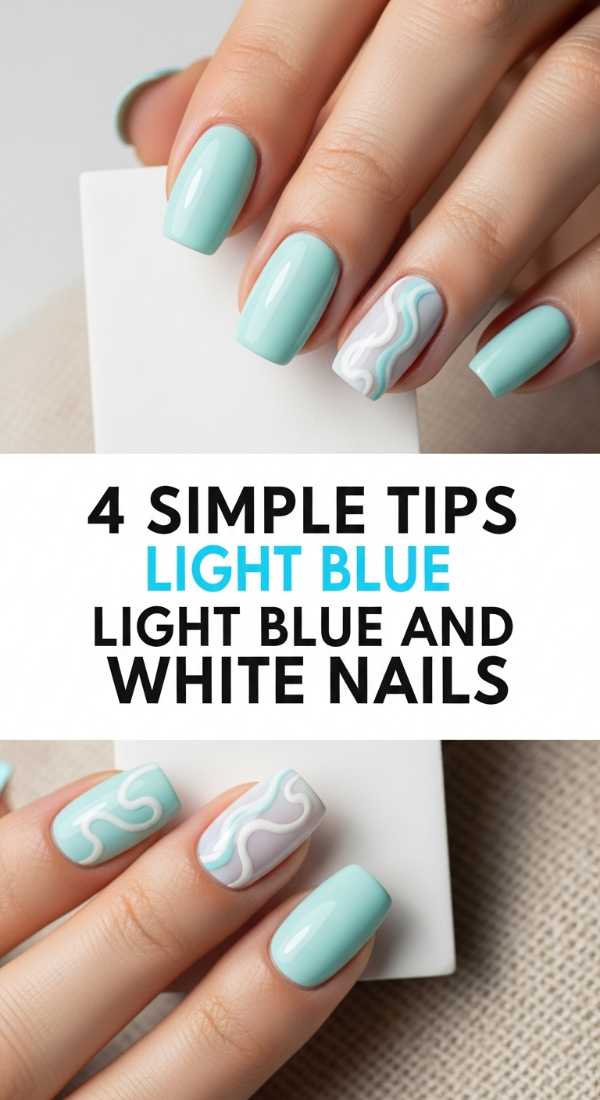
Why to love this Design:
Light blue and white always reminds me of those soft, fluffy clouds on a perfect spring morning. It’s a gentle look that brightens your mood every time you glance at your keyboard or hold your coffee mug.
Essential Elements:
- Sky blue polish
- Sponging foam
- White cream polish
- Matte top coat (optional)
How to Prepare:
- Paint nails with the sky blue shade and let dry completely.
- Dab a tiny bit of white polish onto a makeup sponge.
- Lightly press the sponge onto the tips of your nails for a gradient.
- Use a toothpick to swirl the edges for a marble effect.
Budget Range
- Sally Hansen ‘Hard as Nails’ Sky Blue – $4
- Makeup Wedges (Target) – $3
- Zoya ‘Purity’ White – $12
5 Steps to Create Navy Blue and White Nails

Why to love this Design:
Navy is the ultimate sophisticated neutral, my darlings. When paired with crisp white, it creates a nautical, high-fashion vibe that makes you feel instantly more put-together, even if you’re just wearing leggings and a tee.
Essential Elements:
- Deep navy polish
- White striping tape or vinyls
- Precision tweezers
- Clear strengthener
How to Prepare:
- Apply navy blue to all nails except the ring finger.
- Paint the ring finger pure white.
- Apply two horizontal strips of tape to the navy nails.
- Paint white over the tape and peel immediately.
- Add a navy dot to the center of the white nail for balance.
Budget Range
- Holler and Glow Navy Polish – $8
- Nail Striping Tape – $5
- Seche Vite Dry Fast Top Coat – $9
3 Ways to Master Blue and White French Tip Nails

Why to love this Design:
The classic French manicure gets a modern, whimsical update with these blue and white variations. It’s a nod to tradition with a playful, creative twist that feels so fresh and airy.
Essential Elements:
- Sheer pink base
- White tip guide stickers
- Electric blue polish
- Cornflower blue polish
How to Prepare:
- Choose your style: a double tip, a side-swept curve, or a classic smile line.
- Use stickers to mask off the tip and paint with your chosen blue.
- Outline the blue edge with a very thin white line for a ‘pro’ pop.
Budget Range
- Orly Rubberized Base Coat – $12
- Wet n Wild ‘Wild Shine’ Blue – $2
- French Tip Guides – $4
7 Secrets for Dark Blue and White Nails

Why to love this Design:
Dark blue is like the midnight sky, full of mystery and depth. Adding white accents is like scattering stars across your fingertips. These secrets will help you keep the look clean and professional without the mess.
Essential Elements:
- Midnight blue polish
- White acrylic paint (easier for details)
- Clean-up brush
- Acetone
How to Prepare:
- Apply dark blue in thin layers to avoid bubbling.
- Use acrylic paint for the white parts; it’s more forgiving.
- Keep a brush dipped in acetone nearby for mistakes.
- Dot the white on in clusters for a galaxy effect.
- Wait 5 minutes before top-coating to prevent smearing.
- Apply oil to cuticles last for that ‘just-left-the-spa’ glow.
- Use a UV lamp if using gel for extra longevity.
Budget Range
- Revlon ‘Midnight’ – $6
- FolkArt Acrylic White – $2
- Clean-up Brush – $7
5 Trendy Blue and White Nail Designs to Try

Why to love this Design:
I love keeping things fresh, and these trendy patterns—from gingham to porcelain florals—are the perfect way to express your artistic side. They are conversation starters that feel like wearing tiny pieces of art.
Essential Elements:
- Variety of blue shades
- Dotting tool
- Matte finish coat
- Fine liner brush
How to Prepare:
- Try a ‘Mismatched’ look: each finger a different blue and white pattern.
- Use a dotting tool to create white daisies on a blue base.
- Try a checkered pattern using a small flat brush.
- Create ’tiles’ by painting small blue squares on white.
- Finish with a matte top coat for a modern, velvety feel.
Budget Range
- Nail Art Dotting Tools – $5
- OPI Matte Top Coat – $11
- Sinful Colors Blue Collection – $3 each
4 Cute Ways to Style Baby Blue and White Nails

Why to love this Design:
Baby blue is just so darling, isn’t it? It’s soft, approachable, and sweet. These styling tips make sure your baby blue look stays ‘chic’ rather than ‘childish’ by adding sophisticated white accents.
Essential Elements:
- Pastel baby blue polish
- White pearl stickers
- Silver glitter (optional)
- Short-oval nail shape
How to Prepare:
- Shape nails into a soft oval to match the gentle color.
- Apply baby blue and add a single white pearl near the cuticle.
- Create a ‘half-moon’ look by leaving a white semi-circle at the base.
- Accent with a very thin silver glitter line for sparkle.
Budget Range
- Essie ‘Saltwater Happy’ – $10
- Flat-back Nail Pearls – $6
- Glass Nail File – $9
Paint Blue and White Striped Nails in 6 Steps

Why to love this Design:
Stripes are so crisp and energetic! They remind me of beach umbrellas and summer holidays. Mastering the perfect stripe is a skill that will make your DIY manicures look incredibly high-end.
Essential Elements:
- Long-haired liner brush
- White stamping polish (extra opaque)
- Royal blue base
- Steady surface for your elbow
How to Prepare:
- Find a flat surface to rest your hand to minimize shaking.
- Paint your royal blue base and dry.
- Load your liner brush with white polish, pulling it through to keep it thin.
- Drag the brush in one fluid motion from base to tip.
- Repeat for as many stripes as you desire.
- Clean any excess from the skin immediately.
Budget Range
- Maniology White Stamping Polish – $9
- Long Liner Brush – $8
- Blueberry Polish – $7
5 Bold Looks for Royal Blue and White Nails

Why to love this Design:
Royal blue is a power color, my loves! It’s bold, confident, and stunningly vibrant. When you pair it with white, the contrast is so sharp and beautiful—it’s for the days when you want to feel unstoppable.
Essential Elements:
- Electric/Royal blue lacquer
- White nail vinyls (geometric shapes)
- High-gloss top coat
- Cuticle oil
How to Prepare:
- Paint a solid royal blue base.
- Apply a triangle-shaped vinyl to the center.
- Fill the triangle with white polish.
- Remove the vinyl while the white is still slightly tacky.
- Apply a thick layer of top coat for a ‘gel-like’ plumpness.
Budget Range
- OPI ‘Euro So Over It’ – $11
- Vinyl Nail Stencils – $5
- CND Solar Oil – $13
3 Steps to Get Blue and White Nail Inspo Looks

Why to love this Design:
Sometimes the hardest part is just choosing where to start! These three steps will help you curate your own inspiration board so you always have a beautiful design ready when the mood strikes.
Essential Elements:
- Pinterest app
- Digital camera/Phone
- A small notebook
How to Prepare:
- Search for ‘Blue and White Porcelain’ or ‘Chinoiserie’ patterns for classic ideas.
- Save photos of nature—like the ocean or the sky—to grab color palettes.
- Sketch your favorite ideas in a notebook before you start painting to plan your layout.
Budget Range
- Free Pinterest Account – $0
- Small Sketchbook – $5
- Phone Camera – $0
Finding Your Creative Flow
My loves, I hope this guide helps you find a little pocket of peace in your week. Remember, it’s not about being perfect; it’s about the joy of creating something with your own two hands. Whether you choose a soft baby blue or a bold royal navy, let your nails be a reflection of the beautiful light you carry inside. You are brilliant, your hands are capable, and you deserve this little moment of self-care. Until next time, keep shining!