

From Brunch to Movie Night: Viral Food Board Ideas for Every Occasion
There is something inherently magical about the way a beautifully curated spread brings people together. Whether it is the soft glow of golden hour hitting a marble countertop or the excited chatter of friends reaching for a slice of brie, food boards have become the heartbeat of modern hosting. They aren’t just about eating; they are about the art of the ‘gather,’ turning a simple Tuesday night into a memory that feels curated, intentional, and deeply warm.
But a viral-worthy lifestyle isn’t just about what’s on the plate—it’s about the entire environment you create. From the way the sun filters through a garden trellis to the organized peace of a functional pantry, the backdrop of our lives dictates how we feel in our homes. Today, we are diving into the ultimate guide for elevating your space and your hosting game, blending those viral food board vibes with DIY projects that make every corner of your home feel like a sanctuary.
How to Build a Garden Trellis for a Beautiful Floral Entrance

Why we love this
Imagine walking through a living archway where the scent of climbing jasmine or honeysuckle greets you like a warm embrace. This trellis adds a vertical dimension to your garden, creating a sense of mystery and romance that flat landscapes lack. The rough texture of the cedar against the delicate, waxy leaves of a vine provides a stunning visual contrast that evolves with the seasons, offering a lush, green architecture even in the height of summer.
Essential Elements:
- Two 8-foot cedar posts (4×4)
- Cedar lattice panel or heavy-duty wire mesh
- Pressure-treated wood screws
- Fast-setting concrete mix
- Spirit level and post-hole digger
- Climbing plants like Clematis or Climbing Roses
How to make it
- Measure and mark the entrance of your pathway, ensuring the width is at least 4 feet to allow for easy passage once the plants have matured and filled out.
- Dig two post holes to a depth of 24 inches using a post-hole digger, ensuring the bottom of the hole is flat and stable to prevent future leaning or sinking.
- Set the cedar posts into the holes, using a spirit level to ensure they are perfectly vertical on all sides; this is critical for the structural integrity of the arch.
- Pour fast-setting concrete into the holes around the posts, filling up to 3 inches below the ground level, then add water according to the manufacturer’s instructions and let it cure for 24 hours.
- Attach the lattice panel or wire mesh between the two posts using wood screws, pre-drilling pilot holes to prevent the cedar from splitting under pressure.
- Plant your climbers at the base of each post, gently weaving the initial tendrils into the lattice to encourage upward growth and secure them with soft garden twine.
How to Create a Rock River Bed for a Serene Backyard Oasis

Why we love this
There is a profound, meditative quality to the sight of smooth, river-worn stones winding through a landscape, mimicking the path of a natural stream. This rock river bed brings a sense of fluid movement to static garden beds, catching the light on rainy days and creating a textural masterpiece during the dry ones. The cool, earthy aroma of damp stone and the visual rhythm of varying pebble sizes create a backyard retreat that feels like a high-end spa escape.
Essential Elements:
- Landscaping fabric (heavy-duty weed barrier)
- Large river rocks (3-5 inches)
- Medium-sized smooth pebbles
- Fine pea gravel
- Steel landscape edging
- Spade and metal rake
How to make it
- Outline the path of your ‘river’ using a garden hose or spray paint, incorporating natural curves and meanders to mimic a real waterway rather than a straight line.
- Excavate the area to a depth of 4 to 6 inches, sloping the sides slightly inward to create a shallow trench that will hold the rocks securely.
- Install steel landscape edging along the perimeter to keep the grass from encroaching and to hold the stones within the designated ‘river’ path.
- Lay down heavy-duty landscaping fabric across the entire trench, pinning it down with landscape staples to prevent weeds from growing through your rock arrangement.
- Place your largest ‘anchor’ rocks first at the bends of the river to create a natural look, then fill the center with medium pebbles and use fine pea gravel to fill the small gaps.
- Rake the stones gently to ensure even distribution and spray the entire bed with water to wash away dust, revealing the natural colors and luster of the stones.
How to Stencil Concrete for a High End Patio Look

Why we love this
Transforming a cold, gray concrete slab into a Mediterranean-inspired masterpiece is nothing short of a design miracle. The intricate patterns of a well-chosen stencil create the illusion of expensive hand-painted tiles, providing a sophisticated foundation for your outdoor furniture. The tactile feel of the matte porch paint underfoot is cooling in the sun, and the visual transformation makes the entire patio feel like an intentional extension of your indoor living space.
Essential Elements:
- Large-scale patio stencil
- High-quality exterior porch and floor paint (two contrasting colors)
- Small foam rollers and stencil brushes
- Painter’s tape and repositionable spray adhesive
- Concrete cleaner and stiff scrub brush
- Concrete sealer (clear matte or satin)
How to make it
- Thoroughly clean the concrete surface using a heavy-duty degreaser and a stiff scrub brush, as any dirt or oil will prevent the paint from adhering properly.
- Apply two coats of your base color (the ‘grout’ color) using a long-handle roller, allowing at least 4 hours of drying time between coats or until the surface is no longer tacky.
- Apply a light mist of repositionable adhesive to the back of your stencil and press it firmly onto the concrete, starting in the most visible corner of the patio.
- Load your foam roller with the secondary paint color but roll most of it off onto a paper towel; the ‘dry brush’ technique is vital to prevent paint from bleeding under the stencil.
- Dab the paint onto the stencil using a vertical motion, moving carefully from the edges toward the center to maintain crisp lines and even coverage.
- Peel the stencil back while the paint is slightly damp, reposition it for the next section, and once the entire patio is dry, apply two coats of clear sealer to protect the finish.
How to Build a Duck Enclosure for a Sustainable Backyard Farm

Why we love this
There is a rustic, grounding joy in the soft ‘quacks’ of happy ducks and the knowledge that your backyard is becoming a self-sustaining ecosystem. This enclosure combines the charm of a farmhouse aesthetic with the practical needs of poultry, offering a safe haven that smells of fresh cedar shavings and clean water. It provides a tactile connection to the earth, reminding us of the slow, beautiful pace of nature every time we step outside to collect eggs or watch them splash.
Essential Elements:
- Hardware cloth (1/2 inch gauge)
- Pressure-treated 2×4 lumber for the frame
- Corrugated metal or asphalt shingles for the roof
- Locking latches (predator-proof)
- A pre-formed pond or large plastic tub
- Nesting boxes and straw bedding
How to make it
- Frame out the base and walls of the enclosure using 2×4 lumber, ensuring a minimum of 4 square feet of space per duck to prevent overcrowding and stress.
- Attach hardware cloth to the exterior of the frame using a heavy-duty staple gun, burying the wire at least 12 inches into the ground to prevent burrowing predators like foxes.
- Construct a sloped roof frame to allow for rainwater runoff, then secure your corrugated metal panels using specialized roofing screws with rubber gaskets to prevent leaks.
- Install a sturdy door with a two-step locking mechanism; ducks are vulnerable at night, so the enclosure must be entirely sealed against agile predators like raccoons.
- Set a pre-formed pond into the ground within the run area, ensuring it has a flat base and a way to be easily drained and refilled, as ducks require clean water for feather health.
- Line the interior ‘house’ portion with thick cedar shavings or straw, providing raised nesting boxes in a dark corner to encourage laying and provide warmth.
How to Style Front Porch Flower Pots for Welcoming Curb Appeal

Why we love this
The front porch is the handshake of the home, and beautifully styled pots are the perfect greeting. The sensory experience of vibrant petals, the earthy aroma of fresh potting soil, and the soft rustle of ornamental grasses create an immediate sense of ‘home.’ By layering different heights and textures, you create a visual symphony that draws the eye upward, making even a small entryway feel grand, lush, and meticulously cared for.
Essential Elements:
- A variety of large ceramic or resin planters
- High-quality potting mix with perlite
- ‘Thriller’ plants (Dracaena or Canna Lily)
- ‘Filler’ plants (Petunias or Geraniums)
- ‘Spiller’ plants (Sweet Potato Vine or Bacopa)
- Slow-release fertilizer granules
How to make it
- Select a grouping of three pots in varying heights (tall, medium, short) to create a tiered effect that adds depth and visual interest to your porch corner.
- Fill the pots with a lightweight potting mix, leaving about 2 inches of space from the rim to allow for watering without overflow.
- Plant your ‘Thriller’ in the center or back of the pot; this should be your tallest plant with a striking silhouette to act as the focal point.
- Surround the thriller with ‘Fillers’—mounded plants that add bulk and color, ensuring you break up the root balls gently before placing them in the soil.
- Tuck your ‘Spillers’ around the edges of the pot so they can cascade over the sides, softening the hard edges of the planter and creating a lush, overflowing look.
- Water the pots thoroughly until water drains out of the bottom, then apply a layer of slow-release fertilizer to ensure consistent blooms throughout the season.
How to Create Glass Yard Art for a Dreamy Garden Glow

Why we love this
When the sun hits a piece of colored glass in a garden, it creates a kaleidoscope of light that feels like something out of a fairy tale. Glass yard art captures the movement of the light throughout the day, casting ruby, cobalt, and amber shadows across the grass. The smooth, cool surface of the glass contrasts beautifully with the organic, wild textures of the garden, providing a permanent pop of color that never fades, even in the depths of winter.
Essential Elements:
- Thrifted glass plates, bowls, and vases
- All-weather glass adhesive (GE Silicone II)
- Rebar or copper pipe for the ‘stem’
- Glass drill bits (if creating hanging pieces)
- Rubbing alcohol for surface prep
- Sandpaper (fine grit)
How to make it
- Clean all glass pieces thoroughly with soap and water, then wipe the bonding surfaces with rubbing alcohol to remove any oils that might weaken the adhesive.
- Experiment with ‘stacking’ your glass pieces on a flat surface, placing larger plates at the bottom and smaller bowls or decorative baubles on top to create a flower-like shape.
- Apply a generous bead of clear silicone adhesive to the base of each piece, pressing them together firmly and allowing them to cure for at least 24 to 48 hours in a dry area.
- If creating a ‘glass flower,’ find a sturdy glass vase or votive holder to act as the back connector where the garden stake will be inserted.
- Attach the cured glass head to a copper pipe or rebar stake using more silicone, ensuring the stake is centered so the heavy glass doesn’t lean or pull to one side.
- Place the art in a sunny spot in your garden, burying the stake at least 10 inches deep to ensure the wind doesn’t topple your new shimmering focal point.
How to Design a Nostalgic Room for a Cozy Retro Feel

Why we love this
There is a unique comfort in the aesthetics of the past—the warm hum of a record player, the touch of velvet, and the soft glow of a mushroom lamp. Designing a nostalgic room is about curate-ing a ‘vibe’ that feels timeless and lived-in, rather than sterile. The scent of old books and the rich, saturated colors of mustard yellow and forest green create an atmosphere that encourages you to unplug, slow down, and savor the present moment through the lens of the past.
Essential Elements:
- Mid-century modern furniture (tapered legs are key)
- Textured textiles (velvet, corduroy, or shag)
- Vintage-inspired lighting (lava lamps or globe pendants)
- Vinyl record player and display shelf
- Retro art prints or macramé wall hangings
- Warm-toned wood accents
How to make it
- Choose a color palette based on a specific decade, such as 1970s earth tones (rust, avocado, gold) to anchor the room’s mood and keep the design cohesive.
- Layer your lighting by avoiding harsh overhead fixtures; instead, use floor lamps with warm-toned bulbs and accent lights to create ‘pockets’ of cozy illumination.
- Integrate one or two authentic vintage pieces—like a refurbished side table or a brass mirror—to give the room a sense of history and character that new furniture lacks.
- Create a ‘sensory corner’ with a record player and a stack of vinyl, providing a tactile way to enjoy music that fits the nostalgic theme of the space.
- Use textiles to add warmth, such as a thick shag rug or velvet throw pillows, which provide the physical comfort necessary for a truly ‘cozy’ retro environment.
- Decorate the walls with a mix of framed vintage advertisements and personal photos filtered in sepia or grainy film styles to bridge the gap between past and present.
How to Build a Floating Deck for the Ultimate Outdoor Lounge

Why we love this
A floating deck is the ultimate luxury for an outdoor space, providing a level, clean platform for lounging without the complexity of a traditional attached deck. The feeling of sun-warmed wood beneath your bare feet and the way the deck seems to ‘hover’ over the grass creates an inviting island of relaxation. It defines an outdoor ‘room,’ making your backyard feel larger and more organized, perfect for those viral summer food board parties.
Essential Elements:
- Pressure-treated 2×6 joists
- Decking boards (Cedar or Composite)
- Concrete deck blocks
- Level and chalk line
- Deck screws (coated to prevent rust)
- Landscape fabric and gravel (for the base)
How to make it
- Clear the area of grass and debris, then lay down landscape fabric and a thin layer of gravel to prevent weeds and ensure proper drainage under the deck.
- Position your concrete deck blocks in a grid pattern, typically spaced 4 to 6 feet apart, ensuring they are perfectly level with one another using a long straight-edge and a level.
- Construct the outer frame using 2×6 pressure-treated lumber, setting the boards into the slots of the deck blocks and checking for squareness by measuring the diagonals.
- Install the interior joists every 16 inches on center, securing them to the outer frame with joist hangers or heavy-duty wood screws for a solid, bounce-free surface.
- Lay your decking boards across the joists, using 1/8-inch spacers between the boards to allow for wood expansion and water drainage during rain.
- Fasten each board with two screws per joist, then sand any rough edges and apply a high-quality deck stain to protect the wood from UV rays and moisture.
How to Organize a Realistic Pantry for a Stress Free Kitchen
Why we love this
An organized pantry is the ultimate form of self-care for the home cook. The visual clarity of seeing exactly what you have in uniform glass jars, the satisfying ‘click’ of a sealed lid, and the clean aroma of spices make meal prep feel like a joy rather than a chore. It removes the mental clutter of searching for ingredients, allowing you to focus on the creative process of building those viral food boards and family dinners.
Essential Elements:
- Airtight glass or BPA-free plastic canisters
- Tiered shelving for canned goods
- Lazy Susans for oils and vinegars
- Uniform labels (chalkboard or minimalist stickers)
- Woven baskets for ‘ugly’ packaging
- Over-the-door rack for small items
How to make it
- Empty the entire pantry and discard any expired items, then wipe down the shelves with a vinegar-based cleaner to remove dust and crumbs.
- Group your items into ‘zones’ based on usage, such as a baking zone, a pasta/grain zone, and a snack zone, to make the pantry intuitive to navigate.
- Decant dry goods like flour, sugar, and rice into airtight canisters; this not only looks beautiful but also keeps food fresh for much longer.
- Use Tiered ‘stadium’ shelving for cans so you can see the labels of the items in the back without having to move everything in the front.
- Place oils, honey, and sticky sauces on a Lazy Susan to prevent rings on your shelves and to make hard-to-reach bottles easily accessible with a quick spin.
- Label every container clearly at eye level, ensuring that everyone in the household knows exactly where items belong, which helps maintain the organization over time.
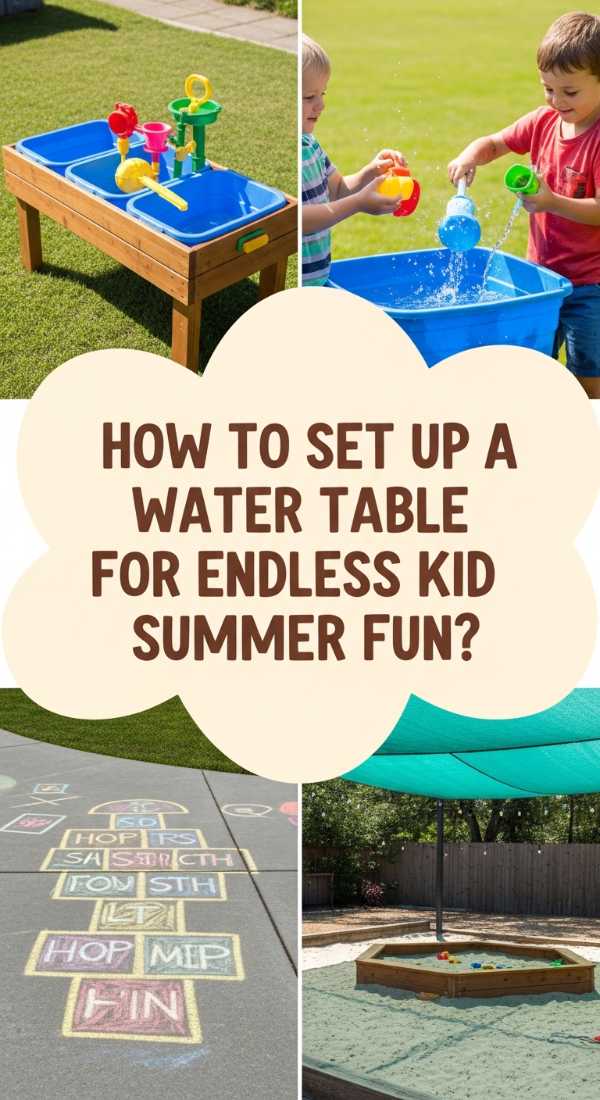
How to Set Up a Water Table for Endless Kid Summer Fun
[IMAGE_10]
Why we love this
There is no sound quite like the rhythmic splashing of water and the giggles of children on a hot July afternoon. A water table is a sensory wonderland that keeps little ones engaged for hours, exploring concepts of gravity, flow, and texture. The cool water against sun-warmed skin and the bright, cheerful colors of the toys create a backyard scene that is pure, unadulterated summer joy, giving parents a well-deserved break nearby.
Essential Elements:
- Multi-level water table
- Measuring cups and funnels
- Floating toys (rubber ducks, boats)
- Water-safe figurines
- Siphon pump or watering can
- Submersible LED lights (for evening play)
How to make it
- Select a level spot in the shade to set up the water table, as plastic can become hot in direct sunlight and the water will stay cooler for longer play sessions.
- Assemble the table according to the manufacturer’s guide, ensuring all plugs and seals are tight to prevent the water from slowly leaking out during use.
- Fill the table with fresh, clean water, adding a few drops of blue food coloring if you want to create a ‘deep sea’ theme for the day’s activities.
- Introduce a variety of tools like funnels, ladles, and perforated cups that allow children to experiment with how water moves and pours at different speeds.
- Add a ‘bubble station’ by mixing a small amount of tear-free dish soap into one section of the table, providing whisks for the kids to create their own foam clouds.
- Empty and scrub the table at the end of each day to prevent algae growth, and store the toys in a mesh bag to allow them to air dry completely.
Conclusion
Creating a viral-worthy lifestyle isn’t about perfection; it’s about the intention we pour into our surroundings. Whether you are building a floating deck for sunset cocktails or organizing your pantry to make morning coffee smoother, these projects are the building blocks of a home that feels like a retreat. When we take the time to style our porches and build sanctuaries for our backyard animals, we are really just creating more opportunities for those beautiful, connected moments that make life feel truly rich.
Frequently Asked Questions
What is the best wood for outdoor DIY projects?
Cedar and Redwood are the gold standards for outdoor projects because they are naturally resistant to rot, decay, and insect infestation. If you are on a budget, pressure-treated pine is a durable alternative, though it may require more frequent staining to maintain its appearance.
How do I keep my outdoor food boards safe from pests?
When hosting outdoors, use mesh food covers to protect your boards from flies and bees. Additionally, placing your food board on a raised stand can help keep crawling insects away. For best results, keep the board indoors until the very moment your guests are ready to eat.
Is concrete stenciling permanent?
With proper preparation and a high-quality sealer, a stenciled concrete patio can last for several years. However, like any painted surface, it will eventually show wear in high-traffic areas and may need a touch-up or a fresh coat of sealer every 2-3 years.