

Have you ever walked through your front door and felt an immediate weight lift off your shoulders, or conversely, felt a surge of panic at the clutter greeting you? Our homes and surroundings are the silent narrators of our daily lives, and for a long time, mine was telling a story of chaotic busyness and neglected corners. We often think of ‘lifestyle design’ as something reserved for high-end architects or professional organizers, but the truth is, it starts with the intentional choice to reclaim your space, one small DIY project at a time.
Today, I want to take you on a journey from chaos to calm. We’re moving beyond just ‘cleaning up’ and diving into the art of creating environments that fuel our souls. Whether it’s the way the morning light hits a perfectly curated desk or the satisfaction of seeing your garden climb a handmade trellis, these moments of intentionality are what transform a mere house into a sanctuary. It’s about finding that sweet spot where functionality meets whimsy, and where your personality is woven into every square inch of your living space.
Join me as we explore ten transformative DIY ideas designed to elevate your everyday experience. From the curb appeal that greets you after a long day to the hidden storage solutions that keep your mind clear, these projects are more than just home improvements—they are invitations to live more beautifully and mindfully. Let’s roll up our sleeves and start designing the life you’ve always dreamed of, right where you are.
How to Upgrade Front Landscaping for Instant Curb Appeal

Why we love this
There is nothing quite like the feeling of pulling into your driveway and being greeted by a lush, vibrant landscape that feels like a warm embrace. The scent of fresh cedar mulch mingling with the sweet fragrance of lavender and jasmine creates an immediate sensory shift from the stress of the road to the peace of home. Seeing the crisp, clean lines of a well-defined garden bed against the soft textures of ornamental grasses provides a visual rhythm that is both grounding and exhilarating. It’s the ultimate way to tell the world—and yourself—that what lies within these walls is cared for, loved, and intentionally cultivated.
Essential Elements:
- Steel or stone landscape edging
- Premium dark hardwood or cedar mulch
- A mix of perennial shrubs (like Boxwood or Hydrangea)
- Solar-powered warm LED pathway lights
- Assorted perennial flowers for seasonal color
- Landscaping fabric and garden staples
How to make it
- Begin by defining the perimeter of your garden beds using a garden hose or spray paint to create fluid, organic curves that lead the eye toward the entrance.
- Use a sharp spade or a power edger to cut a clean trench about 3-4 inches deep along your marked line, removing any grass or weeds that have encroached on the space.
- Lay down a heavy-duty landscaping fabric to suppress future weed growth, securing it tightly with metal garden staples every 12 inches to ensure it doesn’t shift during planting.
- Arrange your larger shrubs first as ‘anchor plants’ toward the back or center, ensuring you leave enough space for their mature width; dig holes twice as wide as the root ball and just as deep.
- Incorporate your smaller perennials and flowers in the foreground, staggering them in groups of three for a more natural, professional aesthetic rather than a rigid line.
- Install your edging material—whether it’s hammered-in steel strips or stacked stone—to create a permanent barrier that keeps mulch in and grass out.
- Apply a generous 3-inch layer of mulch across the entire bed, taking care not to pile it directly against the stems or trunks of your plants (the ‘volcano’ effect), which can cause rot.
- Finalize the look by spacing your solar lights evenly along the path, ensuring they are positioned to catch maximum sunlight during the day for a soft, inviting glow at night.
How to Curate a Whimsical Apartment Aesthetic for Dreamy Living

Why we love this
Stepping into a whimsical apartment feels like stepping inside a living storybook where every object has a soul and a secret. The air feels lighter when surrounded by gossamer linen curtains that dance in the breeze and the soft, warm glow of mismatched vintage lamps that cast long, amber shadows across the room. We love this aesthetic because it rejects the sterile perfection of modern minimalism in favor of texture, history, and a touch of magic. It’s the tactile joy of a velvet emerald sofa paired with the ethereal shimmer of disco balls catching the afternoon sun, turning your living room into a sanctuary of creativity and comfort.
Essential Elements:
- Sheer linen or lace window treatments
- Ornate, thrifted gold-leaf mirrors
- String lights with warm ‘Edison’ style bulbs
- A collection of vintage art prints and botanical illustrations
- Plush, mismatched throw pillows in velvet and silk
- Hanging macramé planters with trailing ivy
How to make it
- Start by evaluating your lighting; swap out harsh overhead fluorescent bulbs for warm-toned LEDs and add at least three secondary light sources (floor lamps, table lamps, or fairy lights) to create depth.
- Layer your window treatments by installing a double rod; place sheer lace curtains closest to the glass for privacy and light diffusion, topped with heavier velvet drapes for texture.
- Create a ‘whimsy wall’ by grouping vintage mirrors of different shapes and sizes; the reflections will bounce light around and make even the smallest apartment feel like an infinite hall of wonders.
- Incorporate ‘living’ decor by suspending plants from the ceiling at varying heights; use trailing varieties like Pothos or String of Pearls to create a vertical jungle effect that softens hard corners.
- Arrange a curated ‘vignette’ on your coffee table or bookshelf, mixing high and low items—think a stack of old leather-bound books topped with a modern crystal or a brass magnifying glass.
- Introduce sensory elements like a high-quality essential oil diffuser or beeswax candles to ensure the scent of the space matches its dreamy, ethereal visual identity.
How to Arrange Summer Table Centerpieces for Bright Gatherings
Why we love this
A summer centerpiece is more than just a decoration; it’s the heartbeat of a celebration, capturing the essence of the sun-drenched months in a single arrangement. Imagine the zesty, bright aroma of sliced citrus fruits pressed against the glass of a vase, perfectly complementing the wild, untamed beauty of fresh-cut sunflowers and eucalyptus. The visual feast of vivid yellows, deep greens, and crisp whites brings an immediate energy to the table, making every meal feel like a special occasion. It’s the way the condensation on a cold pitcher of lemonade mirrors the dew-like freshness of the flowers, creating a refreshing oasis for your guests to gather around.
Essential Elements:
- Wide-mouth clear glass vases or wooden dough bowls
- Fresh citrus fruits (lemons, limes, and oranges)
- Seasonal blooms (sunflowers, zinnias, or dahlias)
- Filler greens like seeded eucalyptus or fern fronds
- Floral foam or a ‘chicken wire’ frog for structure
- Taper candles in summery shades of peach or sky blue
How to make it
- Select a low-profile vessel if you want to encourage conversation across the table, or a taller vase for a dramatic buffet display; ensure it is thoroughly cleaned to prevent bacteria from wilting your flowers.
- If using a clear vase, slice lemons or limes into thin rounds and press them against the interior walls of the glass, filling the center with a smaller glass or floral foam to keep the fruit in place.
- Fill the vessel with cool water mixed with floral preservative, which provides the necessary nutrients and acidity to keep the summer blooms vibrant in the heat.
- Begin the arrangement with your ‘thriller’ flowers—the large, showy blooms like sunflowers—placing them at slightly different heights to create a natural, asymmetrical look.
- Add your ‘filler’ elements, such as eucalyptus, to tuck into the gaps; make sure the leaves don’t touch the water, as submerged foliage will rot and cloud the water.
- Incorporate ‘spiller’ elements like jasmine vines or delicate ivy that can drape over the edges of the container, breaking the hard lines of the table.
- Finish the look by scattering smaller pieces of fruit or loose petals directly on the table runner around the base of the centerpiece for an effortless, ‘just picked’ garden vibe.
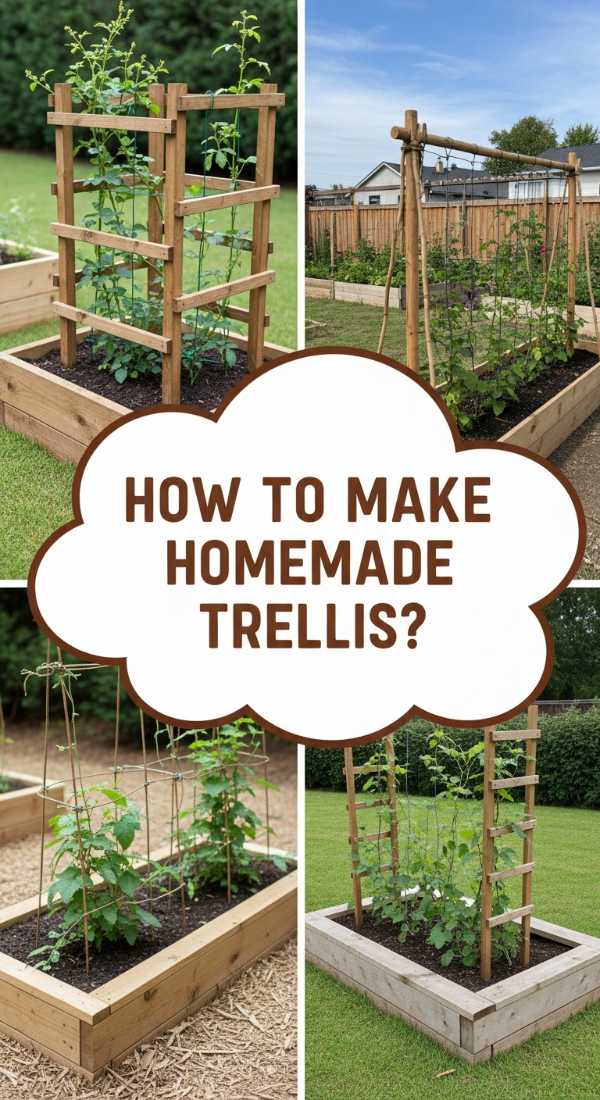
How to Build Simple Homemade Trellis Systems for Flourishing Gardens

Why we love this
There is a profound sense of satisfaction in watching a garden grow vertically, as if the plants are reaching for the heavens on a ladder you built with your own two hands. A trellis system transforms a flat garden bed into a living wall of architecture, where the rough texture of cedar meets the delicate tendrils of sweet peas or the heavy, ripening weight of heirloom tomatoes. We love this because it maximizes space while creating a stunning visual focal point that changes every day. The sight of a trellis covered in deep green foliage provides a sense of privacy and enclosure, turning a backyard into a secret, flourishing sanctuary.
Essential Elements:
- 8-foot Cedar 2×2 posts or bamboo poles
- Galvanized wire fencing or heavy-duty jute twine
- Exterior-grade wood screws
- Power drill and wire snips
- Spirit level and a mallet
- Rust-proof staples or small eye hooks
How to make it
- Measure your garden space to determine the height and width of your trellis; for most climbing vegetables or flowers, a height of 6 to 7 feet is ideal to allow for significant growth.
- Construct a simple rectangular frame using your cedar posts, pre-drilling holes to prevent the wood from splitting, and securing the corners with two screws each for maximum stability.
- To create the ‘climbing’ surface, stretch your wire fencing across the frame and secure it tightly with heavy-duty staples every 4 inches, ensuring there is no sag in the mesh.
- Alternatively, for a more rustic look, screw eye hooks into the inner frame every 6 inches and weave jute twine in a diamond pattern, knotting it securely at each junction point.
- Drive two shorter support stakes 18 inches into the ground where the trellis will stand, then bolt your main frame to these stakes to ensure it can withstand high winds and the weight of heavy plants.
- Once installed, check that the structure is perfectly vertical using a spirit level, as any lean will become more pronounced once the plants begin to climb.
- Plant your seeds or seedlings at the base and gently guide the first few inches of growth toward the trellis using soft garden ties, teaching the plant where its new home is.
How to Design Small Camper Hacks for Maximum Travel Comfort

Why we love this
Living small doesn’t have to feel cramped; in fact, a well-organized camper feels like a cozy, high-tech cocoon that carries you to the edges of the map. We love the ingenuity of camper hacks because they turn every square inch of a vehicle into a functional masterpiece. There’s a specific joy in the ‘click’ of a magnetic spice tin sticking to the wall or the way a collapsible bin disappears when not in use. It’s the aroma of coffee brewing in a tiny galley kitchen that feels like a five-star cafe because everything you need is exactly where it should be, allowing you to focus on the vista outside your window rather than the clutter inside.
Essential Elements:
- Heavy-duty magnetic strips for knives and tools
- Collapsible silicone kitchenware (bowls, kettles, colanders)
- Over-the-door clear pocket organizers
- Command hooks and industrial-strength Velcro
- Under-cabinet LED puck lights (battery operated)
- Multi-functional furniture (ottomans with storage)
How to make it
- Audit your vertical space; the walls and ceiling of a camper are underutilized real estate. Mount magnetic strips inside cabinet doors to hold metal utensils and spice tins, freeing up valuable drawer space.
- Swap all your standard kitchen gear for collapsible versions; these items nest together and can reduce the volume of your ‘kitchen’ by nearly 70%, preventing annoying rattles while driving.
- Install clear pocket organizers on the back of the bathroom or closet door; this keeps small items like sunscreen, charging cables, and flashlights visible and within reach without taking up counter space.
- Utilize the ‘dead space’ beneath the bed or seating by installing heavy-duty sliding drawers or using clear bins labeled by category (e.g., ‘Rain Gear,’ ‘First Aid’).
- Improve the ambiance and functionality by sticking LED puck lights under the upper cabinets; this provides task lighting for cooking without draining the main house battery excessively.
- Apply industrial-strength Velcro to the bottom of decorative items or remote controls to keep them securely in place while the camper is in motion, preventing the ‘earthquake’ effect after a day on the road.
How to Organize Yard Tool Storage for a Clutter Free Garage

Why we love this
There is a unique type of mental clarity that comes from walking into a garage where every rake, shovel, and power tool has a dedicated home. The smell of clean oil and sawdust is much more pleasant when it’s not accompanied by the frustration of tripping over a tangled hose. We love organized yard storage because it turns a chore into a seamless transition; when your tools are displayed like a gallery, you feel inspired to get outside and work. The sight of neatly hung, color-coded handles and a perfectly swept floor makes the garage feel like an extension of the home’s intentional design rather than a forgotten dumping ground.
Essential Elements:
- Wall-mounted pegboard system or slatwall
- Assorted heavy-duty tool hooks and brackets
- Clear plastic bins for small hardware (nails, screws)
- A dedicated charging station for power tool batteries
- Plywood and 2x4s for a custom garden tool rack
- Label maker for clear categorization
How to make it
- Clear everything out of the garage first; you cannot organize a space until you see its true dimensions and purge the items you no longer use or that are broken.
- Group your tools by frequency of use and season; winter shovels should be tucked away in the back, while summer gardening trowels should be at eye level during the warmer months.
- Install a heavy-duty pegboard or slatwall across one entire wall, ensuring you anchor it directly into the wall studs to support the weight of heavy metal tools.
- For long-handled tools like rakes and hoes, build a simple ‘comb’ rack out of plywood scraps that allows the heads to rest securely while the handles hang vertically, saving floor space.
- Create a dedicated ‘Power Zone’ with a small workbench and a power strip; mount battery chargers to the wall and use small bins to keep drill bits and saw blades organized.
- Use a label maker to mark the ‘shadow’ of each tool on the pegboard or use a marker to trace the outline; this visual cue ensures that anyone who borrows a tool knows exactly where it belongs when they’re finished.
- Finish by installing a wall-mounted hose reel and a cord organizer to keep long, winding items from becoming trip hazards on the floor.
How to Paint Front Porch Concrete for a Fresh Entryway Look

Why we love this
The transformation of a dull, stained concrete slab into a vibrant, patterned entryway is one of the most rewarding DIY projects you can undertake. There’s something incredibly satisfying about the smooth glide of a paint roller as it covers years of wear with a fresh, modern hue. Whether you choose a classic ‘haint blue’ for a Southern vibe or a bold geometric stencil, the result is a front porch that feels like a true outdoor room. The cool, clean surface under your feet on a summer morning, combined with the way the new color makes your potted plants pop, creates an instant ‘wow’ factor that breathes new life into your entire home’s exterior.
Essential Elements:
- Concrete-specific porch and patio paint (slip-resistant)
- Concrete etcher or a high-pressure washer
- Large-scale floor stencil (optional for patterns)
- Painter’s tape and high-density foam rollers
- Exterior concrete sealer
- Extension pole for the roller
How to make it
- Clean the concrete surface meticulously using a pressure washer to remove all dirt, oil, and loose debris; if the concrete is very smooth, apply a chemical etcher to open the pores so the paint can bond.
- Allow the concrete to dry completely for at least 24 to 48 hours; moisture trapped inside the slab will cause the paint to bubble and peel later.
- Mask off the siding of your house and any columns with high-quality painter’s tape to ensure clean, crisp lines at the edges.
- Apply a dedicated concrete primer if the surface is particularly porous or if you are making a drastic color change (e.g., from dark grey to white).
- Roll on the first coat of porch paint using an extension pole, starting from the corner furthest from the stairs so you don’t paint yourself into a corner; let it dry for the time recommended on the can.
- If using a stencil, secure it with repositionable spray adhesive and use a ‘dry’ roller technique (very little paint) to prevent bleeding under the edges of the pattern.
- Once the final coat of paint or stencil is dry, apply two coats of clear exterior concrete sealer to protect your hard work from UV rays and heavy foot traffic.
How to Personalize Office Desk Setup Ideas for Better Work Focus

Why we love this
Your desk is the cockpit of your professional life, and personalizing it is about more than just aesthetics—it’s about engineering focus and flow. We love a well-designed desk because it balances the cold utility of technology with the warmth of personal artifacts. Imagine the tactile comfort of a wool desk mat against your wrists, the soft rustle of a healthy snake plant nearby, and the inspiring sight of a framed quote that pushes you through the mid-afternoon slump. When your environment is curated to minimize distractions and maximize comfort, work stops feeling like a chore and starts feeling like a creative endeavor.
Essential Elements:
- Ergonomic desk chair or standing desk converter
- Monitor riser to ensure eye-level screen height
- Cable management boxes or clips
- A high-quality desk mat (felt, leather, or cork)
- Task lighting with adjustable color temperatures
- Small indoor plants (Succulents, Pothos, or ZZ plants)
How to make it
- Clear the deck entirely to start with a blank slate; only items that you use daily should earn a permanent spot on the surface of your desk.
- Position your monitor so the top third of the screen is at eye level; use a wooden riser to achieve this, which also creates a ‘garage’ underneath for your keyboard or notebooks.
- Implement a ‘one cable’ rule by using a cable management box under the desk to hide power strips and excess cord lengths, leaving only the essential charging cables visible.
- Define your workspace with a large desk mat; this provides a soft surface for your arms and visually anchors your keyboard and mouse in a dedicated zone.
- Incorporate ‘biophilic’ design by adding at least one plant; plants have been shown to reduce stress and improve air quality, making your work sessions feel less draining.
- Switch your lighting to a lamp that offers ‘cool white’ light for morning focus and ‘warm amber’ light for evening wind-down tasks, mimicking the natural circadian rhythm.
- Add one or two ‘soul pieces’—a small ceramic dish for paperclips made by a friend or a vintage clock—to ensure the space feels like *yours* and not just a cubicle.
How to Create Hippie Garden Ideas for a Peaceful Backyard Retreat

Why we love this
A ‘hippie garden’ is a celebration of imperfection, wildness, and the bohemian spirit. It’s where the rigid rules of traditional landscaping are thrown out the window in favor of winding stone paths, sun-faded prayer flags, and a riot of wildflowers that attract bees and butterflies. We love this because it encourages a deep, soulful connection with nature. The sound of bamboo wind chimes clinking softly in the breeze and the sight of an old, colorful rug laid out under a weeping willow create a space that feels timeless and free. It’s a garden that invites you to kick off your shoes, sit on the earth, and simply *be*.
Essential Elements:
- Recycled materials (old tires for planters, glass bottles for borders)
- Wildflower seed mixes (native to your region)
- Hammocks or floor cushions for low-level seating
- Wind chimes and suncatchers
- String lights and solar lanterns
- Fragrant herbs like lavender, rosemary, and sage
How to make it
- Start by creating a ‘meditation circle’ or a central focal point using flat river stones or reclaimed bricks laid in a spiral pattern.
- Plant heavily with ‘chaos’ in mind—mix edible herbs like basil and mint with ornamental flowers like marigolds and cosmos to create a functional, beautiful ecosystem.
- Upcycle old items to use as whimsical planters; an old clawfoot tub or even painted wooden crates can become the perfect home for a sprawling herb garden.
- Hang multi-colored glass suncatchers and wind chimes from tree branches to add both visual movement and a soothing auditory layer to the garden.
- Create a ‘soft zone’ for relaxing by hanging a macramé hammock between two sturdy trees or building a low platform out of pallets topped with outdoor cushions and weather-resistant rugs.
- Define paths using organic materials like wood chips or pea gravel, allowing the edges to be soft and overgrown with ‘creeping thyme’ or moss for an ancient, lived-in feel.
- Install a simple water feature, like a solar-powered fountain in a ceramic bowl, to provide the gentle sound of trickling water, which masks neighborhood noise and completes the sensory retreat.
How to Install Cheap Pool Deck Ideas for Affordable Summer Fun
[IMAGE_10]
Why we love this
You don’t need a massive budget to create a five-star resort experience in your own backyard; sometimes all it takes is a little sweat equity and some smart material choices. We love the accessibility of an affordable pool deck because it turns an above-ground pool into a permanent, integrated feature of the landscape. The feeling of warm, sun-baked wood or composite underfoot and the convenience of a level surface for lounging makes the entire summer experience feel more luxurious. It’s the perfect spot for drying off after a dip, sipping a cold drink, and watching the sunset, proving that the best memories aren’t bought—they’re built.
Essential Elements:
- Pressure-treated 2x4s and 4x4s for the frame
- Premade deck tiles or pressure-treated pine planks
- Concrete deck blocks (floating foundation)
- Galvanized deck screws and joist hangers
- Outdoor rugs and weather-resistant furniture
- Privacy screening (lattice or outdoor curtains)
How to make it
- Mark out the area around your pool where the deck will sit, ensuring you maintain a 1-inch gap between the deck and the pool wall to allow for slight movement and liner access.
- Use concrete deck blocks as your foundation; these ‘float’ on the ground, meaning you don’t have to dig deep post holes or pour concrete, which significantly reduces the cost and complexity.
- Build the outer frame using pressure-treated 2x6s, ensuring everything is perfectly level; this is the most critical step, as a sloping deck will feel unstable and look unprofessional.
- Install joists every 16 inches across the frame using joist hangers; these provide the structural ribs that will support the weight of the decking and the people on it.
- Lay your decking boards—standard pressure-treated pine is the most budget-friendly—using spacers to ensure even gaps for drainage and wood expansion.
- Sand down any rough edges and apply a high-quality exterior stain or sealer to protect the wood from water splashes and harsh sun exposure.
- Elevate the ‘cheap’ materials by adding a stylish outdoor rug and a few oversized planters; this draws the eye away from the simple construction and toward the ‘resort’ vibe of the space.
Cultivating Your Own Sanctuary
As we’ve explored, intentional lifestyle design isn’t about how much money you spend, but how much heart you put into the spaces you inhabit. Whether you started with a small desk refresh or a full front-yard transformation, each project is a brick in the wall of the sanctuary you are building for yourself. The transition from chaos to calm is a continuous journey, one that evolves as you do. So, take a deep breath, look around your home, and ask yourself: what story do I want this space to tell today? Then, go out and create it.
Frequently Asked Questions
How do I start if I feel overwhelmed? Start with the smallest project possible, like organizing a single drawer or adding one plant to your desk. Success in small tasks builds the momentum needed for larger ones.
Are these DIY projects suitable for renters? Absolutely! Many of these ideas, like the whimsical apartment decor and office personalization, are fully reversible. For outdoor projects, consider using ‘floating’ or temporary versions like deck blocks or container gardens.
What is the most cost-effective way to improve curb appeal? Mulching and edging are the biggest ‘bang for your buck.’ For under $50, you can give your garden beds a professional, high-end look that lasts all season.