

There was a time when my home felt more like a series of sterile boxes than a sanctuary. I’d walk through the door after a long day and feel the coldness of the white walls pressing in, a stark contrast to the vibrant world I craved. It wasn’t until I brought home my first raggedy Monstera that I realized what was missing: the breath of life. Transforming your space into a green sanctuary isn’t just about decor; it’s about creating a living, breathing ecosystem that anchors your soul and clears your mind.
As I began to experiment with textures, from the waxy sheen of a ZZ plant to the delicate lace of a Maidenhair fern, my home started to tell a story. Each leaf became a brushstroke in a masterpiece of tranquility. In this post, I’m sharing my secrets for turning any room into a lush, botanical escape. Whether you have a sunny loft or a dim studio, there is a green configuration waiting to transform your everyday life into something extraordinary.
How to Curate a Serene Plant Gallery for Absolute Home Harmony

Why we love this
This approach is the ultimate soul-soother, blending the earthy, petrichor-like aroma of freshly misted soil with the visual rhythm of varied leaf shapes. There is a profound sense of satisfaction in seeing a collection of plants arranged by height and hue, creating a gradient of greens that feels like a warm hug for your eyes. The texture of the clay pots against the soft, fluttering leaves provides a tactile grounding that makes the air feel heavier in the best way possible, as if the room itself is taking a deep, restorative breath.
Essential Elements:
- Terra cotta and ceramic pots in neutral tones
- Staggered wooden plant stands
- A mix of broad-leafed plants (Rubber trees) and delicate vines (Pothos)
- Soft-spectrum LED grow lights for consistency
- Decorative river stones for soil dressing
How to make it
- Begin by selecting your ‘anchor’ piece, a tall specimen like a Fiddle Leaf Fig, to establish the vertical peak of your gallery. Place this in a corner where it can receive bright, indirect light, ensuring the pot is twice the width of the root ball for future expansion.
- Layer in your secondary plants at varying heights using stools or shelves; the key technique here is ‘triangulation,’ where you place three plants of different sizes in a triangle to create visual depth. Watch for the ‘visual cue’ of balanced negative space—if the area looks crowded, swap a bushy plant for a sleeker one.
- Check the ‘doneness’ of your arrangement by standing back 10 feet. The gallery is complete when your eye moves naturally from one leaf to the next without catching on a gap or a clash of colors. Adjust the angle of the leaves toward the light source to ensure they look ‘lively’ and ‘upward-reaching.’
How to Design a Living Mural Wall for a Refreshing Morning Vibe
Why we love this
Waking up to a living mural is like stepping into a sun-drenched meadow every single morning. The vibrant, neon greens of Lemon Lime Philodendrons pop against the darker, forest-like tones of a climbing Ivy, creating a sensory explosion that smells of dew and possibility. The way the leaves rustle slightly in the morning breeze provides a gentle acoustic texture that is far more relaxing than any white noise machine, grounding your morning routine in nature’s own rhythm.
Essential Elements:
- Modular wall-mounted planters with drainage reservoirs
- Creeping and trailing plant varieties
- Moisture-resistant wall backing or sealant
- A precision long-neck watering can
- Organic liquid fertilizer for foliar feeding
How to make it
- Mount your modular grid onto the wall using heavy-duty anchors, ensuring the structure is perfectly level; use a spirit level to check this, as a tilted grid will cause uneven water distribution.
- Prepare your plants by gently loosening the root binds and placing them into the wall pockets with a high-drainage peat mix. Technique tip: Pack the soil firmly but not tightly to allow for aeration, aiming for a texture similar to a damp sponge.
- Integrate the plants by weaving trailing vines into the grid frame. The mural is ‘finished’ when the foliage overlaps enough to hide the plastic containers, creating a seamless ‘carpet’ of green. Monitor the moisture levels weekly; when the top inch of soil feels dry and slightly crumbly, it’s time for a deep saturation.
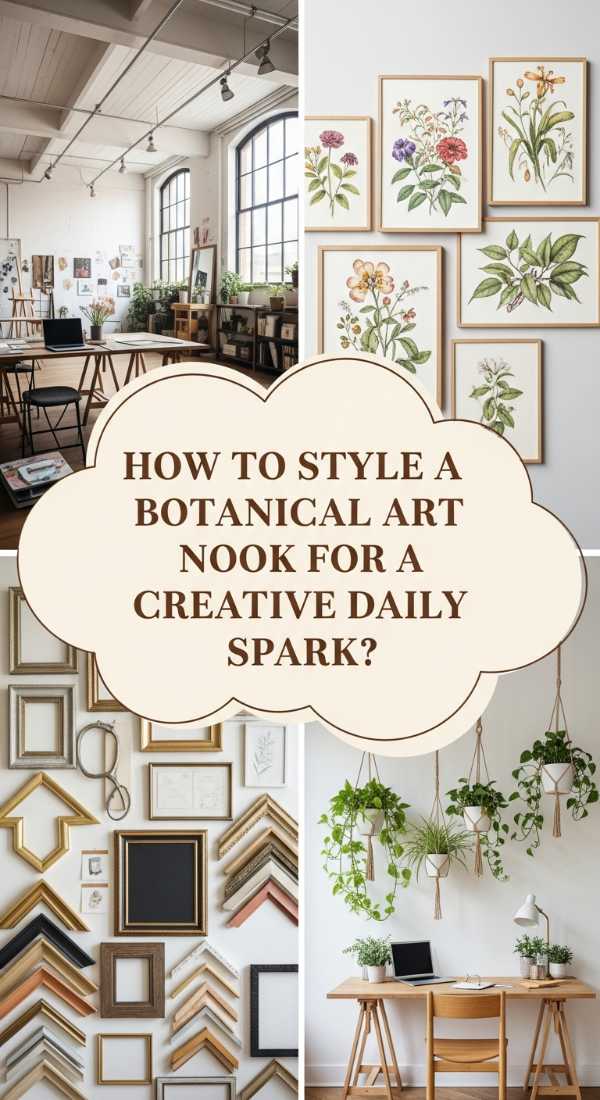
How to Style a Botanical Art Nook for a Creative Daily Spark

Why we love this
There is a special kind of magic in the intersection of human creativity and nature’s design, where the crisp lines of a framed botanical sketch meet the wild, unpredictable curves of a real Hoya plant. This nook smells faintly of old paper and cedarwood, a combination that sharpens the focus and invites the imagination to wander. The sensory contrast between the smooth glass of art frames and the fuzzy, tactile leaves of a Kalanchoe creates a workspace that feels curated yet untamed, perfect for sparking new ideas.
Essential Elements:
- Floating oak shelves
- Framed botanical prints or pressed flowers
- Small, architectural succulents (Haworthia)
- A vintage brass mister
- Task lighting with a warm, amber bulb
How to make it
- Position your floating shelves at eye level, ensuring they are securely fastened to studs to hold the weight of soil and ceramic. Space them at least 15 inches apart to give your ‘living art’ room to grow upward.
- Interleaf your framed prints with live plants, using a ‘checkerboard’ technique where no two plants are directly next to each other horizontally. This ensures the eye alternates between the 2D art and 3D life.
- Fine-tune the lighting to highlight the textures; the light should graze the side of the plants to create soft shadows. The nook is ‘done’ when the space feels balanced and inspiring—if it feels too busy, remove one piece of art to let the plants ‘breathe.’
How to Build an Indoor Jungle Oasis for Maximum Air Purity
Why we love this
An indoor jungle is more than a look; it’s an immersive atmospheric experience where the air feels noticeably lighter, cooler, and crisper. The thick canopy of Snake Plants and Peace Lilies acts as a natural filter, stripping away the staleness of urban living and replacing it with a rich, oxygenated fragrance. Sitting in the middle of this oasis, surrounded by the deep, waxy textures of tropical foliage, provides a profound sense of seclusion and safety, like being hidden away in a secret garden.
Essential Elements:
- Large-scale floor plants (Bird of Paradise, Palms)
- Air-purifying varieties (Spider plants, Dracaena)
- Humidifier with a cool-mist setting
- Natural jute or seagrass rugs
- Hanging macramé planters for vertical layering
How to make it
- Group your high-humidity plants together to create a ‘microclimate’—this technique allows the plants to share transpired moisture, keeping the air around them at a consistent 50-60% humidity.
- Utilize the ‘canopy method’ by placing taller palms in the back and smaller, variegated plants in the front. This creates a dense wall of foliage that mimics a natural forest floor. Visual cue: Look for ‘fullness’ where no floor or wall is visible through the leaves.
- Install a cool-mist humidifier in the center of the group, running it on a medium setting for 4-6 hours daily. The oasis is ‘at peak’ when the leaves look glossy and turgid, and the air feels refreshing rather than humid or sticky.
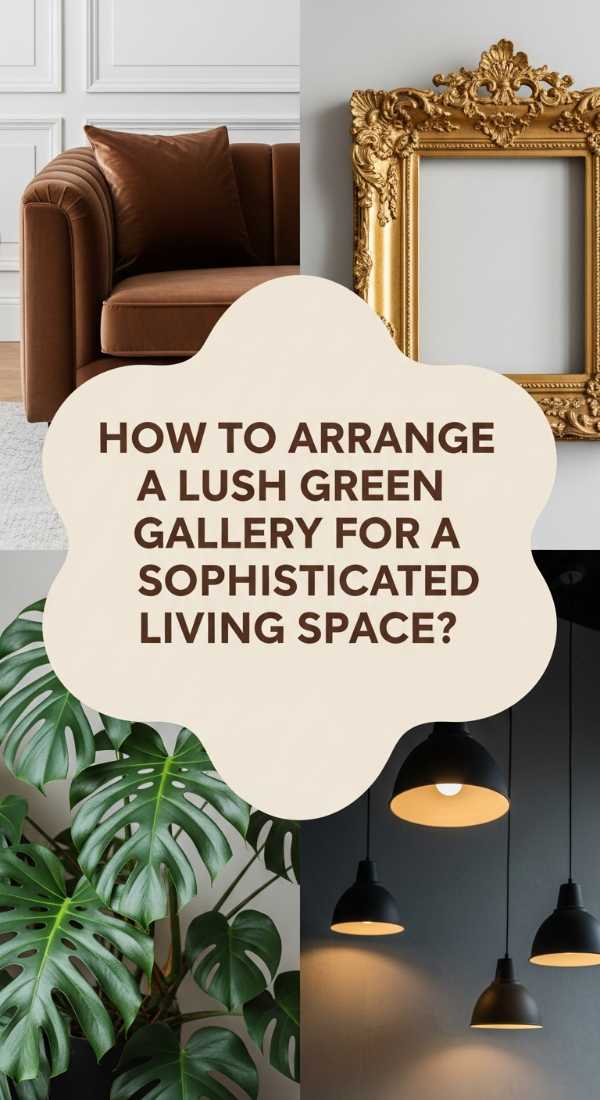
How to Arrange a Lush Green Gallery for a Sophisticated Living Space

Why we love this
Sophistication meets the wild in this gallery style, where the refined elegance of white orchids is grounded by the deep, velvet greens of a Philodendron Micans. The aroma is subtle—a hint of floral sweetness mixed with the clean scent of polished stone. This arrangement feels intentional and high-end, offering a visual texture that is both complex and calming, making your living room feel like a boutique hotel lobby where every leaf has been placed with artistic precision.
Essential Elements:
- Coordinated designer pots (marble, slate, or matte black)
- Specimen plants with unique silhouettes (Zamioculcas)
- Glass cloches for humidity-sensitive rarities
- A minimalist console table or sideboard
- Polished decorative pebbles
How to make it
- Choose a monochromatic color palette for your containers to ensure the focus remains entirely on the diverse shades of green. Prep the console by laying a protective waterproof mat beneath the pots.
- Arrange the plants using the ‘rule of odds’—groups of 3, 5, or 7. This technique is a professional secret for creating a layout that feels natural yet structured. Place the most ‘architectural’ plant (like a Sansevieria) in the center as a focal point.
- Dress the top of the soil with polished pebbles to hide any messy dirt. The gallery is ‘complete’ when the silhouette of the plants against the wall creates a pleasing, sculptural outline. Use a microfiber cloth to buff the leaves until they shine.
How to Create a Tropical Mural Wall for an Endless Summer Feeling
Why we love this
This is for the sun-seekers and the dreamers who want to feel the warmth of the tropics year-round. The broad, vibrant leaves of a Calathea mixed with the explosion of a Bird of Paradise create a tapestry of color that feels like a permanent vacation. The aroma is earthy and sun-warmed, and the visual texture of the large, fan-like leaves creates a bold statement that energizes any room, making even the grayest winter day feel like a bright afternoon in Bali.
Essential Elements:
- Large-leaf tropicals (Monstera Deliciosa, Banana Leaf)
- Vertical support poles (moss poles or bamboo)
- Warm-toned spotlights or accent lighting
- Trellis for climbing varieties
- Rich, organic potting soil with perlite
How to make it
- Set up a sturdy trellis or series of moss poles against the wall. The technique here is to ‘train’ your climbers early by loosely tying their stems to the support with soft garden twine, encouraging upward growth.
- Plant your large tropicals in heavy, stable pots at the base of the wall. Ensure the soil is ‘rich and loamy,’ meaning it holds moisture but feels airy when squeezed. Visual cue: The soil should look like dark chocolate cake crumbs.
- Angle your spotlights upward from the floor to cast dramatic shadows of the tropical leaves onto the ceiling. The mural is ‘done’ when the wall feels like a dense thicket of green. Regularly prune any yellowing leaves to keep the ‘summer’ vibe fresh and healthy.
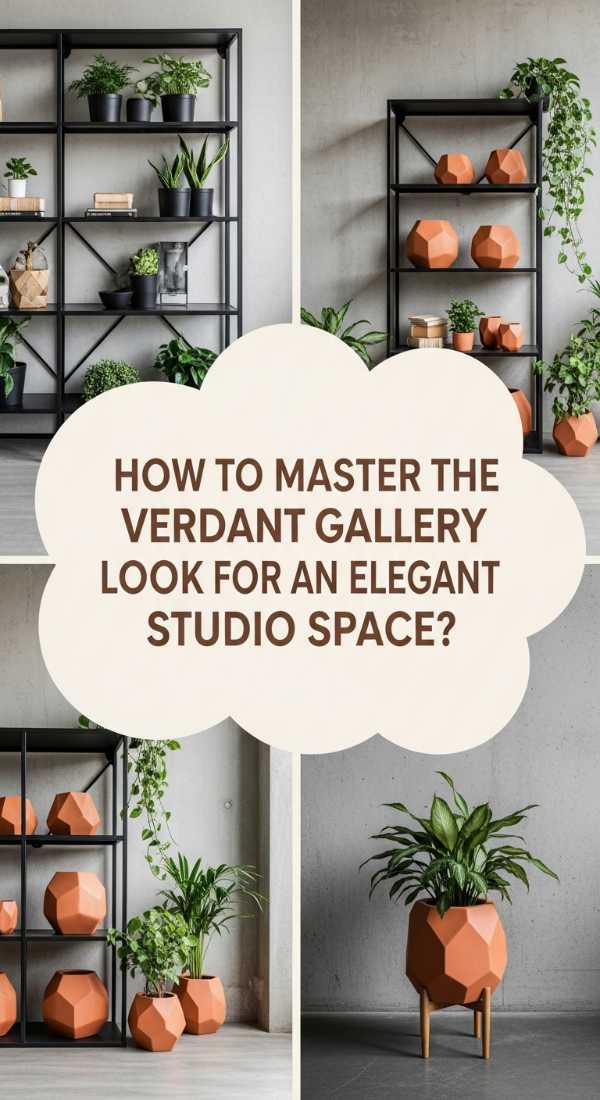
How to Master the Verdant Gallery Look for an Elegant Studio Space
Why we love this
In a small studio, every inch counts, and the verdant gallery look maximizes space by taking the greenery to the skies. Hanging baskets of String of Pearls and Burro’s Tail create a ‘living chandelier’ effect that draws the eye upward, making the ceiling feel higher and the room more expansive. The scent is light and herbaceous, and the feeling of sitting under a canopy of trailing succulents is incredibly intimate and cozy, turning a tiny apartment into a high-end botanical suite.
Essential Elements:
- Ceiling hooks and varied lengths of chain or rope
- Lightweight plastic liners inside decorative woven baskets
- Trailing succulent varieties
- A step ladder for easy maintenance
- Self-watering globes for hard-to-reach plants
How to make it
- Identify the ceiling joists using a stud finder to ensure your hooks can support the weight of a watered plant. Install the hooks in a staggered pattern to avoid a ‘flat’ look.
- Prep your hanging plants by ensuring they are in lightweight, well-draining soil. Technique tip: Use ‘gravity-fed’ watering globes for high-hanging plants to minimize the need for frequent ladder use.
- Adjust the lengths of the hanging ropes so the plants ‘tier’ down the wall. The look is ‘mastered’ when the trailing vines reach different levels, creating a waterfall of green. Watch for ‘vibrancy’ in the leaves—if they look shriveled, the ‘doneness’ isn’t there, and they need more water.
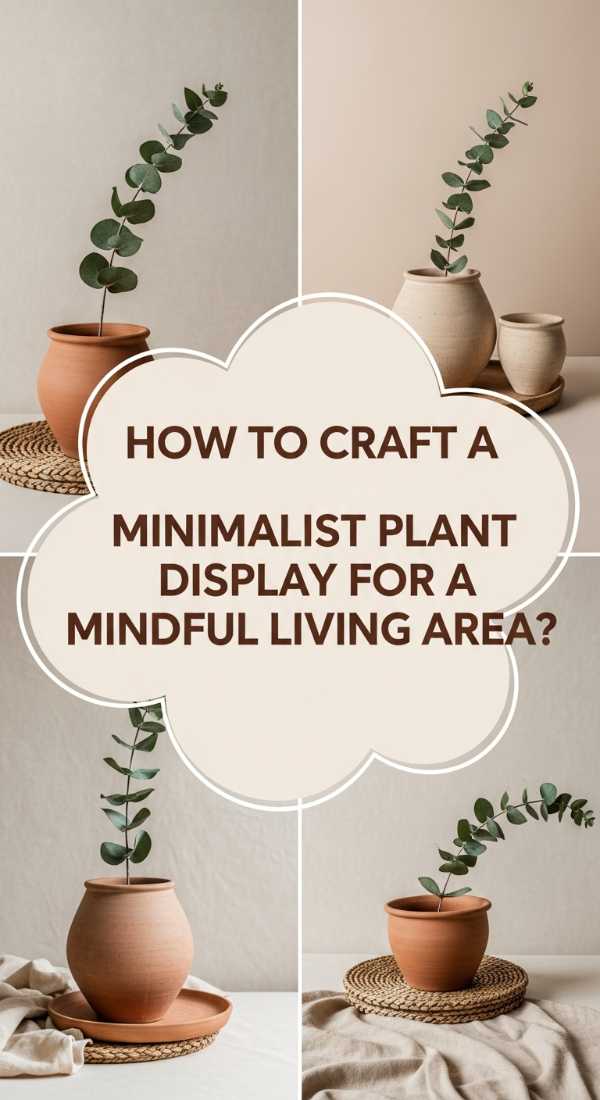
How to Craft a Minimalist Plant Display for a Mindful Living Area

Why we love this
There is a quiet power in simplicity. A minimalist display focuses on a single, stunning specimen or a few perfectly balanced pots, emphasizing the negative space as much as the plants themselves. This aesthetic smells of clean linen and mountain air, providing a visual ‘reset’ for a cluttered mind. The smooth, matte texture of the pots and the sharp, clean lines of a Dragon Tree create a sense of order and peace that makes the room feel like a dedicated space for meditation and mindfulness.
Essential Elements:
- A single, high-quality wooden pedestal
- Minimalist pots in white, grey, or sand
- Specimen plants with clean lines (Pachira Aquatica)
- Natural light (North-facing is best for soft shadows)
- Fine white sand for soil topping
How to make it
- Select one ‘hero’ plant that has a strong, clean silhouette. The technique here is ‘singular focus’—place the plant on a pedestal in a spot with a neutral background, like a plain white wall, to eliminate distractions.
- Ensure the pot is perfectly scaled to the plant; a pot that is too small looks cluttered, while one that is too large looks heavy. The ratio should be roughly 1:3 (pot height to plant height).
- Keep the soil surface perfectly neat by adding a layer of fine white sand. The display is ‘complete’ when the entire setup feels ‘light’ and ‘unburdened.’ If you feel the urge to add more items, you’ve achieved the minimalist ‘sweet spot.’
How to Paint a Dreamy Botanical Mural for a Relaxing Bedroom Suite
Why we love this
Mixing real plants with a hand-painted mural creates a surreal, dreamlike environment that blurs the line between art and reality. The bedroom becomes a soft, hazy forest where the earthy scent of live Lavender mingles with the visual tranquility of painted sage-green leaves. This layered texture—flat paint against 3D foliage—creates a sense of depth that makes the walls seem to disappear, wrapping you in a cocoon of nature that promises the most restful sleep of your life.
Essential Elements:
- Matte wall paint in botanical shades (Sage, Moss, Eucalyptus)
- Stencils or freehand brushes for leaf shapes
- Live plants that match the painted varieties
- Soft, sheer curtains to diffuse sunlight
- Aromatherapy diffuser with forest-scented oils
How to make it
- Paint your mural first using a ‘layered depth’ technique: paint lighter, fuzzier leaves in the background and darker, sharper leaves in the foreground to create a 3D effect. Let the paint cure for at least 48 hours until there is no ‘new paint’ smell.
- Place live plants in front of the painted sections, matching the species where possible (e.g., a real Fern in front of a painted Fern). This creates a ‘trompe l’oeil’ effect that confuses the eye in the best way.
- Use sheer curtains to soften the light hitting the wall, which blends the painted and real elements together. The mural is ‘finished’ when the transition between paint and plant is seamless. Visual cue: The room should feel like it’s glowing with a soft, green light.
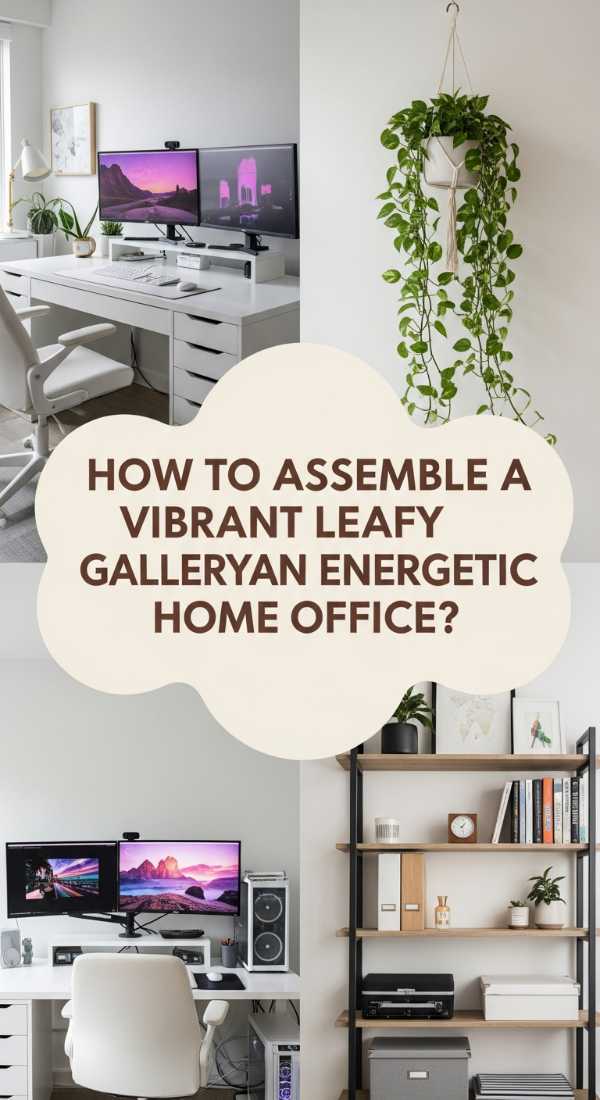
How to Assemble a Vibrant Leafy Gallery for an Energetic Home Office
[IMAGE_10]
Why we love this
Energy and focus are the hallmarks of this vibrant gallery, which uses high-contrast variegation and bright pops of color to keep the mind sharp. The scent of citrusy Lemon Balm or zingy Mint (yes, herbs in the office!) provides a natural cognitive boost, while the sight of neon Pothos and striped Spider plants keeps the visual environment stimulating. It feels like working in a high-tech greenhouse, where the air is buzzing with life and the textures are crisp, firm, and invigorating.
Essential Elements:
- Colorful, geometric pots (yellows, blues, and teals)
- Variegated plant varieties (Marble Queen Pothos, Croton)
- Desktop plant lamps with adjustable necks
- Wall-mounted wire grids for air plants
- Small stones or crystals for energy grounding
How to make it
- Organize your desk-level plants according to their light needs, placing the ‘sun-lovers’ nearest the window. Technique tip: Use ‘color blocking’ by grouping plants in pots of the same bright color to create high-energy focal points.
- Utilize vertical space with a wire grid to hang air plants (Tillandsia). These require no soil and add a futuristic, ‘floating’ texture to the workspace. Mist them twice a week until they are fully saturated but not dripping.
- Position a desktop grow lamp to provide ‘fill light’ during late-night work sessions. The gallery is ‘at its peak’ when the space feels high-vibration and clutter-free. If the plants start to look dusty, wipe them down with a damp cloth; clean leaves are more efficient at photosynthesizing energy for the room.
Cultivating Your Own Green Haven
Transforming your space into a green sanctuary is a journey of patience, observation, and love. It’s about more than just filling a room with plants; it’s about learning to live in harmony with another living being. As you tend to your ferns and florals, you’ll find that you are also tending to yourself. Start small, listen to your plants, and let your home become the lush, vibrant refuge you deserve. Happy planting!