

From Neon to Nude: The Ultimate Guide to 2024 Summer Manicures
Hey there, my loves! Can you feel that? The air is getting a little sweeter, the sun is lingering just a bit longer in the sky, and there is a certain magic dancing in the breeze. Summer isn’t just a season; it’s a whole mood, a soft embrace that tells us to slow down, breathe, and celebrate the beauty in every little detail. And for me, those details always start right at my fingertips.
I’ve been spending my mornings sipping iced lattes and dreaming of all the ways we can express ourselves this year. 2024 is bringing such a gorgeous duality—we are seeing everything from the loudest, most electric neons that scream joy, to the softest, cloud-like nudes that whisper elegance. It’s about finding what makes your soul sing, whether you’re toes-deep in the sand or just catching the light through your office window.
I’ve put together this little guide, a love letter to your summer aesthetic, to help you navigate the hottest trends of the season. So, grab your favorite drink, settle into your sunniest corner, and let’s dive into the world of summer nails together. We’re going to make sure your hands are ready for every sunset, every road trip, and every soft summer memory we’re about to make.
7 steps to master June Nails trends

Why to love this Design:
June is all about that transition from spring’s softness to summer’s heat. These trends celebrate the ‘Aura’ aesthetic—it’s like wearing a little piece of your soul’s energy on your nails. It’s soft, ethereal, and perfectly modern.
Essential Elements:
- Sheer ‘jelly’ polishes
- Makeup sponges for blending
- Soft pastel palettes
- High-shine top coat
How to Prepare:
- Gently push back cuticles and shape nails into a soft almond.
- Apply a sheer nude base coat to create a clean canvas.
- Pick two contrasting pastel colors for your ‘aura’ center.
- Dab the center color onto a sponge and lightly press it into the middle of the nail.
- Softly blend the edges outward until it looks like a glowing mist.
- Add a tiny iridescent flake for extra magic.
- Seal with a thick, glossy top coat for that glass-like finish.
Budget Range
- OPI Infinite Shine in ‘Bubble Bath’ ($14)
- Essie Expressie in ‘Sk8 with Destiny’ ($10)
- Basic Makeup Sponges ($3)
Prepare your Summer Trip nails in 5 steps

Why to love this Design:
When you’re traveling, the last thing you want to worry about is a chipped nail while you’re exploring a new city. This look is all about durability meeting that effortless ‘clean girl’ travel aesthetic.
Essential Elements:
- Long-wear gel formulas
- Neutral, versatile tones
- Nail strengthener
How to Prepare:
- Dehydrate the nail plate with alcohol to ensure the polish grips tight.
- Apply a nourishing base coat to protect from travel-wear.
- Apply two thin coats of a ‘your nails but better’ sheer pink or tan.
- Cap the free edge (the tip) of your nail twice to prevent lifting.
- Finish with a UV-protective top coat to prevent sun-yellowing.
Budget Range
- Beetles Gel Polish Starter Kit ($25)
- Zoya Anchor Base Coat ($12)
Create 3D flowers in 4 easy steps

Why to love this Design:
There is something so romantic and whimsical about 3D art. These little blooms look like they’ve just landed on your nails from a summer garden, adding a touch of tactile luxury to your look.
Essential Elements:
- 3D Sculpting Gel (hard gel)
- Fine dotting tool
- Matte base for contrast
How to Prepare:
- Paint your base color and cure (a matte finish makes the flowers pop!).
- Take a small bead of sculpting gel on your dotting tool and place five tiny dots in a circle.
- Drag the tool toward the center of the circle to create petal shapes.
- Add a tiny gold bead or a drop of yellow gel in the center and do a final cure.
Budget Range
- Saviland 3D Nail Art Gel ($9)
- Nail Art Dotting Tool Set ($6)
Get perfect Holidays Nails in 6 simple steps

Why to love this Design:
Holidays are for celebration, and your nails should be the life of the party! This design incorporates a bit of sparkle and gold leaf to catch the light of the fireworks or the evening stars.
Essential Elements:
- Gold leaf flakes
- Deep navy or vibrant coral base
- Tweezers
How to Prepare:
- Shape nails into a sophisticated square or coffin shape.
- Apply your bold holiday base color and let it dry/cure until tacky.
- Using tweezers, carefully place small fragments of gold leaf near the cuticle.
- Smooth the leaf down gently with a silicone tool.
- Apply a second layer of base color on just one accent nail for depth.
- Lock everything in with a high-gloss, long-wear top coat.
Budget Range
- Modelones Glitter Gel Set ($15)
- Gold Leaf Nail Flakes ($7)
Design June Nails in 3 quick steps

Why to love this Design:
Sometimes, loves, we just need a quick refresh that still feels intentional. This design uses ‘Negative Space’ to create a high-fashion look in literally minutes.
Essential Elements:
- Striping tape or a steady hand
- Bright neon lacquer
How to Prepare:
- Apply a clear, nourishing base coat to the entire nail.
- Paint a single, bold diagonal stripe across the top third of the nail using a neon hue.
- Finish with a quick-dry top coat for an instant, modern vibe.
Budget Range
- Sally Hansen Insta-Dri in ‘Neon’ ($6)
- Nail Striping Tape ($4)
Paint a June Hibiscus in 5 easy steps

Why to love this Design:
Nothing says ‘tropical getaway’ like a hibiscus flower. It’s an instant vacation for your hands, bringing those warm, island vibes wherever you go.
Essential Elements:
- Fine liner brush
- Vibrant pink and white polishes
How to Prepare:
- Start with a soft sandy nude or sky blue base.
- Use your liner brush to paint five large, teardrop-shaped petals in bright pink.
- Add white ‘veins’ or highlights to the petals to give them movement.
- Draw a long, thin yellow line stemming from the center (the stamen).
- Dab tiny white dots at the tip of the stamen for detail and seal with top coat.
Budget Range
- Art 7 Nail Art Brushes ($8)
- Holler and Glow Summer Polish ($5)
Apply 3D starfish charms in 4 steps
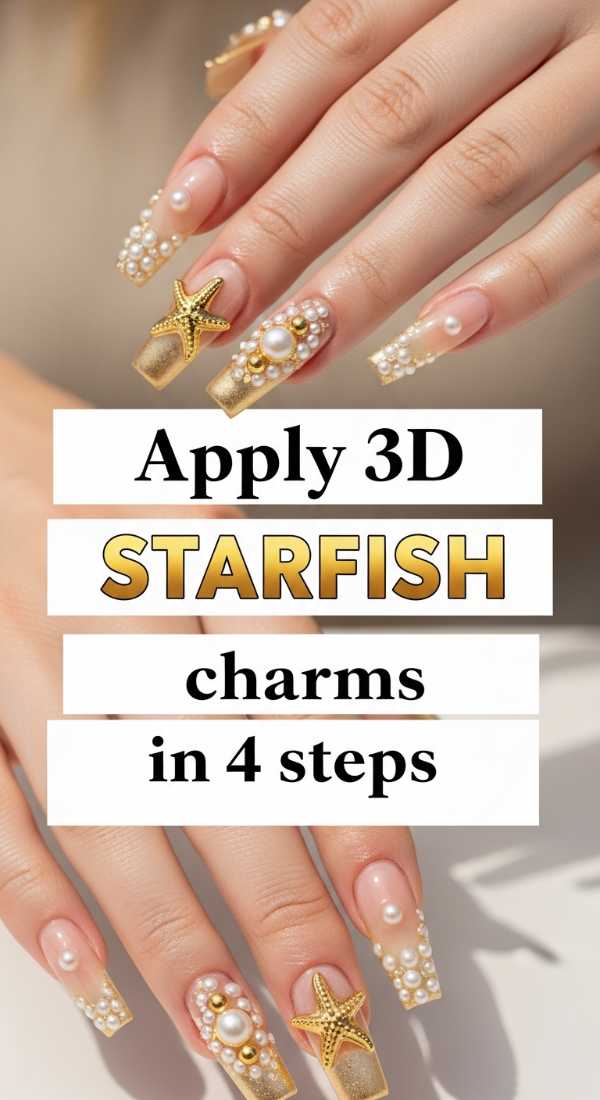
Why to love this Design:
We are embracing our inner mermaids this summer! 3D charms are the ultimate ‘it-girl’ accessory, and starfish give that perfect beachy, textured look.
Essential Elements:
- Metal or resin starfish charms
- Strong nail glue or builder gel
How to Prepare:
- Apply your base color (a shimmering ‘seafoam’ green is lovely here).
- Place a small dollop of nail glue or thick gel where you want the charm.
- Press the starfish charm into the glue and hold for 10 seconds.
- Use a thin brush to seal the edges of the charm with top coat so it doesn’t snag your hair.
Budget Range
- Ocean Theme Nail Charms Pack ($9)
- NYK1 Nail Bond Glue ($12)
Blend June ombré nails in 3 easy steps

Why to love this Design:
Ombré is a classic for a reason—it’s like a sunset on your fingers. It’s soft, feminine, and hides growth beautifully if you choose the right colors.
Essential Elements:
- Two coordinating colors (like peach and pink)
- Wedge sponge
How to Prepare:
- Paint the lighter color as your base and let it dry completely.
- Paint lines of both colors onto your sponge so they just barely overlap.
- Dab the sponge onto the nail repeatedly, moving slightly up and down to blur the line, then top coat.
Budget Range
- Wet n Wild Wild Shine Polishes ($2 each)
- Wedge Makeup Sponges ($4)
Draw tropical tiger prints in 6 steps

Why to love this Design:
For my loves who want to show off their fierce side! Tropical tiger print uses bright colors instead of traditional oranges to make the look feel fresh and summery.
Essential Elements:
- Neon orange or lime green base
- Black detail ink or gel
- Ultra-fine brush
How to Prepare:
- Apply two coats of your bright neon base color.
- Starting from the side of the nail, draw thin, slightly wavy lines toward the center.
- Vary the thickness of the lines—wider at the edge, tapering to a point.
- Incorporate ‘Y’ shaped branches in the lines for a natural fur look.
- Let the black dry completely to avoid smearing.
- Apply top coat with a very light touch to protect the art.
Budget Range
- Gelish Mini Neon Collection ($12)
- Beetles Black Liner Gel ($8)
Make 3D water droplets in 4 steps

Why to love this Design:
This is the coolest trend of 2024! It looks like you’ve just stepped out of a pool and the water is clinging to your nails. It’s refreshing, unique, and a total conversation starter.
Essential Elements:
- Non-wipe top coat (thick viscosity)
- Dotting tool
- Matte top coat (for the base)
How to Prepare:
- Paint your base color and apply a matte top coat (this makes the ‘water’ stand out).
- Take your thick top coat on a dotting tool and place random ‘blobs’ on the nail.
- Immediately cure in a lamp so the droplets don’t flatten out.
- Do not wipe; let the glossy droplets shine against the matte background.
Budget Range
- Kupa Gelfinity No-Wipe Top Coat ($15)
- Miyasi Matte Top Coat ($8)
A Summer of Beauty and Self-Love
So there you have it, my beautiful souls. Whether you choose the quiet elegance of a nude ombré or the wild energy of 3D charms, remember that your nails are just another way to tell the world who you are. This summer, I hope you find moments that make you feel as vibrant and beautiful as your manicure. Take care of your hands, but more importantly, take care of your heart. I can’t wait to see which of these looks you choose for your summer adventures. Stay glowing, loves!