

There is something undeniably magical about the way a simple TikTok video can transform your entire approach to dinner. We’ve all been there: scrolling late at night, mesmerized by the sound of a knife hitting a wooden board or the sizzle of vegetables hitting a hot pan. It’s not just about the food; it’s about the aesthetic, the warmth, and that deep-seated desire to create something beautiful and nourishing without spending four hours in the kitchen. That’s why the viral food board has taken over our feeds—it’s the ultimate lazy-girl (or guy!) hack to a gourmet meal.
Bringing that TikTok trend to your own table is easier than you think. Imagine walking into your kitchen as the sun sets, the air thick with the caramelized aroma of slow-roasted garlic and the earthy sweetness of charred carrots. A food board isn’t just a meal; it’s an experience. It’s about piling high the colors of the season, grabbing a piece of crusty bread, and sharing a moment of pure, unadulterated comfort with the people you love. Let’s dive into how you can master the easiest, most impressive roasted vegetable board ever.
7 Easy Ways to Roast Vegetables (Step-by-Step Guide)

Why we love this
Roasting is the ultimate culinary glow-up for any vegetable, turning humble produce into golden, caramelized treasures. There is a specific sensory joy in hearing the crunch of a perfectly roasted exterior while the inside remains tender and buttery. The aroma that fills your home—a mixture of olive oil, sea salt, and the natural sugars of the vegetables—is better than any scented candle. It is the foundation of the viral food board, offering a rainbow of textures that feel both indulgent and incredibly wholesome.
Ingredients
- 2 lbs mixed seasonal vegetables (bell peppers, zucchini, red onions)
- 3 tablespoons extra virgin olive oil
- 1 teaspoon sea salt
- 1/2 teaspoon cracked black pepper
- 2 cloves garlic, minced
- 1 teaspoon dried oregano
- Fresh parsley for garnish
How to make it
- Preheat your oven to 425°F (220°C). This high temperature is crucial for achieving that golden-brown caramelization without overcooking the centers. Place your baking sheet inside while the oven preheats to ensure a sear the moment the veggies touch the surface.
- Wash and dry your vegetables thoroughly. Any excess moisture will cause them to steam rather than roast, resulting in a mushy texture. Cut them into uniform pieces (about 1-inch chunks) so they cook at the same rate.
- In a large mixing bowl, toss the vegetables with olive oil, salt, pepper, garlic, and oregano. Use your hands to ensure every nook and cranny is coated in a thin, glistening layer of oil.
- Carefully remove the hot baking sheet from the oven and spread the vegetables in a single layer. Avoid overcrowding; if the pan is too full, the vegetables will release moisture and soften instead of browning.
- Roast for 20-25 minutes. At the halfway mark, use a wide spatula to flip the vegetables, ensuring even color on all sides. Look for edges that are starting to turn dark brown and slightly crisp.
- Once finished, remove from the oven and let them rest on the pan for 2 minutes to allow the natural juices to redistribute.
- Transfer to your serving board and sprinkle with fresh parsley for a pop of color and brightness.
5 Easy Ways to Make Roasted Broccoli (Step-by-Step Guide)

Why we love this
Roasted broccoli is a revelation, especially for those who grew up thinking broccoli only came steamed and bland. When hit with high heat, the florets become crispy and “pop” in your mouth, while the stems turn sweet and tender. The smell is slightly nutty and deeply savory, reminiscent of the best charred greens you’d find at a high-end bistro. It adds a necessary crunch to your food board that keeps everyone coming back for just one more bite.
Ingredients
- 2 large heads of broccoli
- 2 tablespoons avocado oil (high smoke point)
- 1/2 teaspoon garlic powder
- 1/4 teaspoon red pepper flakes
- Zest of half a lemon
How to make it
- Set your oven rack to the lower-middle position and preheat to 400°F (200°C). This position helps the bottom of the florets get that desired dark char.
- Break the broccoli into bite-sized florets. Don’t throw away the stems! Peel the tough outer layer of the stalks and slice them into thin rounds; they roast beautifully and taste like water chestnuts.
- Drizzle the broccoli with oil and sprinkle with garlic powder and red pepper flakes. Toss vigorously in a bowl to distribute the spices evenly into the “trees” of the florets.
- Spread the broccoli onto a rimmed baking sheet. Ensure the flat, cut sides of the florets are facing down against the metal; this maximize surface contact for better browning.
- Roast for 15 to 20 minutes. You are looking for the tips of the florets to look almost burnt—that’s where all the flavor lives. The stems should be easily pierced with a fork.
6 Easy Ways to Cook Roasted Vegetable Soup (Step-by-Step Guide)

Why we love this
This soup is like a warm hug in a bowl, concentrating the flavors of roasted produce into a silky, velvety liquid. There’s a depth of flavor here that boiling simply can’t achieve—a smoky, caramelized undertone that makes the soup feel rich and complex. As you stir the pot, the steam carries the scent of roasted onions and sweet tomatoes, promising a meal that is both light and deeply satisfying. It’s the perfect dipping companion for the bread on your viral board.
Ingredients
- 4 cups roasted vegetables (tomatoes, onions, bell peppers)
- 3 cups vegetable or chicken broth
- 1/2 cup heavy cream or coconut milk
- 1 tablespoon tomato paste
- Fresh basil leaves
- Salt and pepper to taste
How to make it
- Start by collecting your pre-roasted vegetables. If you are roasting them specifically for soup, leave them in the oven 5 minutes longer than usual to get extra char, which adds a smoky dimension to the final blend.
- Place a large Dutch oven or heavy-bottomed pot over medium heat. Add the tomato paste and cook for 2 minutes, stirring constantly, until it turns a deep rust color. This “frys” the paste and removes the raw metallic taste.
- Add the roasted vegetables into the pot along with any juices that accumulated on the baking sheet. Pour in the broth until the vegetables are just submerged.
- Bring the mixture to a gentle simmer. Do not let it reach a rolling boil, as this can break down the delicate flavors you worked hard to build during the roasting process. Simmer for 10 minutes.
- Stir in the heavy cream or coconut milk. This introduces a luxurious mouthfeel that balances the acidity of the roasted vegetables.
- Add fresh basil leaves at the very end to preserve their bright, herbaceous aroma. Season with extra salt and pepper to taste.
8 Easy Ways to Glaze Roasted Carrots (Step-by-Step Guide)

Why we love this
Glazed carrots are the jewels of the food board, shimmering with a glossy coating that hints at the sweetness within. When you bite into one, the initial hit of honey or maple syrup is followed by the earthy, concentrated flavor of the carrot itself. The texture is soft but not mushy, with a slight “bite” that feels sophisticated. They provide a beautiful orange hue to your platter and a sweetness that pairs perfectly with salty cheeses or savory dips.
Ingredients
- 1 lb rainbow carrots, scrubbed and trimmed
- 2 tablespoons melted butter
- 2 tablespoons honey or maple syrup
- 1/2 teaspoon cinnamon
- 1/4 teaspoon salt
- Fresh thyme sprigs
How to make it
- Preheat your oven to 400°F (200°C). If your carrots are very thick, slice them in half lengthwise; if they are thin “baby” carrots, leave them whole for a rustic look.
- In a small bowl, whisk together the melted butter, honey, cinnamon, and salt. The cinnamon adds a subtle warmth that enhances the carrot’s natural sugars without making it taste like dessert.
- Place the carrots on a parchment-lined baking sheet. Pour the glaze over them and use tongs to roll them around until they are fully coated. Lay a few sprigs of thyme over the top for aromatic infusion.
- Roast for 20 minutes. At this point, the glaze will be bubbly and the carrots will be softening.
- Remove the pan and toss the carrots again in the glaze that has pooled on the parchment. This “re-coating” step is the secret to a thick, professional-looking glaze.
- Return to the oven for another 5-10 minutes until the glaze has reduced to a sticky, syrupy consistency and the carrots are tender.
10 Easy Ways to Serve Roasted Vegetables (Step-by-Step Guide)

Why we love this
The presentation is where the TikTok magic really happens. Serving roasted vegetables on a large wooden board transforms a simple side dish into a communal feast. There’s something so social and inviting about a board filled with different piles of textures and colors. It encourages grazing, conversation, and the joy of discovery as guests find their favorite combinations of roasted roots, crispy greens, and creamy dips.
Ingredients
- Assorted roasted vegetables (from previous steps)
- 1 bowl of hummus or whipped feta
- Handful of toasted nuts (walnuts or pine nuts)
- Pomegranate seeds for garnish
- Crusty baguette or pita bread
- Microgreens
How to make it
- Choose a large, flat wooden board or a slate platter. Ensure it is clean and dry before you begin building your masterpiece.
- Start by placing your “anchor” items—usually small bowls of dips like hummus or a yogurt-based sauce—in diagonal corners of the board. This creates visual balance.
- Create “rivers” of vegetables. Instead of mixing them all together, group the roasted broccoli in one section, the glazed carrots in another, and the mixed roasted veggies in a third. This allows the individual flavors to shine.
- Intersperse the vegetables with slices of warm, toasted bread or crackers. Angle the bread so it flows around the curves of the vegetable piles.
- Fill in any small gaps with “texture builders.” Sprinkle toasted nuts over the roasted vegetables for crunch and pomegranate seeds for a burst of juicy acidity.
- Garnish the entire board with a handful of microgreens or fresh herbs. This adds height and a professional “catered” look to the presentation.
5 Easy Ways to Season Roasted Broccoli (Step-by-Step Guide)

Why we love this
Seasoning is the bridge between “okay” food and “I need this recipe right now” food. For broccoli, it’s about finding that perfect balance of salt, acid, and heat. The way a sprinkle of parmesan melts into the hot florets or how a squeeze of lemon cuts through the richness of the oil is pure culinary chemistry. It turns a simple green vegetable into a flavor powerhouse that stands tall on any food board.
Ingredients
- 1 head of roasted broccoli (fresh from the oven)
- 3 tablespoons grated Parmesan cheese
- 1/2 lemon
- 1/2 teaspoon smoked paprika
- 1 tablespoon toasted sesame seeds
How to make it
- While the broccoli is still steaming hot on the baking sheet, immediately sprinkle with the grated Parmesan. The residual heat will melt the cheese into the crevices of the florets, creating a savory crust.
- Dust lightly with smoked paprika. Hold the shaker about 6 inches above the pan to ensure a fine, even mist of spice rather than heavy clumps.
- Squeeze the juice of half a lemon over the pan. Listen for the slight hiss; the acidity brightens the heavy roasted flavors and prevents the broccoli from feeling too oily.
- For an Asian-inspired twist, skip the cheese and paprika, and instead toss the roasted broccoli with toasted sesame seeds and a tiny drop of toasted sesame oil.
- Toss everything together one last time on the pan using tongs so the seasonings are distributed into every bite.
7 Easy Ways to Blend Roasted Vegetable Soup (Step-by-Step Guide)

Why we love this
The blending process is where the texture of your soup is defined—it’s the difference between a rustic, chunky chowder and a sophisticated, silky bisque. Watching the jagged pieces of roasted vegetables swirl into a smooth, vibrant liquid is incredibly satisfying. A well-blended soup feels expensive and decadent on the palate, coating the tongue and delivering a concentrated burst of roasted goodness in every spoonful.
Ingredients
- Pot of simmered roasted vegetable soup base
- 1 tablespoon cold butter (optional, for gloss)
- Immersion blender or high-speed stand blender
How to make it
- If using a stand blender, let the soup cool for at least 10 minutes. Never fill a blender more than halfway with hot liquid, as the steam can build pressure and blow the lid off.
- For an immersion blender (the easiest way!), submerge the blade completely in the pot before turning it on. This prevents the soup from splattering all over your kitchen walls.
- Blend on a low speed initially to break down the large chunks, then move the blender in a slow, circular motion, gradually increasing the speed.
- For a rustic texture, stop blending when small bits of vegetable are still visible. For a silky-smooth finish, continue blending for a full 2-3 minutes.
- Professional tip: If you want a truly world-class texture, pour the blended soup through a fine-mesh sieve (chinois) into a clean pot. This removes any lingering skins or seeds.
- Whisk in a tablespoon of cold butter at the very end. This technique, called “monter au beurre,” gives the soup a professional glossy sheen and a rich finish.
9 Easy Ways to Prep Roasted Vegetables (Step-by-Step Guide)

Why we love this
Prep is the ritual that sets the tone for your cooking. There is a meditative quality to the rhythmic chopping and the organized rows of vegetables on your counter. Getting the prep right ensures that everything on your board looks uniform and cooks perfectly. It’s the “behind-the-scenes” work that makes the final “TikTok-worthy” result possible, turning a chaotic kitchen into a space of creative flow.
Ingredients
- Whole vegetables (potatoes, squash, onions, peppers)
- Sharp chef’s knife
- Large cutting board
- Bowl of cold water
How to make it
- Start with a sharp knife. A dull blade is more dangerous and will bruise your vegetables rather than slicing through them cleanly.
- Create a flat surface for every vegetable. If you are cutting a round potato or onion, slice a small piece off the side first so it sits flat on the board and doesn’t roll while you cut.
- Aim for uniform sizing. If your potatoes are large and your peppers are small, the peppers will burn before the potatoes are soft. Try to keep everything within a 1-inch size range.
- For root vegetables like potatoes or parsnips, soak the cut pieces in cold water for 10 minutes, then pat completely dry. This removes excess starch and leads to a much crispier roast.
- Don’t peel everything! The skins of carrots, parsnips, and young potatoes contain vitamins and add a beautiful, rustic texture to the board. Just give them a good scrub.
5 Easy Ways to Char Roasted Broccoli (Step-by-Step Guide)
Why we love this
Char is flavor. That blackened, crispy edge on a piece of broccoli isn’t burnt—it’s caramelized to perfection. The charring process introduces a smoky, almost grilled quality to the vegetable that contrasts beautifully with the tender, sweet stem. It adds a sophisticated, “chef-y” element to your food board, making it look like it came straight out of a wood-fired oven in a trendy bistro.
Ingredients
- Broccoli florets
- Extra virgin olive oil (generous amount)
- Flaky sea salt
- High-heat oven (450°F)
How to make it
- Crank your oven up to 450°F (230°C). Charring requires high, intense heat to color the outside before the inside turns to mush.
- Use a dark-colored baking sheet if you have one; dark metal absorbs more heat and will char the bottom of the broccoli more effectively than shiny aluminum.
- Coat the broccoli heavily in oil. The oil acts as a heat conductor, helping the dry heat of the oven brown the irregular surfaces of the florets.
- Place the pan on the very top rack of the oven. This puts the vegetables in the path of the most intense heat reflecting off the oven ceiling.
- Roast for 10-12 minutes, checking frequently. You want to see distinct black edges. If it’s not charring fast enough, turn on the broiler for the last 2 minutes, but watch it like a hawk—it can go from charred to burnt in seconds!
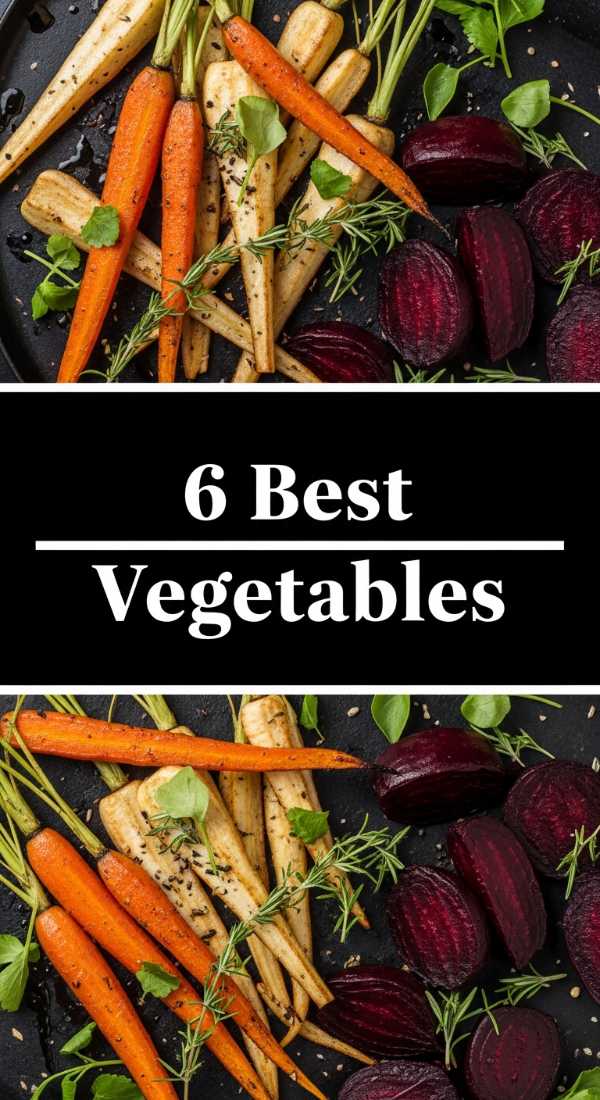
6 Easy Ways to Roast Root Vegetables (Step-by-Step Guide)
[IMAGE_10]
Why we love this
Root vegetables are the heavy hitters of the fall and winter food board. There is something so grounding and hearty about a perfectly roasted parsnip or sweet potato. As they roast, their starches convert to sugar, resulting in a flavor that is incredibly deep and comforting. The smell is sweet and earthy, filling the kitchen with a sense of abundance and warmth that makes any meal feel like a special occasion.
Ingredients
- Mixed root vegetables (beets, parsnips, sweet potatoes, radishes)
- 3 tablespoons melted duck fat or olive oil
- 2 sprigs rosemary, chopped
- 1 tablespoon balsamic vinegar
- 1 teaspoon coarse salt
How to make it
- Preheat your oven to 400°F (200°C). Root vegetables are dense and require a longer, more consistent heat to soften their cores.
- Peel the beets and parsnips, but keep the sweet potato skins on for texture. Cut them into wedges rather than cubes for a more elegant, elongated look on the board.
- Toss the vegetables in duck fat (if using) or olive oil. Duck fat has a high smoke point and adds an incredible savory richness that olive oil can’t match.
- Add the chopped rosemary and coarse salt. The piney scent of rosemary is the classic pairing for the sweetness of roots.
- Spread in a single layer and roast for 35-45 minutes. Unlike broccoli, root vegetables need time. They are done when a knife slides into the thickest part with zero resistance.
- Five minutes before they are finished, drizzle the balsamic vinegar over the pan and toss. The vinegar will reduce into a tangy glaze that cuts through the starchiness of the roots.
Wrapping Up Your Viral Food Board
Mastering the viral food board isn’t about perfection; it’s about the celebration of simple, beautiful ingredients. By using these different roasting and prep techniques, you can create a platter that hits every flavor note—sweet, salty, charred, and creamy. So, turn on your favorite playlist, preheat that oven, and get ready to create a meal that looks just as good as it tastes. Your TikTok-inspired dinner is just one roast away!