

From TikTok to Table: Why This Easy Food Board is a Total Game Changer
There is something about a perfectly curated food board that just stops the scroll. We’ve all been there—tucking into a late-night TikTok binge only to find ourselves mesmerized by the rhythmic chopping of fresh herbs and the artistic drizzle of honey over a mountain of cheese. It’s more than just food; it’s a vibe. It represents those slow, golden afternoons where the sun lingers a little longer and the conversation flows as easily as the chilled rosé. These boards have revolutionized the way we host, turning the stress of a multi-course dinner into a tactile, shared experience that brings everyone to the table.
As someone who used to spend hours hovering over a hot stove while my guests laughed in the next room, discovering the viral ‘board’ lifestyle was a total game-changer. It’s about ditching the formality for something much more intimate and vibrant. Whether you’re hosting a backyard bash or just looking to elevate a quiet Tuesday night, these ideas are designed to be effortless yet impressive. Let’s dive into the ultimate summer collection that will take your hosting game from ‘fine’ to ‘Pinterest-perfect’ in no time.
10 Best Summer Crockpot Recipes
Why we love this
Nothing beats the convenience of a slow cooker when the thermometer starts to climb. Imagine coming home from a long day at the beach to the intoxicating aroma of citrus-infused pulled pork that has been simmering in its own juices until it’s melt-in-your-mouth tender. The texture is a perfect balance of succulent meat and crispy, caramelized edges, offering a savory-sweet profile that feels light enough for a humid July evening yet deeply satisfying for a hungry crowd. It’s the ultimate ‘set it and forget it’ hack that keeps your kitchen cool while delivering professional-grade flavor.
Ingredients
- 4 lb Pork Shoulder (Boston Butt)
- 1 cup Orange juice (freshly squeezed)
- 1/4 cup Lime juice
- 4 cloves Garlic (smashed)
- 1 tbsp Ground Cumin
- 1 tbsp Dried Oregano
- Salt and Pepper to taste
- 1 Onion, sliced
How to make it
- Begin by patting the pork shoulder dry with paper towels to ensure a better sear later. Generously season all sides with salt, pepper, cumin, and oregano, pressing the spices into the meat.
- Place the sliced onions and smashed garlic at the bottom of the crockpot to create a flavor base and prevent the meat from sticking to the bottom.
- Position the pork on top of the onions. Pour the orange and lime juices around the sides of the meat, being careful not to wash off the spice rub.
- Cover and cook on LOW for 8 to 10 hours. Do not open the lid during the process; maintaining a consistent internal temperature is key to breaking down the tough connective tissues.
- Once the meat is fork-tender, remove it from the pot and shred it using two forks. For a professional finish, spread the shredded meat on a baking sheet and broil for 3-5 minutes until the tips become crispy and golden.
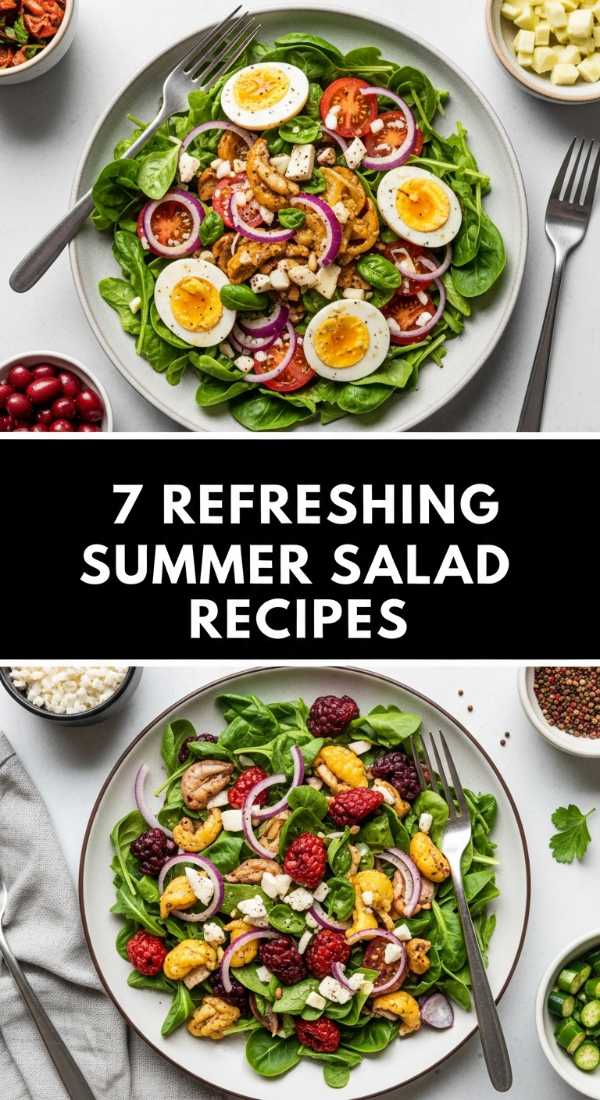
7 Refreshing Summer Salad Recipes

Why we love this
The Watermelon and Feta salad is the undisputed queen of summer refreshments. Each bite is an explosion of contrasting sensations: the icy, crisp crunch of sweet melon meeting the creamy, salty tang of crumbled feta cheese. The aroma of freshly torn mint leaves wafts up, providing an herbal brightness that cuts through the heat of a summer afternoon. Drizzled with a balsamic glaze, this dish offers a sophisticated balance of sweet, salty, and acidic notes that feels incredibly luxurious yet takes only minutes to assemble.
Ingredients
- 6 cups Cubed seedless watermelon
- 1 cup Crumbled Feta cheese
- 1/2 cup Fresh mint leaves, torn
- 1/4 cup Red onion, thinly sliced
- 2 tbsp Extra virgin olive oil
- 1 tbsp Balsamic glaze
- Flaky sea salt
How to make it
- Start by cubing a cold, seedless watermelon into uniform 1-inch squares. Using cold fruit is essential as it provides that signature refreshing temperature contrast.
- In a large, shallow serving bowl (a board or platter works best for presentation), layer the watermelon cubes evenly. Avoid stacking them too high so the ingredients don’t get crushed.
- Scatter the thinly sliced red onions over the melon. Pro tip: soak the onion slices in ice water for 10 minutes beforehand to remove the harsh ‘bite’ and keep them extra crunchy.
- Sprinkle the crumbled feta generously over the top. Use a high-quality sheep’s milk feta for the best creamy texture.
- Tear the mint leaves by hand just before serving to release their essential oils without bruising the edges. Drizzle with olive oil and balsamic glaze, and finish with a pinch of flaky sea salt to make the flavors pop.
12 Best Cookout Side Dishes

Why we love this
Mexican Street Corn, or Elote, is the side dish that always steals the spotlight at any cookout. There is something primal and deeply satisfying about the smell of charred corn hitting the grill, its kernels popping and caramelizing into sweet nuggets of gold. When slathered in a zesty, creamy lime-crema and coated in salty Cotija cheese, it becomes a multi-sensory experience. The smoky heat from the chili powder lingers on the tongue, while the cool cilantro provides a refreshing finish that makes it impossible to stop at just one cob.
Ingredients
- 6 ears of Corn, husked
- 1/4 cup Mayonnaise
- 1/4 cup Sour cream or Mexican Crema
- 1/2 cup Cotija cheese, crumbled
- 1 tsp Chili powder or Ancho powder
- 1/4 cup Fresh cilantro, chopped
- 1 Lime, cut into wedges
How to make it
- Preheat your grill to medium-high heat (about 400°F). Ensure the grates are clean and lightly oiled to prevent the corn from sticking.
- Place the husked corn directly on the grates. Grill for about 10-12 minutes, turning occasionally. You are looking for a beautiful char on all sides—the kernels should be slightly blackened in spots but still plump and juicy.
- While the corn grills, whisk together the mayonnaise, sour cream, and a squeeze of lime juice in a small bowl until smooth.
- Once the corn is done, remove it from the grill and immediately brush each cob generously with the cream mixture while the corn is still hot. This allows the sauce to slightly melt and adhere to the kernels.
- Roll the coated corn in the crumbled Cotija cheese, then dust with chili powder and fresh cilantro. Serve immediately with extra lime wedges for guests to squeeze over the top.
8 Simple Summer Dinner Ideas

Why we love this
Sheet Pan Shrimp Scampi is the ultimate hack for a fancy-feeling dinner without the mountain of dishes. The aroma of garlic sautéing in butter and lemon juice fills the kitchen instantly, signaling a meal that is both light and indulgent. The shrimp emerge from the oven perfectly opaque and snappy, bathed in a glossy sauce that begs to be mopped up with a piece of crusty bread. It’s the kind of meal that feels like a coastal vacation on a plate, bringing a touch of elegance to even the busiest weeknight.
Ingredients
- 1 lb Large shrimp, peeled and deveined
- 4 cloves Garlic, minced
- 3 tbsp Butter, melted
- 2 tbsp Olive oil
- 1 Lemon, sliced into rounds
- 1/4 cup Dry white wine (optional)
- 1/2 tsp Red pepper flakes
- Fresh parsley for garnish
How to make it
- Preheat your oven to 400°F (200°C). Line a large rimmed baking sheet with parchment paper for easy cleanup and to prevent the delicate garlic from sticking.
- In a large bowl, toss the shrimp with the minced garlic, melted butter, olive oil, white wine, and red pepper flakes. Ensure every shrimp is thoroughly coated in the fat and aromatics.
- Spread the shrimp in a single layer on the prepared baking sheet. It is vital not to overcrowd the pan; if the shrimp are touching too much, they will steam rather than roast, losing that perfect texture.
- Nestle the lemon rounds between the shrimp. Roast in the center of the oven for 6 to 8 minutes. Watch closely—the shrimp are done the moment they turn pink and form a ‘C’ shape. Overcooking will make them rubbery.
- Remove from the oven and immediately sprinkle with fresh parsley. Serve directly from the pan or toss with cooked angel hair pasta for a fuller meal.
9 Delicious Summer Dessert Recipes

Why we love this
No-Bake Lemon Icebox Cake is the cool, creamy antidote to a scorching afternoon. This dessert is all about layers of texture: the soft, cake-like consistency of graham crackers that have softened in the fridge, nestled between clouds of tart, velvety lemon whipped cream. The scent is pure sunshine—bright, citrusy, and sweet. As it melts slightly on your tongue, the zing of the lemon zest awakens your palate, making it the perfect refreshing finale to a heavy barbecue meal. It’s effortless, nostalgic, and visually stunning when sliced.
Ingredients
- 2 cups Heavy whipping cream, cold
- 1 cup Lemon curd (store-bought or homemade)
- 1 tsp Vanilla extract
- 1 box Graham crackers
- Zest of 2 lemons
- Fresh berries for topping
How to make it
- In a large chilled bowl, beat the heavy whipping cream and vanilla extract until stiff peaks form. Be careful not to overbeat, or you’ll end up with butter; you want it light and airy.
- Gently fold the lemon curd into the whipped cream using a spatula. Use a folding motion (over and under) to keep the air in the cream while creating beautiful yellow swirls.
- In an 8×8 inch baking dish, spread a very thin layer of the lemon cream on the bottom to act as ‘glue’ for the first layer of crackers.
- Place a single layer of graham crackers over the cream, breaking them if necessary to fit the edges. Top with a thick layer of the lemon cream mixture.
- Repeat the layers (usually 3 or 4) until you reach the top, ending with a smooth layer of cream. Cover and refrigerate for at least 4 hours, though overnight is best to allow the crackers to transform into a soft, sponge-cake texture. Garnish with lemon zest and berries before serving.
10 Most Fun Summer Drinks
Why we love this
The Spicy Strawberry Margarita is the ultimate summer cocktail that plays with your senses. First, you get the vibrant, floral sweetness of muddled strawberries, followed by the sharp, clean bite of premium tequila. Then, a slow, flickering heat from the jalapeño creeps in, creating a complex flavor profile that is incredibly addictive. Served in a salt-rimmed glass with plenty of crushed ice, it’s a drink that looks like a sunset and tastes like a party. It’s refreshing, bold, and exactly what you want to be holding while lounging by the pool.
Ingredients
- 2 oz Tequila Blanco
- 1 oz Fresh lime juice
- 1/2 oz Agave nectar
- 3 Fresh strawberries, hulled
- 2 slices Jalapeño (remove seeds for less heat)
- Tajin or salt for the rim
- Ice cubes
How to make it
- Prepare your glass by rubbing a lime wedge around the rim and dipping it into a plate of Tajin or coarse salt. Fill the glass with fresh ice and set aside.
- In a cocktail shaker, combine the fresh strawberries and jalapeño slices. Use a muddler to crush them thoroughly until the strawberries are pulpy and the jalapeño has released its oils.
- Add the tequila, fresh lime juice, and agave nectar to the shaker. Fill the shaker halfway with ice.
- Shake vigorously for at least 15-20 seconds. This not only chills the drink but also provides the necessary dilution and creates a slight froth from the strawberry fibers.
- Double strain the mixture (using a Hawthorne strainer and a fine-mesh sieve) into your prepared glass to ensure no seeds or pepper bits end up in the final drink. Garnish with a whole strawberry and an extra jalapeño slice.
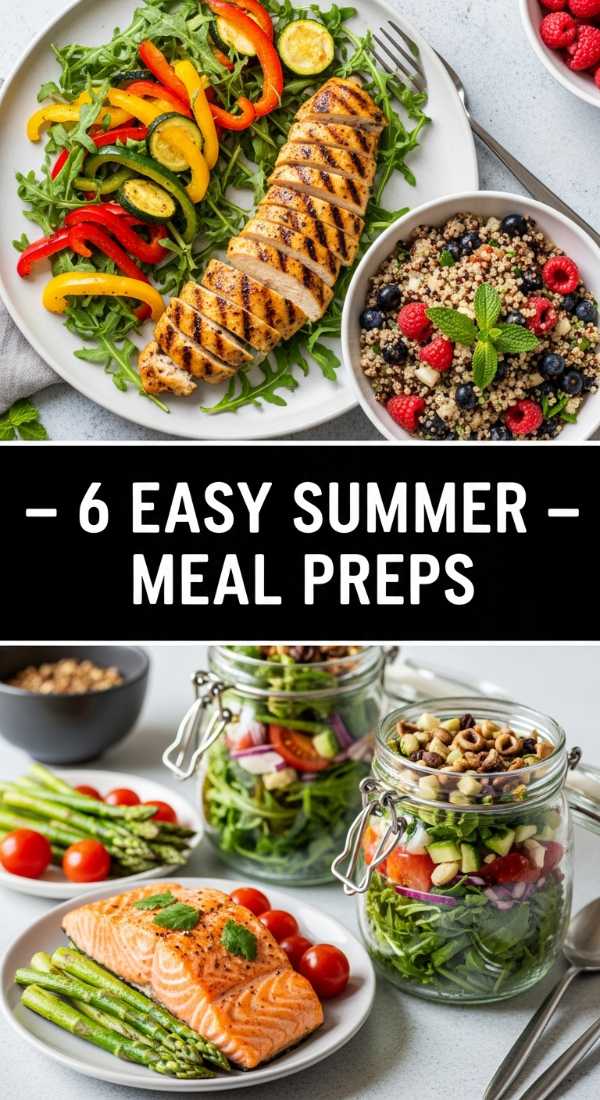
6 Easy Summer Meal Preps

Why we love this
Greek Chicken Bowls are the gold standard for meal prepping because they actually taste better as the flavors meld together over a few days. The combination of herb-marinated grilled chicken, crunchy cucumbers, and briny olives creates a Mediterranean symphony of flavors. The aroma of dried oregano and lemon peel on the chicken is incredibly appetizing, even when eaten cold. It’s a nutrient-dense, colorful meal that keeps you feeling light and energized, making it the perfect grab-and-go option for those busy summer workdays when you’d rather be outside.
Ingredients
- 1.5 lbs Chicken breast, cubed
- 2 cups Cooked Quinoa or Farro
- 1 cup Cherry tomatoes, halved
- 1 English cucumber, diced
- 1/2 cup Kalamata olives
- 1/2 cup Tzatziki sauce
- Marinade: Olive oil, Lemon juice, Oregano, Garlic
How to make it
- Whisk together the olive oil, lemon juice, minced garlic, and oregano. Toss the cubed chicken in this marinade and let it sit for at least 30 minutes in the fridge to tenderize.
- Grill or pan-sear the chicken over medium-high heat until the internal temperature reaches 165°F. Allow the chicken to rest for 5 minutes before packing to keep the juices locked in.
- While the chicken cooks, prepare your base of quinoa or farro according to package instructions. Fluff with a fork and let it cool completely before portioning.
- Divide the grains into four airtight meal prep containers. Top with the cooked chicken, diced cucumbers, halved cherry tomatoes, and olives.
- Keep the Tzatziki sauce in small, separate containers to prevent the rest of the ingredients from getting soggy. These bowls will stay fresh and delicious in the refrigerator for up to 4 days.
11 Crowd-Pleasing Summer Dips

Why we love this
Whipped Feta with Honey and Pistachios is the dip that people will be talking about long after the party is over. It takes the naturally crumbly, salty feta and transforms it into a cloud-like, spreadable masterpiece. The texture is incredibly silky, providing the perfect canvas for a generous drizzle of spicy hot honey and the earthy crunch of toasted pistachios. The contrast between the cold, tangy cheese and the warm, floral sweetness of the honey is pure culinary magic. It’s sophisticated, visually stunning, and works perfectly on a food board surrounded by warm pita and crunchy crudités.
Ingredients
- 8 oz Feta cheese (in brine)
- 1/2 cup Greek yogurt (full fat)
- 1 clove Garlic, minced
- 2 tbsp Olive oil
- 3 tbsp Honey (or hot honey)
- 1/4 cup Roasted pistachios, chopped
- Fresh thyme for garnish
How to make it
- Place the feta cheese and Greek yogurt into a food processor. It is important to use feta from a block in brine rather than pre-crumbled, as the block variety has a much creamier moisture content.
- Add the minced garlic and olive oil. Process on high for 2-3 minutes. Stop halfway through to scrape down the sides with a spatula. You are looking for a completely smooth, airy consistency with no lumps.
- Transfer the whipped feta to a shallow bowl or spread it directly onto your serving board using the back of a spoon to create ‘swirls’ and ‘wells’ for the honey to sit in.
- Drizzle the honey generously over the top, letting it pool in the decorative indentations you created.
- Sprinkle with the chopped pistachios and fresh thyme leaves. Serve at room temperature with toasted pita bread, crackers, or cucumber slices for the ultimate dip experience.
5 Best Summer Pasta Salads

Why we love this
Caprese Orzo Salad is like a classic Caprese salad’s more filling, fun-loving cousin. The tiny, rice-shaped pasta grains act as little sponges, soaking up the balsamic vinaigrette and the juices from the ripe cherry tomatoes. The smell of fresh, peppery basil combined with the creaminess of ‘bocconcini’ (mini mozzarella pearls) is the essence of summer in Italy. Every bite is a delightful mix of chewy pasta, soft cheese, and the snap of fresh vegetables. It’s light enough for a side dish but hearty enough for a main, making it a versatile staple for any summer gathering.
Ingredients
- 1 lb Orzo pasta, cooked and cooled
- 1 pint Cherry tomatoes, halved
- 8 oz Mini mozzarella pearls
- 1/2 cup Fresh basil, chiffonade
- 1/4 cup Balsamic vinaigrette
- 2 tbsp Toasted pine nuts (optional)
- Salt and cracked black pepper
How to make it
- Cook the orzo in a large pot of salted boiling water until al dente. It’s crucial not to overcook it, as it will continue to soften slightly once the dressing is added. Drain and rinse under cold water to stop the cooking process and remove excess starch.
- In a large mixing bowl, combine the cooled orzo with the halved cherry tomatoes and mozzarella pearls.
- Add the balsamic vinaigrette and toss gently to coat. Start with a small amount of dressing and add more as needed; you want the pasta to be glossy, not swimming in liquid.
- Stack your basil leaves, roll them tightly like a cigar, and slice thin strips (chiffonade). Fold the basil into the salad at the very end to keep it from turning dark or bruising.
- Season generously with salt and cracked black pepper. For an extra layer of texture, sprinkle with toasted pine nuts just before serving. This salad is best served slightly chilled or at room temperature.
15 Top Summer Lunch Ideas
[IMAGE_10]
Why we love this
The Hummus and Roasted Veggie Wrap is the ultimate ‘power lunch’ that doesn’t leave you feeling sluggish in the afternoon heat. It’s a vibrant, colorful rainbow wrapped in a soft tortilla, offering a satisfying crunch from fresh sprouts and the smoky, tender depth of roasted bell peppers. The thick layer of creamy hummus provides a rich, nutty base that holds everything together while adding a punch of plant-based protein. It’s the perfect portable meal for a picnic, a hike, or just a quick desk lunch that feels like a treat. The combination of textures—creamy, crunchy, and soft—makes every bite interesting.
Ingredients
- 4 Large flour or spinach tortillas
- 1 cup Roasted red pepper hummus
- 1 Red bell pepper, thinly sliced
- 1 Zucchini, sliced into ribbons
- 1 cup Fresh spinach or arugula
- 1/2 cup Shredded carrots
- 1/4 cup Feta cheese (optional)
How to make it
- For the best flavor, quickly char your bell pepper slices and zucchini ribbons in a pan with a little olive oil until they are just tender but still have some structure. Season with a pinch of salt.
- Lay a tortilla flat on a clean surface. Spread a thick, even layer of hummus across the center, leaving about an inch of space around the edges to prevent leaking.
- Layer the spinach or arugula over the hummus, followed by the roasted peppers, zucchini ribbons, and shredded carrots. Adding the greens first creates a barrier that keeps the tortilla from getting soggy from the vegetables.
- Sprinkle with a little feta cheese if desired for an extra salty kick.
- Fold in the sides of the tortilla, then roll it up tightly from the bottom. Slice diagonally across the middle to show off the beautiful internal layers. Wrap tightly in parchment paper if you are taking it to go.
Conclusion
Embracing the ‘From TikTok to Table’ lifestyle is all about finding the joy in the preparation and the beauty in the presentation. Whether you are assembling a massive board for twenty people or a small personal platter for yourself, the goal is the same: to celebrate the fresh, vibrant flavors of the season. These recipes are more than just instructions; they are invitations to slow down, invite friends over, and create memories around a table filled with good food. So, grab your favorite board, pick a recipe from this list, and let’s make this summer the most delicious one yet!