

From Zero to Trending: The Ultimate Guide to Viral Lifestyle Mastery
Have you ever scrolled through your feed and felt that sudden spark of inspiration—that feeling where a single image of a sun-drenched patio or a perfectly organized desk makes you catch your breath? We’ve all been there, yearning to transform our everyday surroundings into a sanctuary that feels both deeply personal and effortlessly ‘viral.’ Living a lifestyle that trends isn’t about having a massive budget; it’s about the intentionality you pour into your space and the small, magical details that tell your unique story.
In this guide, I’m pulling back the curtain on how to master the art of viral living. We’re moving beyond the superficial and diving deep into the projects that create real emotional resonance. From the way the morning light hits your new garden lattice to the satisfying click of a perfectly curated cubicle, we’re going to explore how to elevate your life from ordinary to extraordinary. Let’s start this journey together and make your home the talk of the town—or at least the star of your own grid.
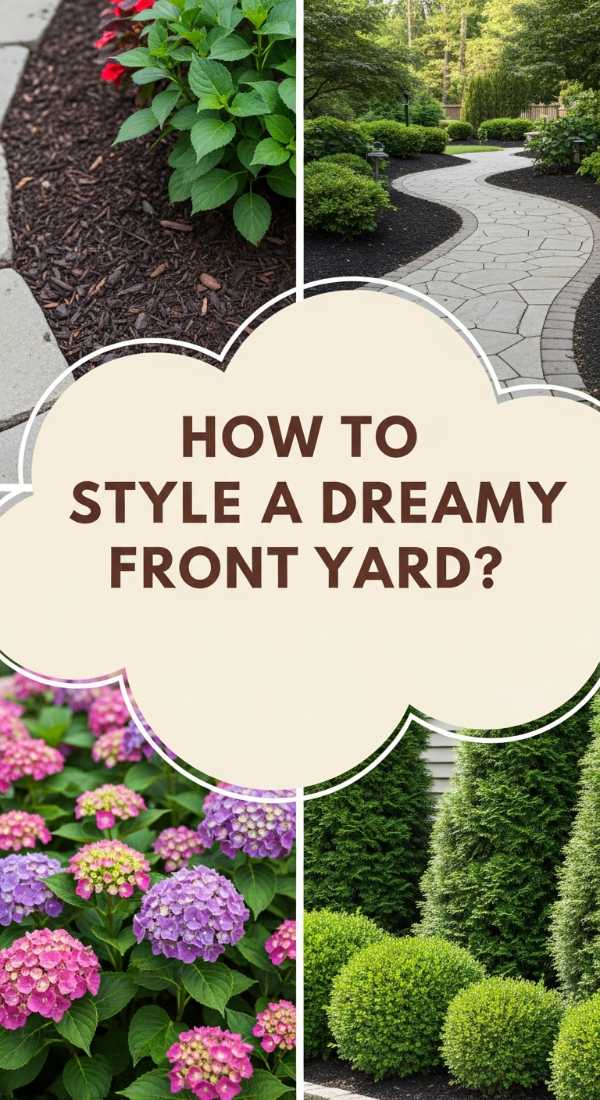
How to Design Simple Landscaping for Instant Curb Appeal
Why we love this
There is nothing quite like the earthy, grounding aroma of freshly turned mulch and the vibrant, velvety texture of new petals to welcome you home. Simple landscaping transforms a house into a haven, creating a visual rhythm that draws the eye and calms the soul. Imagine the crisp, clean lines of a freshly edged lawn meeting the soft, billowy clouds of white hydrangeas, creating a sensory experience that feels both luxurious and welcoming every time you pull into the driveway.
Essential Elements:
- Native perennial flowering shrubs (like Hydrangeas or Boxwoods).
- Dark hardwood mulch for contrast.
- Natural stone or brick edging.
- Solar-powered warm-white path lights.
- A heavy-duty spade and metal rake.
How to make it
- Begin by defining your bed lines using a garden hose to map out organic, flowing curves. Use a sharp spade to cut a clean 3-inch deep edge into the turf, ensuring a crisp transition that prevents grass from creeping in.
- Amend the soil by tilling in 2 inches of high-quality compost. Work the soil until it is crumbly and dark, which provides the aeration and nutrients necessary for roots to establish quickly.
- Position your plants while they are still in their pots. Place taller shrubs toward the back and smaller perennials in the front, staggering them in a ‘W’ pattern for a fuller, more natural look.
- Dig holes twice as wide as the root ball but no deeper. When you place the plant, the top of the root ball should be flush with the ground level; planting too deep can cause stem rot.
- Apply a 3-inch layer of mulch across the entire bed, but keep it a few inches away from the base of the plant stems. This ‘donut’ method prevents moisture from trapping against the bark.
- Water deeply immediately after planting. Visual cue: The soil should be saturated but not muddy. Continue to water every morning for the first two weeks until the plants show new green growth.
How to Curate a Productive Cubicle for Professional Success

Why we love this
Your workspace is the cockpit of your career, and curating it for success is a total game-changer. We love the feeling of sitting down to a desk that smells faintly of peppermint essential oil and looks like a minimalist dream, where every tool has its place. The tactile satisfaction of a smooth leather desk mat under your wrists and the soft glow of a dedicated task light can turn a grueling Monday into a flow-state masterpiece of productivity and professional poise.
Essential Elements:
- Ergonomic wrist rests (memory foam or leather).
- A small, low-light indoor plant (like a Snake Plant).
- Vertical file organizers in a metallic or wood finish.
- Warm-toned LED desk lamp.
- Noise-canceling headphones with a dedicated stand.
How to make it
- Clear everything off your desk first. A ‘hard reset’ allows you to see the spatial potential without the clutter of old post-its. Wipe all surfaces with a microfiber cloth to ensure a dust-free foundation.
- Position your monitor so the top third of the screen is at eye level. This prevents neck strain and creates a more commanding, professional posture.
- Apply the ‘Zone Method’: Place your computer in the center (Zone 1), your notebook and frequently used pens to your dominant side (Zone 2), and a single decorative or green element on the non-dominant side (Zone 3) to provide visual relief.
- Tame the ‘cable nest’ by using adhesive cable clips along the back edge of the desk. Group cords together with Velcro ties so they run in a single, neat line down the desk leg.
- Adjust the lighting. Avoid harsh overhead fluorescents by using a desk lamp with a ‘warm’ bulb (2700K-3000K). The light should be angled to hit your workspace without reflecting off your screen.
- Incorporate a ‘scent-scape’. Use a small reed diffuser or a stone diffuser. Visual cue for success: You should feel a sense of calm and focus the moment you sit down, with no visual distractions in your peripheral vision.
How to Style Your Desktop with High-Vibe Speaker Wallpapers

Why we love this
Digital styling is the new interior design, and high-vibe speaker-themed wallpapers bring an incredible rhythmic energy to your screen. We love the way a well-chosen digital aesthetic can make your computer feel like a piece of high-end audio equipment, vibrating with the potential of your favorite playlist. It’s about that crisp, high-definition contrast and the way the light from your screen sets the mood for your entire room, turning a mundane device into a focal point of cool, tech-forward style.
Essential Elements:
- High-resolution (4K) speaker or turntable photography.
- Color-matching desktop folder icons.
- A clean, hidden taskbar or dock.
- A widget app for ‘Now Playing’ music displays.
How to make it
- Source an ultra-high-definition image with a focal point on the left or right side to allow space for your icons. Look for images with deep blacks and vibrant ‘neon’ or ‘warm wood’ accents to create depth.
- Adjust your monitor’s color profile to ‘Cinema’ or ‘Vibrant’ to ensure the speaker textures look realistic and the shadows are rich.
- Organize your folders into a single transparent dock or hide them entirely. In Windows, right-click the desktop and uncheck ‘Show desktop icons’ for a professional, viral look.
- Use a tool like Rainmeter (PC) or Widgetsmith (Mac) to add a translucent music visualizer that reacts to your audio. Set the transparency to 50% so it blends into the wallpaper.
- Color-match your system accent color to a prominent hue in the wallpaper—for example, a copper tone from a vintage speaker cone.
- Check the visual balance: Squint at your screen; if one side feels ‘heavier’ with icons or widgets, move them until the composition feels as balanced as a professional photograph.
How to Build a Budget Friendly Pool Deck for Summer Entertaining

Why we love this
There is nothing that screams ‘summer luxury’ like the feeling of warm, sun-baked wood under your bare feet as you head for a dip. We love the way a budget-friendly pool deck creates an instant vacation vibe in your own backyard, smelling of cedar and suntan lotion. It’s the perfect stage for golden hour cocktails, where the water reflects the setting sun and the deck provides a sturdy, stylish frame for all your poolside memories and laughter.
Essential Elements:
- Pressure-treated 2×4 and 5/4 decking boards.
- Concrete deck blocks (for a floating foundation).
- Galvanized deck screws.
- Semi-transparent wood stain in a modern grey or warm oak.
- Outdoor string lights and weather-resistant rugs.
How to make it
- Level the ground around your pool area. Remove grass and lay down landscape fabric followed by a thin layer of gravel to prevent weeds and ensure drainage.
- Place concrete deck blocks every 4 feet. This ‘floating’ method is budget-friendly because it doesn’t require digging deep post holes or pouring concrete footings.
- Build the outer frame using 2×6 pressure-treated lumber. Check for levelness across the entire span using a 4-foot level; adjust by adding or removing gravel under the blocks.
- Install joists every 16 inches on center. This ensures the deck feels ‘solid’ and doesn’t bounce when walked upon. Use joist hangers for a professional-grade connection.
- Lay the decking boards with a 1/8 inch gap (use a carpenter’s pencil as a spacer) to allow for wood expansion and water drainage. Drive screws flush with the wood surface.
- Apply stain once the wood is ‘thirsty’. Tip: Pour a few drops of water on the wood; if it soaks in immediately, it’s ready for stain. Apply with a long-handle roller for an even, professional finish.
How to Use Lattice Panels for a Private Garden Sanctuary

Why we love this
Privacy is the ultimate luxury, and there is something deeply romantic about a garden sanctuary hidden behind a veil of latticework. We love the way the sunlight filters through the diamond patterns, creating a dance of shadows on the ground, while the scent of climbing jasmine or roses fills the air. It’s a tactile, living wall that provides a sense of seclusion and peace, turning a simple backyard into a secret escape where time seems to slow down.
Essential Elements:
- Pressure-treated or vinyl lattice panels.
- 4×4 wooden posts for support.
- Fast-growing climbing plants (Clematis, Ivy, or Star Jasmine).
- U-shaped staples or zip ties for vine training.
- Heavy-duty post hole digger and quick-set concrete.
How to make it
- Mark your post locations 4 to 8 feet apart, depending on your panel size. Use a string line to ensure all posts are perfectly aligned in a straight row.
- Dig holes at least 24 inches deep. Add 2 inches of gravel for drainage, then set the 4×4 posts. Pour quick-set concrete and use a level to ensure the posts are perfectly vertical (plumb) while the concrete cures.
- Pre-drill holes into your lattice panels to prevent cracking. Attach the panels to the posts using heavy-duty exterior screws, leaving a 2-inch gap at the bottom to prevent the wood from soaking up ground moisture.
- Install a ‘cap rail’ across the top of the panels. This protects the end-grain of the lattice from rain and gives the project a finished, high-end architectural look.
- Plant your climbers at the base of each panel. Gently weave the existing stems into the lattice, securing them loosely with garden twine.
- Visual cue: As the vines grow, keep ‘training’ them by tucking new growth into the lattice every week. Within one season, you should have a solid green wall of privacy.
How to Create Summer Table Centerpieces for Elegant Outdoor Dining

Why we love this
A beautiful centerpiece is the heartbeat of an outdoor dinner party. We love the combination of organic textures—think the rough skin of lemons against the delicate, silver-green leaves of eucalyptus. There’s a certain magic in the way a centerpiece catches the flickering candlelight as the sun dips below the horizon, creating an inviting atmosphere that encourages guests to linger over their wine and enjoy the cool evening breeze.
Essential Elements:
- Long wooden dough bowl or a linen runner.
- Fresh citrus (lemons, limes, or oranges).
- Bunches of seeded eucalyptus or olive branches.
- Unscented pillar candles in glass hurricane holders.
- Small white bud vases with seasonal blooms.
How to make it
- Start with your base. Lay a linen runner down the center of the table, bunching it slightly to create ‘movement’ and texture rather than laying it perfectly flat.
- Place your largest items first—the glass hurricanes. Space them evenly down the length of the table to ensure the ‘glow’ is distributed for all guests.
- Layer in the greenery. Weave the eucalyptus branches around the hurricanes, letting some leaves spill off the runner for a ‘wild’ and effortless aesthetic.
- Nestle the citrus fruits into the greenery. Group them in clusters of three (the ‘rule of thirds’) to create visual interest and pops of vibrant color.
- Fill small bud vases with one or two stems of a white flower, like ranunculus or spray roses, and tuck them into the gaps to add height and a touch of elegance.
- Lighting technique: Light the candles 10 minutes before guests arrive. Visual cue: The table is ready when the citrus looks ‘bright’ against the green and the glass hurricanes catch the first glimmers of twilight.
How to Decorate a Patriotic Porch for a Festive Home

Why we love this
There’s a nostalgic, heartwarming charm to a porch decked out in red, white, and blue. We love the crisp snap of a flag in the breeze and the way classic Americana styling feels both bold and deeply comforting. It’s about the sensory details: the sound of a porch swing, the sight of vibrant red geraniums, and the feeling of community that comes from celebrating together. It’s a timeless look that instantly makes your home feel like the friendliest on the block.
Essential Elements:
- A high-quality cotton American flag.
- Red geraniums in classic navy or white ceramic pots.
- Bunting for the porch railings.
- Striped outdoor throw pillows in navy and cream.
- A natural fiber coir doormat.
How to make it
- Mount your flag bracket at a 45-degree angle on a prominent pillar or near the front door. Ensure the flag has enough clearance to fly freely without hitting the roof or bushes.
- Drape pleated bunting across the railing. Start from the center and work your way out, ensuring the ‘swags’ are equal in depth. Secure with zip ties hidden behind the fabric.
- Flank your front door with oversized pots. Use the ‘Thriller, Filler, Spiller’ method: A tall grass (thriller), red geraniums (filler), and white bacopa (spiller) for a professional floral arrangement.
- Switch out your everyday textiles. Use navy blue pillows with white piping on porch chairs to ground the look and add a touch of nautical sophistication.
- Add a ‘pop’ of white by painting your house numbers or updating your mailbox to a crisp, clean finish.
- Visual cue: Stand back at the street level. The porch should look ‘balanced’ with color distributed from the top (flag/bunting) to the bottom (pots/mats).
How to Master the Whimsical Apartment Aesthetic for a Magical Home

Why we love this
The whimsical aesthetic is all about embracing your inner child and turning your apartment into a living storybook. We love the soft, ethereal glow of fairy lights tangled in sheer curtains and the eclectic mix of velvet textures and brass accents. It’s a style that feels like a warm hug—magical, unexpected, and filled with personality. It’s about creating a space where every corner holds a tiny surprise, from a hidden crystal to a vintage gold-framed mirror that reflects the moonlight.
Essential Elements:
- Sheer iridescent or lace curtains.
- Warm-toned ‘starry’ fairy lights with copper wire.
- Mismatched vintage glass vases and candlesticks.
- Velvet floor cushions in jewel tones (emerald, amethyst).
- Floating shelves for displaying ‘curiosities’ like dried flowers or old books.
How to make it
- Layer your lighting. Avoid using the ‘big light’ (the ceiling fixture). Instead, place small lamps with warm bulbs at three different heights: floor, table, and shelf levels.
- Hang sheer curtains floor-to-ceiling to create a soft, diffused light. Weave copper fairy lights behind the fabric so the glow feels like it’s coming from within the walls.
- Create a ‘clutter-core’ gallery wall. Mix framed botanical prints with 3D objects like brass keys or small mirrors. Don’t worry about perfect alignment; an ‘organic’ arrangement feels more whimsical.
- Incorporate ‘living’ elements. Drape ivy over the tops of bookshelves and use dried lavender in vases for a scent that is as enchanting as the decor.
- Use a vintage trunk as a coffee table. It provides a tactile, historical element that grounds the lighter, more airy pieces in the room.
- Visual cue: The room should feel like a ‘discovery’. When you walk in, your eyes should dance from one interesting detail to the next, feeling a sense of wonder.
How to Design a Serene Aquarium Setup for Your Living Room

Why we love this
An aquarium is more than a pet habitat; it’s a living piece of art that brings a profound sense of serenity to your home. We love the hypnotic movement of bright, shimmering fish through lush green aquatic plants and the gentle, rhythmic hum of the water filter. The cool blue light of a well-designed tank can transform a high-stress living room into a zen sanctuary, offering a meditative focal point that calms the mind and cleanses the spirit after a long day.
Essential Elements:
- A rimless glass tank for a modern, clean look.
- Natural substrate (aquarium sand or fine gravel).
- Live aquatic plants (Anubias or Java Fern).
- Driftwood and dragon stone for ‘aquascaping’.
- High-quality LED lighting with a ‘moonlight’ setting.
How to make it
- Place your tank on a dedicated, leveled stand away from direct sunlight (to prevent algae growth). Ensure there is an electrical outlet nearby for the filter and lights.
- Layer your substrate with a slight slope—higher in the back and lower in the front. This creates a sense of depth and makes the tank appear larger than it is.
- Arrange your ‘hardscape’ (rocks and wood) first. Use the ‘Golden Ratio’ by placing your main focal point slightly off-center to create a more natural, pleasing composition.
- Add water slowly by pouring it over a saucer placed on the sand. This prevents the water from getting cloudy and keeps your careful landscaping in place.
- Plant your live greenery using long tweezers. Group taller plants at the back and shorter ones in the crevices of your rocks. Visual cue: The plants should look like an underwater forest.
- Cycle the tank for at least two weeks before adding fish. Test the water parameters daily. Visual cue for readiness: The water should be crystal clear and the ammonia levels should read zero.
How to Curate a Vintage Grandma Aesthetic for a Cozy Lifestyle

Why we love this
Vintage Grandma (or ‘Grandmacore’) is the ultimate tribute to comfort, heritage, and the slow-living movement. We love the tactile warmth of a hand-crocheted throw and the comforting clink of a floral porcelain teacup. It’s a style that smells like cinnamon and old paper, celebrating the beauty of ‘imperfection’ and the stories told by weathered wood and cross-stitched art. It’s about creating a home that feels lived-in, loved, and deeply anchored in the soul of the past.
Essential Elements:
- Chintz or floral patterned textiles (pillows, tablecloths).
- A collection of mismatched vintage teacups and saucers.
- Hand-knitted or crocheted afghans.
- Antique wooden side tables with a natural patina.
- Pressed flowers in simple wooden frames.
How to make it
- Start with a neutral base—like a cream sofa—to prevent the patterns from becoming overwhelming. Layer on a variety of floral pillows in different scales (one large print, one small ditsy print).
- Source authentic vintage pieces from thrift stores. Look for items with ‘soul’—a slightly tarnished brass candlestick or a wooden chair with worn armrests. Do not refinish them; the ‘wear’ is the point.
- Create a ‘tea station’ on a sideboard. Display your mismatched china on a lace doily and include a vintage tin for your favorite loose-leaf tea.
- Incorporate ‘handmade’ touches. Even if you don’t knit, find a chunky throw and drape it haphazardly over the back of a chair to suggest a life of cozy leisure.
- Use ‘warm’ scents. A beeswax candle or a simmer pot with apple slices and cloves will complete the sensory experience of a grandmother’s kitchen.
- Visual cue: The space should feel ‘assembled over time’ rather than ‘bought in a day’. If a corner feels too ‘new’, add a stack of old, leather-bound books to age it instantly.
Conclusion
Mastering a viral lifestyle isn’t about chasing every passing trend; it’s about curating a life that feels as good as it looks. Whether you’re planting a garden sanctuary or styling a digital desktop, the secret lies in the details—the textures, the scents, and the intentional choices that make your space uniquely yours. By following these guides, you’re not just creating content; you’re creating a haven. Now, go forth and live beautifully!