

There is something undeniably magical about a gathering where the food looks just as good as it tastes. We’ve all seen those impossibly perfect Pinterest boards overflowing with artisan cheeses and delicate garnishes, and while they are stunning, let’s be real: sometimes we just want the aesthetic without the twelve hours of prep. I’ve spent many weekends trying to find that sweet spot between ‘effortless host’ and ‘culinary artist,’ and I’ve finally discovered the secret. It’s not about the complexity of the ingredients, but the way you bring them together to create a vibe that feels warm, welcoming, and slightly viral-ready.
Today, I’m sharing my ultimate guide to mastering the aesthetic food board trend using simple, high-impact dishes that look like a million bucks but are surprisingly easy to pull off. Whether you’re hosting a backyard movie night, a Sunday brunch, or just want to treat yourself to a beautiful solo meal, these recipes are designed to be the stars of your spread. Grab your favorite wooden board, your prettiest serving bowls, and let’s dive into a world of vibrant colors, rich textures, and flavors that will have your guests asking for the recipe before they’ve even finished their first bite.
How to make the ultimate rotel dip

Why we love this
This isn’t just a dip; it’s a nostalgic hug in a bowl that brings everyone together the moment it hits the table. The way the thick, velvety cheese melts into a pool of creamy gold, punctuated by the spicy, acidic pop of diced tomatoes and green chilies, creates a sensory experience that is hard to beat. As you dip a salty, crunchy tortilla chip into the warm, gooey center, the aroma of savory sausage and melted goodness wafts up, promising a comforting bite that is both smoky and sharp. It is the ultimate crowd-pleaser that looks stunning when served in a rustic cast-iron skillet nestled right in the center of your food board.
Ingredients
- 1 lb Velveeta cheese, cubed
- 1 can (10 oz) Ro-Tel Diced Tomatoes and Green Chilies, undrained
- 1 lb ground breakfast sausage or chorizo
- 1/2 cup sharp cheddar cheese, shredded
- 1/4 cup fresh cilantro, chopped
- 1/2 tsp smoked paprika
How to make it
- Begin by placing a medium-sized skillet over medium-high heat. Add your ground sausage or chorizo, breaking it apart with a wooden spoon or spatula into small, uniform crumbles. Cook for 6-8 minutes until the meat is thoroughly browned and no pink remains, ensuring you get those crispy, flavorful edges. Drain the excess fat carefully.
- In a slow cooker or a heavy-bottomed pot over low heat, add the cubed Velveeta cheese. Low heat is crucial here to prevent the cheese from scorching or becoming grainy. Stir frequently as it begins to liquefy into a smooth, glossy consistency.
- Once the cheese is about 70% melted, pour in the entire can of Ro-Tel (do not drain the juices, as they provide essential acidity and moisture). Add the browned sausage and the shredded cheddar cheese. Stir gently to incorporate all elements until the mixture is completely homogeneous and bubbling slightly.
- Dust the top with smoked paprika for a hint of color and woodsy flavor. Transfer to your serving vessel and garnish generously with fresh cilantro. Serve immediately while hot for that perfect cheese pull.
How to make fresh corn salad

Why we love this
This salad is like capturing a summer afternoon in a bowl, bursting with the sweet, crisp snap of kernels that have been perfectly charred to add a smoky depth. The vibrant contrast between the bright yellow corn, the deep purple of the red onions, and the lush green of the cilantro makes it a visual masterpiece on any aesthetic board. Each bite offers a refreshing explosion of lime-zest brightness followed by the creamy, salty crumble of feta cheese that rounds out the palate beautifully. It’s light, breezy, and provides that much-needed crunch and acidity to balance out heavier, savory elements on your spread.
Ingredients
- 4 cups fresh sweet corn (about 5 ears), husked
- 1/2 red onion, finely diced
- 1/2 cup crumbled feta or cotija cheese
- 1/4 cup fresh cilantro, chopped
- 1 jalapeño, seeded and minced
- 2 tbsp olive oil
- Juice of 2 large limes
- 1/2 tsp chili powder
- Salt and pepper to taste
How to make it
- Heat a large cast-iron skillet over high heat with a tablespoon of olive oil. Once the pan is shimmering and slightly smoking, add the corn kernels in a single layer. Let them sit undisturbed for 2-3 minutes to achieve a deep, golden-brown char before tossing. Continue cooking for another 4 minutes until the corn is tender but still has a firm bite.
- Transfer the charred corn to a large mixing bowl and allow it to cool for at least 10 minutes. Cooling is vital so that the residual heat doesn’t wilt your fresh herbs or melt the cheese immediately upon contact.
- Add the diced red onion, minced jalapeño, and chopped cilantro to the bowl. The jalapeño provides a subtle heat that cuts through the sweetness of the corn; remove all seeds if you prefer a milder profile.
- In a small jar, whisk together the lime juice, remaining olive oil, chili powder, salt, and pepper. Pour this dressing over the salad and toss thoroughly to coat every kernel. Finally, gently fold in the crumbled cheese to ensure it stays in distinct, creamy chunks rather than dissolving.
How to make summer pasta

Why we love this
Summer pasta is the epitome of effortless elegance, relying on the purity of seasonal ingredients to create a dish that feels sophisticated yet incredibly grounded. Imagine the fragrance of fresh basil mingling with the sweet, roasted aroma of cherry tomatoes that have burst open to create their own silky, natural sauce. The texture is a delightful interplay between the al dente bite of the pasta and the soft, melting pearls of fresh mozzarella that stretch lazily with every forkful. It’s a dish that looks stunning when swirled onto a platter, decorated with a final drizzle of golden olive oil that catches the light beautifully.
Ingredients
- 1 lb pasta (penne or fusilli work best)
- 2 pints cherry tomatoes, halved
- 3 cloves garlic, thinly sliced
- 1/4 cup extra virgin olive oil
- 1/2 cup fresh basil leaves, torn
- 8 oz mini mozzarella pearls
- 1/4 tsp red pepper flakes
- Balsamic glaze for drizzling
How to make it
- Bring a large pot of heavily salted water to a rolling boil. Add your pasta and cook for exactly one minute less than the package directions for ‘al dente.’ This ensures the pasta maintains its structural integrity when tossed with the warm sauce. Reserve 1/2 cup of pasta water before draining.
- While the pasta cooks, heat olive oil in a large skillet over medium heat. Add the sliced garlic and red pepper flakes, sautéing for about 1-2 minutes until the garlic is fragrant and translucent, but not browned. Browning the garlic too much will make the sauce bitter.
- Add the halved cherry tomatoes to the skillet. Increase the heat slightly and cook for 5-7 minutes, stirring occasionally. You want the tomatoes to slump and release their juices, creating a light, rustic sauce. Use the back of a spoon to gently press down on any tomatoes that haven’t burst yet.
- Add the cooked pasta and the reserved pasta water to the skillet. Toss vigorously for 2 minutes to allow the starchy water to emulsify with the oil and tomato juices. Remove from heat, fold in the mozzarella pearls and torn basil, and finish with a heavy drizzle of balsamic glaze for a sweet, acidic punch.
How to make iced coffee drinks

Why we love this
There is a specific kind of joy found in watching ribbons of cream slowly cascade through a glass of dark, rich coffee, creating marble-like patterns that are pure art. A well-crafted iced coffee drink is the ultimate accessory for a brunch board, offering a cool, caffeinated crispness that cuts through the sweetness of pastries and fruit. The aroma of roasted beans mixed with the sweetness of vanilla or caramel is intoxicating, and the clinking of ice cubes against glass provides the perfect soundtrack for a slow morning. It’s refreshing, stylish, and serves as a beautiful liquid centerpiece that feels like a boutique cafe experience at home.
Ingredients
- 1 cup strong cold brew coffee or chilled espresso
- 2 tbsp vanilla or caramel syrup
- 1/4 cup heavy cream or oat milk
- Large ice cubes (clear ice looks best)
- Optional: Whipped cream and a dusting of cinnamon
How to make it
- Start with a tall, clear glass to maximize the visual ‘aesthetic’ of the drink. Fill the glass to the very top with large, solid ice cubes. Smaller ice melts too quickly, which dilutes the intensity of the coffee flavor.
- Pour your cold brew or chilled espresso over the ice until the glass is about three-quarters full. If using espresso, ensure it has been chilled beforehand to prevent it from immediately melting the ice and creating a lukewarm beverage.
- Stir in your choice of flavored syrup. Using a long bar spoon, stir from the bottom up to ensure the sweetener is evenly distributed throughout the cold liquid, as sugar dissolves slower in cold temperatures.
- For the viral ‘cloud’ effect, slowly pour the heavy cream or oat milk over the back of a spoon held just above the coffee’s surface. This technique allows the cream to sit on top briefly before slowly drifting downward in beautiful, wispy streaks. Serve with a reusable straw and an optional sprinkle of cinnamon for a professional finish.
How to make fruit cobbler
Why we love this
Fruit cobbler is the ultimate comfort dessert, offering a rustic charm that perfectly complements a relaxed food board setup. The sight of bubbling purple and red fruit juices peeking through a golden, craggy biscuit crust is enough to make anyone’s mouth water. Each spoonful provides a contrast between the jammy, tart intensity of the baked berries and the buttery, slightly salty crunch of the topping. As it bakes, your kitchen will be filled with the scent of caramelized sugar and warm fruit, creating an inviting atmosphere that beckons everyone to grab a spoon and dive into the warm, gooey center.
Ingredients
- 4 cups mixed berries (blueberries, blackberries, raspberries)
- 1/2 cup granulated sugar
- 1 tbsp cornstarch
- 1 cup all-purpose flour
- 1 tsp baking powder
- 1/4 cup cold butter, cubed
- 1/2 cup buttermilk
- 1 tsp vanilla extract
How to make it
- Preheat your oven to 375°F (190°C). In a large bowl, toss the mixed berries with 1/4 cup of the sugar and the cornstarch. The cornstarch is essential as it reacts with the fruit juices to create a thick, glossy sauce rather than a watery mess. Pour the fruit into a greased baking dish.
- In a separate bowl, whisk together the flour, the remaining sugar, and the baking powder. Using a pastry cutter or your fingers, work the cold, cubed butter into the flour mixture until it resembles coarse crumbs. Seeing pea-sized bits of butter is a good sign; these will create steam and make the crust flaky.
- Gently stir in the buttermilk and vanilla extract until just combined. Do not overmix, or the cobbler topping will become tough and bread-like instead of light and tender.
- Drop rounded spoonfuls of the dough onto the fruit mixture, leaving small gaps for the steam to escape. Bake for 30-35 minutes until the fruit is bubbling vigorously at the edges and the biscuit topping is a deep, golden brown. Let it rest for 10 minutes before serving to allow the juices to set.
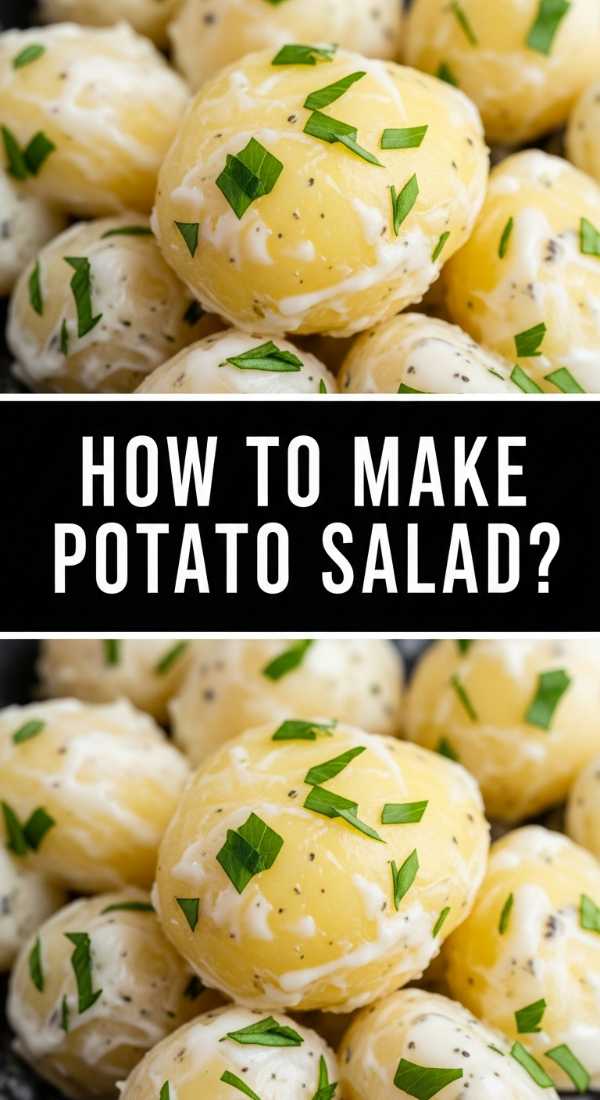
How to make loaded potato salad

Why we love this
Forget the bland, mushy potato salads of the past; this loaded version is a textured, flavor-packed powerhouse that demands center stage. The combination of tender, waxy potatoes enveloped in a zesty, creamy dressing and topped with smoky, shatteringly crisp bacon is absolute perfection. Every forkful offers the sharp bite of fresh chives and the savory depth of cheddar cheese, making it feel more like a main event than a side dish. It adds a hearty, grounded element to your board, with its creamy whites and pops of green and red creating a rustic, appetizing look that feels incredibly indulgent.
Ingredients
- 2 lbs red potatoes, cut into 1-inch cubes
- 1/2 cup mayonnaise
- 1/4 cup sour cream
- 6 slices bacon, cooked and crumbled
- 1 cup sharp cheddar cheese, shredded
- 3 green onions, thinly sliced
- 1 tbsp Dijon mustard
- Salt and black pepper to taste
How to make it
- Place the cubed potatoes in a large pot and cover with cold water by at least an inch. Add a generous pinch of salt. Bring to a boil, then reduce to a simmer and cook for 10-12 minutes. Check for doneness by piercing a potato with a fork; it should be tender but still hold its shape. Drain and let them cool completely.
- While the potatoes cool, whisk together the mayonnaise, sour cream, Dijon mustard, salt, and pepper in a large bowl. This base should be thick and tangy. If it acts as the glue that holds all the savory ‘loaded’ toppings together.
- Once the potatoes are cool to the touch (this prevents the mayo from melting and becoming oily), fold them into the dressing. Use a rubber spatula to gently coat the potatoes without mashing them.
- Add the crumbled bacon, shredded cheese, and sliced green onions. Reserve a little of each for garnish. Toss gently one last time, then transfer to a serving bowl. Garnish with the reserved toppings and chill for at least an hour to allow the flavors to marry before placing on your food board.
How to make creamy fruit dip

Why we love this
This creamy fruit dip is like a cloud of sweetness that elevates even the simplest fruit platter into a gourmet dessert experience. Its texture is incredibly light and airy, thanks to the combination of whipped cream cheese and marshmallow fluff, creating a silky mouthfeel that pairs perfectly with the crisp snap of an apple or the juiciness of a strawberry. It’s bright white and glossy, making it a stunning focal point on a colorful fruit board. The flavor is subtle—sweet but with a slight tang—making it dangerously addictive and the perfect dip for guests of all ages to enjoy.
Ingredients
- 8 oz cream cheese, softened to room temperature
- 7 oz marshmallow fluff (one jar)
- 1 tsp vanilla extract
- 1/2 tsp orange zest (optional for brightness)
- Assorted fruit for serving (strawberries, grapes, melon)
How to make it
- Ensure your cream cheese is completely softened at room temperature for at least 30 minutes. If the cheese is cold, the dip will be lumpy rather than silky smooth. Place the softened cream cheese in a large mixing bowl.
- Using a hand mixer or a stand mixer with the whisk attachment, beat the cream cheese on medium-high speed for 2-3 minutes until it is light, fluffy, and free of any lumps.
- Add the marshmallow fluff, vanilla extract, and optional orange zest to the bowl. Turn the mixer to low to incorporate, then increase to medium-high and whip for another 2 minutes. The mixture should double slightly in volume and look glossy and white.
- Transfer the dip to a pretty serving bowl. For an extra aesthetic touch, use a spoon to create a swirl on the top and garnish with a tiny sprig of mint or a dusting of cinnamon. Serve chilled alongside a rainbow of fresh fruit skewers.
How to make lemon chicken

Why we love this
Lemon chicken is the sophisticated protein every food board needs, offering a bright, citrusy zing that wakes up the senses and cleanses the palate. The sight of golden-brown chicken thighs nestled among charred lemon slices and fresh rosemary sprigs is peak ‘lifestyle blogger’ aesthetic. The chicken is incredibly juicy on the inside with a crisp, herb-crusted exterior that crackles under the fork. The aroma of roasted garlic and lemon juice caramelizing in the oven creates an inviting, savory scent that promises a meal that is both healthy and deeply satisfying. It’s elegance made simple.
Ingredients
- 1.5 lbs boneless, skinless chicken thighs
- 1/4 cup olive oil
- 3 lemons (2 juiced, 1 sliced into rounds)
- 4 cloves garlic, minced
- 1 tbsp fresh rosemary, chopped
- 1 tsp dried oregano
- Salt and cracked black pepper
How to make it
- In a large bowl or a zip-top bag, combine the olive oil, lemon juice, minced garlic, rosemary, oregano, salt, and pepper. Add the chicken thighs and toss to coat thoroughly. Let the chicken marinate for at least 30 minutes (or up to 4 hours in the fridge) to allow the acid in the lemon to tenderize the meat.
- Preheat your oven to 425°F (220°C). A high temperature is key to getting that beautiful golden-brown sear while keeping the interior moist and juicy.
- Place the chicken thighs in a single layer in a large baking dish or on a rimmed sheet pan. Arrange the lemon slices around and on top of the chicken. The slices will caramelize in the oven, releasing a sweet and tart oil that flavors the meat further.
- Roast for 20-25 minutes, or until the internal temperature reaches 165°F (74°C). For an extra aesthetic touch, turn on the broiler for the last 2-3 minutes to get those edges extra crispy and the lemon slices slightly charred. Let the meat rest for 5 minutes before slicing and serving.
How to make berry salad

Why we love this
A berry salad is a jewel-toned masterpiece that brings a pop of intense color and natural sweetness to your food board. The mixture of deep indigo blueberries, bright scarlet strawberries, and velvety raspberries looks like a bowl of gems, especially when finished with a honey-lime glaze that makes them shimmer under the light. The taste is a symphony of tart and sweet, enhanced by the cooling, peppery finish of fresh mint leaves. It’s the perfect light dish to serve alongside heavier brunch items, providing a refreshing burst of antioxidants and a clean, crisp flavor profile that everyone loves.
Ingredients
- 1 pint strawberries, hulled and quartered
- 1 pint blueberries
- 1 pint raspberries
- 1 cup blackberries
- 2 tbsp honey or agave nectar
- Juice of 1 lime
- 2 tbsp fresh mint, chiffonade (finely sliced)
How to make it
- Carefully wash all the berries and pat them completely dry with a paper towel. This step is vital; if the berries are wet, the honey-lime dressing will slide right off and pool at the bottom of the bowl instead of coating the fruit.
- In a small glass bowl, whisk together the honey and the lime juice until the honey is completely dissolved. If the honey is too thick, microwave it for 5 seconds to loosen it up before mixing.
- Place all the berries in a large, wide glass bowl. Using a wide bowl prevents the berries at the bottom from being crushed by the weight of the ones on top. Pour the dressing over the fruit.
- Using a large spoon or clean hands, very gently toss the berries to coat them in the glaze. Add the finely sliced mint leaves at the very last second and toss once more. Serve immediately to maintain the berries’ structural integrity and the mint’s vibrant green color.
How to make grilled steak tacos
[IMAGE_10]
Why we love this
Steak tacos bring a smoky, charred energy to a food board that is both rustic and incredibly appetizing. The sizzle of the steak as it hits the grill, followed by the rich, savory aroma of toasted cumin and garlic, sets the stage for a mouthwatering meal. Each taco is a perfect bite of tender, medium-rare beef tucked into a warm, slightly blistered corn tortilla, topped with a zesty crunch of cabbage and a drizzle of lime. It’s a hands-on, communal food that encourages guests to build their own perfect taco, making your food board an interactive experience that feels vibrant and full of life.
Ingredients
- 1.5 lbs flank steak or skirt steak
- 12 small corn tortillas
- 2 tbsp olive oil
- 1 tbsp chili powder
- 1 tsp cumin
- 1 tsp garlic powder
- 1/2 tsp onion powder
- Salt and pepper
- Toppings: Shaved cabbage, radishes, cilantro, lime wedges
How to make it
- Rub the steak generously with olive oil and then coat both sides with the chili powder, cumin, garlic powder, onion powder, salt, and pepper. Let the steak sit at room temperature for 15-20 minutes. This ensures the meat cooks evenly throughout.
- Heat a grill or a heavy cast-iron grill pan over high heat. You want the surface to be screaming hot to achieve a deep, dark crust (the Maillard reaction). Place the steak on the grill and cook for 4-5 minutes per side for medium-rare.
- Remove the steak from the grill and place it on a cutting board. Crucial step: let the meat rest for at least 8-10 minutes. This allows the juices to redistribute; if you cut it too soon, all that flavor will run out onto the board.
- While the meat rests, briefly char the corn tortillas over an open flame or on the grill for 30 seconds per side until they are pliable and have light brown spots. Slice the steak against the grain into thin strips. Assemble the tacos with the steak and fresh toppings, arranging them in a row on your board for a stunning, high-contrast presentation.
Conclusion: Bringing Your Aesthetic Board to Life
Mastering the aesthetic food board trend isn’t about being a professional chef; it’s about the celebration of textures, colors, and the joy of shared eating. By combining these simple, high-impact recipes, you create a spread that feels thoughtful and luxurious without the stress. Remember to play with heights using different bowls, fill in the gaps with fresh herbs or nuts, and most importantly, enjoy the process of creating something beautiful. Your next gathering is about to become a viral-worthy success!