

Have you ever walked into a room and felt your shoulders immediately drop an inch? That is the magic of balancing hygge with minimalism. For years, we were told that to be a minimalist, you had to live in a white box with one uncomfortable chair, but I’m here to tell you that’s a myth. True minimalist living isn’t about subtraction for the sake of emptiness; it’s about making room for the things that actually nourish your soul, like the scent of a beeswax candle or the feel of a heavy wool blanket against your skin.
Lately, I’ve been obsessed with this intersection of ‘cozy’ and ‘clear.’ It’s about creating a sanctuary where your mind can rest because there is no visual clutter, but your body can sink into softness because every texture has been chosen with intention. It’s a delicate dance between the Danish art of hygge—which celebrates intimacy and warmth—and the sleek clarity of minimalist design. Let’s dive into how you can transform your space into a breathable, beautiful haven.
How to Curate a Small Living Room for Maximum Serenity

Why we love this
There is something deeply grounding about a small space that feels perfectly intentional rather than cramped. We love this approach because it forces you to prioritize quality over quantity, filling the room with the scent of fresh cedar and the sight of soft, natural light filtering through sheer curtains. When a small room is curated for serenity, every square inch becomes a dedicated zone for peace, offering a tactile experience that feels like a warm hug for your senses while maintaining a crisp, airy aesthetic that allows your thoughts to flow freely without hitting ‘stuff’ barriers.
Essential Elements:
- Multi-functional low-profile sofa
- Single statement piece of neutral wall art
- Sheer linen window treatments
- Solid oak coffee table with rounded edges
- Dimmable warm-toned floor lamp
How to make it
- Assess the flow: Begin by clearing the room entirely to see the ‘bones’ of the space. Timing: 30 minutes. Visualize the natural path from the door to the window to ensure no furniture blocks the movement of light or air.
- Prep the foundation: Place your largest piece—the sofa—against the longest wall but pull it three inches away from the surface to create ‘breathing room.’ Professional tip: This prevents a ‘pushed-in’ look and adds an immediate sense of depth.
- Layer the lighting: Set your ‘heat levels’ by choosing bulbs with a 2700K color temperature. Install a dimmer switch to adjust the glow. Visual cue: The room is ‘done’ when there are no harsh shadows in the corners, only a soft, diffused radiance.
- Style the surfaces: Place exactly three items on the coffee table (a book, a candle, a small tray). Visual cue for doneness: The table should look balanced but still have 70% of its surface area visible.
How to Layer Cozy Minimalist Textures for a Warm Home Atmosphere

Why we love this
Texture is the secret ingredient that prevents a minimalist home from feeling ‘cold’ or sterile. We love layering textures because it provides a rich, multi-sensory experience—think of the contrast between a smooth, cool marble tabletop and the nubby, chunky knit of a hand-woven wool throw. This technique appeals to our sense of touch, making the home feel lived-in and soulful without needing bright colors or excess decor. It creates a visual rhythm that is soothing to the eye and provides a physical warmth that makes even the coldest winter evening feel like a high-end retreat.
Essential Elements:
- Chunky wool knit blankets
- Smooth linen pillow covers
- Jute or sisal area rug
- Velvet accent cushions in earth tones
- Polished stone or wood bowls
How to make it
- Base Layering: Start with the largest texture—the rug. Position a jute rug under the sofa to provide a rough, organic base. Technique: Ensure the rug extends at least 6 inches beyond the sofa edges to anchor the room.
- Middle Layering: Add linen pillows to the sofa. Tip: Use high-quality feather inserts that are 2 inches larger than the covers for a ‘plump’ but relaxed look. Timing: 5 minutes.
- Top ‘Heat’ Layer: Drape a chunky wool throw over the arm of a chair. Heat Level: Higher texture density equals more perceived warmth. Visual cue: The fabric should look like it was tossed naturally, not folded into a stiff square.
- Balance Check: Scan the room for a mix of hard (wood/stone) and soft (fabric). Visual cue for doneness: You should see at least four distinct materials within your eye line from the center of the room.
How to Master Minimalist Room Decor for a Calming Evening Glow

Why we love this
There is a specific moment at dusk when the world slows down, and your home decor should reflect that transition. We love mastering the evening glow because it turns a functional room into a meditative sanctuary, utilizing warm ambers and soft shadows to signal to the brain that it’s time to rest. The interplay of minimalist decor with strategic lighting creates a sophisticated atmosphere where the flicker of a candle flame becomes the focal point, heightening the aroma of vanilla and sandalwood and making the stresses of the day melt away into the soft architecture of the room.
Essential Elements:
- Warm-toned LED strips (hidden behind furniture)
- Hand-poured soy candles
- Frosted glass table lamps
- Opaque window shades
- Matte black or brass candle holders
How to make it
- Define the ‘Glow Zones’: Identify three points in the room at varying heights—one low (floor lamp), one medium (table lamp), and one accent (shelf light). Timing: 10 minutes.
- Set the Intensity: Use bulbs with low wattage or smart bulbs set to 20% brightness. Tech tip: Aim for ‘pooling’ light rather than ‘flooding’ light. The light should spill onto surfaces like water.
- The Candle Prep: Trim candle wicks to 1/4 inch before lighting to prevent soot. Position them away from drafts. Visual cue: The flame should be steady and upright, casting a soft orange light on the immediate surroundings.
- Evening Transition: Close shades to eliminate blue exterior light. Visual cue for doneness: The room should feel intimate, with the corners fading into soft darkness while the ‘living’ areas are bathed in a gentle, amber-hued warmth.
How to Arrange Minimalist Living Room Furniture for Fluid Movement
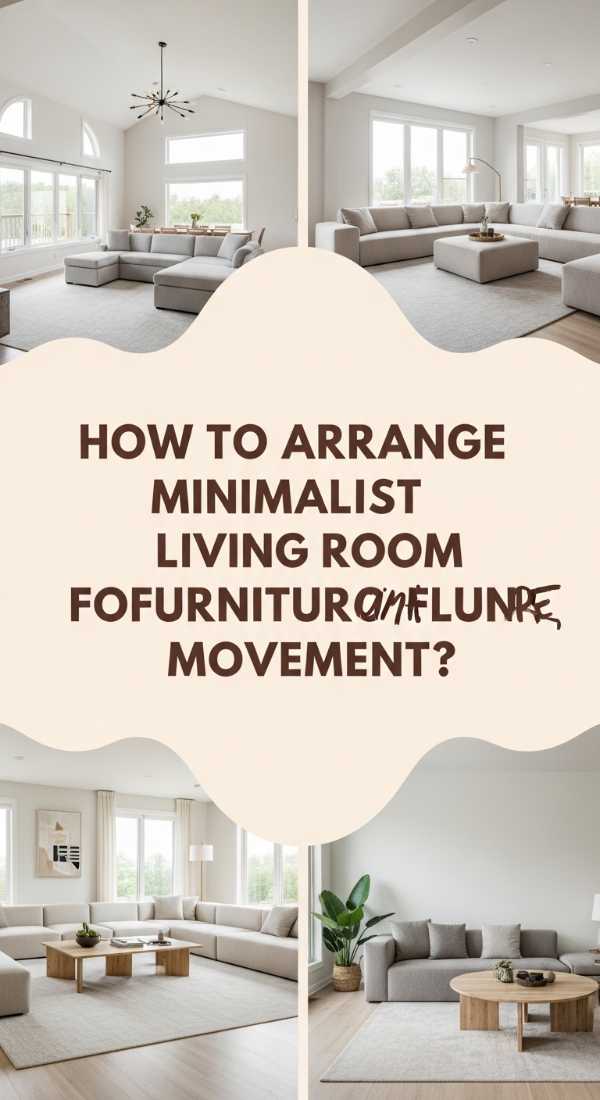
Why we love this
A room that flows well is a room that feels effortless to live in. We love this arrangement style because it removes the physical and mental ‘clutter’ of navigating around bulky items, creating a space that feels expansive and liberated. There is a profound sense of clarity that comes from being able to move through your living area with fluid grace, where the furniture feels like part of the architecture rather than obstacles in your path. This layout prioritizes ‘negative space’ as a design element itself, allowing the eye to rest and the air to circulate freely.
Essential Elements:
- Leggy, open-base furniture
- Circular coffee tables for better pathing
- Transparent or mesh accent pieces
- A clear ‘hero’ focal point (like a fireplace or window)
- Minimalist floating shelves
How to make it
- Clear the ‘Traffic Lanes’: Identify the main path from one door to another. Ensure a minimum of 36 inches of clearance for walking. Timing: 15 minutes of measuring.
- Furniture Anchoring: Place the sofa facing the focal point, but keep it angled slightly to invite entry into the seating group. Technique: Use the ‘rule of thirds’ to place furniture so that 1/3 of the floor remains completely visible.
- Visual Lightness: Choose chairs with slim legs so you can see the floor beneath them. Tip: Seeing more floor space tricks the brain into perceiving the room as larger and more ‘breathable.’
- Visual cue for doneness: Walk through the room with your eyes closed (carefully!). If you can move from one end to the other without fear of bumping into an edge, the flow is perfected.
How to Organize a Minimalist Home for a Clutter Free Mindset

Why we love this
Organizing for minimalism is more than just tidying; it is a ritual of mental hygiene. We love this process because it transforms the home from a storage unit for ‘stuff’ into a launchpad for creativity and relaxation. There is an incredible sensory relief in opening a cabinet to find only what you need, neatly aligned and easily accessible. The aroma of clean surfaces and the absence of visual ‘noise’ allow your brain to switch from ‘management mode’ to ‘being mode,’ fostering a deep sense of clarity and control that ripples out into every other area of your life.
Essential Elements:
- Hidden storage ottomans
- Uniform glass jars for pantry/shelf items
- Neutral-colored storage baskets (seagrass or felt)
- Label maker for discrete organization
- Decluttering bins (Keep, Donate, Trash)
How to make it
- The ‘Purge’ Phase: Empty one category (e.g., books or tech) completely onto the floor. Timing: 1-2 hours per category. Visual cue: Look for items that haven’t been touched in 6 months—these are ‘done’ and ready for donation.
- Prep the Systems: Group like-items together. Technique: Use the ‘one-in, one-out’ rule for every new item brought into the home to maintain the balance.
- The ‘Hidden’ Layout: Store utilitarian items inside closed-door cabinets or baskets. Heat level: Keep frequently used items at waist height for easy access.
- Visual cue for doneness: Every flat surface in the room (counters, tables) should be 90% clear. When you can find any essential item in under 30 seconds, your mindset organization is complete.
How to Style Minimalist Cozy Greenery for Fresh Indoor Air

Why we love this
Bringing the outdoors in is the ultimate way to soften a minimalist aesthetic. We love minimalist greenery because it adds a vibrant, living energy that synthetic decor simply cannot replicate. The sight of a sculptural snake plant or a delicate olive tree provides a ‘living’ texture that cleans the air and brings a sense of forest-bathing into your living room. The earthy scent of damp soil and the lush green hues act as a natural anti-depressant, creating a sanctuary that feels both modern and ancient, providing a visual ‘pop’ that is grounded in nature.
Essential Elements:
- Sculptural plants (Monstera, Fiddle Leaf Fig)
- Matte terracotta or concrete pots
- Wooden plant stands of varying heights
- Small mister bottle
- Organic potting soil
How to make it
- Selection Prep: Choose plants based on your light levels. Timing: 20 minutes of research. Visual cue: ‘Low-light’ plants go in corners; ‘High-light’ plants go within 3 feet of windows.
- The ‘Odd Number’ Grouping: Style plants in groups of three. Technique: Place one tall plant, one medium plant, and one trailing plant together. This creates a ‘micro-jungle’ look without looking messy.
- Color Coordination: Use pots in a single color palette (e.g., all white or all grey) to keep the look minimalist. Tip: The plant is the art; the pot is the frame.
- Visual cue for doneness: The plants should look like they grew there naturally, not like they are ‘on display.’ The air should feel noticeably crisper and the green should be the only ‘bright’ color in the room.
How to Select a Minimalist Room Palette for Timeless Elegance
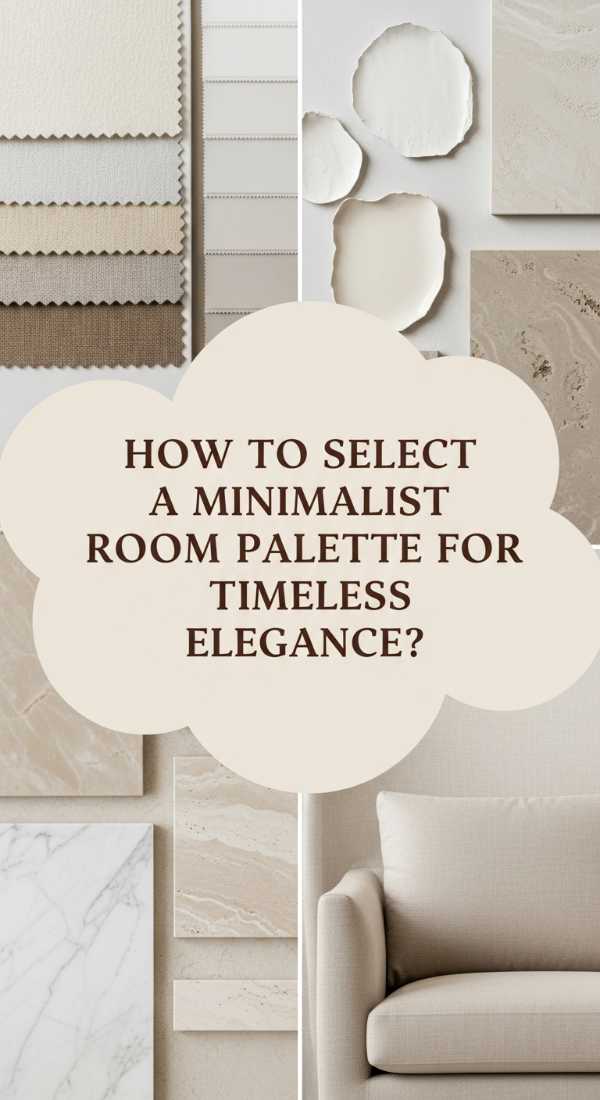
Why we love this
A perfectly chosen palette is the silent conductor of a room’s mood. We love a minimalist palette because it relies on the subtle nuances of ‘greige,’ ‘bone,’ and ‘oatmeal’ to create a sophisticated, timeless backdrop. This approach isn’t about lack of color; it’s about the richness of monochromatic layers that catch the light differently throughout the day. It creates an atmosphere of quiet luxury where the eye isn’t darting from one bright object to another, but rather gliding across a harmonious landscape of tone and shadow, leading to a state of profound mental calm.
Essential Elements:
- Paint swatches in warm neutrals
- Fabric samples (linen, wool, velvet) in the same tone
- Wood samples (oak, walnut)
- A ‘pop’ of matte black for grounding
- Natural light bulbs
How to make it
- The ‘Base’ Selection: Pick your main wall color. Timing: Observe the swatch for 24 hours in different light. Visual cue: The color ‘wins’ when it doesn’t look yellow at night or blue in the morning.
- The 60-30-10 Technique: Use your primary neutral for 60% of the room, a secondary shade for 30%, and a grounding dark tone (like charcoal or black) for the final 10%.
- Texture-Matching: Ensure your fabrics stay within two shades of your wall color. Heat Level: This ‘low-contrast’ approach is what creates the high-end minimalist feel.
- Visual cue for doneness: Squint your eyes while looking at the room. If the colors blend into a soft, hazy gradient without any ‘hot spots’ of clashing color, you have achieved timeless elegance.
How to Design a Small Living Room Nook for Quiet Moments

Why we love this
In a world of constant connectivity, a ‘nook’ is a sacred boundary. We love this design element because it creates a specific destination for offline ‘hygge’ moments—reading a physical book, sipping tea, or simply watching the rain. By carving out a corner of a minimalist room specifically for quietude, you give yourself permission to slow down. The sensory experience of a soft sheepskin rug underfoot and the narrow focus of a reading lamp creates an ‘intimacy bubble’ that feels separate from the rest of the house, offering a powerful tool for daily mindfulness.
Essential Elements:
- Deep, comfortable armchair
- Small pedestal side table
- Floor lamp with a swivel head
- Soft wool rug to define the zone
- One high-quality ceramic mug
How to make it
- Define the Border: Place a small rug in a corner away from the TV or main walkway. Timing: 5 minutes. This rug acts as a ‘visual boundary’ for the nook.
- Prep the Seat: Position the chair at a 45-degree angle toward the room’s center but tucked into the corner. Technique: This ‘nested’ position provides a psychological sense of safety (the ‘refuge’ effect).
- The Reach Test: Place the side table within arm’s reach (approx. 18 inches from the seat). Visual cue: The table height should be level with the chair’s arm for maximum comfort.
- Visual cue for doneness: Sit in the chair. If you feel ‘tucked away’ but not ‘hidden,’ and you have everything you need (light, a surface for tea, softness), the nook is ready for its first quiet hour.
How to Create a Minimalist Room Workspace for Deep Focus

Why we love this
A minimalist workspace is the ultimate productivity hack. We love this setup because it removes the cognitive load of clutter, allowing your brain to enter a ‘flow state’ almost instantly. Imagine sitting down to a desk that smells faintly of eucalyptus, with nothing but a sleek laptop and a single plant in your periphery. The clarity of the environment mirrors the desired clarity of your work, making deep focus feel effortless. It turns ‘work’ from a chore into a sophisticated ritual of creation, where every tool is high-quality and every surface is pristine.
Essential Elements:
- Sleek, cable-managed desk
- Ergonomic but stylish chair
- Single task light with cool/warm adjustment
- Noise-canceling headphones (minimalist design)
- Desk mat in felt or leather
How to make it
- The Cable Cleanse: Use clips and under-desk trays to hide every single wire. Timing: 45 minutes. Visual cue: Not a single cable should be visible from a standing position.
- Prep the ‘Primary Zone’: Keep only the tools you use every 30 minutes on the desk surface (Laptop, mouse, notepad). Visual cue: Everything else goes in a drawer or a basket out of sight.
- Lighting Technique: Position your task light to the side of your non-dominant hand to avoid shadows. Set the light to ‘Cool White’ for focus hours and ‘Warm’ for admin tasks.
- Visual cue for doneness: When you stand back and the desk looks like a piece of art rather than a workspace, your deep-focus environment is primed.
How to Frame Living Room Decor for a Sophisticated Look

Why we love this
Framing is the ‘jewelry’ of a room—it provides the final polish that elevates minimalist decor from ‘simple’ to ‘sophisticated.’ We love this because it adds structure and intentionality to your walls without creating visual noise. The sight of perfectly matted black-and-white photography or architectural sketches in thin oak frames creates a sense of history and personality. It’s about the sensory appreciation of craftsmanship; the way the glass catches the evening light and the way the ‘white space’ within a frame allows the art to breathe, reflecting a curated life well-lived.
Essential Elements:
- High-quality wooden or metal frames
- Acid-free mats (extra-wide for a gallery look)
- Black and white photography or line art
- Level and measuring tape
- Adhesive bumpers for frame backs
How to make it
- The ‘Theme’ Prep: Select a cohesive theme for your art (e.g., all botanical sketches or all travel photos). Timing: 1 hour of selection.
- The Wide-Mat Technique: Use mats that are at least 3-4 inches wide. Tip: This creates ‘air’ around the art, making even a small print look expensive and intentional.
- The Layout Phase: Lay your frames on the floor in front of the wall first. Visual cue: Space them exactly 3 inches apart. Technique: Use a level to ensure the top edges are perfectly aligned.
- Visual cue for doneness: Stand 10 feet back. The frames should lead the eye across the room smoothly, acting as ‘windows’ rather than ‘clutter.’ When the wall feels balanced but not crowded, your sophisticated gallery is complete.
Finding Your Balance: The Art of Living Well
Creating a cozy minimalist home is not a destination; it’s a lifestyle of constant refinement. It’s about choosing the ‘best’ over the ‘most’ and finding beauty in the quiet moments between the objects we own. By focusing on sensory textures, intentional light, and fluid movement, you can build a home that doesn’t just look like a magazine spread, but feels like a true sanctuary for your soul. Start small, clear one surface at a time, and listen to how your space begins to breathe again. Happy styling!