

Master the Rainbow: The Hottest Viral Nail Art Tutorials of the Year
Hi my sweet loves! There is something so profoundly healing about sitting down with a fresh set of polishes and letting your creativity flow. In a world that can sometimes feel a bit grey, our nails are like tiny, vibrant canvases that carry our joy wherever we go. I’ve spent the last few weeks experimenting with every color under the sun, and honestly, it’s been the ultimate act of self-care. It’s like a cloud-soft embrace for your soul, seeing those pops of color every time you type or reach for your morning matcha.
I know how overwhelming it can be when you see those perfectly polished videos on your feed and think, ‘I could never do that.’ But darling, you absolutely can! Today, I’m pulling back the curtain on my favorite viral looks. We’re going to walk through these together, step by step, because you deserve to feel that spark of magic at your fingertips. Let’s dive into the rainbow!
3 Easy Steps to Blend Two Color Nails

Why to love this recipe:
This sunset-inspired blend is the perfect way to ease into nail art. It creates a soft, dreamy transition between your two favorite shades, making your hands look elegant and professionally done without the salon price tag.
Essential Ingredients:
- Two contrasting nail polish colors
- A small makeup sponge
- Liquid latex or tape (for cleanup)
- Clear top coat
How to Prepare:
- Paint your base with the lighter of the two colors and let it dry completely.
- Apply both colors in parallel lines onto the edge of your makeup sponge.
- Gently dab the sponge onto your nail, moving it slightly up and down to blur the line, then seal with a top coat.
Budget Range
- Essie Glossy Shine Polish ($9.00)
- Sally Hansen Insta-Dri ($5.00)
- Wedge Makeup Sponges ($3.00)
Apply Color Street Nails in 5 Simple Minutes

Why to love this recipe:
For my busy loves who are always on the go, these real nail polish strips are a total game changer. No dry time means no smudges, just instant perfection that lasts for weeks.
Essential Ingredients:
- Color Street nail strip set
- Nail prep pad (alcohol wipe)
- Glass nail file
How to Prepare:
- Cleanse your natural nails thoroughly with the prep pad to remove oils.
- Select the strip that best fits your nail size and peel off the clear plastic cover.
- Press the strip onto the nail, smoothing from the center outward to avoid bubbles.
- Fold the excess over the tip and gently file downward to remove it.
- Repeat for all fingers and you’re ready to shine!
Budget Range
- Color Street Basic Sets ($11.00 – $14.00)
- Glass Nail File ($7.00)
Get Vibrant Nails Colorful with 4 Quick Tips

Why to love this recipe:
Sometimes neon and bright colors can look a bit sheer. This little hack ensures your colors pop so vibrantly they practically glow, giving you that high-fashion editorial look effortlessly.
Essential Ingredients:
- Opaque white nail polish
- High-pigment neon polishes
- Quality base coat
How to Prepare:
- Always start with a base coat to prevent staining from high-pigment colors.
- Apply one thin coat of white polish first; this acts as a primer to make the colors above it pop.
- Apply your vibrant color in two thin layers rather than one thick one.
- Finish with a UV-protectant top coat to prevent the bright colors from fading in the sun.
Budget Range
- OPI Alpine Snow ($11.50)
- Orly Neon Earth Collection ($15.00)
- Holotaco Glossy Taco ($11.00)
Create 10 Stunning Multicolor Nails at Home

Why to love this recipe:
The ‘Skittle’ nail trend is staying forever, and I am here for it! It’s the easiest way to wear every color you love at once without needing a steady hand for intricate drawing.
Essential Ingredients:
- A palette of 5 to 10 coordinating colors
- Nourishing cuticle oil
How to Prepare:
- Pick a color story (like pastels, jewel tones, or ‘cool blues’).
- Line your bottles up in the order you want them to appear on your hands.
- Paint each nail a different color, ensuring you apply two thin coats for even coverage.
- Let them dry and apply cuticle oil to make the colors look fresh and hydrated.
Budget Range
- Zoya Professional Lacquer ($12.00)
- Ella + Mila Mommy & Me Set ($15.00)
- Cuccio Revitalize Cuticle Oil ($7.00)
Try These 7 Colorful Nail Inspo Looks Today

Why to love this recipe:
When you’re feeling uninspired, these quick-mix looks—from French tips to wavy swirls—provide the perfect spark. It’s all about playing with shapes and movement.
Essential Ingredients:
- Fine liner nail brush
- Dotting tool
- Pastel polish set
How to Prepare:
- For swirls: Use a liner brush to drag a contrasting color in ‘S’ shapes across a dry base.
- For dots: Dip your dotting tool and create a cluster near the cuticle.
- For French: Use the brush tip to follow the natural curve of your nail tip with a bright color.
Budget Range
- Nail Art Brush Set ($6.00)
- Essie Pastels ($9.00)
- Dotting Tool Kit ($4.00)
Shaping 5 Bold Colorful Stiletto Nails for Beginners

Why to love this recipe:
Stiletto nails are fierce and elongating! This shape adds an instant edge to any outfit, and when paired with bold colors, you’ll feel like an absolute queen.
Essential Ingredients:
- 100/180 grit nail file
- Nail clippers
- Strengthening base coat
How to Prepare:
- Find the center point of your nail tip.
- File the sides at a sharp angle toward that center point, keeping the movement consistent on both sides.
- Soften the very tip slightly so it’s not dangerously sharp.
- Apply a strengthening base to support the new shape, then go in with your boldest polish.
Budget Range
- Revlon Emery Boards ($4.00)
- Nailtiques Formula 2 ($18.00)
- OPI Big Apple Red ($11.50)
Master 2 Color Nails with This Simple Guide

Why to love this recipe:
This is the ultimate ‘cool girl’ aesthetic. By splitting the nail vertically or using a clean accent nail, you create a modern, minimalist look that is incredibly chic.
Essential Ingredients:
- Striping tape or painter’s tape
- Tweezers
- Two matte or gloss polishes
How to Prepare:
- Paint the entire nail with your first color and wait for it to be 100% dry.
- Place a piece of tape vertically down the center of the nail.
- Paint the exposed half with your second color and immediately remove the tape with tweezers.
Budget Range
- Striping Tape Rolls ($5.00)
- Maybelline Fast Gel ($6.00)
- Tweezerman Tweezers ($12.00)
Design 8 Fun Multicolor Nails with 3D Art
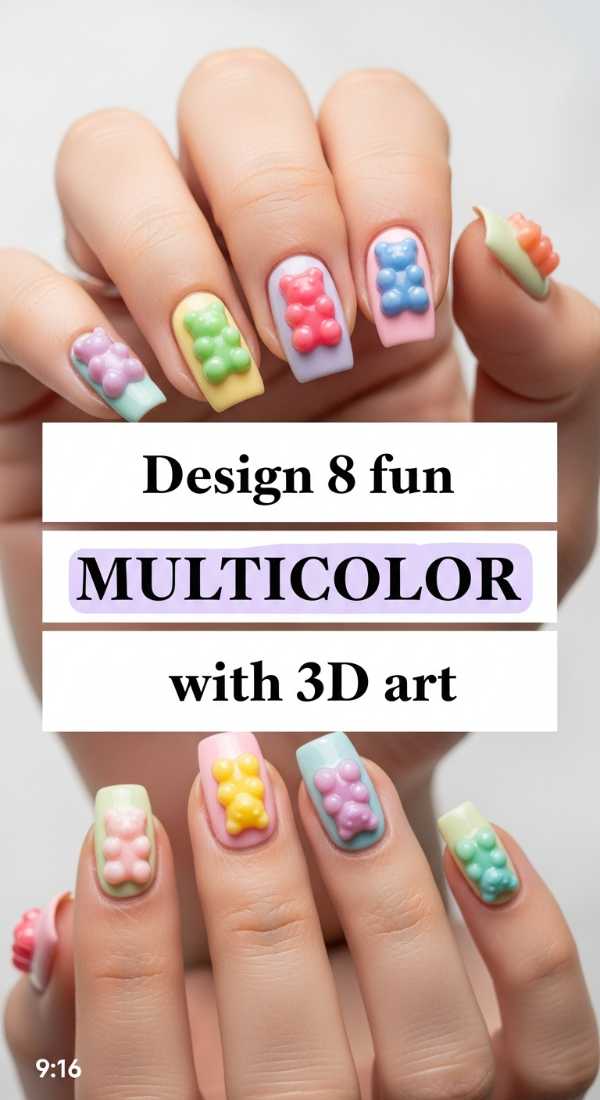
Why to love this recipe:
Texture is everything! Adding 3D elements like tiny gems or pearls makes your nails look like expensive jewelry. It’s a tactile joy that you won’t stop touching.
Essential Ingredients:
- Nail rhinestones or flat-back pearls
- Nail glue or a thick gel top coat
- Wax picker tool
How to Prepare:
- Apply your colorful base colors and let dry.
- Place a tiny dot of glue where you want your 3D element.
- Use the wax tool to pick up the gem and press it into the glue.
- Seal the edges (but not the top of the gem!) with a top coat for extra security.
Budget Range
- Mixed Nail Gems Bulk Pack ($8.00)
- KDS Nail Glue ($6.00)
- Wax Rhinestone Picker ($5.00)
Finish Your Colorful Stiletto Nails in 4 Steps

Why to love this recipe:
The finish is what separates an amateur look from a viral masterpiece. These steps ensure your sharp stiletto shape looks glossy, durable, and expensive.
Essential Ingredients:
- High-shine gel-effect top coat
- Clean-up brush
- Acetone
- Hand cream
How to Prepare:
- Use a clean-up brush dipped in acetone to crisp up the edges near the cuticle.
- Apply a generous layer of ‘plumping’ top coat to give that gel-like thickness.
- Cap the free edge (the very tip) to prevent chipping on your sharp points.
- Massage a luxury hand cream in once dry to give that ‘soft cloud’ glow to your skin.
Budget Range
- Seche Vite Dry Fast Top Coat ($10.00)
- Pure Acetone ($4.00)
- L’Occitane Shea Butter Hand Cream ($13.00)
Stay Bright and Beautiful
Oh my loves, I hope these tutorials fill your heart with as much color as they do your nails! Remember, it’s not about being perfect; it’s about the joy of the process and expressing your beautiful, unique self. Whether you choose a soft ombre or a fierce stiletto, wear it with confidence. You are a masterpiece in progress, and your hands are just the beginning! Tag me in your recreations—I can’t wait to see your stunning rainbows. Stay bright!