

Minimalist Charcuterie: The Viral Simple Food Board Trend Explained
There is a specific kind of magic that happens when the sun begins to dip low on a humid Tuesday afternoon and you realize that the last thing you want to do is stand over a hot stove for an hour. We’ve all been there—craving something that feels sophisticated and ‘Instagram-worthy’ but requires the absolute minimum effort. This is exactly why the viral simple food board trend has taken over our feeds; it’s a celebration of quality over quantity, focusing on just a few perfect elements that look as good as they taste.
The minimalist charcuterie movement isn’t about the $100 cheese boards of yesteryear with twenty different types of cured meats. Instead, it’s about a single, beautiful side dish or a handful of fresh ingredients arranged with intention. It’s the art of the ‘snack dinner’ elevated to a lifestyle, proving that you don’t need a culinary degree to create a spread that brings people together and sparks joy. Whether it’s a bowl of perfectly seasoned dip or a platter of vibrant summer fruit, the secret is in the simplicity.
7 Best Cookout Side Dishes (Step-by-Step Guide)

Why we love this
Nothing screams summer quite like the aroma of charred corn and the creamy, tangy zip of a classic elote-style salad. When you bite into this dish, you get the satisfying crunch of fresh kernels followed by the silky smoothness of Mexican crema and a lingering, smoky heat from the chili powder. It’s a sensory explosion that feels like a backyard party in every bite, balancing the sweetness of the corn with the salty crumble of cotija cheese. It transforms a simple cookout into a gourmet experience without losing that nostalgic, home-cooked feeling.
Ingredients
- 6 ears of fresh sweet corn, husked
- 1/2 cup Mexican crema or sour cream
- 1/4 cup mayonnaise
- 1/2 cup crumbled cotija cheese
- 1/4 cup fresh cilantro, chopped
- 1 teaspoon ancho chili powder
- 1 lime, cut into wedges
- 1 clove garlic, minced
How to make it
- Preheat your grill to medium-high heat (about 400°F). Lightly oil the grates to prevent sticking.
- Place the husked corn directly on the grates. Grill for 10-12 minutes, turning every 2-3 minutes, until the kernels are charred in spots and tender to the touch. Look for a bright golden color with deep brown char marks.
- While the corn is grilling, whisk together the crema, mayonnaise, minced garlic, and a squeeze of lime in a large bowl until smooth and emulsified.
- Once the corn is done, let it cool for 5 minutes. Carefully stand each cob upright in a large bowl and use a sharp knife to saw downward, removing the kernels from the cob.
- Toss the warm kernels into the dressing bowl. Fold gently to coat every grain of corn without mashing them.
- Top with the crumbled cotija cheese, chili powder, and fresh cilantro. Serve immediately while warm, or chill for 30 minutes to allow the flavors to meld into a creamy, savory delight.
5 Easy Rotel Dip Recipes (Step-by-Step Guide)
Why we love this
This is the ultimate comfort food that brings an instant sense of community to any gathering. The sight of bubbling, molten golden cheese swirled with the vibrant reds and greens of diced tomatoes and chilies is enough to make anyone’s mouth water. As you dip a salty, crunchy tortilla chip into the warm mixture, the velvety texture of the melted cheese contrasts perfectly with the chunky, zesty vegetables. It smells of cumin, green chilies, and pure nostalgia, making it the undisputed king of the viral food board trend.
Ingredients
- 1 lb Velveeta or high-quality melting American cheese, cubed
- 1 can (10 oz) Ro-Tel Diced Tomatoes and Green Chilies
- 1/2 lb ground breakfast sausage or chorizo
- 1/2 teaspoon smoked paprika
- Optional: Fresh jalapeños and cilantro for garnish
How to make it
- In a medium skillet over medium heat, brown the sausage or chorizo, breaking it into small crumbles with a wooden spoon. Cook until no pink remains and the edges are slightly crispy (about 7-9 minutes). Drain the excess fat thoroughly.
- In a slow cooker or a heavy-bottomed saucepan over low heat, add the cubed cheese and the entire can of Ro-Tel (do not drain the liquid; it provides the necessary acidity and moisture).
- Stir constantly if using a saucepan to prevent the cheese from scorching on the bottom. If using a slow cooker, cover and set to low, stirring every 15 minutes.
- Once the cheese is completely smooth and liquid, fold in the cooked sausage and smoked paprika.
- If the dip is too thick, add a splash of whole milk or heavy cream until it reaches a pourable but thick consistency.
- Transfer to a serving bowl on your food board and garnish with fresh jalapeños for a pop of color and extra heat.
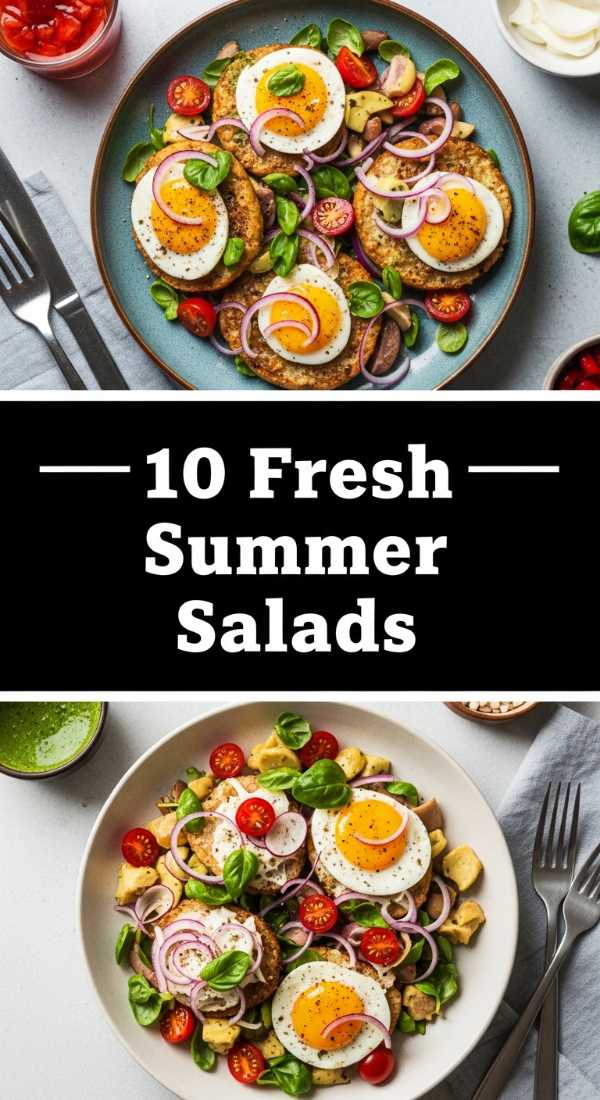
10 Fresh Summer Salad Ideas (Step-by-Step Guide)

Why we love this
There is nothing more refreshing than the combination of juicy, ice-cold watermelon and the sharp, briny kick of feta cheese. This salad is the epitome of summer; it smells of fresh mint and salty sea air, offering a crisp texture that hydrates you on the hottest days. Each bite is a delicate dance between the sugary sweetness of the fruit and the savory richness of the cheese, finished with the bright acidity of lime. It’s a visually stunning dish that looks like a mosaic of pink, white, and green on your board.
Ingredients
- 4 cups seedless watermelon, cut into 1-inch cubes
- 1/2 cup feta cheese, crumbled (use sheep’s milk feta for better texture)
- 1/4 cup red onion, very thinly sliced
- 1/2 cup fresh mint leaves, torn
- 2 tablespoons extra-virgin olive oil
- 1 tablespoon lime juice
- A pinch of flaky sea salt
How to make it
- Place the sliced red onions in a small bowl of ice water for 10 minutes. This removes the harsh ‘bite’ and keeps them incredibly crisp. Drain and pat dry.
- In a large, shallow platter (rather than a deep bowl to prevent crushing the fruit), arrange the watermelon cubes in a single, even layer.
- Sprinkle the chilled red onions and the crumbled feta evenly over the watermelon.
- In a small jar, whisk together the olive oil and lime juice until combined. Drizzle this dressing lightly over the salad—do not oversaturate, as the watermelon will release its own juice.
- Scatter the torn mint leaves over the top just before serving to prevent them from bruising or turning black.
- Finish with a light sprinkle of flaky sea salt to enhance the natural sugars of the melon.
8 Top Picnic Side Dishes (Step-by-Step Guide)

Why we love this
A pesto pasta salad is the heavy-hitter of picnics because it travels beautifully and only gets better as it sits. The aroma of fresh basil and toasted pine nuts wafts up the moment you open the container, promising a lush, herbaceous bite. The pasta shells act as little cups, holding onto the vibrant green sauce and the tiny pearls of mozzarella. It feels substantial yet light, with the sun-dried tomatoes providing a chewy, umami punch that keeps you coming back for ‘just one more’ spoonful while lounging on a picnic blanket.
Ingredients
- 1 lb Orecchiette or shell pasta
- 1 cup fresh basil pesto (homemade or high-quality store-bought)
- 1 cup cherry tomatoes, halved
- 1/2 cup mini mozzarella pearls
- 1/4 cup sun-dried tomatoes, chopped
- 2 tablespoons toasted pine nuts
- 1 tablespoon balsamic glaze for drizzling
How to make it
- Bring a large pot of heavily salted water to a rolling boil. Cook the pasta until just ‘al dente’—it should have a firm bite, as it will soften slightly once the dressing is added.
- Drain the pasta and immediately rinse with cold water to stop the cooking process and remove excess starch, which prevents the pasta from sticking together.
- In a large mixing bowl, toss the cooled pasta with the basil pesto. Ensure every piece is thoroughly coated in the green sauce.
- Gently fold in the halved cherry tomatoes, mozzarella pearls, and sun-dried tomatoes. Using a silicone spatula helps avoid breaking the delicate cheese.
- Refrigerate for at least 30 minutes to allow the pasta to absorb the herbal flavors of the pesto.
- Just before serving, top with toasted pine nuts for crunch and a dramatic drizzle of balsamic glaze for a sweet-tart finish.
6 Quick Spring Dinner Recipes (Step-by-Step Guide)

Why we love this
Spring is all about the return of green, and a sheet-pan lemon herb chicken with asparagus captures that essence perfectly. As it roasts, the scent of caramelizing lemon and earthy thyme fills the kitchen, signaling a meal that is healthy but deeply satisfying. The chicken skin becomes golden and shatteringly crisp, while the asparagus stays tender-crisp with a hint of smoky char from the high heat. It’s a one-pan wonder that looks elegant enough for a dinner party but is simple enough for a hectic Monday night.
Ingredients
- 1.5 lbs chicken thighs, bone-in and skin-on
- 1 bunch thin asparagus, woody ends trimmed
- 2 lemons (one sliced into rounds, one for juicing)
- 3 tablespoons olive oil
- 4 cloves garlic, smashed
- 1 tablespoon fresh thyme leaves
- Salt and cracked black pepper
How to make it
- Preheat your oven to 425°F (220°C). High heat is essential for crispy skin and fast-cooking vegetables.
- Pat the chicken thighs completely dry with paper towels. Moisture is the enemy of crispiness. Season both sides generously with salt and pepper.
- On a large sheet pan, toss the asparagus with 1 tablespoon of olive oil and a pinch of salt. Push them to the perimeter of the pan.
- Place the chicken thighs in the center of the pan. Tuck the lemon slices and smashed garlic cloves around and under the chicken pieces.
- Whisk the remaining olive oil, lemon juice, and thyme together, then brush it over the chicken skin.
- Roast for 25-30 minutes. The chicken is done when the internal temperature reaches 165°F and the skin is a deep mahogany gold. The asparagus should be slightly blistered. Let rest for 5 minutes before serving to keep the juices locked in.
7 Best Summer Dinner Meals (Step-by-Step Guide)
Why we love this
Honey-lime glazed salmon kebabs are the ultimate summer dinner because they cook incredibly fast and offer a sophisticated tropical vibe. The salmon becomes buttery and flaky, glazed in a sticky, sweet sauce that caramelizes beautifully over an open flame. Interspersed with charred red peppers and onions, each skewer is a balance of tender protein and smoky, sweet vegetables. It’s the kind of meal that feels like a vacation on a plate, especially when served alongside a cold glass of white wine.
Ingredients
- 1 lb center-cut salmon fillet, skin removed, cut into 1.5-inch cubes
- 1 red bell pepper, cut into chunks
- 1 red onion, cut into wedges
- 2 tablespoons honey
- Juice of 2 limes
- 1 tablespoon soy sauce
- 1 teaspoon sriracha
- Wooden or metal skewers
How to make it
- If using wooden skewers, soak them in water for at least 30 minutes to prevent them from burning on the grill.
- In a small bowl, whisk together the honey, lime juice, soy sauce, and sriracha to create the glaze.
- Thread the salmon cubes, red pepper, and onion onto the skewers, alternating colors for a beautiful presentation. Don’t crowd them too tightly so the heat can circulate.
- Preheat the grill to medium heat. Lightly grease the grates.
- Place skewers on the grill and cook for about 3-4 minutes per side. Brush the glaze onto the salmon every time you flip the skewers.
- The salmon is done when it is opaque throughout and flakes easily with a fork, but still slightly pink in the very center. Do not overcook, as salmon dries out quickly.
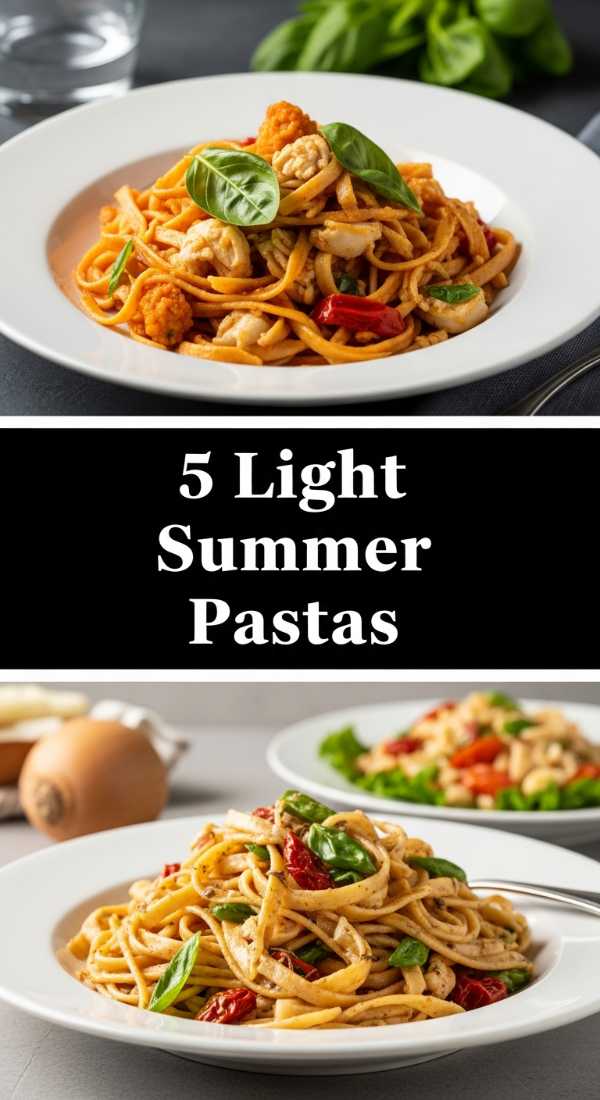
5 Light Summer Pasta Dishes (Step-by-Step Guide)

Why we love this
Lemon Ricotta Pasta is like a hug in a bowl, but lightened up for the warmer months. It replaces heavy cream with the airy, cloud-like texture of whipped ricotta, creating a sauce that is velvety but not weighed down. The scent of fresh lemon zest provides an immediate olfactory lift, while the addition of bright green peas adds a pop of sweetness and texture. It feels like a sunny afternoon in the Italian countryside, emphasizing fresh, high-quality dairy and citrus.
Ingredients
- 12 oz spaghetti or linguine
- 1 cup whole milk ricotta cheese
- 1/2 cup grated Parmesan cheese
- Zest and juice of 1 large lemon
- 1/2 cup frozen peas, thawed
- 1/4 cup reserved pasta water
- Freshly cracked black pepper and red pepper flakes
How to make it
- Boil the pasta in salted water until al dente. Important: Before draining, scoop out at least 1/2 cup of the starchy pasta water. This is the secret to a smooth sauce.
- In a large mixing bowl, whisk together the ricotta, Parmesan, lemon zest, and lemon juice until smooth.
- Slowly whisk in 1/4 cup of the warm pasta water into the ricotta mixture to create a creamy, pourable consistency.
- Add the hot, drained pasta and the peas directly into the ricotta bowl.
- Toss vigorously with tongs. The heat from the pasta will slightly melt the cheeses and cook the peas through, creating a glossy coating.
- Serve with an extra sprinkle of Parmesan and a pinch of red pepper flakes for a tiny hint of back-heat.
9 Viral Summer Coffee Drinks (Step-by-Step Guide)

Why we love this
The Iced Oat Milk Shaken Espresso is the drink that defined the ‘aesthetic’ coffee movement. It’s all about the layers: the dark, rich espresso at the bottom, the frothy, shaken foam, and the creamy oat milk swirling through like a marble painting. It smells of toasted grain and dark chocolate, providing a caffeine kick that is smooth rather than acidic. The ritual of shaking the espresso with ice creates a unique micro-foam that feels luxurious on the tongue, making your morning routine feel like a trip to a high-end cafe.
Ingredients
- 2 shots of hot espresso (or 1/2 cup very strong coffee)
- 1 tablespoon brown sugar or maple syrup
- 1/2 teaspoon vanilla extract
- 1/2 cup creamy oat milk
- 1 cup ice cubes
How to make it
- Brew your espresso directly into a cocktail shaker or a mason jar with a tight-fitting lid.
- Add the brown sugar and vanilla extract to the hot espresso immediately so the sugar dissolves completely.
- Fill the shaker with ice. Secure the lid and shake vigorously for at least 20 seconds. You want to hear the ice clinking and see a thick, tan foam forming.
- Fill a tall glass with fresh ice.
- Pour the shaken espresso (and its foam) over the ice in the glass.
- Slowly pour the oat milk over the top. Watch as the milk cascades through the espresso foam for that perfect viral look. Stir gently before drinking.
10 Best Summer Dessert Recipes (Step-by-Step Guide)

Why we love this
A No-Bake Berry Cheesecake Jar is the ultimate summer dessert because it keeps the house cool and the palate refreshed. The contrast between the buttery, crunchy graham cracker crust and the silky, tangy cheesecake filling is pure bliss. When you top it with a macerated berry compote, the juices seep down into the cream, creating a beautiful ombre effect. It’s a portable, individual-sized portion of decadence that smells of vanilla and sun-ripened strawberries, perfect for eating on a porch swing.
Ingredients
- 1 cup graham cracker crumbs
- 2 tablespoons melted butter
- 8 oz cream cheese, softened
- 1/2 cup powdered sugar
- 1 cup heavy whipping cream, chilled
- 1 teaspoon vanilla bean paste
- 2 cups mixed berries (strawberries, blueberries, raspberries)
- 1 tablespoon granulated sugar
How to make it
- In a small bowl, mix the graham cracker crumbs with melted butter. Press 2 tablespoons of the mixture into the bottom of 4-6 small glass jars.
- In a large bowl, beat the softened cream cheese, powdered sugar, and vanilla until completely smooth and lump-free.
- In a separate chilled bowl, whip the heavy cream until stiff peaks form.
- Gently fold the whipped cream into the cream cheese mixture using a spatula. This keeps the filling airy and light. Pipe or spoon the mixture into the jars over the crust.
- Toss the berries with the granulated sugar in a small bowl and let sit for 15 minutes until they become glossy and saucy.
- Top each jar with a generous spoonful of the berries. Refrigerate for at least 2 hours to allow the cheesecake to set into a mousse-like consistency.
8 Most Delicious Summer Eats (Step-by-Step Guide)
[IMAGE_10]
Why we love this
Grilled Peach and Prosciutto Crostini are the ‘it’ food of the viral board trend because they hit every single taste bud: sweet, salty, creamy, and crunchy. The aroma of peaches caramelizing on the grill is intoxicating, reminding you of late-August farmers’ markets. The heat from the grill softens the fruit, making it melt into the cool, spreadable goat cheese, while the paper-thin prosciutto adds a savory, cured depth. It’s a sophisticated appetizer that feels like fine dining but is assembled in minutes.
Ingredients
- 1 baguette, sliced into rounds
- 3 ripe peaches, pitted and sliced into wedges
- 4 oz honey goat cheese
- 1/4 lb prosciutto, torn into strips
- Fresh basil leaves for garnish
- Balsamic glaze for drizzling
- Olive oil
How to make it
- Brush the baguette slices with olive oil and toast them in a 400°F oven for 5-7 minutes until the edges are golden and crisp.
- Lightly oil the grates of a grill pan or outdoor grill. Place peach wedges over medium-high heat for 2-3 minutes per side until distinct grill marks appear and the fruit softens slightly.
- Spread a generous layer of honey goat cheese onto each warm crostini. The warmth will make the cheese slightly easier to spread.
- Top the cheese with a slice of grilled peach and a ribbon of prosciutto.
- Tuck a small basil leaf into the side for a pop of freshness.
- Arrange them on your food board and finish with a concentrated drizzle of balsamic glaze just before your guests arrive.
Conclusion
The beauty of the viral minimalist food board trend is that it removes the pressure of perfection and replaces it with the joy of assembly. Whether you are whipping up a light summer pasta or layering a coffee drink, the focus remains on the ingredients and the atmosphere. By following these step-by-step guides, you can create a culinary experience that feels like a celebration of the season, all while keeping things wonderfully simple. So, grab a board, pick a recipe, and enjoy the effortless elegance of modern entertaining.