

Simple, Stunning, and Social Media Ready: The Ultimate Food Board Guide
There is something inherently magical about a shared meal that looks as good as it tastes. We live in a world where we eat with our eyes first, and nothing captures that ‘main character’ energy quite like a sprawling, vibrant food board. Whether you are hosting a backyard sunset soirée or just trying to make a Tuesday night feel like a celebration, the art of the board is about bringing people together through texture, color, and a little bit of culinary soul.
I remember the first time I set out a massive spread for my friends; the room went quiet for a split second before the ‘oohs’ and ‘aahs’ started. It wasn’t about being a professional chef; it was about the intention. In this guide, we are diving deep into how to build those viral-worthy components that turn a simple wooden plank into a masterpiece. From the golden glow of homemade jelly to the crisp crunch of a perfect summer salad, let’s get into the kitchen and make some magic happen.
How to make dandelion jelly?

Why we love this
Dandelion jelly is like capturing liquid sunshine in a glass jar. It has a delicate, honey-like sweetness with subtle floral undertones that evoke memories of running through open fields on a warm spring afternoon. The texture is silky smooth, spreading effortlessly over a warm piece of sourdough or a sharp cheddar cheese. It’s a conversation starter—a wild-foraged treasure that adds an artisanal, earthy touch to any food board, making the ordinary feel extraordinary.
Ingredients
- 2 cups dandelion petals (yellow parts only)
- 4 cups boiling water
- 1/4 cup lemon juice
- 1 package (1.75 oz) powdered fruit pectin
- 4 cups granulated sugar
How to make it
- Harvest your dandelions from a clean area free of pesticides. Carefully pull the yellow petals away from the green base; the green parts are bitter and will ruin the flavor profile.
- Place the petals in a heat-proof bowl and pour 4 cups of boiling water over them. Let this steep for at least 8 hours or overnight in the fridge to extract the full floral essence.
- Strain the liquid through a fine-mesh sieve or cheesecloth, squeezing the petals to get every drop. You should have about 3.5 to 4 cups of ‘dandelion tea.’
- In a large pot, combine the dandelion liquid, lemon juice, and pectin. Bring the mixture to a rolling boil over high heat, stirring constantly to ensure the pectin dissolves completely.
- Add the sugar all at once. Return to a full rolling boil (one that doesn’t stop when stirred) and boil hard for exactly 1 to 2 minutes.
- Remove from heat and skim off any foam from the surface. Pour into sterilized jars, leaving a 1/4 inch headspace. Process in a water bath for 10 minutes or let cool and store in the fridge.
How to cook quick recipes?

Why we love this
Quick recipes are the backbone of a modern, busy lifestyle, offering a sensory explosion without the hours of labor. Imagine the hiss of a hot pan as it sears a piece of protein, the aroma of fresh garlic hitting olive oil, and the vibrant colors of flash-cooked vegetables. These dishes celebrate freshness and speed, ensuring that you can serve a gourmet-style meal even when the clock is against you. It’s about high-impact flavor and satisfying textures that keep life moving beautifully.
Ingredients
- 1 lb thin-sliced chicken breast or shrimp
- 2 tablespoons olive oil
- 3 cloves minced garlic
- 1 teaspoon red pepper flakes
- Fresh parsley and lemon wedges
How to make it
- Prep all your ingredients before turning on the stove. In quick cooking, timing is everything, and you won’t have time to chop once the heat is on.
- Heat a large stainless steel or cast-iron skillet over medium-high heat. Add the olive oil and wait until it shimmers but isn’t smoking.
- Place your protein in the pan in a single layer. If using chicken, sear for 3-4 minutes per side until golden brown; if using shrimp, cook for 1-2 minutes until opaque and pink.
- In the final 60 seconds of cooking, toss in the minced garlic and red pepper flakes. Stir constantly so the garlic perfumes the oil without burning or becoming bitter.
- Deglaze the pan with a squeeze of fresh lemon juice, scraping up the browned bits (fond) from the bottom. Garnish with fresh parsley and serve immediately while the heat is still radiating from the dish.
How to make summer dinner?

Why we love this
Summer dinner is all about the transition from the heat of the day to the cool, breezy evening. We love it for the lightness—think charred corn, juicy tomatoes, and the smoky aroma of a grill drifting through the air. The flavors are bright and acidic, designed to refresh the palate rather than weigh it down. It’s an evocative experience that tastes like sea salt, garden herbs, and the relaxed joy of dining under the stars with friends.
Ingredients
- 4 ears of corn, husked
- 1 pint cherry tomatoes
- 1 ball of fresh burrata cheese
- Fresh basil leaves
- Balsamic glaze and flaky sea salt
How to make it
- Preheat your grill to medium-high heat (about 400°F). Lightly oil the grates to prevent sticking.
- Place the corn ears directly on the grates. Grill for 10-12 minutes, turning occasionally, until the kernels are bright yellow and show beautiful charred spots.
- While the corn grills, slice the cherry tomatoes in half and toss them with a drizzle of olive oil and a pinch of salt to draw out their juices.
- Cut the charred corn off the cob using a sharp knife, holding the cob vertically inside a large bowl to catch the kernels.
- Arrange the corn and tomatoes on a platter. Place the burrata in the center and break it open to let the creamy center spill out. Top with torn basil, a heavy drizzle of balsamic glaze, and flaky salt.
How to prep camping meals?

Why we love this
There is a primal satisfaction in eating a meal prepared over an open flame amidst the rustle of trees. Camping meal prep is about the genius of foil packets and one-pot wonders that deliver deep, smoky flavors with minimal cleanup. We love the way the steam escapes when you crack open a foil pouch, revealing perfectly tender potatoes and savory meats infused with woodsmoke. It transforms a simple outdoor trip into a rugged culinary adventure that warms the soul.
Ingredients
- Heavy-duty aluminum foil
- Sliced smoked sausage
- Pre-chopped bell peppers and onions
- Canned black beans (drained)
- Cajun seasoning and butter pats
How to make it
- At home, chop your sausages and vegetables into uniform bite-sized pieces to ensure they cook at the same rate.
- Lay out a large square of heavy-duty foil. Place a portion of sausage, peppers, onions, and beans in the center.
- Sprinkle generously with Cajun seasoning and place two small pats of butter on top. The butter will melt and create a rich sauce during the cooking process.
- Fold the foil over the food and crimp the edges tightly to create a sealed packet. Make sure there are no gaps where steam can escape.
- Store these in your cooler. When ready to eat, place the packets on a grill grate over a campfire or directly on hot coals for 15-20 minutes, flipping once halfway through using tongs.
How to prep summer meals?

Why we love this
Preparing summer meals in advance is the ultimate gift to your future self, allowing you to reclaim your sunny afternoons. We love the crisp, cool organization of pre-chopped veggies and chilled grains waiting in the fridge. This method focuses on ‘no-cook’ components that maintain their structural integrity and vibrant colors, ensuring that even three days later, your meal tastes like it was just plucked from the garden. It’s efficiency meeting seasonal freshness.
Ingredients
- Pre-cooked quinoa or farro
- Sliced cucumbers and radishes
- Chickpeas (rinsed and dried)
- Lemon-tahini dressing
- Fresh mint and parsley
How to make it
- Cook your grains (quinoa or farro) early in the morning before the house gets hot. Spread them on a baking sheet to cool quickly and prevent clumping.
- Wash and slice your hard vegetables like cucumbers and radishes. Store them in airtight containers lined with a damp paper towel to maintain maximum crispness.
- Prepare a large batch of dressing by whisking tahini, lemon juice, garlic, and water until creamy. Store this in a glass jar.
- Assembly is key: Use a ‘layering’ technique in jars or containers. Put the dressing at the bottom, followed by the chickpeas, then the grains, and finally the fresh herbs and veggies on top.
- When you are ready to eat, simply shake the container or dump it into a bowl. The herbs stay fresh because they aren’t sitting in the dressing, and the grains absorb just enough flavor.
How to make pasta salad?

Why we love this
Pasta salad is the undisputed queen of the potluck board. We love the contrast between the tender, al dente ridges of the pasta and the sharp, salty punch of olives and feta. When dressed properly, the pasta absorbs the vinaigrette, becoming a flavor vessel that only gets better as it sits. The aroma of dried oregano and red wine vinegar creates a Mediterranean atmosphere that feels both nostalgic and sophisticated, providing a hearty yet refreshing bite.
Ingredients
- 1 lb Rotini or Fusilli pasta
- 1/2 cup Kalamata olives, pitted
- 1/2 cup crumbled feta cheese
- 1/4 cup red onion, finely diced
- Italian vinaigrette (olive oil, red wine vinegar, dried oregano, garlic powder)
How to make it
- Boil a large pot of heavily salted water. Cook the pasta for 1 minute less than the package directions for ‘al dente.’ You want it to have a firm ‘bite’ so it doesn’t get mushy after dressing.
- Drain the pasta and immediately rinse it under cold running water. This stops the cooking process and removes excess starch, preventing the pasta from sticking together.
- In a large bowl, whisk together your olive oil, vinegar, and seasonings. Add the warm-ish pasta to the dressing; the slight warmth helps the pasta absorb the flavors more effectively than stone-cold pasta.
- Fold in the olives, feta, and red onion. Use a rubber spatula to ensure the cheese doesn’t break down too much.
- Refrigerate for at least 2 hours before serving. Just before putting it on your food board, give it another toss and add a splash of olive oil if it looks dry.
How to make summer salad?

Why we love this
The perfect summer salad is a study in balance: sweet, salty, crunchy, and soft. We love using seasonal fruit like peaches or strawberries to add a burst of natural sugar that plays beautifully against bitter greens. The visual appeal of deep reds and bright oranges against emerald leaves makes it a centerpiece in itself. It’s the feeling of a garden party in every forkful, offering a hydrating and revitalizing experience that perfectly complements grilled meats or cheeses.
Ingredients
- Mixed baby greens or arugula
- Sliced fresh strawberries or peaches
- Goat cheese log
- Toasted pecans or walnuts
- Honey-balsamic vinaigrette
How to make it
- Start with very cold, dry greens. If they are wet, the dressing will slide right off and pool at the bottom of the bowl. Use a salad spinner if possible.
- Toast your nuts in a dry skillet over medium heat for 3-5 minutes. Watch them closely; they go from toasted to burnt very quickly. You’ll know they’re done when they smell fragrant and oily.
- Slice your fruit just before serving to prevent browning or wilting. Use a very sharp knife to get clean, elegant slices.
- Place the greens in a wide, shallow bowl. Drizzle half the dressing and toss gently with your hands to ensure every leaf is lightly coated.
- Arrange the fruit and toasted nuts on top. Finally, dollop small pieces of goat cheese throughout. Do not toss again, or the goat cheese will cloud the salad and hide the beautiful ingredients.
How to make salad recipes?
Why we love this
Mastering salad recipes is about understanding the architecture of flavor. We love the versatility—how a few swaps can take a dish from a light side to a main course. It’s all about the ‘crunch factor’ and the interplay of different textures, from creamy dressings to crisp croutons and tender leaves. A well-constructed salad recipe isn’t just ‘rabbit food’; it’s a complex, satisfying dish that leaves you feeling energized and nourished, with layers of flavor that reveal themselves with every bite.
Ingredients
- 1 bunch Lacinato kale, stems removed
- 1/2 cup grated Parmesan cheese
- 1 cup toasted breadcrumbs (Panko)
- For the dressing: 1 egg yolk, 1 tsp Dijon mustard, anchovy paste, lemon juice, olive oil
How to make it
- The secret to a great kale salad is the ‘massage.’ Thinly ribbon the kale, place it in a bowl with a drizzle of olive oil, and literally squeeze it with your hands for 2-3 minutes until the leaves turn dark green and soft.
- For the dressing, whisk the egg yolk and mustard. Slowly, drop by drop, whisk in the olive oil to create a thick emulsion. Stir in the anchovy paste and lemon juice at the end.
- In a small pan, toast the panko breadcrumbs with a little butter and garlic powder until deep golden brown. This adds the essential crunch.
- Toss the massaged kale with the dressing and half of the Parmesan cheese. Let it sit for 10 minutes; kale is hearty enough to handle it and will actually improve in texture.
- Top with the remaining Parmesan and the toasted breadcrumbs right before serving to maintain the textural contrast.
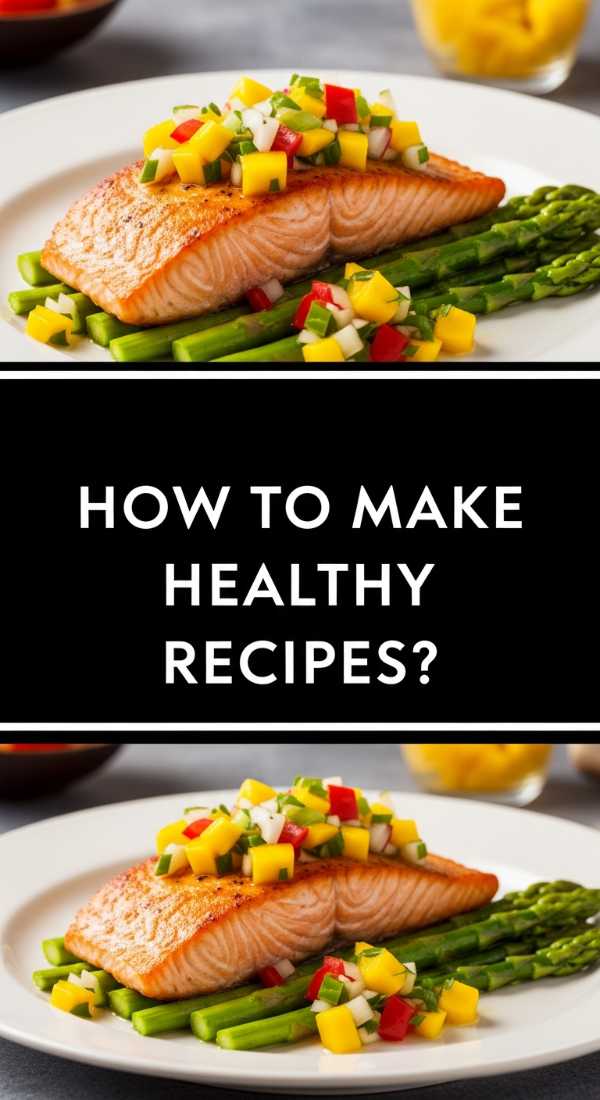
How to make healthy recipes?

Why we love this
Healthy recipes shouldn’t feel like a compromise; they should feel like an indulgence in wellness. We love the vibrancy of nutrient-dense ingredients—the deep purple of roasted beets, the bright orange of sweet potatoes, and the earthy green of avocado. These dishes are designed to make you feel as good as you look, focusing on whole foods that provide sustained energy. The textures are rich and varied, proving that ‘clean eating’ can be just as decadent and flavorful as any comfort food.
Ingredients
- 2 large sweet potatoes, cubed
- 1 can chickpeas, drained and patted dry
- Fresh spinach
- Tahini and lemon juice
- Avocado slices and hemp seeds
How to make it
- Preheat your oven to 400°F (200°C). Tossing your vegetables in enough oil is crucial for the Maillard reaction (browning).
- Place cubed sweet potatoes and dried chickpeas on a parchment-lined baking sheet. Drizzle with olive oil, salt, and cumin. Toss to coat thoroughly.
- Roast for 25-30 minutes. The sweet potatoes should be tender with caramelized edges, and the chickpeas should be slightly crunchy.
- While roasting, prepare a ‘base’ of fresh spinach in your bowls. The residual heat from the roasted vegetables will slightly wilt the spinach without making it slimy.
- Combine the warm roasted components with the spinach. Top with avocado slices and a sprinkle of hemp seeds for healthy fats, then drizzle with a simple tahini-lemon sauce.
How to make meal prep?
[IMAGE_10]
Why we love this
Meal prep is the ultimate ritual for a balanced life. We love the visual satisfaction of a fridge filled with matching glass containers, each one a promise of a stress-free day. It’s about the peace of mind that comes from knowing exactly what you’re fueling your body with. By spending a few hours on a Sunday, you create a symphony of ready-to-eat components that make healthy choices the easiest choices. It’s the ultimate form of self-care for the modern, busy individual.
Ingredients
- 3 lbs chicken thighs or firm tofu
- Large batch of brown rice or quinoa
- Steamed broccoli or roasted zucchini
- Individual dressing containers
How to make it
- The ‘Assembly Line’ method is the most efficient. Set out all your containers on the counter before you start cooking.
- Cook your protein in one large batch. For chicken thighs, sear them in a pan and finish in the oven at 375°F until they reach an internal temperature of 165°F. Let them rest for 10 minutes before slicing to keep the juices inside.
- While the protein cooks, use a rice cooker or a large pot to make a big batch of grains. Fluff with a fork and let the steam escape so the grains don’t get gummy in the containers.
- Divide the grains into 5-6 containers, followed by the protein and a generous portion of cooked vegetables.
- Wait until the food is completely cool before putting the lids on. If you seal them while hot, steam will condense and make your meal soggy by Tuesday. Store dressings separately and add only when you are ready to eat.
Conclusion
Building a viral-worthy food board is about more than just laying out snacks; it’s about the love and craft that goes into every single component. From the DIY dandelion jelly to the perfectly prepped healthy bowls, these recipes are designed to bring beauty and flavor to your table. Remember, the best boards are the ones that reflect your personality—so don’t be afraid to mix and match these ideas to create something uniquely yours. Happy hosting, and may your boards always be social media ready!