

Sizzling Summer: 2024’s Must-Try Nail Trends & Step-by-Step Tutorials
Hello, my beautiful loves! Can you feel it? That first kiss of golden summer sun on your skin, the scent of sea salt dancing in the breeze, and that unmistakable feeling of pure freedom? It is finally here. Summer 2024 isn’t just a season to me; it is a whole mood, a soft-focus dream, and I want us to wear that magic right down to our fingertips. Your nails are the ultimate accessory to every sun-drenched memory we’re about to make.
I’ve spent the last few weeks playing with colors that pop like tropical fruit and textures that feel as real as the flowers in your garden. Whether you’re lounging poolside or dancing under the June stars, I’ve curated these trends to make you feel like the goddess you are. Let’s dive into these tutorials together, like a warm, cloud-soft embrace for your creativity. I promise, your hands will be the talk of the beach!
5 Easy Steps to 3D Tropical Flower Nails

Why to love this Design:
This design is like wearing a tiny, blooming paradise on your hands. The texture of the petals catching the light makes it feel alive, bringing a touch of high-end salon artistry right to your home vanity. It’s whimsical, feminine, and utterly breathtaking.
Essential Elements:
- Thick viscosity builder gel or 3D carving gel
- Fine liner brush
- Vibrant coral or pink gel polish
- Small pearl accents for the center
- High-shine top coat
How to Prepare:
- Apply your base color and cure under a UV/LED lamp.
- Dip your liner brush into the 3D gel and place five small beads in a circle to form the foundation of your petals.
- Gently pull the gel from the center outward to create a pointed or rounded petal shape.
- Flash cure for 10 seconds, then add a second layer to the petals for height.
- Place a tiny pearl in the center and do a final full cure for 60 seconds.
Budget Range
- Saviland 3D Nail Art Gel – $8.99
- Beetles Gel Polish in ‘Sunset Coral’ – $7.50
- Teenitor Nail Dotting Tools – $5.99
3 Simple Ways to Add Water Droplets

Why to love this Design:
There is nothing more refreshing than the look of morning dew or pool splashes on a hot July day. This trend is deceptively simple but adds an incredible ‘wow’ factor that looks like professional CGI. It’s the ultimate cool-girl summer aesthetic.
Essential Elements:
- Non-wipe thick top coat or hard gel
- Dotting tool
- Matte top coat (for the base)
How to Prepare:
- The Classic Drop: Apply a matte top coat over your color. Use a dotting tool to place various sizes of clear, thick top coat ‘beads’ and cure immediately.
- The Running Drip: Drag the dotting tool slightly down from the bead to create a ‘melting’ effect before curing.
- The Layered Splash: Apply small droplets on top of existing droplets to create a multi-dimensional, realistic splash look.
Budget Range
- Modelones No Wipe Top Coat – $6.99
- Kupa GelFinity Matte Top – $12.00
7 Steps to Master Sunset Gradient Nails
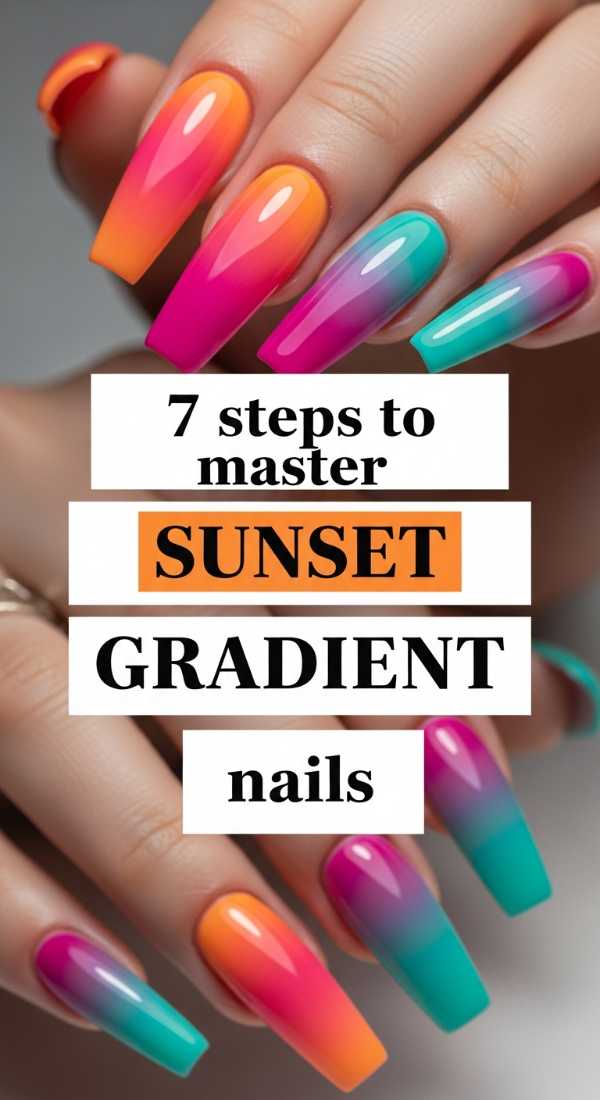
Why to love this Design:
This is the literal manifestation of a summer evening on your nails. The way the oranges melt into purples and pinks is so soothing to look at. It captures that ‘golden hour’ glow that makes everyone look and feel their absolute best.
Essential Elements:
- Wedge-shaped makeup sponges
- Yellow, Orange, and Magenta gel polish
- Liquid latex or cuticle guard
How to Prepare:
- Apply a white base coat to make the colors pop and cure.
- Apply liquid latex around your cuticles to minimize cleanup.
- Paint horizontal stripes of your sunset colors directly onto the makeup sponge.
- Dab the sponge gently onto the nail, moving it slightly up and down to blend the colors.
- Cure the first layer.
- Repeat the sponging process a second time for deep color saturation.
- Remove the latex and seal with a glossy top coat.
Budget Range
- AIMEILI Gel Polish Set ‘Island Oasis’ – $15.99
- Pueen Latex Tape – $8.50
Prepare Your Holiday Nails in 4 Quick Stages

Why to love this Design:
When you’re on vacation, the last thing you want to worry about is a chipped nail or dull shine. This process is all about longevity and ensuring your manicure stays as vibrant as your holiday spirit from the first flight to the final sunset.
Essential Elements:
- Nail dehydrator and primer
- Rubber base coat
- Long-wear gel color
- Cuticle oil pen for travel
How to Prepare:
- Cleanse the nail plate thoroughly with alcohol and apply a high-quality primer to prevent lifting.
- Apply a ‘Rubber Base’ coat, which is flexible and moves with your natural nail to prevent cracking.
- Apply two thin layers of your chosen summer hue, ensuring you cap the free edge (the tip) perfectly.
- Finish with a stain-resistant top coat to protect against sunscreen and chlorine.
Budget Range
- Kodi Professional Rubber Base – $14.00
- Mia Secret Nail Prep & Primer – $9.50
6 Tips to Apply 3D Gold Charms Perfectly

Why to love this Design:
Gold charms add a touch of luxury and ‘old money’ beach vibes to any manicure. They catch the sun beautifully and make your hands look like they belong on a yacht in the Mediterranean. It’s instant glamour, my loves!
Essential Elements:
- Gold shell or starfish charms
- Charm glue or thick builder gel
- Tweezers or a wax picker tool
How to Prepare:
- Place a small bead of charm glue exactly where you want the charm.
- Press the charm firmly into the glue, ensuring there are no gaps underneath.
- Tip: Use a ‘flash cure’ handheld light to freeze the charm in place instantly.
- Gently brush a bit of top coat around the edges of the charm to ‘lock’ it in.
- Avoid covering the top of the charm with top coat if you want to keep its metallic shine.
- Always test the ‘snag factor’ by running your hair over the nail before the final cure.
Budget Range
- Makartt Rhinestone Glue – $9.99
- EBANKU 3D Ocean Theme Charms – $7.99
Design June Vacation Nails in 5 Steps

Why to love this Design:
June is all about anticipation! This design focuses on bright, airy teals and sandy beiges that scream ‘the beach is calling.’ It’s a clean, sophisticated look that transitions perfectly from the office to the ocean.
Essential Elements:
- Turquoise cream polish
- Fine gold glitter for ‘sand’
- Striping brush
How to Prepare:
- Paint the bottom half of the nail a soft sandy beige.
- Paint the top half a refreshing turquoise.
- Use a striping brush to create a thin, wavy ‘surf’ line where the two colors meet.
- Add a touch of gold glitter along the ‘sand’ edge for a sun-kissed sparkle.
- Top with a high-gloss finish to mimic the reflection of water.
Budget Range
- Essie ‘In the Cabana’ – $10.00
- Holo Taco ‘Gold Flake’ – $13.00
4 Techniques for Ultra-Long Summer Nails

Why to love this Design:
There is something so empowering about long, tapered nails in the summer. They elongate the fingers and provide a bigger canvas for all these beautiful trends. It’s for the bold, the brave, and the beautiful!
Essential Elements:
- Full-cover Coffin or Stiletto tips
- Gel-X adhesive gel
- Sturdy nail file
How to Prepare:
- Etching: File the inside of the nail tip and your natural nail to create a ‘grip’ for the gel.
- Flash Bonding: Hold the tip at a 45-degree angle to the cuticle and cure under a mini-lamp while holding it.
- Reinforcement: Apply a layer of builder gel over the extension to ensure it doesn’t snap during summer activities.
- Tapering: File the side walls of the tips after application to ensure they look slim and natural.
Budget Range
- Aprés Gel-X Prep Kit – $30.00
- BTArtbox Soft Gel Nails – $12.99
8 Steps to Style Hibiscus June Nails

Why to love this Design:
The Hibiscus is the queen of summer flowers. Hand-painting this design feels like an act of self-care and artistic expression. It’s vibrant, energetic, and perfectly captures the tropical soul of the season.
Essential Elements:
- Red and White acrylic paint or gel
- Detailing brush
- Yellow polish for the stamen
How to Prepare:
- Apply a neutral base color and cure.
- Sketch five large, heart-shaped petals in red.
- Fill in the petals, leaving the center slightly darker.
- Use white to add fine, feathery strokes on the edges for highlight.
- Draw a long, thin yellow line coming from the center (the stamen).
- Dot the end of the stamen with tiny orange spots.
- Add a few green leaves for contrast.
- Seal the masterpiece with a thick top coat.
Budget Range
- Winstonia Berry Wine Fine Nail Brushes – $11.00
- Gellen Tropical Gel Set – $18.99
Get the Glowing Aura Look in 3 Steps

Why to love this Design:
The ‘Aura’ nail is the trend of the year. It looks like a soft, ethereal puff of color in the center of your nail, representing your energy. It’s dreamy, modern, and very ‘spiritual summer.’
Essential Elements:
- Blooming gel or an eyeshadow applicator
- Two contrasting pastel colors
How to Prepare:
- Apply your base color and cure.
- Apply a layer of ‘Blooming Gel’ (do not cure), then drop a bead of your second color in the center and let it spread.
- Alternatively, dab a bit of eyeshadow or pigment powder in the center of a tacky gel layer for a soft, diffused glow, then top coat.
Budget Range
- Vishine Blooming Gel – $7.99
- NYX Ultimate Edit Eyeshadow Palette (for pigments) – $7.00
5 Ways to Mix Animal Prints and Neon

Why to love this Design:
For my loves who want to stand out! This is ‘Electric Jungle’ chic. Combining the wildness of leopard or zebra with the intensity of neon green or pink creates a high-fashion look that is perfect for summer festivals.
Essential Elements:
- Neon yellow and pink gel
- Black stamping polish or liner gel
- Matte and Glossy top coats
How to Prepare:
- Neon Base: Apply a neon pink base and add black leopard spots on top.
- The French Twist: Do a black zebra print only on the tips of a neon yellow base.
- Split Screen: Half the nail neon, half animal print, divided by a gold line.
- Matte Jungle: Make the neon base matte and the black spots glossy for texture.
- Accent Wild: Keep four nails solid neon and one nail full-on neon animal print.
Budget Range
- Born Pretty Black Stamping Gel – $6.50
- Kiara Sky Neon Collection – $15.00
Sending You Sunshine and Sparkles
I hope these designs inspire you to take a little moment for yourself this week. Grab a cold glass of lemonade, put on your favorite playlist, and let your creativity flow. You deserve to feel beautiful, from your head right down to your perfectly manicured toes. I can’t wait to see which look you choose, my loves! Tag me in your photos so I can gush over your gorgeous work. Stay radiant, stay sun-kissed, and I’ll see you in the next post!