

There is a specific, fleeting magic that happens just as the sun begins its descent, casting a honeyed glow over the backyard and turning every leaf into a sliver of gold. It’s that moment when the air cools slightly, the evening birds begin their chorus, and the potential for a perfect night feels limitless. For me, the garden has always been more than just a plot of land; it is a living, breathing extension of our home where memories are etched into the landscape during long, laughter-filled dinners under the stars.
Designing an open-air entertainment space isn’t just about choosing the right furniture or planting the trendiest shrubs; it’s about curate an atmosphere that beckons you to stay a little longer. Whether you are hosting a boisterous neighborhood BBQ or seeking a quiet corner to sip tea and watch the fireflies, your outdoor space should feel like a sanctuary. Today, I’m sharing my favorite secrets for transforming your backyard into a designer haven that feels both luxurious and deeply personal.
How to Brighten Garden Pathways for Eternal Summer Vibes
![]()
Why we love this
There is something incredibly romantic about a glowing path that leads you through the shadows of a summer garden, guiding your feet toward hidden corners. We love this because it adds a layer of safety without sacrificing that ethereal, dreamlike quality we crave during evening strolls. The soft hum of solar-powered lights against the crunch of gravel creates a sensory experience that feels like walking through a fairytale, where the scents of night-blooming jasmine and damp earth are heightened by the gentle illumination.
Essential Elements:
- Weather-resistant LED solar stakes
- Crushed limestone or pea gravel
- Low-voltage path lights (wired option)
- Natural stone or brick edging
- Low-growing ground cover like Creeping Thyme
How to make it
- Begin by outlining your path with a garden hose or spray paint to find the most natural flow through your space; gentle curves are always more inviting than harsh straight lines.
- Excavate the path to a depth of 3-4 inches, ensuring the ground is level and removing any large rocks or roots that might create a tripping hazard.
- Lay down a heavy-duty landscape fabric to prevent weeds from popping through, securing it with landscape staples every 12 inches along the edges.
- Pour your chosen gravel into the trench, spreading it evenly with a rake until it sits about half an inch below the surrounding soil level for a tidy look.
- Install your lighting fixtures about 3 to 5 feet apart, staggering them on opposite sides of the path to create a balanced, zigzag glow rather than a ‘runway’ effect.
- For solar lights, ensure they are placed in spots that receive at least 6 hours of direct sunlight; for wired systems, bury the cables 6 inches deep and connect to a weatherproof transformer.
How to Transform Boring Sheds for Artistic Backyard Charm

Why we love this
A shed should never be just a place to hide the lawnmower; it is a canvas waiting to be brought to life as a focal point of your garden’s personality. We love the way a simple coat of paint and some architectural details can turn a utilitarian box into a charming ‘she-shed’ or a rustic workshop that looks like it belongs on the cover of a magazine. The visual warmth of a well-decorated shed adds a sense of ‘place’ to the yard, making the entire property feel more established and intentionally designed.
Essential Elements:
- High-quality exterior latex paint in a bold or pastel hue
- Decorative window boxes
- Reclaimed wood shutters
- New hardware (brass or wrought iron handles)
- Climbing roses or ivy
How to make it
- Start by pressure washing the exterior of the shed to remove dirt, mildew, and loose paint, then allow it to dry completely for at least 24 to 48 hours.
- Sand down any rough spots or peeling areas with medium-grit sandpaper to ensure the new paint adheres perfectly to the wood or metal surface.
- Apply a coat of high-bonding exterior primer, which is crucial for preventing tannins from bleeding through the paint and ensuring a long-lasting finish.
- Paint the body of the shed using a roller for large surfaces and a high-quality angled brush for the trim and corners; use at least two coats for a rich, vibrant color.
- Attach window boxes at the base of any windows, ensuring they are bolted into the wall studs for support, and fill them with a mix of ‘thriller, filler, and spiller’ plants.
- Swap out old, rusted hinges and latches for oversized, decorative hardware that complements the new color scheme, providing that final ‘designer’ touch.
How to Create Private Outdoor Sanctuaries for Total Backyard Seclusion

Why we love this
In our fast-paced world, having a secret corner where the neighbors can’t see you and the noise of the street fades away is the ultimate luxury. We love the feeling of ‘cocooning’ in a private sanctuary, where the textures of soft outdoor pillows and the rustle of tall grasses create a barrier between you and the rest of the world. It’s a space for meditation, deep reading, or intimate conversations, enveloped in a sense of security and peace that only a secluded garden nook can provide.
Essential Elements:
- Freestanding wooden pergola or arbor
- Flowing outdoor privacy curtains
- Deep-seated lounge chair or hammock
- Tall potted grasses (like Maiden Grass)
- Outdoor rug with a plush texture
How to make it
- Select a corner of the yard that is naturally shielded by the house or existing trees to serve as the foundation for your private retreat.
- Install a pergola or a simple four-post structure, ensuring the posts are anchored in concrete at least 2 feet deep to withstand wind and heavy fabrics.
- Mount weather-resistant curtain rods to the top beams and hang outdoor-rated sheer or canvas curtains that can be tied back or closed for total seclusion.
- Define the floor space with an outdoor rug that mimics the softness of an indoor living room, choosing a material like polypropylene for easy cleaning.
- Place your seating at an angle that faces the most beautiful part of your garden, avoiding views of the house or fences to maintain the illusion of being far away.
- Surround the perimeter with large planters filled with tall, airy plants to create a ‘living wall’ that filters light and dampens ambient noise.
How to Elevate Patio Styles for an Expensive Designer Look
Why we love this
A designer patio is all about the art of layering; it’s where sophistication meets the rugged beauty of the outdoors. We love this approach because it uses high-end textures—like smooth stone, sleek metal, and rich textiles—to create a space that feels as curated as a luxury hotel lounge. When you sit on a patio that has been thoughtfully elevated, you feel an immediate sense of ‘wow,’ and the transition from indoors to out becomes seamless, elegant, and incredibly inviting for guests.
Essential Elements:
- Monochromatic or neutral color palette
- Modern modular furniture with clean lines
- Large-scale porcelain or slate pavers
- Designer outdoor lighting (sconces or floor lamps)
- Statement centerpiece (fire table or water feature)
How to make it
- Choose a cohesive color story, such as ‘Cool Slate and Navy’ or ‘Warm Sand and Terracotta,’ to ensure every element from the cushions to the planters feels intentional.
- Invest in oversized pavers (at least 24×24 inches) to create a clean, modern grid pattern that makes even a small patio feel significantly larger and more expensive.
- Arrange modular furniture in a way that encourages conversation, leaving enough ‘negative space’ so the area doesn’t feel cluttered or cramped.
- Incorporate ‘indoor’ elements like a coffee table and side tables made from high-quality materials like teak or powder-coated aluminum.
- Layer your lighting by using a mix of overhead string lights, wall-mounted sconces, and even battery-operated table lamps to create a warm, multi-dimensional glow.
- Add a high-end focal point, such as a sleek linear fire table, which provides both physical warmth and a sophisticated visual anchor for the entire space.
How to Design Lush Flower Beds for Instant Curb Appeal

Why we love this
There is nothing quite as breathtaking as a flower bed overflowing with a riot of colors and textures, greeting you every time you pull into the driveway. We love the way a lush garden bed adds movement to the landscape—the sway of foxgloves in the wind and the vibrant hum of bees visiting lavender blooms. It’s an instant mood lifter that signals a home that is cared for and full of life, providing a fragrant welcome that begins the moment you step out of the car.
Essential Elements:
- Mix of perennials and annuals
- Quality organic compost and mulch
- Varying heights (tall delphiniums to low alyssum)
- Consistent color theme (e.g., pastels or hot tropicals)
- Edge definition (scalloped stone or clean spade edge)
How to make it
- Analyze your sun exposure throughout the day; plants that love the sun will wither in the shade, so group your ‘full sun’ and ‘part shade’ varieties accordingly.
- Prep the soil by tilling in 3-4 inches of rich organic compost to ensure your plants have the nutrients they need to produce large, healthy blooms.
- Place your tallest plants in the back (or the center if the bed is visible from all sides) and stagger medium and short plants toward the front to create a tiered, ‘stadium seating’ effect.
- Space plants according to their mature width, not their size at the nursery, to prevent overcrowding and fungal issues as they grow.
- Dig holes twice as wide as the root ball, gently tease the roots, and plant them at the same depth they were in the pot to avoid stem rot.
- Finish with a 2-inch layer of dark wood mulch to retain moisture, suppress weeds, and give the beds that crisp, professional ‘manicured’ look.
How to Light Up Night Parties for a Magical Evening Glow
Why we love this
When the sun goes down, the right lighting can turn a standard backyard into a mystical wonderland. We love the way strategic lighting creates ‘pockets’ of intimacy, drawing people together around a warm glow while leaving the rest of the garden in a soft, mysterious twilight. It’s the difference between a party that ends when it gets dark and one that truly begins at dusk, sparkling with the twinkle of Edison bulbs and the flickering dance of real flames.
Essential Elements:
- Commercial-grade Edison string lights
- Stainless steel or copper tiki torches
- Floating pool lights (if applicable)
- Battery-operated wax candles
- Tree-mounted ‘moonlight’ spotlights
How to make it
- String Edison lights in a ‘criss-cross’ or ‘fan’ pattern over the main dining area, using sturdy poles or tree branches to keep them at least 8-9 feet above the ground.
- Use ‘moonlighting’ techniques by placing small spotlights high up in tree canopies, pointing them downward through the leaves to create dappled shadows on the lawn.
- Set up a perimeter of tiki torches or oversized lanterns to define the boundaries of the party space, using citronella oil to keep uninvited pests at bay.
- Cluster various sizes of battery-operated candles on tables and ledges; they provide the flickering romance of real fire without the risk of wax spills or wind blow-outs.
- For a dramatic touch, hide low-voltage ‘uplights’ at the base of architectural plants or statues to create striking silhouettes against the night sky.
- Ensure all walkways are lit with low-intensity ‘step lights’ to prevent trips while maintaining the moody, low-light ambiance of the party.
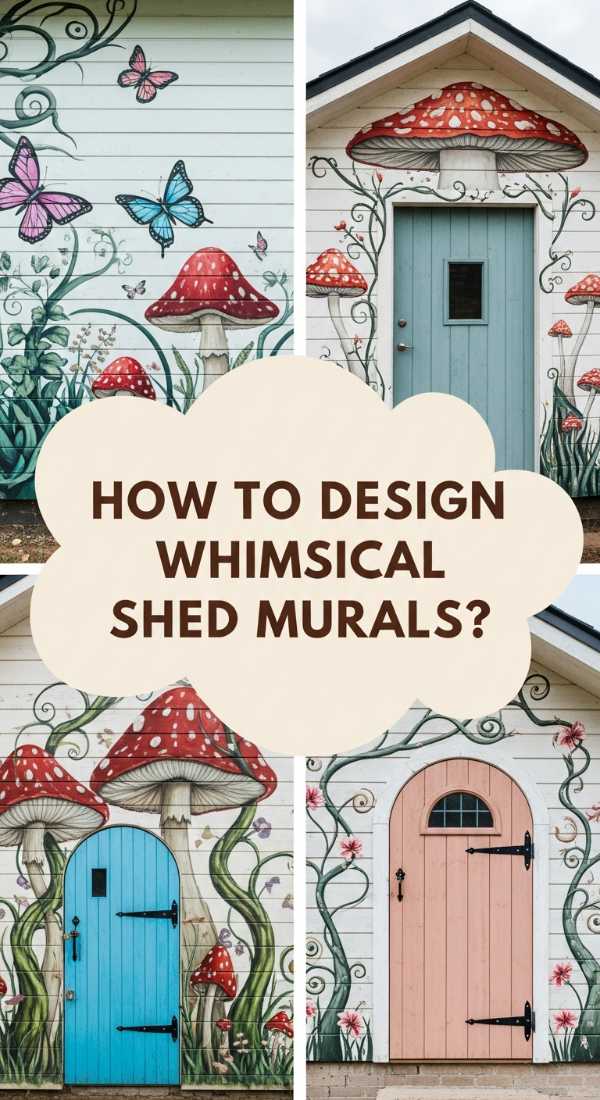
How to Paint Custom Wall Art for a Whimsical Outdoor Haven

Why we love this
Outdoor wall art is the ultimate expression of creativity, turning a dull fence or a brick wall into a storytelling masterpiece. We love this because it brings the ‘indoor gallery’ vibe outside, adding pops of unexpected color and whimsy where you least expect it. Whether it’s a bold geometric mural or a soft botanical stencil, custom art gives your garden a unique soul that can’t be bought at a garden center—it’s a reflection of your personal journey and style.
Essential Elements:
- Exterior-grade acrylic paints
- UV-resistant clear topcoat
- Stencils or painter’s tape for clean lines
- High-quality synthetic brushes
- Concrete or wood primer
How to make it
- Scrub the wall surface with a wire brush to remove any loose debris, then apply a specialized masonry or wood primer to create a smooth, ‘grippy’ surface for your art.
- Sketch your design lightly with a pencil or chalk first; if you’re not confident in freehanding, use a projector at night to trace the image onto the wall.
- Block in your largest areas of color first using a small roller or a large flat brush, working from the top of the wall down to avoid drips ruining your work.
- Use high-quality detail brushes to add fine lines, highlights, and shadows, which give the artwork depth and make it pop against the natural background.
- Allow the paint to cure for at least 72 hours in dry weather before applying two coats of a UV-resistant, waterproof clear sealer to prevent fading and peeling.
- Frame your masterpiece with climbing vines or wall-mounted planters to integrate the art into the living landscape of the garden.
How to Build Living Greenery Screens for a Peaceful Garden Escape

Why we love this
There is something deeply satisfying about a structure that grows and changes with the seasons. We love living screens because they provide privacy that feels ‘breathable’ and organic, unlike a cold wooden fence. The sound of wind rustling through a wall of emerald leaves, the sight of hummingbirds darting between vines, and the cooling effect of transpiration make these screens a functional piece of art that actually improves the air quality and microclimate of your patio.
Essential Elements:
- Sturdy timber or metal trellis panels
- Fast-growing climbers (Clematis, Honeysuckle, or Star Jasmine)
- Large, rectangular cedar planters
- Automatic drip irrigation line
- Slow-release organic fertilizer
How to make it
- Position your large planters exactly where you want the screen to sit, as they will be very heavy once filled with soil and moisture.
- Install the trellis panels securely to the back of the planters or mount them to the ground, ensuring they are strong enough to support the weight of a mature vine in a storm.
- Fill the planters with a high-quality ‘container mix’ soil, which is lighter and drains better than standard garden soil.
- Plant your climbers every 12-18 inches along the base of the trellis, gently untying the stems from their nursery stakes and weaving them into the trellis grid.
- Install a simple drip irrigation system with a timer to ensure the plants get consistent water, as container plants dry out much faster than those in the ground.
- Prune the plants regularly during the first growing season to encourage horizontal branching, which will fill in the ‘holes’ in the screen much faster.
How to Craft Patterned Stone Walkways for a Timeless Estate Feel

Why we love this
A patterned stone walkway is the hallmark of a classic, well-manicured estate. We love the timelessness of a herringbone or basketweave pattern, which adds architectural interest and a sense of permanence to the garden. It feels solid underfoot and looks even better as it ages, developing a soft patina and allowing moss to grow in the crevices. It’s an investment in your home’s character that never goes out of style and provides a structured contrast to the wildness of garden beds.
Essential Elements:
- Uniform stone pavers or bricks
- Polymeric sand for joints
- Compacted crushed stone base (3/4 inch minus)
- Leveling sand
- Plate compactor (rental recommended)
How to make it
- Excavate the walkway area to a depth of 6-8 inches, ensuring a slight slope (1 inch for every 4 feet) away from your home’s foundation to prevent water pooling.
- Fill the trench with 4 inches of crushed stone, then use a plate compactor to create a rock-solid, level base that won’t shift over time.
- Add a 1-inch layer of fine leveling sand over the crushed stone, using a straight board to ‘screed’ the sand until it is perfectly flat.
- Lay your pavers in your chosen pattern (like a 45-degree herringbone), working outward from a corner and using a rubber mallet to tap each stone into place.
- Once all stones are laid, sweep polymeric sand into the joints until they are filled to the brim, then use a leaf blower to remove any excess dust from the stone surfaces.
- Lightly mist the walkway with water to activate the polymers in the sand, which will harden and ‘lock’ the stones together, preventing weeds and ants from moving in.
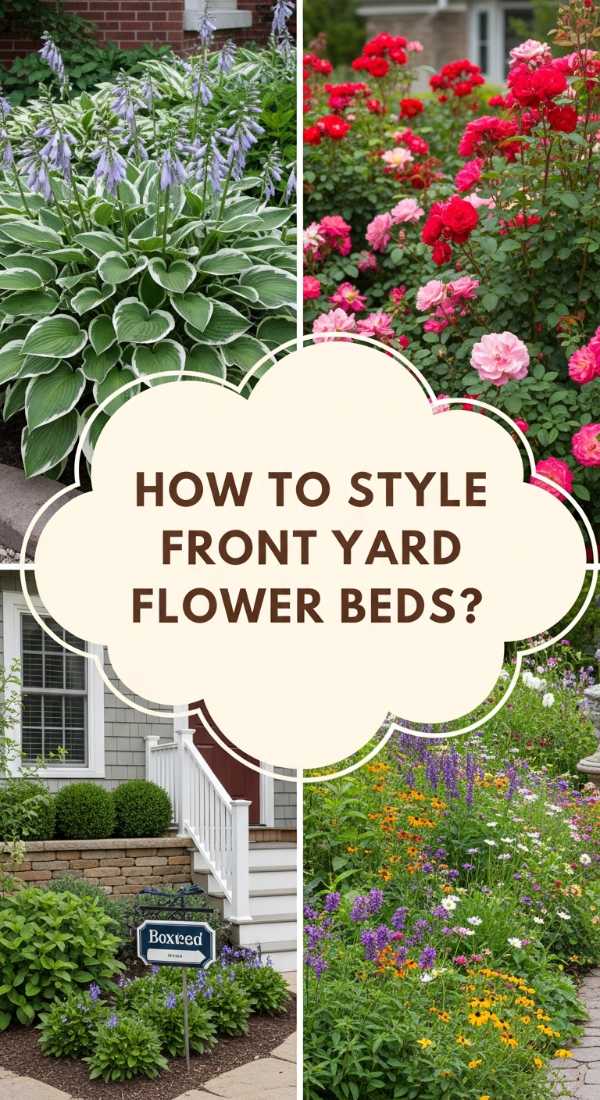
How to Arrange Colorful Botanical Borders for a Welcoming Home Entrance
[IMAGE_10]
Why we love this
Your front entrance sets the tone for the entire home, and a botanical border is like a permanent ‘welcome’ mat made of petals and perfume. We love the layers of fragrance—the spicy scent of carnations mixed with the sweet notes of roses—that greet you at the door. It’s about creating a transition from the public street to your private world that feels soft, colorful, and curated, making every arrival feel like a special occasion for you and your guests alike.
Essential Elements:
- Evergreen shrubs for year-round structure
- Fragrant flowering plants (Lavender, Gardenia)
- Ornamental grasses for movement
- Seasonal ‘pop’ flowers (Tulips in spring, Mums in fall)
- Decorative mulch or river rock
How to make it
- Start with ‘anchor’ plants—evergreens like Boxwood or Dwarf Conifers—to ensure your entrance doesn’t look barren during the winter months.
- Layer in height by placing taller shrubs toward the house and shorter, flowering perennials toward the walkway to create a sense of depth and ‘enclosure.’
- Incorporate ‘sensory’ plants near the path where people will brush against them, such as rosemary or lavender, which release their oils when touched.
- Use a repeating color palette (for example, whites, silvers, and purples) to create a sense of rhythm and harmony that leads the eye toward the front door.
- Incorporate different leaf textures—from the broad, waxy leaves of a Host to the fine, feathery blades of Fountain Grass—to keep the border interesting even when nothing is in bloom.
- Update the very front edge of the border every season with fresh annuals, keeping the look vibrant and exciting throughout the entire year.
The Final Flourish
Creating the perfect outdoor space is a journey of layers, much like the garden itself. It starts with a vision of how you want to feel—be it peaceful, energized, or inspired—and grows through the careful addition of light, texture, and life. As you implement these changes, remember that a garden is never truly ‘finished’; it is a living entity that evolves with you. So, pour yourself a glass of something cold, step outside, and enjoy the beautiful sanctuary you’ve built under the open sky.