

The 5-Minute Viral Food Board That’s Taking Over the Internet
There is something inherently magical about a gathering that centers around a shared board of treats. We’ve all seen them scrolling through our feeds—those effortless, overflowing displays of color and texture that seem to whisper of slow Sunday mornings and late-night laughter with friends. It’s not just about the food; it’s about the feeling of being taken care of, the tactile joy of reaching for a bite-sized morsel, and the way a beautifully arranged board can turn a simple Tuesday into a core memory.
Lately, I’ve been obsessed with how these ‘viral boards’ bring people together without the stress of a formal five-course meal. Whether you are celebrating a massive milestone like a graduation or just trying to survive the toddler lunch rush, there is a way to make it feel intentional and aesthetic. Today, I’m sharing the ultimate secrets to the simple food board trend, featuring everything from zesty pastas to the perfect summer pie. Let’s dive into the delicious details that make these boards so irresistible.
HOW TO DECORATE GRADUATION CAKES?

Why we love this
A graduation cake is more than just a dessert; it is a sugary monument to years of hard work and sleepless nights. We love the elegant contrast of a smooth, velvet-like fondant paired with shimmering gold leaf accents that catch the light as the graduate takes their first celebratory slice. The aroma of rich vanilla bean and whipped buttercream fills the room, creating an atmosphere of pure accomplishment. It’s about that satisfying moment when the decorations perfectly mirror the pride and joy of the day, making the celebration feel truly official and bespoke.
Ingredients
- Pre-baked tiered cake
- Silky Swiss Meringue Buttercream
- Edible gold leaf or metallic dust
- Fondant in school colors
- Cardstock cake toppers or miniature mortarboards
- Fresh, organic flowers
How to make it
- Begin by applying a ‘crumb coat’—a thin layer of frosting—to your chilled cake to lock in moisture and prevent stray crumbs from ruining your finish; refrigerate for 20 minutes until firm.
- Apply a thick, final layer of buttercream using an offset spatula, then use a metal bench scraper held at a 45-degree angle to rotate the cake on a turntable for a perfectly smooth, professional finish.
- Roll out your fondant on a surface dusted with cornstarch until it is 1/8 inch thick, then use precision cutters to create the graduate’s name or graduation year.
- Carefully apply edible gold leaf using a dry, soft-bristled brush, pressing it gently onto the areas where the frosting is still slightly tacky for a luxurious, mottled effect.
- Place your central topper slightly off-center to create visual interest and height, then anchor it by tucking fresh flowers around the base of the top tier.
HOW TO BAKE RHUBARB PIE?

Why we love this
There is nothing quite like the rustic charm of a rhubarb pie cooling on a windowsill, its ruby-red juices bubbling through a flaky, golden lattice crust. The scent of tart rhubarb mingling with warm cinnamon and sweet sugar is the ultimate olfactory hallmark of early summer. Every bite offers a delightful dance of textures, from the crunch of the buttery pastry to the soft, jammy interior that melts on your tongue. It’s a nostalgic experience that evokes memories of family picnics and the simple pleasure of seasonal baking at its finest.
Ingredients
- Double pie crust (chilled)
- 5 cups fresh rhubarb, chopped into half-inch pieces
- 1 1/4 cups granulated sugar
- 1/4 cup cornstarch
- 1/2 teaspoon cinnamon
- 1 tablespoon unsalted butter (cubed)
- 1 egg (for egg wash)
How to make it
- Preheat your oven to 400°F (200°C) and place a baking sheet on the middle rack to catch any overflow of fruit juices.
- In a large glass bowl, toss the chopped rhubarb with sugar, cornstarch, and cinnamon, letting it macerate for 15 minutes to release the natural juices and create a thick syrup.
- Roll out your bottom crust and fit it into a 9-inch pie plate, leaving an inch of overhang, then pour in the rhubarb mixture and dot the top with small cubes of butter for extra richness.
- Roll out the second crust and cut into 1-inch strips to create a lattice weave over the top, crimping the edges tightly to seal the juices inside.
- Brush the lattice with a whisked egg wash and sprinkle with coarse sugar; bake for 45-55 minutes until the crust is deep golden brown and the filling is thick and bubbling.
HOW TO BREW ICED COFFEE?

Why we love this
The first sip of a perfectly brewed iced coffee is like a cold, refreshing wake-up call for the soul on a humid afternoon. We love the way the dark, robust coffee swirls into the creamy milk, creating beautiful caramel-colored clouds inside a tall glass filled with clinking ice. The aroma is bold and chocolatey, providing an instant sensory boost that transitions you from a sluggish morning to a productive day. It’s a simple luxury that feels like a high-end cafe experience right in the comfort of your own sun-drenched kitchen.
Ingredients
- Coarsely ground dark roast coffee beans
- Filtered cold water
- Large ice cubes
- Simple syrup or flavored creamer
- Whole milk or oat milk
How to make it
- Use a cold-brew method for the smoothest results: combine 1 cup of coarse coffee grounds with 4 cups of filtered water in a large jar.
- Stir the mixture gently to ensure all grounds are saturated, then cover and steep in the refrigerator for at least 12 to 18 hours.
- Strain the concentrate through a fine-mesh sieve lined with a paper coffee filter or cheesecloth to remove all sediment for a crystal-clear brew.
- Fill a tall glass to the brim with large ice cubes—larger cubes melt slower and prevent the coffee from becoming watery.
- Pour 1/2 cup of the coffee concentrate over the ice, followed by 1/2 cup of cold filtered water and a heavy splash of your favorite milk, stirring gently until the colors marble beautifully.
HOW TO MAKE RHUBARB JAM?

Why we love this
Rhubarb jam is like capturing summer in a jar; it has a vibrant, neon-pink hue that looks stunning spread across a piece of crusty sourdough bread. The texture is thick and luscious, with a perfect balance of sharp acidity and mellow sweetness that lingers on the palate. We love the way the kitchen smells while it simmers—a bright, fruity fragrance that feels both cozy and sophisticated. It’s the ultimate homemade gift that adds a pop of seasonal flavor to any breakfast board or afternoon tea spread.
Ingredients
- 2 lbs fresh rhubarb (trimmed and chopped)
- 3 cups granulated sugar
- 1 tablespoon lemon juice
- 1 teaspoon vanilla bean paste
- A pinch of salt
How to make it
- Combine the chopped rhubarb and sugar in a heavy-bottomed pot and let it sit for 2 hours at room temperature until the sugar has completely dissolved into a syrup.
- Place the pot over medium heat and bring the mixture to a rolling boil, stirring constantly with a wooden spoon to prevent the bottom from scorching.
- Add the lemon juice and vanilla bean paste; the lemon juice provides the necessary pectin and acidity to help the jam set properly.
- Continue to boil for about 15-20 minutes, or until the jam reaches 220°F (105°C) on a candy thermometer, or passes the ‘plate test’ (a drop of jam wrinkles when pushed on a chilled plate).
- Ladle the hot jam into sterilized glass jars, leaving 1/4 inch of headspace, and seal tightly; let them cool completely at room temperature to allow the set to firm up.
HOW TO FROST GRAD CUPCAKES?

Why we love this
There is a specific joy in seeing a perfectly frosted cupcake topped with a miniature graduation cap—it’s whimsical, celebratory, and incredibly photogenic. The buttercream should be piped high in a swirling mountain of sweetness that is firm enough to hold its shape but soft enough to melt away the moment it hits your tongue. We love how customizable these are, allowing you to incorporate school colors through subtle ombré frosting or vibrant sprinkles. It’s a bite-sized celebration that brings a smile to every guest’s face, regardless of their age.
Ingredients
- Standard vanilla or chocolate cupcakes
- Stiff-peak American buttercream
- Gel food coloring
- Large star piping tip (1M or 2D)
- Small chocolate squares and sour belts (for caps)
- Edible glitter
How to make it
- Fit a large piping bag with a 1M star tip and fill it with your tinted buttercream, ensuring there are no air pockets by squeezing the bag firmly.
- Hold the bag vertically over the center of the cupcake, about half an inch above the surface, and apply steady pressure to create a base star.
- Move the tip in a tight, continuous spiral starting from the outside edge of the cupcake and working your way toward the center and then upward.
- As you reach the peak of your swirl, release the pressure and lift the bag quickly to create a clean, sharp point.
- Assemble the graduation caps by placing a chocolate square on top of the frosting and attaching a small strip of sour belt as a tassel using a tiny dot of frosting as ‘glue.’
HOW TO STYLE SUMMER COOKIES?

Why we love this
Styling summer cookies is an art form that celebrates the bright, airy vibes of the season with sunshine yellows, ocean blues, and crisp whites. We love the satisfying snap of a sugar cookie paired with the smooth, matte finish of royal icing that has been decorated with intricate, nautical or floral designs. The aroma is a nostalgic mix of almond extract and sweet butter, reminiscent of childhood seaside vacations. When arranged on a board, these cookies become a visual feast that sets the tone for a stylish garden party or beach picnic.
Ingredients
- Chilled sugar cookies (various shapes)
- Royal icing (flooding and piping consistencies)
- Scribe tool or toothpick
- Luster dust
- Edible markers
How to make it
- Start with a completely cooled cookie; use high-consistency icing to pipe a thin border around the edge of the shape to act as a dam for the flood icing.
- Immediately fill the center with ‘flood’ consistency icing (which should disappear into itself within 10 seconds), using a scribe tool to pop bubbles and push icing into the corners.
- For a ‘wet-on-wet’ technique, drop small dots of a contrasting color into the wet flood icing and drag a toothpick through them to create heart or marble patterns.
- Allow the base layer to dry for at least 6-8 hours in a cool, dry place until the surface is hard and matte.
- Once dry, use a fine-tip edible marker or a brush dipped in gold luster dust and vodka to add delicate details like flower petals, leaf veins, or graduation years.
HOW TO PREP TODDLER LUNCHES?

Why we love this
Toddler lunch prep is all about the ‘wow’ factor that turns ordinary ingredients into an adventurous snack board for little hands. We love the rainbow of colors—bright orange carrots, deep purple grapes, and creamy white cheese—that make the meal look like a palette of fun rather than a chore. The textures range from the satisfying crunch of a cucumber to the soft fluffiness of a mini sandwich cut into a star shape. It’s a way to encourage healthy eating through play, making the lunch table a place of discovery and joy for both the parent and the child.
Ingredients
- Miniature whole-wheat bread
- Cucumber slices and baby carrots
- Mild cheddar cheese cubes
- Deli turkey or ham
- Hummus or yogurt dip
- Fresh berries
How to make it
- Use small cookie cutters to transform standard sandwiches and cheese slices into fun shapes like stars, hearts, or dinosaurs to increase visual appeal for picky eaters.
- Peel and slice vegetables into ‘matchsticks’ or thin rounds that are easy for small fingers to grasp and dip without being a choking hazard.
- Arrange the components in a bento-style box or on a small wooden board, keeping the different textures and flavors in separate ‘zones’ to respect the common toddler preference for non-touching foods.
- Include a small container of hummus or Greek yogurt dip in the center to provide a protein-rich interactive element to the meal.
- Finish the board with a handful of brightly colored berries, ensuring they are cut lengthwise if they are particularly large, to provide a natural sweet treat.
HOW TO COOK LEMON PESTO?
Why we love this
Lemon pesto is a vibrant, sun-drenched twist on the classic Italian sauce that tastes like a Mediterranean summer in a bowl. We love the explosive brightness of the fresh lemon zest against the earthy, peppery bite of fresh basil and the rich, buttery depth of toasted pine nuts. The aroma is incredibly uplifting—a citrusy-herbaceous scent that fills the kitchen the moment the ingredients hit the blender. It’s a versatile sauce that clings perfectly to pasta, creating a silky, zesty coating that feels light yet deeply satisfying.
Ingredients
- 2 cups fresh basil leaves (packed)
- 1/2 cup freshly grated Parmesan cheese
- 1/3 cup toasted pine nuts
- 2 cloves garlic (peeled)
- Juice and zest of 1 large organic lemon
- 1/2 cup high-quality extra virgin olive oil
- Salt and pepper to taste
How to make it
- Begin by lightly toasting the pine nuts in a dry skillet over low heat for 3-5 minutes until they are fragrant and golden; this releases the oils and enhances the nutty flavor.
- In a food processor, pulse the basil, garlic, and toasted pine nuts several times until they are coarsely chopped and well combined.
- Add the Parmesan cheese, lemon zest, and lemon juice, then pulse again to incorporate the ingredients while maintaining some texture.
- While the processor is running on low, slowly drizzle in the extra virgin olive oil in a thin, steady stream to create an emulsion that is thick and creamy.
- Taste the pesto and season with salt and freshly cracked black pepper, then toss immediately with hot pasta, adding a splash of pasta water to help the sauce coat the noodles evenly.
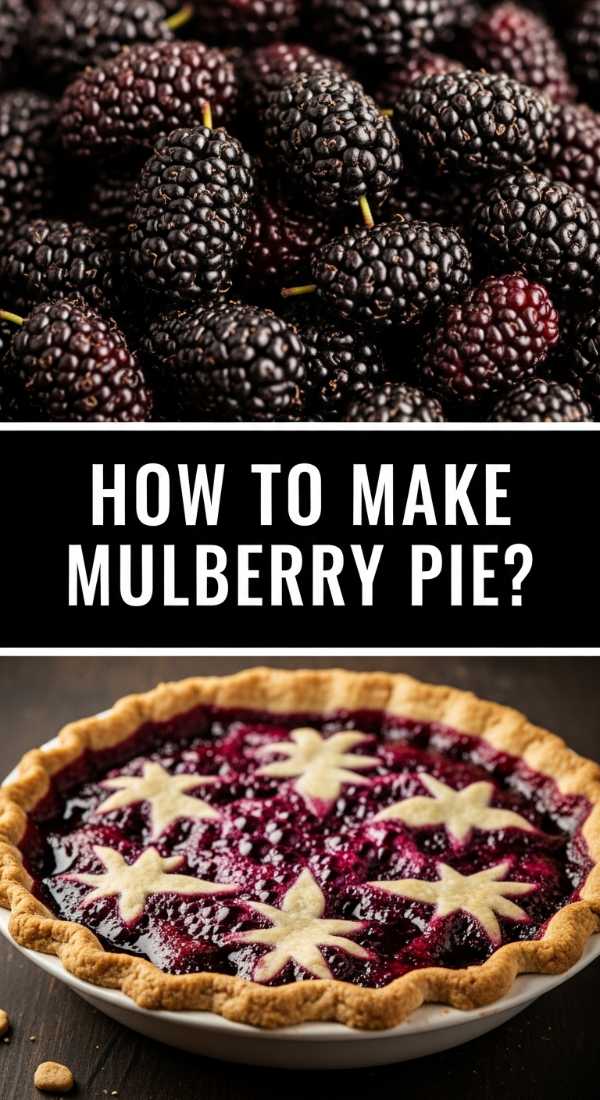
HOW TO MAKE MULBERRY PIE?

Why we love this
Mulberry pie is a rare and sophisticated treat that boasts a deep, complex berry flavor that is slightly more floral and earthy than your standard blackberry. We love the dramatic, ink-purple color of the filling that stains the bottom of the flaky crust, hinting at the intense fruitiness within. The texture of the softened mulberries is tender and succulent, held together by a thick, velvety syrup that balances the berry’s natural sweetness with a hint of lemon. It’s the kind of pie that feels like a hidden treasure, perfect for a special summer evening under the stars.
Ingredients
- 4 cups fresh mulberries (stems removed)
- 1 cup granulated sugar
- 3 tablespoons cornstarch
- 1 teaspoon lemon zest
- 1 tablespoon lemon juice
- Double pie crust
- Turbinado sugar for topping
How to make it
- Carefully wash and dry the mulberries, ensuring you remove the small green stems which can be fibrous; toss them gently with sugar, cornstarch, and lemon zest in a large bowl.
- Let the berries sit for 20 minutes to allow the cornstarch to begin absorbing the purple juices, which will ensure your pie sets beautifully and isn’t ‘soupy.’
- Roll out your bottom pastry and drape it over a 9-inch pie tin, then fill it with the mulberry mixture, spreading it out to create an even surface.
- Place the top crust over the fruit, cut a few decorative vents in the center to allow steam to escape, and crimp the edges firmly with a fork or your fingers.
- Brush the top with a bit of water or milk, sprinkle generously with crunchy turbinado sugar, and bake at 375°F (190°C) for 50 minutes until the crust is golden and the juice is thick and bubbling.
HOW TO DESIGN GRAD CAKES?
[IMAGE_10]
Why we love this
Designing a graduation cake is about storytelling; it’s the process of translating a student’s journey into a visual masterpiece. We love the architectural challenge of creating multi-tiered structures that stand tall and proud, much like the graduate themselves. The aesthetic is often a mix of tradition—represented by classic emblems—and modern flair, such as clean lines or textured geometric patterns. It’s the centerpiece of the party, a conversation starter that tastes as good as it looks, leaving a lasting impression on everyone who celebrates this momentous occasion.
Ingredients
- Tiered cake layers (chilled and leveled)
- Structural dowels or boba straws
- Cake boards of varying sizes
- Palette knives and sculpting tools
- Decorations: ribbons, tassels, and sugar pearls
How to make it
- Start with a solid foundation by using internal supports; for tiered cakes, insert food-grade dowels into the bottom tier to support the weight of the cake board and tier above it.
- Create a cohesive design language by choosing a color palette of three colors—usually the school colors plus a neutral like white, gold, or silver for balance.
- Use a palette knife to create ‘textured’ buttercream, applying the frosting in short, deliberate strokes for a rustic-chic look, or keep it perfectly smooth for a modern aesthetic.
- Strategically place your largest design elements first—like a fondant diploma or a custom ‘Class of’ sign—using the ‘Rule of Thirds’ to guide your placement for a balanced composition.
- Add finishing touches like sugar pearls or edible sequins at the base of each tier to hide any imperfections and give the cake a polished, professional ‘designer’ finish.
Conclusion
Creating a viral-worthy food board isn’t about perfection; it’s about the joy of sharing something handmade and heartfelt with the people you love. Whether you are piping the perfect swirl on a graduation cupcake or simmering a batch of ruby-red rhubarb jam, these moments in the kitchen are what make a house feel like a home. I hope these recipes and tips inspire you to clear off your counter, grab a wooden board, and start styling your own delicious masterpiece. Remember, the best ingredient is always the laughter shared around the table!