

The 5-Minute Viral Food Board That’s Taking Over Your Feed
We’ve all been there—scrolling through our feeds at midnight, mesmerized by those perfectly curated spreads that look like they belong in a high-end editorial. There is something deeply satisfying about a visual feast that balances color, texture, and flavor so effortlessly. It’s not just about the food; it’s about the feeling of gathering, the warmth of a shared moment, and the creative joy of making something beautiful with your own hands.
Today, I’m pulling back the curtain on how to create that ‘viral’ aesthetic for your next gathering or quiet weekend at home. From the tart pop of rhubarb to the celebratory spark of graduation treats, we’re building a lifestyle board that hits every note. Whether you’re a seasoned pro or a kitchen novice, these tips will help you craft a spread that tastes even better than it looks.
How to style graduation cakes?

Why we love this
A graduation cake is more than just a dessert; it is a centerpiece that celebrates years of hard work and late-night study sessions. We love the way a well-styled cake captures the light with shimmering gold leaf and elegant toppers, creating a sense of sophisticated triumph. The contrast between smooth, velvety buttercream and the sharp lines of a mortarboard topper creates a visual narrative of success. It feels celebratory and grand, yet intimate enough to be sliced and shared with those who supported the journey.
Ingredients
- Freshly baked multi-tier cake
- Silky Swiss meringue buttercream
- Edible gold leaf
- Custom acrylic topper
- Fresh white flowers or eucalyptus
- Food-grade glitter
How to make it
- Begin by applying a final ‘beauty coat’ of buttercream to your chilled cake, using a metal bench scraper to achieve razor-sharp edges and a perfectly level top surface.
- Place the cake back in the refrigerator for 20 minutes; a firm surface is essential for applying gold leaf without it sinking into soft frosting.
- Using sterilized tweezers, gently press small fragments of gold leaf onto the lower third of the cake, creating a ‘gradient’ effect that looks organic and high-end.
- Insert your custom topper slightly off-center for a modern look, ensuring the base of the topper is clean and hidden by a small dollop of frosting.
- Tuck fresh, pesticide-free greenery or florals around the base and one side of the top tier, following a ‘S’ curve to guide the eye across the design.
- Finish with a light dusting of food-grade glitter to catch the camera flash, giving it that viral-ready sparkle.
How to bake rhubarb pie?

Why we love this
There is nothing quite like the rustic charm of a rhubarb pie cooling on a windowsill, its ruby-red juices bubbling through a golden lattice crust. The scent is a nostalgic blend of buttery pastry and the sharp, bright tang of cooked stalks, evoking memories of early summer afternoons. The texture is a masterclass in contrast: the flaky, salt-kissed crunch of the crust yields to a soft, jammy interior that balances sweetness with a sophisticated acidity. Every bite feels like a warm hug from the garden.
Ingredients
- Double pie crust dough (chilled)
- 5 cups fresh rhubarb, chopped
- 1.25 cups granulated sugar
- 3 tablespoons cornstarch
- 1 tablespoon lemon juice
- 1 teaspoon vanilla extract
- Egg wash and coarse sanding sugar
How to make it
- Roll out your bottom crust to a 12-inch circle and drape it into a 9-inch pie plate, leaving an inch of overhang; chill this base while you prepare the filling.
- In a large bowl, toss the chopped rhubarb with sugar, cornstarch, lemon juice, and vanilla, ensuring every piece is evenly coated to prevent a soggy bottom.
- Pour the filling into the prepared shell, mounding it slightly in the center to account for the fruit shrinking as it bakes.
- Create a lattice top by cutting the second crust into strips and weaving them over the fruit, then crimp the edges tightly to seal in those precious juices.
- Brush the entire top with a beaten egg wash and a heavy sprinkle of sanding sugar for that signature professional crunch.
- Bake at 425°F for the first 15 minutes to set the crust, then lower to 375°F and bake for another 45-50 minutes until the filling is thick and bubbling slowly.
How to design funny cakes?

Why we love this
In a world of perfection, funny cakes are the breath of fresh air we all need, bringing a sense of whimsy and laughter to any party board. We love the irony of a beautifully piped, professional-looking cake that features a hilarious meme or a self-deprecating joke in bold lettering. The bright, saturated colors and intentionally ‘extra’ decorations like maraschino cherries or chunky sprinkles make it feel approachable and fun. It’s a conversation starter that tastes as good as the punchline it delivers.
Ingredients
- 8-inch round cake layers
- Brightly colored American buttercream
- Piping bags with star and round tips
- Edible ink pens or fondant for lettering
- Cocktail cherries
- Rainbow sprinkles
How to make it
- Stack and crumb-coat your layers with a neutral frosting, then apply a thick, vibrant outer layer of buttercream in a bold color like electric pink or turquoise.
- Use a large star tip (like a 1M) to pipe a vintage-style border around the top and bottom edges, using a rhythmic ‘loop-de-loop’ motion for a retro look.
- If using fondant for the joke, roll it thin and cut out letters; if piping, use a small round tip and practice your script on parchment paper first.
- Center your ‘funny’ message—whether it’s a birthday jab or a relatable quote—ensuring the spacing allows the joke to be read clearly from a distance.
- Add ‘over-the-top’ accents like bright red cherries with stems still attached and a heavy-handed application of sprinkles along the bottom border.
- Chill the cake thoroughly before transport to ensure the humorous message doesn’t shift or crack during the reveal.
How to mix coffee drinks?

Why we love this
There is a profound ritualistic beauty in mixing the perfect coffee drink, seeing the dark, intense espresso swirl into creamy, clouded milk. The aroma alone is enough to transform a morning, filling the air with notes of toasted beans, caramel, and a hint of spice. We love the tactile experience of the cold glass against our palms and the way the ice clinks rhythmically as the flavors marry together. It’s a sensory bridge between the quiet of dawn and the energy of the day ahead.
Ingredients
- 2 shots of high-quality espresso
- 1 cup milk of choice (oat, almond, or dairy)
- 1 tablespoon flavored syrup (vanilla or salted caramel)
- Large ice cubes
- Cinnamon or cocoa powder for dusting
How to make it
- Start by brewing two fresh shots of espresso; let them sit for 30 seconds to develop the crema but don’t let them go cold.
- Fill a tall, aesthetic glass to the brim with large, clear ice cubes; smaller cubes melt too fast and dilute the richness of the brew.
- Pour your chosen milk over the ice, filling it about three-quarters of the way to leave room for the coffee and the foam.
- If you have a handheld frother, froth a small amount of milk with your syrup until it reaches a thick, velvety micro-foam consistency.
- Slowly pour the espresso over the back of a spoon onto the milk to create a beautiful layered ‘ombre’ effect that looks professional.
- Top with your prepared cold foam and a light dusting of cinnamon or cocoa for a fragrant finish that hits the nose before the first sip.
How to make rhubarb crumble?

Why we love this
Rhubarb crumble is the ultimate comfort food, offering a symphony of textures that dance between the crisp, buttery topping and the meltingly soft fruit beneath. We love the way the oats toast to a deep hazelnut brown, providing a nutty crunch that perfectly offsets the vibrant, zesty punch of the rhubarb. It’s best served warm, where the heat releases the fruit’s natural perfumes and allows a scoop of vanilla bean ice cream to pool into the crevices like a sweet sauce. It is pure, unadulterated cozy magic.
Ingredients
- 4 cups sliced rhubarb
- 1/2 cup sugar (for fruit)
- 1 cup rolled oats
- 1 cup all-purpose flour
- 1 cup brown sugar (packed)
- 1/2 cup cold butter (cubed)
- 1 teaspoon cinnamon
How to make it
- Preheat your oven to 375°F and lightly grease a ceramic baking dish to ensure the sugars don’t stick to the sides.
- Toss the rhubarb slices with the white sugar and a pinch of flour, then spread them in an even layer across the bottom of the dish.
- In a separate bowl, combine oats, flour, brown sugar, and cinnamon; use your fingers or a pastry cutter to rub the cold butter into the dry mix.
- Continue mixing until the topping resembles coarse crumbs with some pea-sized chunks of butter remaining; these chunks create the ‘crisp’ texture.
- Sprinkle the crumble topping generously over the rhubarb, pressing down very lightly so it adheres to the fruit during the bake.
- Bake for 35-40 minutes until the topping is golden brown and the rhubarb juice is bubbling up around the edges in thick, pink ribbons.
How to decorate graduation cookies?

Why we love this
Graduation cookies are tiny canvases of celebration, offering a personalized touch to any viral food board. We love the crisp snap of a sugar cookie paired with the smooth, matte finish of royal icing that allows for intricate, delicate detailing. There is something so satisfying about seeing a tray of mini-diplomas and tiny caps, each decorated with precision and care. They are the perfect ‘grab-and-go’ treat that carries a high visual impact, making them a favorite for both the eyes and the palate.
Ingredients
- Baked sugar cookies in graduation shapes
- Royal icing (stiff and flood consistency)
- Gel food coloring (school colors)
- Fine-tip piping bags
- Edible gold luster dust
- Scribe tool or toothpick
How to make it
- Outline your shapes using stiff-consistency icing, creating a ‘dam’ that will hold the thinner icing inside the borders of the cookie.
- Fill the center with ‘flood’ consistency icing, using a scribe tool to pop any air bubbles and to pull the icing into the corners for a seamless finish.
- Allow the base layer to dry completely—usually 6 to 8 hours—before adding secondary details like the year or a tassel.
- For the diploma ties, use a contrasting color to pipe a small bow, then use a tiny brush to apply gold luster dust once the icing has crusted.
- Add depth to graduation caps by piping a small square on top of the base circle, giving it a 3D effect that pops off the cookie.
- Let the finished cookies dry overnight in a cool, dry place to ensure the icing sets hard enough for stacking and display.
How to prepare lemon pesto?
Why we love this
Lemon pesto is a bright, sun-drenched twist on the classic Genovese sauce, bringing a zesty energy to the board that feels incredibly fresh. We love the way the aromatic basil leaves harmonize with the sharp, citrusy oils of the lemon zest, creating a sauce that is both herbaceous and electrifying. The creamy texture of pine nuts and parmesan provides a savory backbone that makes this pesto addictive. It smells like a Mediterranean summer and tastes like pure sunshine on a plate.
Ingredients
- 2 cups fresh basil leaves (packed)
- Zest and juice of 2 organic lemons
- 1/2 cup grated Parmesan cheese
- 1/3 cup toasted pine nuts
- 2 cloves garlic
- 1/2 cup high-quality extra virgin olive oil
- Salt and pepper to taste
How to make it
- Toast the pine nuts in a dry pan over medium heat for 2-3 minutes until they are fragrant and golden; this step is crucial for a deep, nutty flavor.
- Place the basil, garlic, toasted nuts, and lemon zest in a food processor; pulse several times until the ingredients are coarsely chopped but not pureed.
- Add the Parmesan cheese and lemon juice, then pulse again to incorporate, keeping a bit of texture in the greens.
- With the processor running on low, slowly drizzle in the olive oil in a thin stream; this emulsifies the sauce so it remains thick and vibrant.
- Season with salt and freshly cracked black pepper, tasting as you go to ensure the acidity of the lemon is perfectly balanced by the salt.
- Store in a glass jar with a thin layer of olive oil on top to prevent oxidation, keeping that bright green color viral-ready for days.
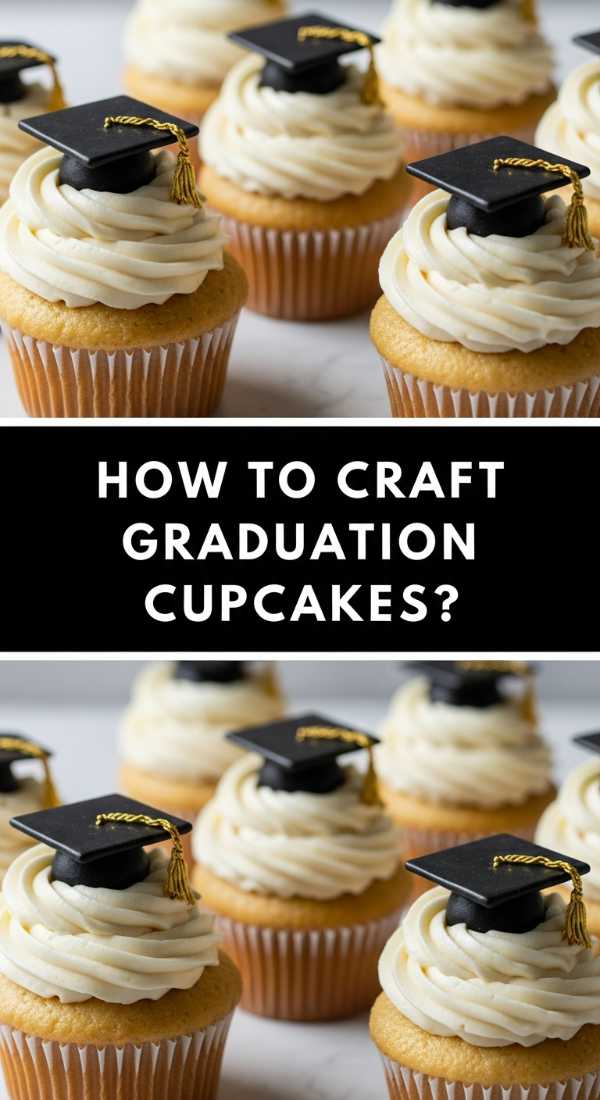
How to craft graduation cupcakes?

Why we love this
Graduation cupcakes offer a playful and versatile alternative to a traditional cake, allowing for a variety of flavors and designs within a single spread. We love the way a swirl of frosting can be transformed into a miniature masterpiece with the addition of a simple chocolate cap or a fondant tassel. They are easy to serve, making them perfect for outdoor parties where a cake knife might be hard to find. Plus, the sight of a dozen uniform, perfectly decorated cupcakes is an instant win for any lifestyle photo.
Ingredients
- Baked vanilla or chocolate cupcakes
- Firm buttercream frosting
- Ghirardelli chocolate squares
- Mini peanut butter cups
- Sour belt candy or fondant (for tassels)
- M&Ms or edible pearls
How to make it
- Frost each cupcake with a high, structured swirl of buttercream using a large round tip to create a stable base for the decorations.
- To make the ‘cap,’ unwrap a mini peanut butter cup and place it upside down on the center of the frosting swirl.
- Apply a small dot of melted chocolate to the top of the peanut butter cup and press a chocolate square firmly onto it, creating the mortarboard.
- Cut a thin strip of sour belt or roll a tiny piece of fondant to create the tassel, securing it from the center of the square to the side.
- Use a tiny dab of frosting to stick an M&M or an edible pearl in the center of the square to hide the tassel’s starting point.
- Chill the cupcakes for 15 minutes before serving to ensure the ‘caps’ are set firmly and won’t slide off in warmer temperatures.
How to cook rhubarb jam?

Why we love this
Making rhubarb jam is an exercise in patience and sensory delight, as the stiff, green-and-pink stalks transform into a translucent, glowing jewel-toned spread. We love the way the kitchen fills with a sweet-tart steam as the sugar breaks down the fruit’s fibers into a lush, spreadable consistency. It captures the essence of the season in a jar, allowing you to enjoy the fleeting brightness of rhubarb all year round. It’s the perfect companion for a morning scone or a sharp piece of cheddar on a charcuterie board.
Ingredients
- 6 cups chopped rhubarb (1/2 inch pieces)
- 4 cups granulated sugar
- 2 tablespoons lemon juice
- 1 teaspoon orange zest
- 1/2 teaspoon vanilla bean paste
How to make it
- Combine the chopped rhubarb and sugar in a large, heavy-bottomed pot and let it sit for at least 2 hours; the sugar will draw out the juices, creating a syrup naturally.
- Bring the mixture to a boil over medium-high heat, stirring constantly with a wooden spoon to prevent the sugar from scorching on the bottom.
- Add the lemon juice, orange zest, and vanilla bean paste once the mixture reaches a rolling boil, which helps set the pectin and adds complexity.
- Lower the heat to medium and simmer for 20-30 minutes, skimming off any foam that rises to the top to keep the jam clear and bright.
- Test for ‘set’ by placing a small spoonful on a chilled plate; if it wrinkles when you push it with your finger, it is ready.
- Ladle the hot jam into sterilized jars, leaving a quarter-inch of headspace, and process in a water bath or store in the fridge for immediate enjoyment.
How to plan toddler lunches?
[IMAGE_10]
Why we love this
Planning toddler lunches is about finding the joy in the small things—literally! We love the challenge of creating a balanced, nutritious plate that looks like a work of art, using shapes and colors to make healthy eating an adventure. The best toddler boards are a mix of familiar favorites and new textures, served in a way that encourages exploration without overwhelm. When a lunch looks this cute, it turns a midday meal into a moment of connection and fun that even the pickiest eaters can’t resist.
Ingredients
- Whole grain bread or wraps
- Assorted colorful fruits (berries, melon)
- Cucumber and bell pepper slices
- Cheese cubes or shapes
- Protein source (turkey rolls, hard-boiled eggs)
- Hummus or yogurt dip
How to make it
- Use metal cookie cutters to transform standard sandwiches and cheese slices into stars, hearts, or animals; this small step significantly increases ‘eat-ability.’
- Arrange the components in a bento-style box or on a small wooden board, keeping different textures separate to cater to toddler preferences.
- Include at least three different colors of produce to ensure a wide range of vitamins and to make the board visually stimulating.
- Cut grapes, cherry tomatoes, and sausages lengthwise into small, non-choking pieces to ensure safety while maintaining the aesthetic.
- Add a small ‘dip’ station in the center of the plate, as toddlers often find the interactive element of dipping fun and engaging.
- Finish with a small ‘surprise’ like a couple of chocolate chips or a single strawberry carved into a rose to make them feel special.
Wrapping Up Your Viral Board
Creating a viral-worthy food board is less about perfection and more about the passion you put into the details. Whether you’re simmering a batch of ruby-red rhubarb jam or meticulously styling a graduation cake, the key is to embrace the process and enjoy the sensory journey. These dishes are designed to be shared, photographed, and—most importantly—savored. Now, go grab your apron and start building your own masterpiece!
Frequently Asked Questions
How do I keep my rhubarb from getting too mushy in a pie?
The secret is in the prep! Tossing your rhubarb with cornstarch and sugar and letting it sit for a few minutes helps create a thick syrup that coats the fruit. Also, ensure your oven is hot enough (at least 400°F) to set the crust quickly before the fruit breaks down completely.
Can I make the lemon pesto without a food processor?
Absolutely! For a more rustic, ‘chopped’ texture, you can use a sharp knife to finely mince the basil and garlic, then whisk in the oil, cheese, and lemon juice. A mortar and pestle is also a traditional and excellent way to grind the ingredients into a paste.
What is the best way to store decorated graduation cookies?
Once the royal icing is completely dry (hard to the touch), store them in an airtight container at room temperature. Place a piece of parchment paper between layers to prevent any delicate details from catching or scratching.