

Have you ever walked into a room and felt an immediate sense of calm or a sudden spark of inspiration, only to realize it wasn’t the furniture but the very walls themselves calling to you? We often treat our walls as mere boundaries, but in the world of modern interior aesthetics, they are the largest canvases we own. A well-designed accent wall doesn’t just sit there; it breathes life into the architecture, acting as a focal point that anchors your style and tells a story about who you are.
Today, we are diving deep into the transformative power of vertical design. From the lush, oxygen-rich embrace of indoor greenery to the sleek, architectural precision of slatted wood, we are exploring how to turn those flat surfaces into masterpieces of texture and tone. Whether you are looking to create a high-end home cinema or a serene organic escape, these ten designs will show you how to curate a space that feels curated, lived-in, and utterly chic.
How to Design a Living Green Wall for Total Organic Serenity
Why we love this
Stepping into a room with a living green wall feels like taking a deep, restorative breath in the middle of an ancient forest. We love the way the damp, earthy aroma of the moss and ferns grounds the senses, while the vibrant explosion of emerald and chartreuse leaves provides a visual softness that hard surfaces simply cannot match. It creates a tactile, humid micro-climate that makes your living space feel alive, absorbing the city noise and replacing it with the quiet, pulsing energy of the natural world.
Essential Elements:
- Modular vertical planter system or felt pocket irrigation wall
- Mix of shade-loving plants: Pothos, Bird’s Nest Ferns, and Philodendrons
- Integrated drip irrigation system or moisture-wicking mats
- Grow lights (if natural light is insufficient)
- Waterproof backing membrane to protect your drywall
How to make it
- Begin by securing a moisture-resistant barrier, like a heavy-duty plastic liner or a PVC board, directly to your wall studs to prevent any humidity from reaching the structure.
- Install the framing system; if using a modular grid, ensure every bracket is leveled perfectly using a laser level, as even a slight tilt will cause the irrigation water to pool unevenly.
- Attach the planting containers or the felt layers, ensuring they are tightly fastened to hold the weight of wet soil and mature plants.
- Layer your plants starting from the bottom with the larger, trailing varieties like Monstera Adansonii, and work your way up with upright ferns and dense mosses for a seamless look.
- Set up the automated irrigation timer to run for short, 5-minute bursts twice a day, monitoring the drainage tray at the bottom for any overflows during the first week of installation.
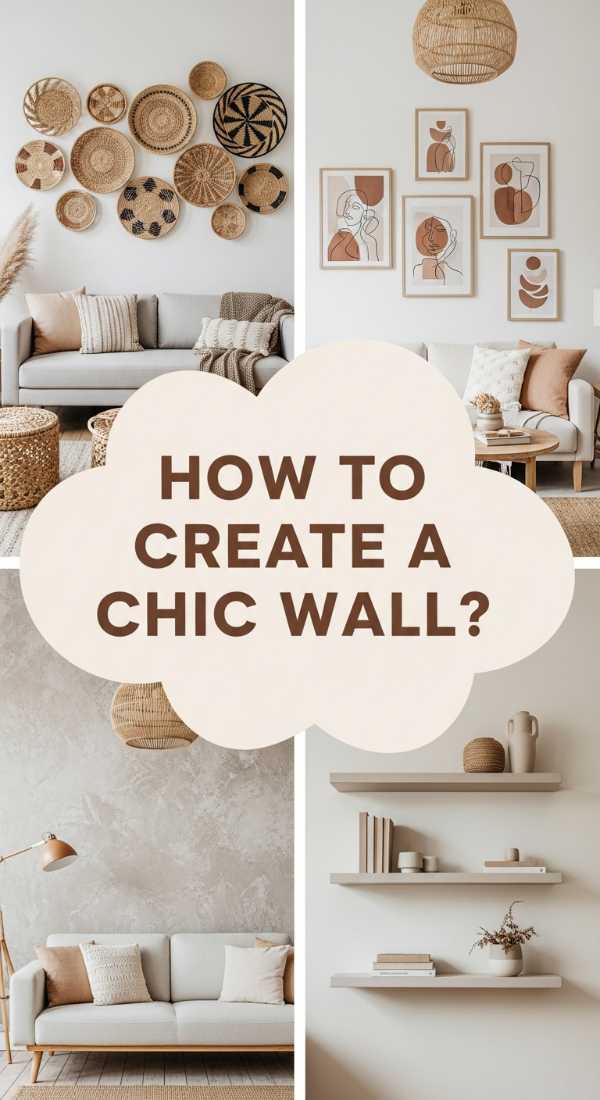
How to Create a Chic Living Room Wall for Effortless Style
Why we love this
This design is all about the subtle interplay of light and shadow, using neutral tones and sophisticated moldings to create a space that feels like a Parisian apartment. We love the velvet-smooth finish of matte paint paired with the crisp lines of picture frame molding, which catches the golden hour light and casts soft, elegant shadows across the room. It’s an aesthetic that feels expensive yet approachable, providing a backdrop that makes your favorite armchair or a simple ceramic vase look like a curated art piece.
Essential Elements:
- Pre-primed decorative wall molding or chair rails
- Matte or eggshell finish paint in a sophisticated neutral (e.g., Greige or Dusty Rose)
- High-quality wood glue and a finishing nail gun
- Caulk and wood filler for seamless joints
- A designer wall sconce for focused ambiance
How to make it
- Map out your wall dimensions on paper first, calculating the exact spacing for each “box” or frame to ensure the layout is symmetrical and leaves at least 4 inches of space from the ceiling and baseboards.
- Cut your molding pieces at 45-degree angles using a miter saw, ensuring the edges are sharp and clean for a professional, furniture-grade fit.
- Apply a thin bead of wood glue to the back of the molding and press it onto the wall, securing it with a pneumatic nailer while checking the level constantly.
- Fill the nail holes and the mitered corners with wood filler, then caulk the tiny gaps where the molding meets the wall to create the illusion that the trim is part of the wall itself.
- Apply two thin coats of your chosen paint over the entire wall and molding, using a high-density foam roller to avoid any brush marks and achieve a flawless, chic finish.
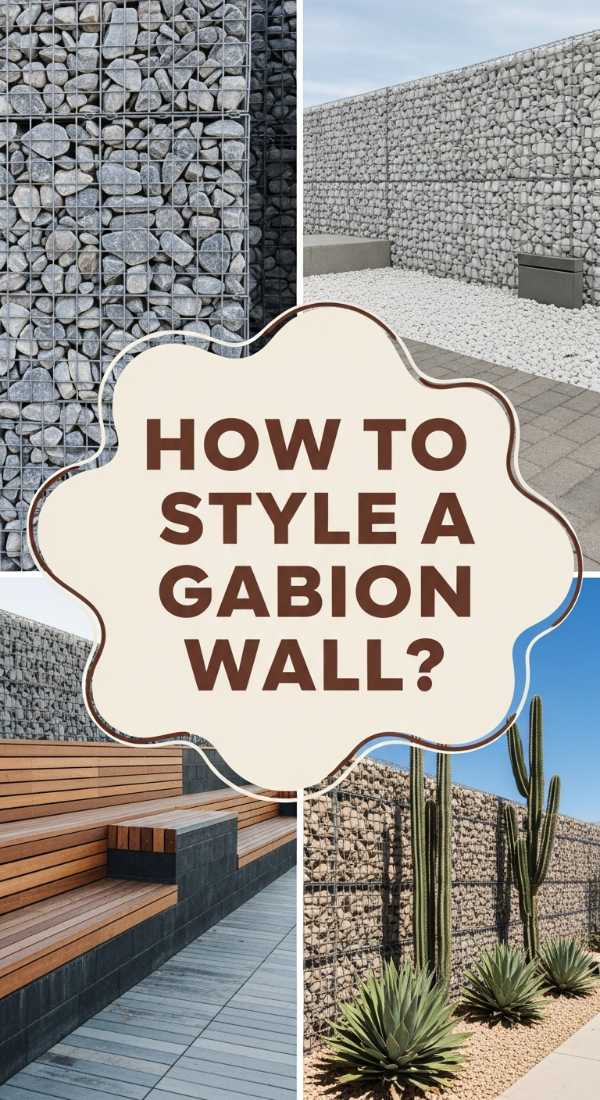
How to Style a Gabion Wall for an Industrial Garden Vibe

Why we love this
There is something incredibly powerful about the raw, unyielding texture of stone encased in steel. We love the gabion wall for its ability to bring a rugged, industrial edge into a garden or transitional living space, offering a tactile contrast to soft outdoor upholstery. The smell of sun-warmed granite and the visual weight of the rocks create a sense of permanence and strength, while the open wire cages keep the design feeling modern, airy, and grounded in the landscape.
Essential Elements:
- Galvanized steel wire mesh baskets
- Natural river stones, slate, or crushed limestone
- Spiral binders or heavy-duty C-rings for assembly
- A leveled gravel or concrete foundation
- Internal stiffeners to prevent bulging
How to make it
- Prepare the site by digging a shallow trench and filling it with compacted gravel to create a stable, level base that can support the immense weight of the stones.
- Assemble the wire mesh baskets on-site using the spiral binders, ensuring the corners are tightly locked and the structure is plumb.
- Install internal wire stiffeners every 12 inches of height; these act like ribs to prevent the weight of the rocks from bowing the steel outward over time.
- Hand-place the stones into the cage, putting the largest and flattest faces against the wire for a clean, masonry-like look, while filling the center with smaller rubble.
- Close the lid and secure it tightly with wire ties, then hose down the stones to remove dust and reveal the natural colors and crystalline textures of the rock.
How to Elevate your Modern TV Wall for the Ultimate Home Cinema
Why we love this
The modern TV wall is where technology meets high-end tailoring, turning a black screen into a cohesive design element. We love the seamless integration of hidden storage and recessed lighting that glows with a soft, cinematic amber hue, making every movie night feel like a premiere event. The smoothness of silk-finish cabinetry paired with the depth of a dark accent wall creates a sophisticated visual anchor that eliminates clutter and focuses the eye on the crisp, glowing images on the screen.
Essential Elements:
- Recessed TV mount for a flush-to-wall look
- Integrated LED backlighting strips (RGB or warm white)
- In-wall cable management channels
- Floating media console with a matte finish
- Acoustic wall panels in a charcoal or navy felt
How to make it
- Route all cables through an in-wall conduit system before finalizing the wall finish, ensuring power and HDMI outlets are positioned directly behind the TV’s mounting plate.
- Install the floating console at a height that allows for at least 10 inches of clearance from the floor to maintain an airy, modern aesthetic.
- Mount the LED strips into a recessed aluminum channel on the back of the TV or along the edges of the wall panels to ensure the light is diffused and doesn’t show individual “dots.”
- Affix the acoustic panels around the TV area using a heavy-duty spray adhesive, ensuring the seams are tight to maximize sound absorption and provide a high-end texture.
- Calibrate the TV’s brightness to match the ambient glow of the backlighting, creating a flicker-free, immersive viewing experience that is easy on the eyes.
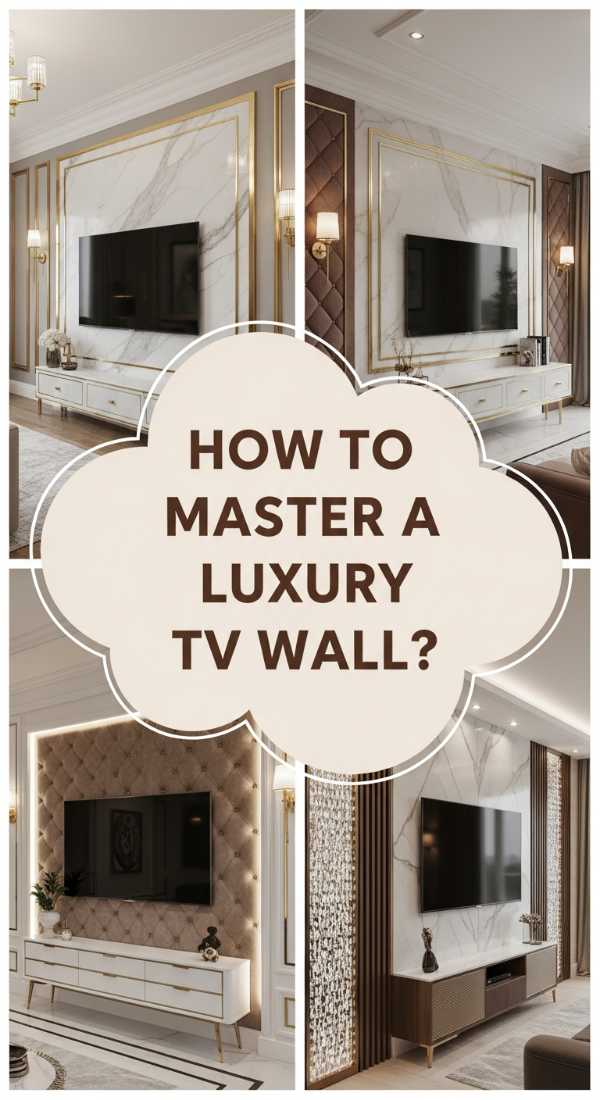
How to Master a Luxury TV Wall for High End Living

Why we love this
This design is the pinnacle of opulence, utilizing large-format porcelain slabs or book-matched marble to create a monolithic statement. We love the cold, smooth touch of the stone contrasted with the warmth of integrated wood accents, creating a sensory balance that screams luxury. The way the light reflects off the polished stone surface adds a shimmering, dynamic quality to the room, making the wall look like a piece of high-end jewelry for your home.
Essential Elements:
- Large format porcelain or marble slabs (6ft x 4ft minimum)
- Heavy-duty specialized wall adhesive
- Gold or brass metal inlay strips
- Custom-built wooden shelving with integrated spotlights
- Professional stone cutting and edge polishing
How to make it
- Reinforce the wall with extra plywood blocking between the studs to support the extreme weight of the stone slabs before you begin.
- Dry-fit your slabs on the floor to ensure the veining patterns flow naturally across the joins, numbering each piece for a foolproof installation.
- Apply a high-bond thin-set mortar using a notched trowel, back-buttering the slab as well to ensure 100% coverage and a permanent bond to the wall.
- Use a tile leveling system to ensure the transitions between slabs are perfectly flush, eliminating any “lippage” that could ruin the monolithic look.
- Finish the perimeter with thin brass inlay strips, tapping them into place with a rubber mallet for a refined, metallic edge that frames the luxury stone.
How to Personalize an Entrance Foyer Wall for a Grand Welcome
Why we love this
The foyer wall is your home’s first impression, and we love the way a personalized design instantly communicates warmth and personality. Imagine walking in to see a curated arrangement of textural wallpaper, a sleek console, and a mirror that reflects the light of your home. It’s about the scent of a signature candle resting on a marble surface and the visual rhythm of personal artifacts that tell guests they have arrived somewhere truly special.
Essential Elements:
- Textured grasscloth or metallic-flecked wallpaper
- Oversized statement mirror (round or organic shape)
- Slimline console table in wood or metal
- A collection of personalized objects: vintage keys, travel books, or family heirlooms
- Warm-toned spotlight or picture light
How to make it
- Apply the textured wallpaper starting from the center of the wall and working outward to ensure any patterns are perfectly centered behind the console.
- Secure the oversized mirror using heavy-duty wall anchors, positioning the center of the mirror at roughly 57 to 60 inches from the floor (eye level).
- Place the console table and style it using the “Rule of Three,” grouping objects of different heights—like a tall lamp, a medium vase, and a small stack of books.
- Install a wireless, rechargeable picture light above the mirror to create a soft, welcoming glow that highlights the textures of the wallpaper.
- Add a small bowl for keys and a signature home fragrance diffuser to engage the senses of everyone who crosses the threshold.
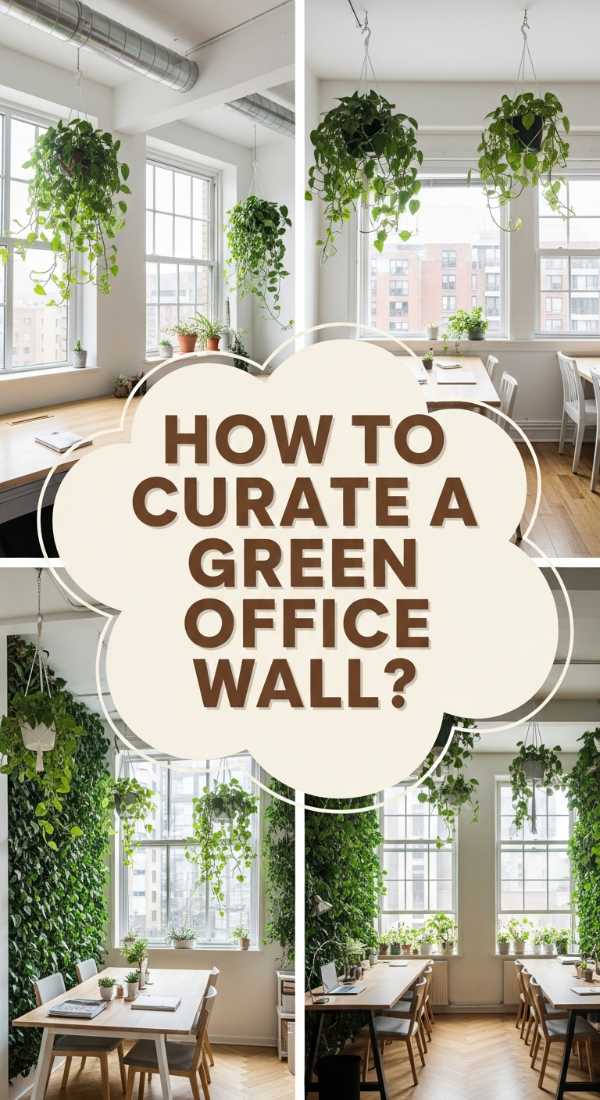
How to Curate a Working Green Wall for Daily Creative Energy
Why we love this
Bringing the “working green” concept into a home office is a total game-changer for focus and creativity. We love the way the fresh, peppery scent of indoor herbs like mint or rosemary mixes with the clean oxygen production of snake plants to keep the mind sharp. It’s a functional piece of art that provides a soothing visual break from digital screens, offering a lush, vertical landscape that makes your workspace feel like a thriving, creative greenhouse.
Essential Elements:
- Vertical hydroponic system or individual wall-mounted pots
- A mix of air-purifying and aromatic plants (Mint, Basil, Snake Plant, Ivy)
- Full-spectrum LED grow bars
- Self-watering reservoirs
- A chalkboard or corkboard section for brainstorming
How to make it
- Identify the wall closest to your desk and install a sturdy rail system that can support individual, modular planting pods.
- Choose a self-watering system where possible to minimize maintenance; fill the reservoirs with a nutrient-rich liquid fertilizer designed for indoor greens.
- Mount full-spectrum grow lights to the underside of a shelf above the wall, setting them on a timer for 8-12 hours a day to mimic natural sunlight.
- Integrate a small section of cork or magnetic metal to one side of the plants to pin up sketches, notes, and inspiration, merging nature with productivity.
- Prune the aromatic herbs weekly to encourage bushy growth and release their natural essential oils into your working environment.
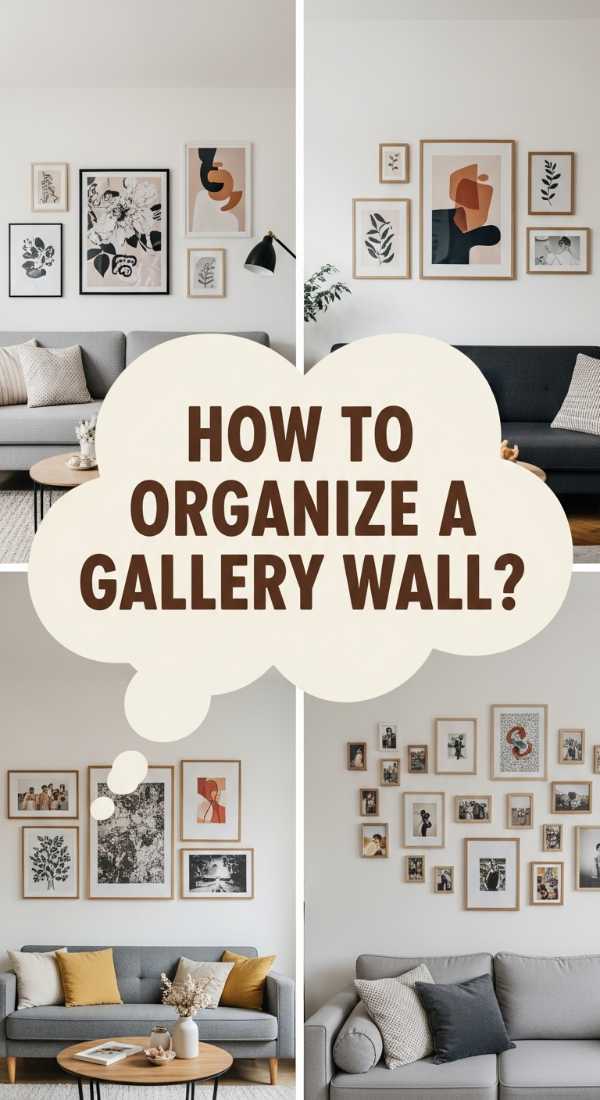
How to Organize a Living Room Gallery Wall for Artistic Flair

Why we love this
A gallery wall is a heartbeat of the home, a collected history of your life and tastes curated into a single visual explosion. We love the eclectic mix of gilded frames, raw wood, and minimalist black borders that hold everything from fine art to children’s sketches. The texture of the various papers and the sheen of the glass create a dynamic surface that feels deeply personal, warm, and perpetually evolving as you add more memories to the collection.
Essential Elements:
- A diverse collection of frames in various sizes and finishes
- Art prints, photographs, textiles, and 3D objects
- Painter’s tape and kraft paper for templating
- Assorted wall hooks and a spirit level
- Command strips for lightweight items
How to make it
- Trace every frame onto kraft paper and cut out the templates, taping them to the wall with painter’s tape to experiment with the arrangement without making holes.
- Start with your largest “anchor” piece slightly off-center and build the smaller items around it, keeping a consistent 2-to-3-inch gap between frames for a cohesive look.
- Use a spirit level on every template to ensure the lines are perfectly straight before you drive a single nail into the wall.
- Mix in a few non-framed items, like a small wall clock or a ceramic plate, to add three-dimensional depth and break up the hard rectangular lines.
- Once satisfied, replace each paper template with the actual frame, using two nails or Command strips on the bottom corners to keep the frames from shifting over time.
How to Build a Modern Slatted TV Wall for Architectural Sophistication

Why we love this
The slatted wood wall is the ultimate marriage of mid-century charm and contemporary precision. We love the rhythmic, vertical lines of warm oak or walnut that draw the eye upward, making ceilings feel higher and rooms feel more expansive. The smell of freshly cut wood and the way the slats catch the light—creating a series of deep, architectural shadows—adds a layer of sophistication that turns a plain TV area into a custom-built masterpiece.
Essential Elements:
- Solid wood or MDF slats (typically 1″ x 1″ or 1″ x 2″)
- Black felt or dark-painted backer board
- Construction adhesive (Liquid Nails) and a brad nailer
- Wood stain and clear polyurethane finish
- Spacers (usually 0.5″ to 0.75″)
How to make it
- Paint the target wall a deep, matte black; this creates the necessary contrast and depth behind the wood slats, making the shadows pop.
- Measure and cut your wood slats to the exact height of the wall, sanding the edges and applying your stain and finish before installation to avoid messy drips on the wall.
- Apply a bead of construction adhesive to the back of the first slat and place it on the far edge of the wall, using a level to ensure it is perfectly vertical.
- Use your spacers to set the distance for the next slat, securing it with the brad nailer through the side of the wood at an angle so the nail heads are hidden.
- Continue across the wall, checking the level every three slats to ensure the pattern hasn’t drifted, and trim the final slat to fit the remaining corner gap.
How to Accentuate an Entrance Foyer Wall for a Lasting Impression
[IMAGE_10]
Why we love this
This is about the “wow” factor—the bold, unapologetic design choice that leaves guests talking long after they’ve left. We love the drama of high-contrast colors, like a deep charcoal wall paired with oversized, brightly colored modern art. The feeling of luxury comes from the intentionality of the lighting and the scale of the pieces, creating a grand, museum-like entrance that signals your home is a place of bold style and confident living.
Essential Elements:
- Deep, saturated wall color (Navy, Charcoal, or Forest Green)
- Oversized canvas art or a sculptural wall installation
- Track lighting or adjustable ceiling gimbals
- A high-gloss or metallic accent piece (like a pedestal)
- A large-scale plant (like a Fiddle Leaf Fig) for height
How to make it
- Apply two coats of high-pigment paint in a flat finish to the accent wall to create a velvet-like backdrop that absorbs light and adds immense visual depth.
- Install adjustable ceiling spotlights and aim them at the center of the wall, creating a focused pool of light where your main art piece will hang.
- Hang your oversized art piece using a heavy-duty z-bar hanger to ensure it sits perfectly flush against the wall and can support the weight of a large frame.
- Place a tall, architectural plant in the corner to soften the transition between the accent wall and the adjacent surfaces, adding a burst of life.
- Keep the rest of the foyer minimal; by leaving the surrounding walls white or neutral, you ensure the entrance wall remains the undisputed star of the show.
Conclusion
Designing a wall is about more than just picking a color; it’s about creating a mood and an experience within your home. Whether you choose the living energy of a green wall or the architectural rhythm of wood slats, remember that the best designs are the ones that resonate with your personal style. Don’t be afraid to mix textures and play with light—your walls are waiting to be transformed.