

The Lazy Host’s Guide to the Viral Simple Food Board Trend
We’ve all been there: the group chat is buzzing, friends are coming over in an hour, and the sudden realization hits that you have absolutely nothing prepared. In the age of social media perfection, the pressure to host a five-course meal can feel overwhelming, but there’s a new trend taking over my kitchen—and my heart—that is changing the game. It’s the ‘Simple Food Board,’ a viral sensation that celebrates the beauty of abundance without the stress of formal plating.
Instead of individual plates and fussy garnishes, this trend focuses on one or two star elements laid out on a massive wooden board, surrounded by complementary dips, breads, or sweets. It’s communal, it’s gorgeous, and most importantly, it’s easy. It invites your guests to dig in, get their hands a little messy, and focus on the conversation rather than the etiquette. Whether you’re a seasoned pro or a total novice, this guide will show you how to master the staples that make these boards legendary.
HOW TO BAKE SOFT COOKIES?

Why we love this
There is nothing quite like the scent of browning butter and warm vanilla wafting through a home to signal that comfort is on the way. Imagine a cookie that yields effortlessly to your touch, with a delicate, golden-brown edge that offers just the slightest snap before giving way to a center so soft and chewy it almost melts on your tongue. The rich, salty-sweet balance of high-quality chocolate pools against a tender crumb, creating a sensory experience that feels like a warm hug on a rainy afternoon, perfect for piling high on a dessert board.
Ingredients
- 1 cup unsalted butter, softened
- 3/4 cup granulated sugar
- 3/4 cup packed brown sugar
- 2 large eggs
- 1 tsp vanilla extract
- 2 1/4 cups all-purpose flour
- 1 tsp baking soda
- 1/2 tsp salt
- 2 cups semi-sweet chocolate chips
How to make it
- Preheat your oven to 350°F (175°C). Ensure the oven rack is in the center position for even heat distribution.
- In a large bowl, cream together the softened butter, granulated sugar, and brown sugar until the mixture is light and fluffy. Use a stand mixer or hand mixer on medium speed for about 3 minutes to incorporate enough air.
- Add the eggs one at a time, beating well after each addition to ensure the fats and liquids are properly emulsified. Stir in the vanilla extract.
- In a separate bowl, whisk together the flour, baking soda, and salt. This step is crucial to prevent clumps of leavening agent in your cookies.
- Gradually add the dry ingredients to the wet ingredients. Mix on low speed just until the flour streaks disappear—overmixing at this stage will develop gluten and make the cookies tough.
- Fold in the chocolate chips by hand using a spatula.
- Scoop rounded tablespoons of dough onto ungreased baking sheets, spacing them 2 inches apart to allow for spreading.
- Bake for 9 to 11 minutes. The secret to softness is taking them out when the edges are just barely golden but the centers still look slightly underbaked and soft.
- Let the cookies cool on the baking sheet for 5 minutes before transferring them to a wire rack. This allows the centers to set without overcooking the bottoms.
HOW TO MAKE FLUFFY PANCAKES?

Why we love this
Waking up to the sight of a towering stack of pancakes is a universal love language. These aren’t just any pancakes; they are clouds of golden dough that act as the perfect sponge for amber maple syrup. When you cut into one, the interior is airy and light, releasing a gentle puff of steam that carries the aroma of buttermilk and toasted flour. The contrast between the slightly crisp, buttery exterior and the pillow-soft middle makes every bite feel like a luxurious breakfast treat that belongs at the center of a brunch board.
Ingredients
- 1 1/2 cups all-purpose flour
- 3 1/2 tsp baking powder
- 1 tsp salt
- 1 tbsp white sugar
- 1 1/4 cups milk
- 1 egg
- 3 tbsp butter, melted
How to make it
- In a large bowl, sift together the flour, baking powder, salt, and sugar. Sifting is the key to removing lumps and ensuring the pancakes rise evenly.
- Make a well in the center of the dry ingredients and pour in the milk, egg, and melted butter.
- Whisk the mixture until combined but still slightly lumpy. A few small lumps are your friend; they signify that the batter hasn’t been over-processed, which keeps the texture light.
- Heat a lightly oiled griddle or frying pan over medium-high heat. You can test the heat by dropping a tiny bit of water on the surface; if it sizzles and dances, it’s ready.
- Pour or scoop the batter onto the griddle, using approximately 1/4 cup for each pancake.
- Wait for bubbles to form on the surface of the pancake and for the edges to look dry and set. This usually takes 2-3 minutes.
- Flip the pancake carefully with a thin spatula. Brown the other side for another 1-2 minutes. The second side never browns as evenly as the first, which is perfectly normal.
- Serve immediately or keep warm in a low oven until the whole stack is ready for the board.
HOW TO BAKE GOOEY BROWNIES?

Why we love this
A truly gooey brownie is a masterpiece of texture—a deep, dark chocolate indulgence that blurs the line between a cake and a truffle. The top should be paper-thin and crackly, like a delicate sheet of ice, while the interior remains dense, moist, and intensely fudgy. As you bite through the crisp surface, your teeth sink into a rich, decadent middle that coats the mouth with the complex flavors of cocoa and butter, making it the ultimate anchor for a decadent dessert grazing board.
Ingredients
- 1/2 cup unsalted butter, melted
- 1 cup granulated sugar
- 2 large eggs
- 1 tsp vanilla extract
- 1/3 cup unsweetened cocoa powder
- 1/2 cup all-purpose flour
- 1/4 tsp salt
- 1/4 tsp baking powder
How to make it
- Preheat your oven to 350°F (175°C) and grease an 8-inch square baking pan with butter or line it with parchment paper for easy removal.
- In a medium bowl, combine the melted butter and sugar. Stir vigorously to ensure the sugar begins to dissolve into the fat, which helps create that signature shiny top.
- Whisk in the eggs and vanilla extract. Beat the mixture for about a minute until it looks slightly pale and well-combined.
- Sift the cocoa powder, flour, salt, and baking powder directly into the wet ingredients. Sifting cocoa is vital as it tends to clump.
- Fold the dry ingredients into the wet mixture using a rubber spatula. Stop as soon as no dry flour remains. Over-beating at this stage will incorporate too much air, leading to a cake-y texture rather than a gooey one.
- Spread the batter evenly into the prepared pan, smoothing the top with the back of a spoon.
- Bake for 20 to 25 minutes. To achieve the perfect gooey consistency, do not overbake. A toothpick inserted into the center should come out with a few moist crumbs attached, not clean.
- Allow the brownies to cool completely in the pan. This cooling period is essential for the structure to set so you can cut them into clean, dense squares.
HOW TO MAKE FOCACCIA BREAD?

Why we love this
Focaccia is the most tactile and rewarding bread to make, characterized by its deep dimples and a generous soaking of golden olive oil. The crust is incredibly crunchy and salty, providing a stunning contrast to the interior, which is honeycombed with air pockets and remains delightfully chewy. The fragrance of fresh rosemary and sea salt blooming in the oven creates an atmosphere of a Mediterranean kitchen, making this bread the perfect canvas for dipping into balsamic vinegar or stacking on a savory board.
Ingredients
- 2 cups warm water
- 2 tsp active dry yeast
- 1 tsp honey or sugar
- 4 cups all-purpose flour
- 2 tsp kosher salt
- 1/2 cup extra virgin olive oil
- Fresh rosemary and flaky sea salt for topping
How to make it
- In a large bowl, combine the warm water, yeast, and honey. Let it sit for about 5-10 minutes until it becomes foamy, indicating the yeast is active.
- Add the flour and kosher salt to the yeast mixture. Stir with a wooden spoon until a shaggy dough forms.
- Pour 2 tablespoons of olive oil over the dough, cover the bowl with a damp cloth, and let it rise in a warm spot for about 1.5 to 2 hours, or until it has doubled in size.
- Generously coat a 9×13 inch baking pan with olive oil. Transfer the dough to the pan and gently stretch it to the corners. If it shrinks back, let it rest for 10 minutes and try again.
- Cover the pan and let the dough rise again for 45 minutes until it is puffy and full of air bubbles.
- Preheat your oven to 425°F (220°C).
- The fun part: grease your fingers with olive oil and press them deep into the dough to create dimples all over the surface. Pour the remaining olive oil over the top, letting it pool in the holes.
- Sprinkle with fresh rosemary and flaky sea salt.
- Bake for 20-25 minutes until the top is deeply golden and the bottom is crisp. Remove from the pan and cool on a wire rack to maintain the crunchy crust.
HOW TO COOK BEEF STROGANOFF?
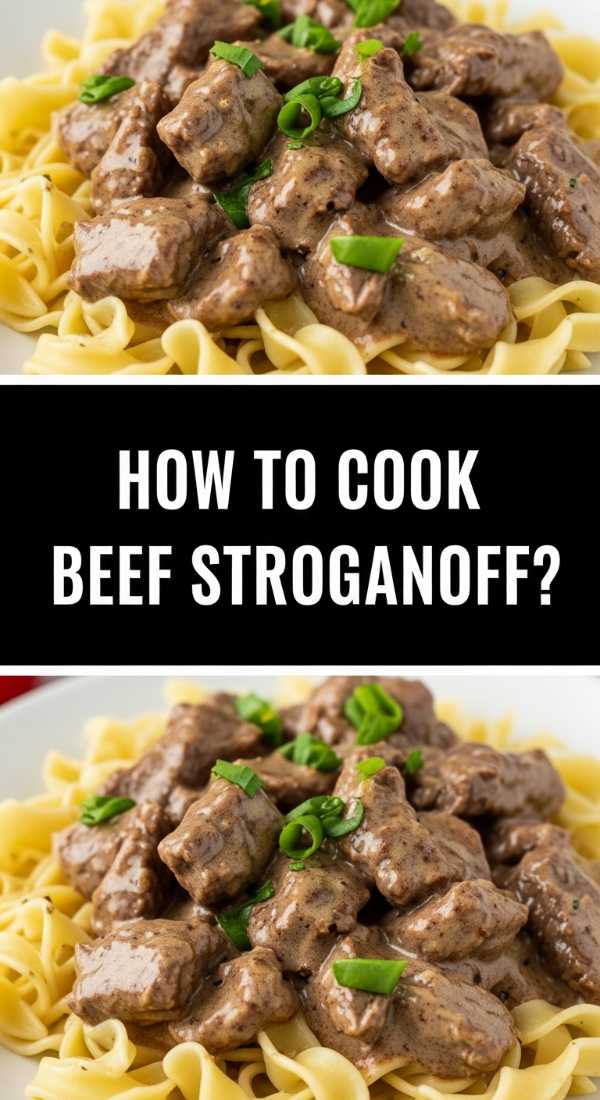
Why we love this
Beef Stroganoff is the epitome of cold-weather comfort, offering a rich and velvety sauce that clings beautifully to tender ribbons of egg noodles. The beef is seared to perfection, locking in juices while providing a savory depth that balances the tang of the sour cream and the earthiness of sautéed mushrooms. Every bite is a harmonious blend of textures—from the silky sauce to the meaty bite of the steak—evoking a sense of nostalgia and warmth that is ideal for a hearty, communal family-style board.
Ingredients
- 1 lb beef sirloin or ribeye, thinly sliced into strips
- 2 tbsp butter
- 1 small onion, diced
- 8 oz cremini mushrooms, sliced
- 1 cup beef broth
- 1 tbsp Dijon mustard
- 1 cup sour cream
- Salt and pepper to taste
- Fresh parsley for garnish
How to make it
- Season the beef strips generously with salt and pepper.
- In a large skillet over high heat, melt 1 tablespoon of butter. Sear the beef in batches to avoid crowding the pan, cooking just until browned on the outside (about 1 minute per side). Remove the beef and set aside; it will finish cooking later.
- Reduce the heat to medium and add the remaining butter. Sauté the diced onions until translucent, then add the mushrooms. Cook until the mushrooms have released their moisture and turned golden brown.
- Pour in the beef broth and whisk in the Dijon mustard. Bring the liquid to a simmer, scraping the bottom of the pan to release any browned bits (the fond), which contain concentrated flavor.
- Let the sauce simmer for about 5 minutes to reduce slightly.
- Turn the heat to low and stir in the sour cream. It is vital not to let the sauce boil after adding the sour cream, as it may curdle.
- Return the beef and its accumulated juices to the pan. Stir gently to coat the beef in the sauce and heat through for 1-2 minutes.
- Serve over a bed of buttery egg noodles, garnished with a handful of fresh chopped parsley for brightness.
HOW TO COOK CREAMY RISOTTO?
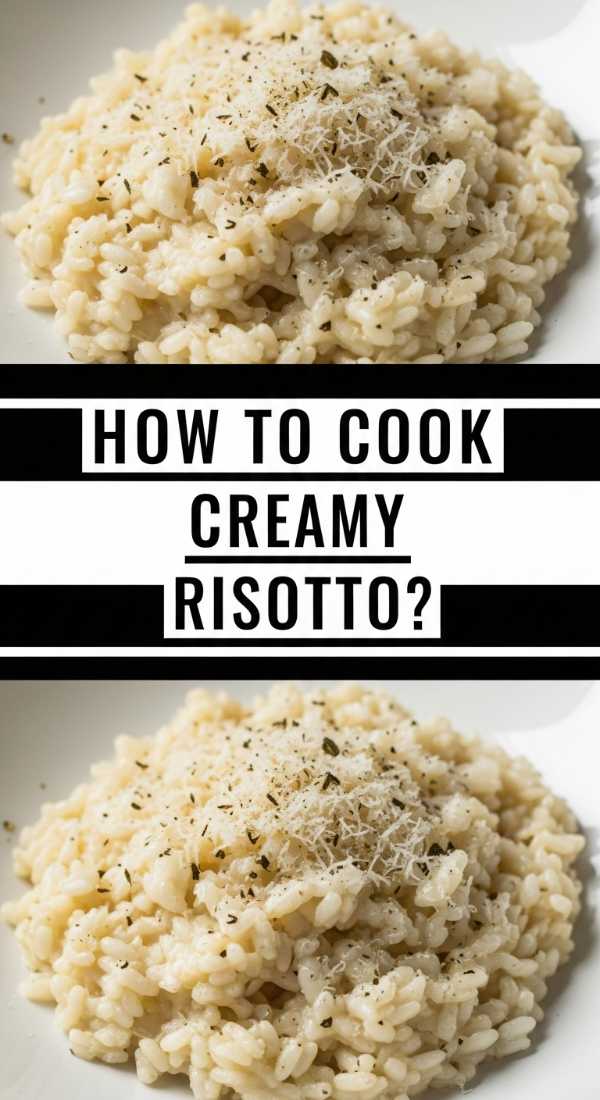
Why we love this
Risotto is the ultimate labor of love that rewards you with a texture unlike any other—a velvety, flowing consistency where every grain of rice is suspended in a luxurious, starchy sauce. As you stir, the aroma of dry white wine and simmering broth fills the kitchen, promising a dish that is deeply savory and incredibly comforting. The final addition of cold butter and sharp Parmesan creates a glossy finish that coats the palate in a richness that feels both sophisticated and rustic, perfect for a center-bowl on a sophisticated food board.
Ingredients
- 1.5 cups Arborio rice
- 5 cups chicken or vegetable broth, kept warm
- 1/2 cup dry white wine
- 2 tbsp olive oil
- 1 shallot, finely minced
- 2 tbsp unsalted butter
- 1/2 cup freshly grated Parmesan cheese
- Salt and pepper to taste
How to make it
- In a saucepan, bring the broth to a gentle simmer and keep it warm on low heat throughout the process. Adding cold broth to the rice will shock it and stop the cooking process.
- Heat the olive oil in a wide, heavy-bottomed pan over medium heat. Add the shallots and sauté until soft and translucent but not browned.
- Add the Arborio rice to the pan and stir for 2 minutes. You are “toasting” the rice here to seal the exterior and ensure the grains stay distinct rather than mushy.
- Pour in the white wine and stir constantly until the liquid is fully absorbed by the rice.
- Add one ladleful of warm broth to the rice. Stir frequently. Frequent stirring is the secret to risotto; it rubs the grains together to release the starch, which creates the creamy sauce.
- Wait until the liquid is almost completely absorbed before adding the next ladle of broth. Continue this process for about 18-22 minutes.
- Taste the rice periodically. It should be “al dente”—tender but with a slight bite in the center.
- Once the rice is cooked and the consistency is creamy but still slightly loose, remove the pan from the heat.
- Stir in the cold butter and Parmesan cheese vigorously. This final step, called “mantecatura,” gives the risotto its signature sheen and richness. Serve immediately.
HOW TO COOK CHICKEN CURRY?

Why we love this
A good chicken curry is a symphony of spices that awakens the senses, offering a complex heat that is mellowed by the sweetness of coconut milk or the richness of tomatoes. The chicken pieces become incredibly tender, soaking up the vibrant flavors of ginger, garlic, and turmeric until they practically fall apart. The sauce is thick and aromatic, begging to be scooped up with flatbread or rice, providing a deep, soul-satisfying warmth that makes it a standout feature for any international-themed food board.
Ingredients
- 1 lb chicken thighs, cut into bite-sized pieces
- 2 tbsp vegetable oil
- 1 large onion, finely chopped
- 3 cloves garlic, minced
- 1 tbsp fresh ginger, grated
- 2 tbsp curry powder
- 1 can (14 oz) crushed tomatoes
- 1 can (14 oz) coconut milk
- Salt and fresh cilantro for garnish
How to make it
- Heat the oil in a large pot or Dutch oven over medium heat. Add the chopped onions and cook until they are soft and starting to turn a golden brown (about 8-10 minutes).
- Stir in the minced garlic and grated ginger. Sauté for 1 minute until fragrant, being careful not to burn the garlic.
- Add the curry powder and stir for 30 seconds to toast the spices, which intensifies their flavor.
- Add the chicken pieces to the pot and stir to coat them thoroughly in the spice and onion mixture. Cook until the chicken is browned on all sides.
- Pour in the crushed tomatoes and coconut milk. Stir well to combine and scrape the bottom of the pot to incorporate all the flavors.
- Bring the mixture to a gentle boil, then reduce the heat to low. Cover the pot and simmer for 20-25 minutes.
- Remove the lid and continue to simmer for another 5-10 minutes if you prefer a thicker sauce. The chicken should be completely tender and the sauce should have a rich, uniform color.
- Season with salt to taste and garnish with a generous amount of fresh cilantro before serving alongside rice or naan.
HOW TO MAKE STEAMED DUMPLINGS?
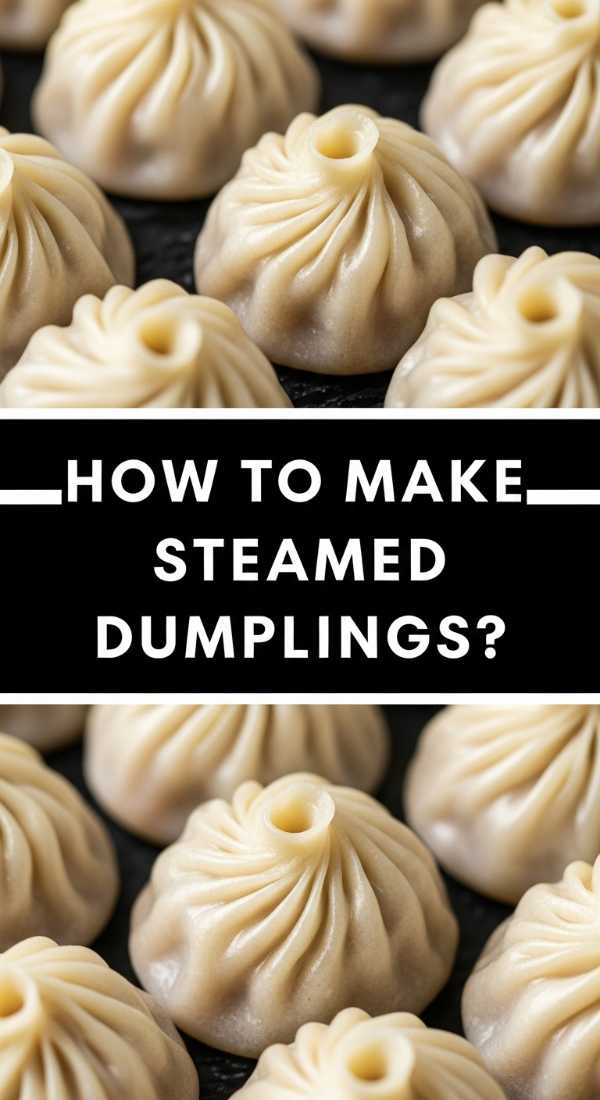
Why we love this
Steamed dumplings are like little parcels of joy, featuring a thin, elastic skin that holds a treasure trove of savory fillings. When prepared correctly, the wrapper is translucent and slightly chewy, giving way to a burst of flavorful juices and tender meat or vegetables inside. The gentle process of steaming preserves the integrity of the ingredients, creating a clean yet deeply satisfying bite that is elevated by a zesty dipping sauce, making them an irresistible addition to a communal Asian-inspired board.
Ingredients
- 1 pack round dumpling wrappers
- 1/2 lb ground pork or finely chopped mushrooms
- 1 cup shredded cabbage
- 2 green onions, finely sliced
- 1 tbsp soy sauce
- 1 tsp sesame oil
- 1 tsp grated ginger
How to make it
- In a medium bowl, combine the ground meat (or mushrooms), shredded cabbage, green onions, soy sauce, sesame oil, and grated ginger. Mix thoroughly with your hands or a fork until the mixture is cohesive.
- Prepare a small bowl of water to use for sealing the wrappers.
- Place one dumpling wrapper in the palm of your hand. Spoon about 1 tablespoon of the filling into the center of the wrapper. Do not overfill, or the dumpling will burst during cooking.
- Dip your finger in the water and run it along the edge of the wrapper.
- Fold the wrapper in half over the filling and pinch the edges together. You can create simple pleats by folding small sections of the front edge over itself before pressing it against the back edge.
- Line a bamboo steamer or a metal steamer basket with parchment paper or cabbage leaves to prevent sticking.
- Arrange the dumplings in the steamer, ensuring they are not touching each other.
- Place the steamer over a pot of boiling water. Cover and steam for 8-10 minutes until the wrappers are translucent and the filling is cooked through.
- Serve hot with a side of soy sauce mixed with a drop of chili oil.
HOW TO BAKE PERFECT CUPCAKES?

Why we love this
The perfect cupcake is a miniature work of art, boasting a tall, rounded dome and a crumb so light and airy it feels like biting into a sweetened cloud. The flavor should be a delicate balance of buttery richness and pure vanilla, providing a sturdy yet tender base for a swirl of silky frosting. These individual treats are the crowning glory of any party board, offering a customizable and portable dessert that looks as beautiful as it tastes, bringing out the child-like wonder in every guest.
Ingredients
- 1 1/2 cups all-purpose flour
- 1 cup sugar
- 1 1/2 tsp baking powder
- 1/2 tsp salt
- 1/2 cup unsalted butter, softened
- 1 large egg
- 1/2 cup whole milk
- 1 1/2 tsp vanilla extract
How to make it
- Preheat your oven to 350°F (175°C) and line a 12-cup muffin tin with paper liners.
- In a large bowl, whisk together the flour, sugar, baking powder, and salt until well combined.
- Add the softened butter, egg, milk, and vanilla extract to the dry ingredients.
- Beat the mixture on low speed until the dry ingredients are moistened, then increase the speed to medium and beat for 2 minutes. This aeration is what creates the fine, tender crumb.
- Fill each cupcake liner about two-thirds full. Avoid overfilling, as this will cause the batter to spill over and create flat tops rather than nice domes.
- Bake for 18-20 minutes. You can check for doneness by inserting a toothpick into the center; it should come out clean or with a few dry crumbs.
- Let the cupcakes cool in the tin for 5 minutes before moving them to a wire rack. Cooling them completely is essential before frosting, otherwise, the butter in the icing will melt.
- Once stone-cold, pipe your favorite buttercream frosting in a spiral starting from the outside edge and moving toward the center.
HOW TO MAKE BUTTERY NAAN?

Why we love this
There is a primal satisfaction in watching a piece of naan dough puff up over a hot flame, creating those characteristic charred bubbles that signal a perfect bake. The contrast between the crisp, smoky exterior and the soft, pillowy interior is a textural dream, especially when brushed with a generous layer of melted garlic butter. Each bite is infused with the tang of yogurt and the fragrance of fresh cilantro, making it the perfect vessel for scooping up rich sauces or simply enjoying on its own while still warm from the pan.
Ingredients
- 2 cups all-purpose flour
- 1/2 tsp salt
- 1 tsp sugar
- 1/2 tsp baking powder
- 1/4 cup plain Greek yogurt
- 2 tbsp vegetable oil
- 1/2 cup warm water
- Melted butter and garlic for brushing
How to make it
- In a large bowl, whisk together the flour, salt, sugar, and baking powder.
- Add the yogurt and vegetable oil. Gradually pour in the warm water while stirring until a soft dough forms.
- Knead the dough on a lightly floured surface for about 5 minutes until it becomes smooth and elastic. If it’s too sticky, add a tablespoon of flour at a time.
- Place the dough in a greased bowl, cover with a damp cloth, and let it rest for at least 30 minutes. This allows the gluten to relax, making the bread easier to roll out.
- Divide the dough into 6 equal portions and roll each into an oval shape about 1/8 inch thick.
- Heat a cast-iron skillet or heavy frying pan over high heat until it’s very hot. Do not add oil to the pan.
- Place one piece of dough in the hot pan. Cook for about 1 minute until bubbles form on the surface and the bottom has dark charred spots.
- Flip the naan and cook the other side for 30-60 seconds.
- Immediately after removing the naan from the pan, brush it with melted butter mixed with minced garlic. Keep the finished naan wrapped in a clean kitchen towel to stay soft while you cook the rest.
Conclusion
Hosting doesn’t have to be a chore defined by stress and rigid schedules. The viral food board trend reminds us that at the end of the day, food is about connection. By mastering these ten essential recipes, you’re not just preparing a meal; you’re creating an experience that encourages your loved ones to linger longer, talk louder, and enjoy the simple pleasures of a well-made dish. So grab your biggest wooden board, pick a recipe, and let the lazy hosting begin!