

The Ultimate Guide to Creating a Viral Snack Board with Zero Effort
We’ve all been there—the sun is setting, the laughter is flowing, and suddenly, everyone is hungry. There is something truly magical about a spread that looks like it took hours but actually came together in minutes. A viral snack board isn’t just food; it’s a centerpiece for memories, a colorful mosaic of flavors that invites everyone to lean in, pick their favorites, and share a moment together. It’s the visual equivalent of a warm hug on a plate.
The secret to a viral-worthy board isn’t fancy techniques or expensive ingredients; it’s about the soul of the food and the joy of the presentation. Whether you are hosting a backyard bash or a cozy movie night, these dishes bring that ‘wow’ factor without the stress. In this guide, I’m sharing my favorite recipes and tricks to make your next gathering absolutely unforgettable. Let’s dive into the flavors that will make your board the talk of the town!
How to make the classic Shoney’s strawberry pie recipe at home

Why we love this
This pie is pure nostalgia served on a plate, capturing the essence of an American summer with its glistening, ruby-red glaze and mounds of fresh, plump strawberries. When you slice into it, the aroma of sweet berries and buttery crust fills the air, promising a refreshing burst of flavor that isn’t overly heavy. The texture is a delightful contrast between the crisp, flaky pastry and the silky, cool strawberry gel that holds everything together in a perfect, wobbly embrace. It’s the kind of dessert that makes everyone stop talking and start smiling with every single bite.
Ingredients
- 1 pre-baked 9-inch pie crust
- 1 quart fresh strawberries, hulled and cleaned
- 1 cup granulated sugar
- 3 tablespoons cornstarch
- 1 cup water
- 1/2 cup strawberry-flavored gelatin powder
- Whipped cream for topping
How to make it
- Begin by preparing your fresh strawberries; ensure they are completely dry after washing so the glaze adheres perfectly. Arrange the whole berries, pointed ends up, in your pre-baked and cooled pie crust until the shell is densely packed.
- In a medium saucepan over medium heat, whisk together the sugar, cornstarch, and water. Stir constantly to prevent clumps from forming. Cook the mixture until it transitions from a cloudy appearance to a clear, thick consistency, which usually takes about 5-7 minutes.
- Once the mixture is thick and bubbling, remove it from the heat and immediately stir in the strawberry gelatin powder until it is fully dissolved and the liquid is a vibrant red.
- Let the glaze cool for about 10 minutes at room temperature, but do not let it set. Pour the slightly cooled glaze evenly over the strawberries, ensuring every nook and cranny is filled and the berries are completely coated.
- Place the pie in the refrigerator for at least 3-4 hours, or until the glaze is firm and chilled through. Serve with a generous dollop of whipped cream for that authentic diner-style finish.
How to cook the best Rotel dip recipe for your next party

Why we love this
There is a reason this dip has become a legendary party staple: it is the ultimate comfort food that brings people together around a single bowl. The velvety, molten cheese creates a luxurious base that carries the smoky heat of green chilies and the savory saltiness of browned meat. As you dip a crunchy tortilla chip into the warm, gooey mixture, the aroma of cumin and melted cheddar rises, making it impossible to stop at just one scoop. It’s rich, savory, and has that perfect spicy kick that keeps everyone coming back for more until the bowl is scraped clean.
Ingredients
- 1 lb ground beef or pork sausage
- 1 block (16 oz) Velveeta or processed cheese, cubed
- 1 can (10 oz) Rotel Original Diced Tomatoes and Green Chilies
- 1/2 teaspoon garlic powder
- 1/4 teaspoon cumin
- Fresh cilantro for garnish
How to make it
- Start by browning your ground beef or sausage in a large skillet over medium-high heat. Use a wooden spoon to break the meat into small, even crumbles, cooking until no pink remains and the meat has developed a deep, savory sear.
- Drain the excess fat from the skillet thoroughly; this is a critical step to ensure your dip is smooth and creamy rather than oily.
- Reduce the heat to low and add the cubed cheese to the skillet. Stir gently and frequently as the cheese begins to melt. Maintaining low heat prevents the cheese from scorching or becoming grainy.
- Pour in the can of Rotel (including the juices) and add the garlic powder and cumin. Continue to stir until the mixture is completely homogeneous, silky, and bubbling gently.
- Transfer the dip to a warm serving bowl or a small slow cooker set to the ‘warm’ setting to keep it liquid throughout the party. Garnish with fresh cilantro before serving with sturdy corn chips.
How to prepare the best beach snacks ideas for summer
Why we love this
Beach snacks need to be more than just food; they need to be a refreshing oasis in the middle of a hot, sandy day. These ideas focus on crisp textures and hydrating flavors that revitalize your body while you soak up the sun. Imagine biting into a chilled, salt-dusted cucumber or a sweet, juicy grape that has been kept at the perfect temperature in a cooler. The colors are bright and inviting, mirroring the tropical vibes of the shoreline, and the ease of eating them means you spend less time cleaning up and more time enjoying the waves.
Ingredients
- Fresh watermelon cubes
- Cucumber slices with Tajin seasoning
- Frozen grapes
- Individual hummus cups with baby carrots
- Beef jerky or protein sticks
- Pretzels or rice crackers
How to make it
- The key to great beach snacks is prep and temperature control. Start by slicing your watermelon into manageable cubes and placing them in airtight, leak-proof containers.
- For the cucumbers, slice them into thick rounds so they maintain their crunch. Store them in a separate container and pack a small tin of Tajin or sea salt to sprinkle on right before eating to prevent them from getting soggy.
- Freeze your grapes overnight on a baking sheet before transferring them to a zip-top bag. They act as edible ice cubes that stay cold for hours in your cooler.
- Portion out hummus into small, individual jars and tuck baby carrots or celery sticks directly into the jars for easy, one-handed snacking that keeps sand out of the main container.
- Pack all items into an insulated cooler bag with multiple ice packs, placing the heaviest items at the bottom and the delicate fruits on top. Always include a pack of wet wipes for easy hand cleaning.
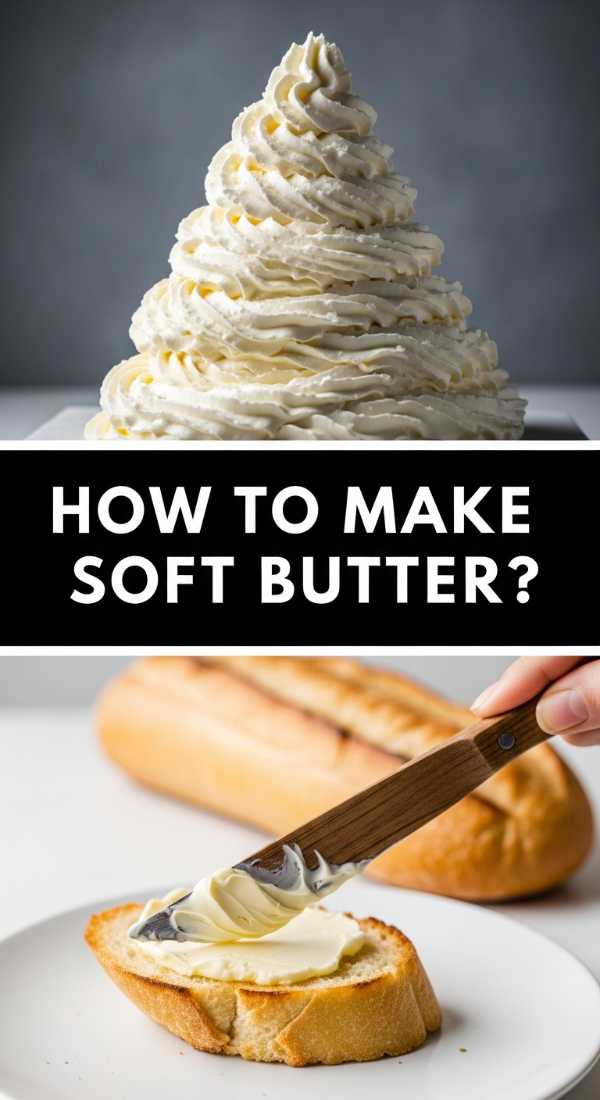
How to create a whipped butter squishy texture for bread

Why we love this
There is nothing quite like the ethereal, cloud-like texture of perfectly whipped butter spread across a warm piece of crusty bread. It transforms a simple pantry staple into a gourmet experience that feels incredibly indulgent and light. The aeration process changes the color to a pale, dreamy ivory and gives the butter a ‘squishy’ consistency that yields instantly to a knife. As it hits the warm bread, it melts into every crevice, carrying hints of sea salt and creaminess that dance on your tongue with a delicate, silky finish.
Ingredients
- 1 cup (2 sticks) high-quality unsalted butter, softened
- 1/4 teaspoon fine sea salt
- 1 tablespoon heavy cream (optional for extra fluff)
- Fresh herbs or honey for flavoring (optional)
How to make it
- Begin with butter that is perfectly room temperature; it should be soft enough that your finger leaves an indentation easily but not so warm that it is oily or melting.
- Place the butter and sea salt into the bowl of a stand mixer fitted with the whisk attachment. Start on a low speed to break the butter down, then gradually increase to high speed.
- Whisk the butter for at least 5 to 7 minutes. This long duration is necessary to incorporate enough air to achieve that signature squishy, voluminous texture. You will see the butter turn from yellow to a very pale white.
- If you want an even lighter consistency, add one tablespoon of heavy cream halfway through the whisking process. This helps emulsify the air and fats into a mousse-like state.
- Stop the mixer and scrape down the sides of the bowl occasionally to ensure every bit is whipped. Once it looks like stiff whipped cream, transfer it to a serving crock and serve immediately for the best texture.
How to prep pre made camping meals for your next trip

Why we love this
Camping meals are all about maximizing flavor while minimizing the stress of cooking in the great outdoors. These pre-made options allow you to enjoy the smoky aroma of a campfire without the hassle of chopping and prepping in the dirt. There is a rugged satisfaction in pulling a perfectly seasoned foil pack out of the embers, knowing that a hot, hearty meal is waiting inside. The combination of tender meats, caramelized vegetables, and melted butter creates a rustic feast that tastes better because it’s eaten under the stars, surrounded by the quiet sounds of the forest.
Ingredients
- Chicken breasts or smoked sausage, sliced
- Baby potatoes, halved
- Bell peppers and onions, sliced
- Olive oil and butter
- Seasoning blend (garlic powder, paprika, salt, pepper)
- Heavy-duty aluminum foil
How to make it
- Do all your chopping at home in a clean kitchen. Cut the proteins and vegetables into uniform sizes so they cook at the same rate over the uneven heat of a campfire.
- In a large bowl, toss the ingredients with olive oil and your seasoning blend until everything is heavily coated. The extra oil helps prevent sticking to the foil.
- Lay out two large sheets of heavy-duty aluminum foil. Place a portion of the mixture in the center and add a small pat of butter on top to create steam and richness during the cooking process.
- Fold the foil tightly, crimping the edges multiple times to create a leak-proof seal. This ‘hobo pack’ style ensures the juices stay inside to tenderize the meat.
- Store these packs in your cooler until ready to cook. When at the campsite, place the packs on a grate over hot coals (not direct flames) and cook for 20-25 minutes, flipping once, until the potatoes are fork-tender and the meat is fully cooked.
How to make a fresh tomato cucumber salad recipe

Why we love this
This salad is the definition of a garden-fresh delight, offering a vibrant crunch that cuts through the richness of any snack board. The combination of acidic, vine-ripened tomatoes and cool, crisp cucumbers creates a flavor profile that is both sharp and refreshing. Every bite is an explosion of juice and herb-infused oil, with the red onion adding a subtle bite that lingers pleasantly. It smells like a summer afternoon—herbal, bright, and earthy—and it looks like a jewel-toned masterpiece in the bowl, making it a visual and culinary highlight.
Ingredients
- 3 large heirloom tomatoes, chopped
- 2 English cucumbers, sliced into half-moons
- 1/2 red onion, thinly sliced
- 1/4 cup extra virgin olive oil
- 2 tablespoons red wine vinegar
- Fresh basil and parsley, chopped
- Salt and cracked black pepper to taste
How to make it
- In a large mixing bowl, combine the chopped tomatoes and cucumbers. If using standard cucumbers, consider peeling strips of the skin off to create a decorative pattern and removing the seeds if they are too large.
- Add the thinly sliced red onions. To mellow the onion flavor, you can soak the slices in cold water for 10 minutes before adding them to the salad.
- In a small jar, whisk together the olive oil, red wine vinegar, salt, and pepper until emulsified. Pour this dressing over the vegetables immediately.
- Gently toss the salad with the fresh herbs. The key to this salad is the ‘marinating’ phase; let it sit at room temperature for at least 15-20 minutes before serving.
- The salt will draw the juices out of the tomatoes, creating a delicious natural broth at the bottom of the bowl. Serve with a slotted spoon to keep the plate tidy, or with bread to soak up the juices.
How to cook perfect grilled veggies on the grill

Why we love this
Grilling vegetables transforms them from simple side dishes into charred, smoky stars of the show. The high heat of the grill caramelizes the natural sugars in peppers, zucchini, and asparagus, creating a complex sweetness that you just can’t get from steaming or roasting. There’s a sensory thrill in seeing those dark, professional-looking grill marks and smelling the savory smoke as it wafts through the air. The texture remains tender-crisp, providing a satisfying snap that pairs perfectly with a creamy dip or a piece of grilled bread.
Ingredients
- Zucchini and yellow squash, sliced lengthwise
- Asparagus spears, woody ends trimmed
- Bell peppers, cut into wide strips
- Portobello mushrooms
- Balsamic glaze and olive oil
- Kosher salt and garlic flakes
How to make it
- Preheat your grill to medium-high heat (about 400°F). A hot grill is essential for getting those deep sear marks without overcooking the inside of the vegetables.
- In a large tray, lay out all your prepared vegetables and drizzle generously with olive oil. Use your hands to ensure every surface is coated; this prevents sticking and encourages even browning.
- Season liberally with salt and garlic flakes. Place the denser vegetables like peppers and mushrooms on the grill first, as they take longer to soften.
- Grill the vegetables for about 3-5 minutes per side. Use long tongs to flip them only once to maintain the integrity of the grill marks. Look for the vegetables to become slightly translucent and charred on the edges.
- Remove from the grill and immediately drizzle with a balsamic glaze while they are still steaming. The heat will help the glaze thicken and adhere to the vegetables for a sweet and tangy finish.
How to cook easy summer meals for busy weeknights

Why we love this
Easy summer meals are all about celebrating the season without being tied to a hot stove for hours. These dishes focus on assembly and light cooking, resulting in plates that feel vibrant, healthy, and incredibly satisfying. The colors are always bright—pinks from shrimp, greens from avocado, and yellows from corn—creating a visual feast that matches the high energy of summer evenings. There is a relaxed, breezy feeling to serving a meal that comes together in 15 minutes, allowing you to spend those extra hours of daylight with your loved ones instead of the dishwasher.
Ingredients
- Pre-cooked rotisserie chicken or chilled shrimp
- Mixed salad greens or pre-made slaw mix
- Avocado and cherry tomatoes
- Store-bought pesto or vinaigrette
- Quick-cooking grains like couscous or quinoa
How to make it
- Utilize ‘speed ingredients’ to cut down your active time. Start by preparing a quick-cooking grain like couscous, which only requires boiling water and five minutes of sitting time.
- Shred a rotisserie chicken while it is still warm, or peel chilled shrimp. Mixing cold proteins with warm grains creates a pleasant temperature contrast that is perfect for summer.
- Toss your greens and chopped vegetables in a large bowl with half of your dressing. Using store-bought high-quality dressings is a major time-saver that doesn’t sacrifice flavor.
- Assemble the bowls by layering the grains at the bottom, followed by the dressed greens, the protein, and finally the fresh avocado slices.
- Top with a drizzle of pesto or a squeeze of fresh lime juice and a sprinkle of nuts or seeds for crunch. This method ensures a balanced meal with zero ‘heavy’ cooking.
How to make a homemade strawberry pie like Shoney’s

Why we love this
Making a Shoney’s-style pie from scratch is a labor of love that rewards you with the most incredible textures and flavors. The homemade crust provides a buttery, flaky foundation that store-bought versions simply can’t match, while the hand-cooked glaze has a clarity and depth of flavor that is truly artisanal. As the pie sets, it develops a beautiful, glassy sheen that looks like something out of a high-end bakery window. It is the ultimate showstopper for any snack board, providing a sweet, fruity anchor that balances out savory dips and salty crackers.
Ingredients
- 2 cups all-purpose flour (for the crust)
- 1 cup cold butter, cubed
- 1 teaspoon salt
- 6-8 tablespoons ice water
- 1.5 lbs fresh strawberries
- 1 cup sugar and 3 tbsp cornstarch (for glaze)
- Red food coloring (optional for that iconic look)
How to make it
- For the crust, pulse flour, salt, and cold butter in a food processor until it resembles coarse crumbs. Add ice water one tablespoon at a time until the dough just comes together.
- Roll the dough out on a floured surface, fit it into a pie plate, and ‘blind bake’ it by lining it with parchment paper and pie weights at 375°F for 15 minutes. Remove weights and bake for another 10 minutes until golden. Let it cool completely.
- Prepare the glaze by simmering water, sugar, and cornstarch. If you want that deep Shoney’s red, add two drops of red food coloring once the glaze is thick and clear.
- Sort your strawberries by size. Place the largest ones in the center of the pie crust and work your way out to the edges. This creates a beautiful dome shape that looks professional.
- Pour the warm glaze over the berries, starting from the center and letting it flow naturally to the edges. Refrigerate for at least 4 hours to ensure the crust stays crisp and the glaze sets firmly.
How to make the ultimate spicy Rotel dip
[IMAGE_10]
Why we love this
This ultimate version of the classic dip takes everything you love and cranks it up to eleven. By adding spicy chorizo and extra jalapeños, you create a complex heat that builds with every bite, balanced perfectly by the creamy, cooling cheese. The addition of the sausage adds a gritty, meaty texture and a smoky fat that weaves throughout the dip, making it feel like a full meal rather than just an appetizer. It’s bold, unapologetic, and has a rich, orange-red hue that signals exactly how much flavor is packed into every spoonful.
Ingredients
- 1 lb spicy Mexican chorizo
- 1 block (16 oz) pepper jack cheese, cubed
- 1 block (8 oz) cream cheese, softened
- 2 cans Rotel Diced Tomatoes with Habaneros
- 1 fresh jalapeño, minced (with seeds for extra heat)
- 1/4 cup heavy cream
How to make it
- Brown the spicy chorizo in a large pot over medium heat. Chorizo releases a lot of flavorful red oil; you may want to drain some, but leave about a tablespoon to flavor the cheese base.
- Add the cubed pepper jack and the softened cream cheese to the pot. The cream cheese is the ‘secret’ to making this version extra creamy and slightly tangy.
- Stir in the two cans of Habanero Rotel. Be sure to include the liquid, as the habanero juice provides the primary heat source for this ‘ultimate’ version.
- Add the minced fresh jalapeños and the heavy cream. The cream helps stabilize the pepper jack, which can sometimes be finicky when melting, ensuring a perfectly smooth dip.
- Keep the heat on ‘low-medium’ and stir constantly until the dip is a thick, bubbling lava of cheese and meat. Serve with thick-cut tortilla chips or even toasted baguette slices for a hearty snack.
Conclusion
Creating a viral snack board is about more than just the food; it’s about the atmosphere you create. By combining nostalgic favorites like the Shoney’s strawberry pie with spicy, modern classics like the ultimate Rotel dip, you provide a range of flavors that cater to every guest. Remember, the best boards are messy, full, and invited to be eaten! Don’t worry about perfection—focus on the freshness of your ingredients and the warmth of your hospitality. Happy snacking!