

There is something truly transformative about turning your outdoor space into a personal sanctuary where the world slows down and the air feels just a little bit sweeter. I remember the first time I sat on my back porch after a long week, coffee in hand, watching the sunrise filter through the trees; it was in that moment I realized our homes shouldn’t just be where we sleep, but where we truly live. Whether you have a sprawling backyard or a cozy balcony, creating an outdoor retreat is about crafting a narrative of comfort, beauty, and soul-soothing design.
We often think of home improvement as a chore, but when you shift your perspective to ‘lifestyle design,’ every project becomes a love letter to your future self. From the soft glow of a garden lantern to the functional charm of a handmade grill station, these touches turn a patch of grass into a destination. In this guide, I’m sharing my favorite ways to elevate your living experience—both outdoors and in—to help you build a dream retreat that feels like a permanent vacation.
How to Build a Custom Planter Light Post for a Magical Garden Entrance

Why we love this
This project is the ultimate marriage of function and fairytale charm. We love how the soft, warm glow of the lantern dances against the vibrant leaves of the plants below, creating a welcoming beacon that guides you home after dusk. The heavy wooden post offers a rustic, grounded feel, while the blooming flowers at the base provide a burst of seasonal color and a sweet, earthy aroma that greets you at the gate. It’s a sophisticated way to add height to your landscaping while ensuring your garden feels safe and enchanted all night long.
Essential Elements:
- Pressure-treated 4×4 wooden post
- Large wooden or ceramic planter (minimum 16 inches wide)
- Solar-powered or hardwired outdoor lantern
- Quick-setting concrete mix
- High-quality potting soil and seasonal flowers (like petunias or creeping jenny)
- Exterior-grade wood stain or paint
How to make it
- Begin by cutting your 4×4 post to your desired height, typically around 6 to 7 feet, and sand the surfaces until smooth. Apply two coats of exterior stain, allowing 24 hours to dry between coats to ensure the wood is fully sealed against moisture.
- Prepare your planter by ensuring it has drainage holes near the bottom but not directly in the center. Place a small piece of mesh over the holes to keep soil in.
- Place the post directly in the center of the empty planter. Mix your quick-setting concrete in a separate bucket according to the package instructions until it reaches the consistency of thick peanut butter.
- Pour the concrete into the planter around the post, filling it about halfway up. Use a level on two sides of the post to ensure it is perfectly vertical. Hold it in place for 5-10 minutes until the concrete sets firmly enough to stand on its own.
- Once the concrete is fully cured (usually 24 hours), drill a small hole through the top of the post to mount your light fixture. If using solar, simply screw the mounting bracket into the top; if hardwired, run the conduit up the back of the post.
- Fill the remainder of the planter with high-quality potting soil. Plant your ‘thriller’ (tall flowers), ‘filler’ (bushy greens), and ‘spiller’ (vines) around the post to hide the concrete base and create a lush, living foundation.
How to Style Spring Flowers Wallpaper for a Fresh Bedroom Glow

Why we love this
Bringing the outdoors in is a design philosophy we live by, and nothing achieves this more instantly than a botanical wallpaper. We love the way delicate floral patterns can soften a room, making a bedroom feel like a sun-drenched meadow even on a rainy Tuesday. The visual texture of petals and stems creates a rhythmic, calming atmosphere that encourages rest and rejuvenation. It’s like waking up in a perennial garden, where the scent of morning dew is replaced by the comforting aesthetic of a timeless, floral embrace.
Essential Elements:
- Removable or traditional floral wallpaper (botanical prints)
- Wallpaper smoothing tool and squeegee
- Utility knife with sharp replacement blades
- Wallpaper paste (if not peel-and-stick)
- Measuring tape and level
- Sponge and bucket of warm water
How to make it
- Start by prepping your walls: remove all outlet covers and use a damp sponge to wipe away any dust or oils. Fill any small holes with spackle and sand them flat, as any bumps will show through the wallpaper.
- Measure the height of your wall and add 2-4 inches for ‘bleed’ at the top and bottom. Cut your first strip of wallpaper according to these measurements, ensuring the pattern is oriented correctly.
- Use a level and a pencil to draw a faint vertical line on the wall where the first strip will go. This ‘plumb line’ is critical because walls are rarely perfectly straight, and this ensures your pattern doesn’t lean.
- If using peel-and-stick, peel back the top 6 inches of backing and align it with your plumb line. If using traditional paste, apply an even layer to the back of the paper or the wall as instructed by the manufacturer.
- Slowly press the paper onto the wall, working from the center outward with your smoothing tool to remove air bubbles. Be gentle but firm to avoid stretching the paper.
- When you reach the next strip, align the pattern carefully at eye level first. Overlap slightly if the manufacturer suggests it, then smooth it down. Use a sharp utility knife and a straight edge to trim the excess paper at the ceiling and baseboards for a professional, crisp finish.
How to Design a Low Retaining Wall for an Elegant Front Yard

Why we love this
There is a structural elegance that a stone wall brings to a home’s exterior that simply cannot be replicated by plants alone. We love how a low retaining wall defines the space, acting as a frame for your favorite blooms while adding a sense of permanence and ‘old-world’ charm to the landscape. The cool, grey tones of the stone against the lush green grass create a high-contrast, professional look that boosts curb appeal instantly. It transforms a sloped or messy yard into a tiered, organized masterpiece that feels intentional and grounded.
Essential Elements:
- Retaining wall blocks or natural fieldstone
- Leveling sand or crushed stone base
- Hand tamper or plate compactor
- Long level (4 feet or longer)
- Construction adhesive (for the top cap)
- Shovel and landscape fabric
How to make it
- Mark your path using a garden hose or spray paint to create a smooth curve or a sharp line. Dig a trench along this line that is about 6 inches deep and twice as wide as your blocks.
- Fill the trench with 3 inches of crushed stone or leveling sand. Use a hand tamper to pack this base down firmly; it must be rock-solid and perfectly level to prevent the wall from shifting over time.
- Lay your first row of blocks (the ‘base course’) into the trench. Use your level on every single block, checking both side-to-side and front-to-back. If a block is too high, tap it with a rubber mallet; if too low, add a pinch of sand beneath it.
- Lay down landscape fabric behind the first row of blocks to prevent soil from washing through the gaps. Fill the space behind the blocks with gravel to ensure proper drainage.
- Stack subsequent rows, staggering the vertical joints (like a brick pattern) for maximum strength. Most modern blocks have a lip on the back that automatically creates a slight ‘setback’ for stability.
- Once you reach the desired height, apply a bead of heavy-duty construction adhesive to the top of the last row and set your ‘capstones’ in place. This provides a finished, polished look and prevents the top layer from moving.
How to Create a Cute Campsite Setup for an Unforgettable Island Vacation

Why we love this
Camping doesn’t have to mean ‘roughing it’ in the traditional sense; we love the ‘glamping’ approach that turns a tent into a boutique hotel suite. Imagine the sound of waves crashing on the shore while you’re nestled into a bed of plush blankets and twinkling fairy lights. This setup is all about the sensory experience—the smell of salt air mixed with citronella candles, the soft texture of an outdoor rug under bare feet, and the visual delight of a curated, bohemian space in the middle of nature’s raw beauty.
Essential Elements:
- Large canvas bell tent or high-quality dome tent
- Battery-operated string lights or lanterns
- Weather-proof outdoor rug
- Inflatable mattress with high-thread-count linens and a thick duvet
- Folding wooden side tables and floor cushions
- Portable fire pit or camp stove
How to make it
- Choose a level spot on higher ground to avoid any potential water runoff if it rains. Clear the area of all sharp rocks, sticks, and pinecones that could puncture your tent floor.
- Lay down a heavy-duty ground tarp that is slightly smaller than the footprint of your tent to prevent moisture from seeping through. Pitch your tent, ensuring the stakes are driven deep into the sand or soil at a 45-degree angle.
- Define the ‘living room’ by placing a large, woven outdoor rug inside the tent or just outside the entrance. This creates an immediate sense of home and keeps sand from being tracked into your sleeping area.
- Set up your sleeping arrangement using a raised air mattress. Layer it with a fitted sheet, a warm comforter, and several decorative throw pillows. For island weather, choose breathable cotton or linen fabrics.
- Hang string lights along the interior ceiling of the tent and drape a few outside the entrance. Use warm-toned LEDs to create a soft, inviting glow that doesn’t attract as many bugs as bright white lights.
- Set up a small ‘kitchen’ area outside with a portable stove and a wooden crate used as a table. Add a few folding chairs or floor cushions around a central point to create a cozy nook for stargazing and evening conversation.
How to Organize a Pink Layout for the Perfect Aesthetic Workspace

Why we love this
A workspace should be a place that inspires creativity and joy, and we love the way a soft pink palette creates a sense of calm and focused energy. The ‘pink aesthetic’ isn’t just about color; it’s about a cohesive, curated environment that minimizes visual clutter and maximizes style. When your pens, notebooks, and tech accessories are all part of a beautiful, tonal story, sitting down to work feels less like a task and more like a moment of self-expression. It’s a blush-toned sanctuary for your big ideas.
Essential Elements:
- Desk in white or light wood
- Acrylic or pink-toned desk organizers
- Ergonomic chair in a dusty rose or blush fabric
- Rose gold or white tech accessories (mouse, keyboard, lamp)
- Pink stationery, washi tape, and planners
- Faux fur rug or velvet seat cushion
How to make it
- Start with a clean slate by clearing everything off your desk. Wipe down the surface and position your desk near a natural light source, which makes the pink tones pop without looking muddy.
- Select a primary ‘pink’ shade (e.g., blush, neon, or dusty rose) and two accent colors (like gold and white) to keep the look intentional and sophisticated rather than chaotic.
- Place your largest items first: your computer monitor or laptop stand and your desk lamp. Ensure these are positioned for ergonomics, with the top of the screen at eye level.
- Group small items using acrylic trays. Dedicate one tray to ‘daily essentials’ like your favorite pink pen and lip balm, and another for ‘creative tools’ like washi tape or stickers. This keeps the surface clear for actual work.
- Incorporate soft textures to balance the hard surfaces of the tech. A pink velvet chair or a small faux fur rug under the desk adds a tactile element that makes the space feel cozy and expensive.
- Finish the layout with a small botanical element, like a pink succulent or a single peony in a bud vase, and a mood board featuring prints or quotes in your chosen color scheme.
How to Construct a DIY Duck Enclosure for a Happy Backyard Farm
Why we love this
There is nothing more charming than the cheerful ‘quack’ of happy ducks wandering their own little estate. We love this project because it combines practical homesteading with whimsical design, creating a space that is safe, functional, and adorable to look at. A well-designed duck enclosure features clean lines, plenty of splashing room, and a sense of rustic cottage-core style. It’s about creating a habitat where your feathered friends can thrive, providing you with fresh eggs and endless entertainment in your own backyard.
Essential Elements:
- Pressure-treated lumber for the frame
- Hardware cloth (1/2 inch gauge) for predator protection
- Corrugated metal or asphalt shingles for the roof
- Pre-formed plastic pond or large heavy-duty tub
- Bedding (straw or pine shavings)
- Nontoxic exterior paint (sage green or barn red looks great)
How to make it
- Design your enclosure with at least 4-5 square feet per duck. Level the ground where the structure will sit. Build a rectangular frame using 2×4 lumber, ensuring you include a ‘house’ area for sleeping and an ‘open run’ for exercise.
- Secure hardware cloth to the entire exterior of the frame using heavy-duty staples. Do not use chicken wire, as predators can tear through it; hardware cloth is the only way to keep ducks truly safe. Bury the wire 6 inches into the ground to prevent digging predators.
- Construct a sloped roof over the sleeping quarters to allow for water runoff. Use corrugated metal panels for a vintage farm look, ensuring all edges are smoothed down to prevent injury.
- Install a sturdy door with a predator-proof latch (a two-step locking mechanism is best). Inside the sleeping area, build a slightly raised floor and cover it with a thick layer of pine shavings for insulation and comfort.
- Dig a hole in the run area to inset your plastic pond. It’s crucial to have a plan for cleaning; a drain plug or a nearby pump system makes the daily water changes much easier for you.
- Paint the exterior wood with a weather-resistant, nontoxic paint. Add a few ‘flower boxes’ to the outside of the enclosure filled with duck-safe herbs like marigolds or mint to keep the air fresh and the ducks happy.
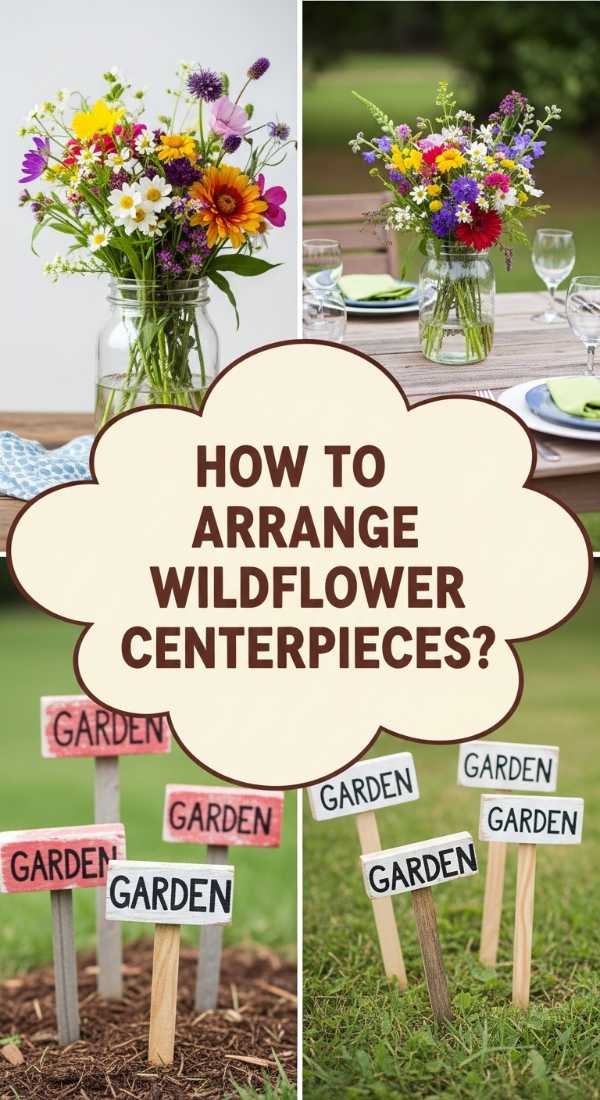
How to Arrange Wildflower Centerpieces for a Whimsical Outdoor Dinner
Why we love this
Wildflower arrangements capture the fleeting, untamed beauty of nature in a way that formal roses never can. We love the ‘just-picked’ look of a centerpiece that feels airy, organic, and slightly asymmetrical. It brings a sense of effortless elegance to an outdoor table, mirroring the surrounding landscape and making your guests feel relaxed and connected to the earth. The variety of textures—from delicate Queen Anne’s Lace to bold Zinnias—creates a visual feast that smells like a summer breeze and looks like a watercolor painting come to life.
Essential Elements:
- Assorted wildflowers (Cosmos, Cornflowers, Poppies, Daisies)
- Vintage glass bottles, mason jars, or ceramic pitchers
- Floral shears or sharp scissors
- Clear floral tape or chicken wire (for structural support)
- Fresh water and floral preservative
- Greenery for filler (Eucalyptus or Ferns)
How to make it
- Harvest your flowers in the early morning or late evening when the stems are most hydrated. Immediately place them in a bucket of cool water. Remove all leaves that will sit below the water line in your final vase to prevent bacterial growth.
- Prepare your vessel by creating a ‘grid’ across the top using thin strips of clear floral tape. This allows you to place stems at angles without them all flopping to one side, which is the key to that professional, airy look.
- Start with your ‘greenery’ or ‘filler.’ Place these stems around the edges and in the center to create a base structure. Think of this as the skeleton of your arrangement that defines the overall shape.
- Add your ‘thriller’ flowers—the biggest, boldest blooms. Place these at varying heights; some should be tucked low near the rim, while others should stand tall and proud. Avoid perfect symmetry for a more natural feel.
- Interspersed with ‘filler’ flowers (smaller blooms) to plug any holes. Finally, add your ‘floaters’—delicate, wispy stems like grasses or small daisies that stick out further than the rest, giving the arrangement movement and whimsy.
- Check the arrangement from all angles, as people will be sitting on all sides of the table. Keep the height low enough so guests can see each other across the table—typically no higher than 10-12 inches from the table surface.
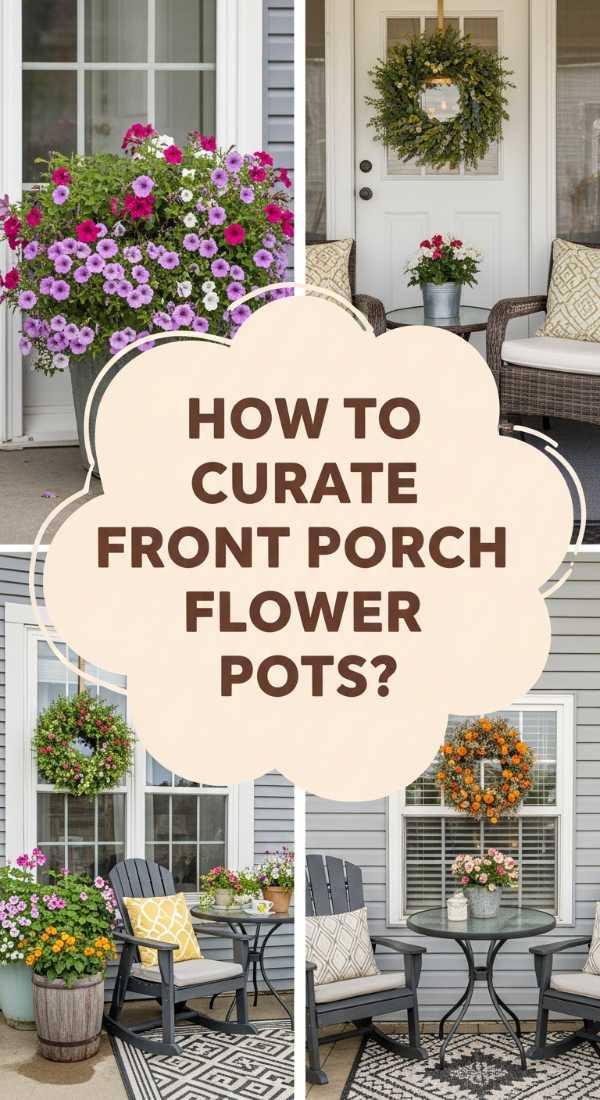
How to Curate Front Porch Flower Pots for a Charming Welcome

Why we love this
Your front porch is the ‘handshake’ of your home, and curated flower pots are the perfect way to make it a warm one. We love the way a well-balanced planter adds life and movement to an entryway, signaling that the home inside is just as cared for as the garden outside. By mixing heights, colors, and leaf textures, you create a mini-ecosystem that changes with the light. There is something deeply satisfying about coming home to a vibrant display of life that greets you before you even turn the key.
Essential Elements:
- Large, weather-resistant planters (varying sizes for grouping)
- High-quality potting mix with perlite
- Slow-release fertilizer
- ‘Thriller’ plants (e.g., Fountain Grass, Canna Lily)
- ‘Filler’ plants (e.g., Geraniums, Lantana)
- ‘Spiller’ plants (e.g., Sweet Potato Vine, Dichondra)
How to make it
- Choose a pair of planters that complement your home’s architecture. Ensure they have ample drainage holes. Fill the bottom third with empty plastic water bottles (lids on) to save on soil and keep the pots light enough to move if necessary.
- Fill the rest of the pot with high-quality potting soil, leaving about 2 inches of space at the top for watering. Mix in a handful of slow-release fertilizer granules to keep the plants fed throughout the season.
- Place your ‘thriller’ in the center (if the pot will be seen from all sides) or at the back (if it will sit against a wall). This should be your tallest, most dramatic plant to draw the eye upward.
- Surround the thriller with ‘fillers.’ These should be mounding plants with colorful flowers or interesting foliage that occupy the middle space and make the pot look full and lush.
- Plant your ‘spillers’ along the very edge of the pot. Aim to have at least three spilling points so that as the vines grow, they cascade over the sides, softening the edges of the container.
- Water the pots immediately until water runs out of the bottom. For a ‘pro’ look, group three pots of different sizes together in a cluster, using the same color palette across all three to create a cohesive, designed feel.
How to Assemble a DIY Grill Station for the Ultimate Summer Cookout
Why we love this
Grilling is an art form, and every artist needs a proper studio. We love a dedicated grill station because it turns the solitary act of cooking into a social event. Instead of running back and forth to the kitchen, you have everything—your tools, your prep space, and your cold drinks—right where the action is. The smell of charcoal and searing steak becomes the backdrop to laughter and conversation. A custom station made of wood and stone feels like a permanent outdoor kitchen, adding massive value to your lifestyle and your home.
Essential Elements:
- Cedar or redwood lumber (naturally rot-resistant)
- Stone or stainless steel countertop slab
- Heavy-duty locking casters (for portability)
- Outdoor-rated hooks for utensils
- Built-in bottle opener and towel rack
- Heat-resistant mat or tiles for the grill surface
How to make it
- Determine the height of your station; 36 inches is the standard comfortable counter height. Build a sturdy box frame using 4×4 posts for the legs and 2x4s for the horizontal supports. Use deck screws to prevent rusting.
- Add a middle and bottom shelf using 1×4 slats. Leave small gaps between the slats (about 1/4 inch) to allow rainwater to drain through and to provide ventilation for any charcoal bags stored below.
- Install heavy-duty locking casters on the bottom of the legs. This allows you to roll the station into the garage for winter or move it to follow the shade during a hot afternoon party.
- For the countertop, use a piece of pre-cut granite, large porcelain tiles, or a stainless steel sheet. If using wood, ensure it is treated with a food-safe outdoor sealer. Ensure the surface is level and securely attached to the frame.
- Attach a row of sturdy hooks to the front or side for your tongs, spatulas, and grill brushes. Mount a heavy-duty bottle opener on one of the legs—this is the small detail that guests always appreciate.
- Place a heat-resistant silicone or stone mat where the grill will sit if it’s a tabletop model. If it’s a standalone grill, build the station as a ‘sideboard’ that sits flush against the grill to provide extra prep space and a place to set serving platters.
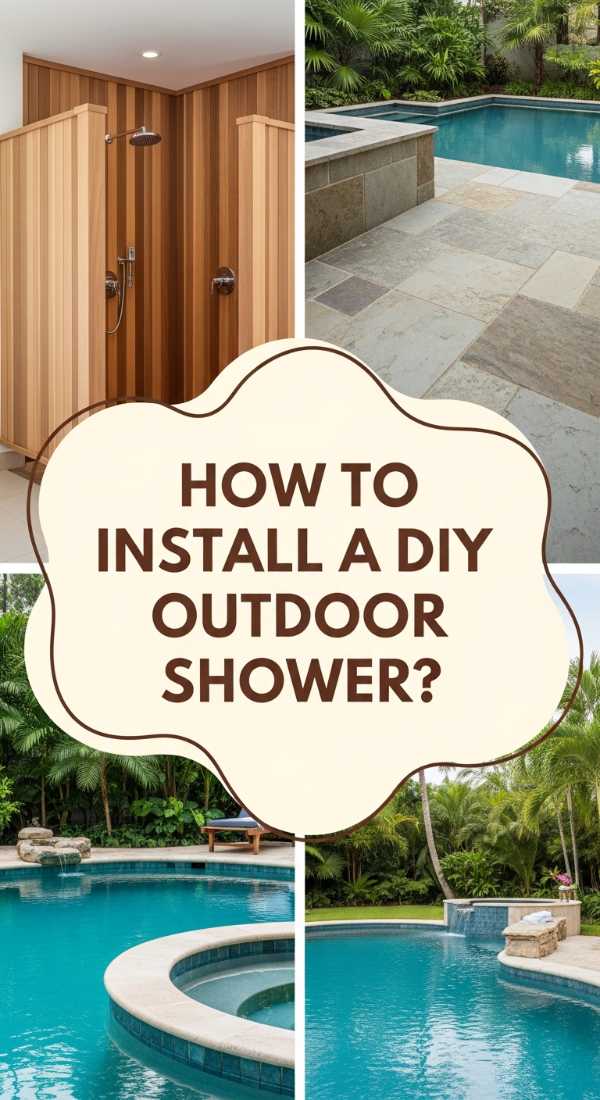
How to Install a DIY Outdoor Shower for a Luxurious Poolside Experience
[IMAGE_10]
Why we love this
There is no luxury quite like an outdoor shower. We love the way it evokes the feeling of a high-end tropical resort right in your own backyard. Whether it’s rinsing off after a dip in the pool or simply enjoying a cool shower under the summer sun, it’s a sensory delight that connects you with nature. The sound of water splashing against cedar slats, the scent of outdoor-friendly eucalyptus soap, and the feeling of a breeze on your skin make it a functional piece of art that elevates your daily routine into a ritual.
Essential Elements:
- Outdoor shower kit (faucet and rain shower head)
- Cedar or Teak wood planks for the privacy screen
- Pressure-treated 4×4 posts
- River rocks or a slatted wood drainage floor
- Standard garden hose adapter or PEX piping
- Heavy-duty outdoor hooks for towels
How to make it
- Choose a location with good natural drainage and access to a water source. If you’re near the house, you can tap into the outdoor spigot; if further away, run a dedicated PEX line underground.
- Dig a shallow pit (about 4 inches deep) for the shower base. Fill it with a layer of gravel and top it with smooth river rocks or a pre-made cedar shower deck. This allows water to filter back into the ground without creating mud.
- Set two or three 4×4 posts into the ground using concrete. These will support your privacy screen. Attach horizontal cedar planks to the posts, leaving small 1/2-inch gaps for airflow while maintaining privacy.
- Mount your shower fixture to the center post. For a simple DIY, use an outdoor shower kit that connects directly to a garden hose. For hot water, you can use a dual-hose mixer or a portable propane water heater.
- Install a sturdy soap dish and several large hooks for towels and robes. Ensure the wood is sealed with a high-quality waterproofer to prevent rot and graying over time.
- Add a few potted tropical plants like palms or hibiscus around the base to enhance the ‘resort’ vibe and provide additional natural screening. Test the water pressure and enjoy your new sanctuary!
Creating Your Forever Sanctuary
Designing your dream outdoor retreat isn’t about doing everything at once; it’s about the journey of making your space reflect the life you want to lead. Each of these projects adds a layer of comfort, beauty, and personality to your home. Whether you start with a simple wildflower arrangement or go all-in on an outdoor shower, you’re investing in your own happiness and creating a backdrop for memories that will last a lifetime. So grab your tools, get your hands in the dirt, and start building the sanctuary you deserve.