

The Ultimate Viral Food Board You Can Make in 5 Minutes
There is something truly magical about the way food brings us together, especially during those golden transition months where graduation caps are flying and the garden is bursting with the tart, ruby-red promise of rhubarb. I remember my first big summer party; I was so stressed about every detail being perfect that I almost forgot to enjoy the laughter ringing out on the patio. That is when I discovered the power of the ‘Viral Food Board’—a curated, effortless way to display home-baked treats and seasonal delights that looks like a million bucks but feels like a warm hug.
In this guide, we are diving deep into the art of the celebration board, blending the nostalgia of graduation season with the zesty, fresh flavors of early summer. Whether you are honoring a scholar or just celebrating a sunny Saturday, these tips will help you create a spread that is as beautiful to look at as it is delicious to eat. Let’s get into the kitchen and start making some memories!
How to bake graduation cakes?

Why we love this
There is nothing quite like the scent of a classic vanilla-bean sponge wafting through the house to signal a major life milestone. When you slice into a perfectly baked graduation cake, you want to feel that cloud-like crumb against your fork and see the flecks of real vanilla bean dancing in the light. It is a sensory experience that combines the richness of high-quality butter with the delicate sweetness of celebration, creating a nostalgic flavor profile that appeals to guests of all ages.
Ingredients
- 2 1/2 cups all-purpose flour
- 1 1/2 cups granulated sugar
- 1 cup unsalted butter, softened
- 4 large eggs, room temperature
- 1 cup whole milk
- 1 tbsp vanilla bean paste
- 2 tsp baking powder
- 1/2 tsp salt
How to make it
- Preheat your oven to 350°F (175°C) and grease two 8-inch round cake pans, lining the bottoms with parchment paper to ensure an easy release.
- In a large mixing bowl, cream the softened butter and granulated sugar together using a stand mixer with a paddle attachment on medium-high speed for about 5 minutes until the mixture is pale, light, and fluffy.
- Add eggs one at a time, beating well after each addition and scraping down the sides of the bowl to ensure a uniform emulsion.
- In a separate bowl, sift together the flour, baking powder, and salt.
- Gradually add the dry ingredients to the butter mixture in three parts, alternating with the milk and vanilla bean paste, starting and ending with the dry ingredients; mix on low speed just until combined—be careful not to overmix, which can lead to a tough cake.
- Divide the batter evenly between the prepared pans and smooth the tops with an offset spatula.
- Bake for 30-35 minutes or until a wooden skewer inserted into the center comes out clean and the edges are slightly golden brown and pulling away from the sides.
- Cool in the pans for 10 minutes before transferring to a wire rack to cool completely before decorating.
How to cook rhubarb jam?
Why we love this
Rhubarb jam is like summer sunshine captured in a jar, offering a sophisticated balance of sharp acidity and floral sweetness. As it simmers on the stove, the rhubarb stalks break down into a glossy, jewel-toned compote that smells vaguely of strawberries and wild roses. The texture is thick and spreadable, with just enough fruit structure left to provide a satisfying bite against a piece of crusty bread or a buttery scone, making it a vibrant addition to any brunch board.
Ingredients
- 4 cups fresh rhubarb, chopped into 1/2 inch pieces
- 1 1/2 cups granulated sugar
- 1 tbsp lemon juice
- 1 tsp lemon zest
- 1/4 tsp ground ginger
How to make it
- Combine the chopped rhubarb and granulated sugar in a heavy-bottomed stainless steel pot, stirring well to coat the fruit.
- Let the mixture sit for about 30 minutes at room temperature; this maceration process draws out the natural juices and helps the sugar dissolve.
- Place the pot over medium-high heat and bring the mixture to a rolling boil, stirring frequently with a wooden spoon to prevent the bottom from scorching.
- Add the lemon juice, lemon zest, and ground ginger, then reduce the heat to medium-low to maintain a steady simmer.
- Cook for 15-20 minutes, stirring often, until the rhubarb has completely broken down and the liquid has thickened into a syrupy consistency.
- To test for doneness, place a small spoonful of jam on a chilled plate and let it sit for a minute; if it wrinkles when pushed with your finger, it has reached the setting point (approximately 220°F or 105°C).
- Remove from heat, skim off any foam from the surface, and ladle into sterilized jars, leaving 1/4 inch of headspace before sealing.
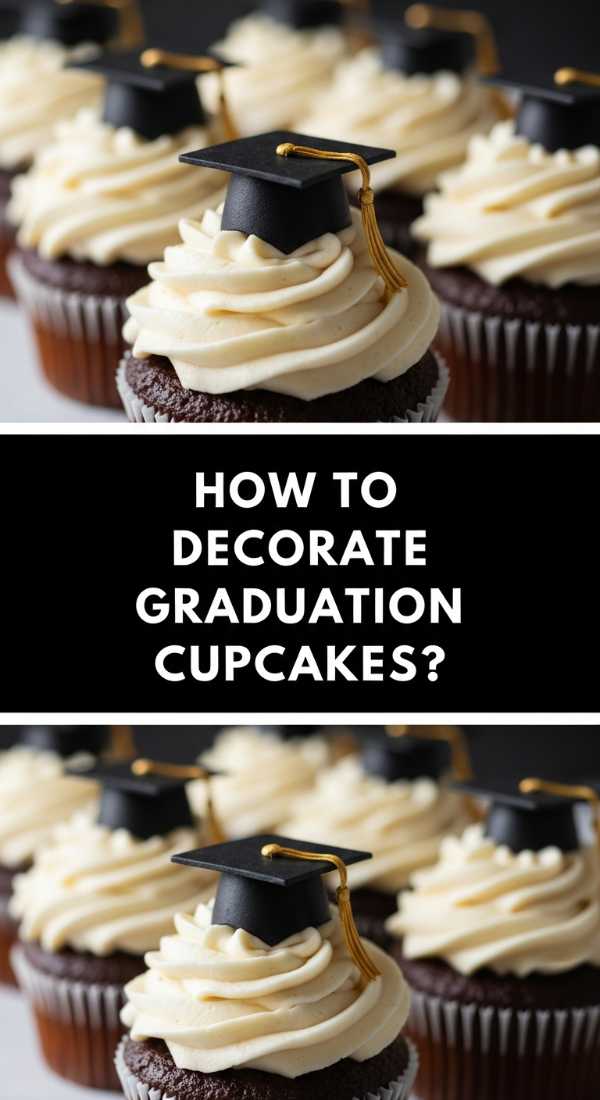
How to decorate graduation cupcakes?

Why we love this
Graduation cupcakes are the ultimate crowd-pleaser, offering a tiny, portable canvas for creativity and school spirit. There is a tactile joy in seeing a perfectly piped swirl of buttercream topped with a miniature chocolate mortarboard or a dusting of glittery sprinkles. The contrast between the soft, moist cake and the rich, velvety frosting provides a decadent mouthfeel that makes every bite feel like a celebration of hard work and new beginnings.
Ingredients
- Baked cupcakes
- Vanilla buttercream frosting
- Chocolate squares (Ghirardelli)
- Miniature peanut butter cups
- Sour belt candy or fruit leather
- Edible gold pearls
How to make it
- Fill a piping bag fitted with a large star tip (like a Wilton 1M) with your vanilla buttercream frosting, ensuring there are no air bubbles in the bag.
- Hold the bag vertically over the center of the cupcake and pipe a swirl starting from the outside edge moving inward and upward to create a tall, professional peak.
- To create the mortarboards, place a miniature peanut butter cup upside down on top of the frosting swirl to act as the base.
- Apply a small dot of frosting to the bottom of a chocolate square and press it firmly onto the peanut butter cup.
- Cut a thin strip of sour belt candy or fruit leather to act as the tassel, and use a tiny dab of frosting to adhere it to the center of the chocolate square.
- Finish by placing an edible gold pearl in the center of the “cap” to cover the tassel attachment point, giving it a polished, high-end look.
How to bake rhubarb pie?

Why we love this
A rhubarb pie is a masterpiece of rustic elegance, characterized by its flaky, golden-brown crust and a filling that strikes a perfect chord between tart and sweet. When you pull it from the oven, the bubbling pink juices break through the lattice crust, filling the kitchen with an aroma that is earthy, fruity, and utterly irresistible. The contrast of the crisp, buttery pastry against the tender, molten fruit creates a symphony of textures that is best enjoyed with a melting scoop of vanilla bean ice cream.
Ingredients
- Double pie crust (homemade or store-bought)
- 5 cups rhubarb, cut into 1/2 inch pieces
- 1 1/4 cups granulated sugar
- 1/4 cup cornstarch
- 1/2 tsp ground cinnamon
- 1 tbsp cold butter, cubed
- 1 egg (for egg wash)
How to make it
- Roll out the bottom pie crust on a floured surface and fit it into a 9-inch pie plate, trimming the edges to leave a 1/2 inch overhang.
- In a large bowl, toss the rhubarb with sugar, cornstarch, and cinnamon until the fruit is evenly coated; the cornstarch is vital here to thicken the juices and prevent a soggy bottom.
- Pour the filling into the prepared crust and dot the top with the small cubes of cold butter for added richness.
- Roll out the second crust and cut it into 1-inch wide strips to create a lattice top, weaving them over and under across the filling.
- Fold the bottom crust overhang over the lattice ends and crimp the edges tightly to seal the pie.
- Brush the top of the lattice with a simple egg wash (one egg beaten with a teaspoon of water) and sprinkle with a bit of coarse sugar for a professional, sparkling finish.
- Bake at 400°F (200°C) for 20 minutes, then reduce the heat to 350°F (175°C) and continue baking for 35-40 minutes until the crust is deep golden and the filling is bubbling thick.
How to frost graduation cookies?
Why we love this
There is a meditative quality to frosting graduation cookies, watching the smooth royal icing flood the surface and create a porcelain-like finish. These cookies are not just treats; they are keepsakes, often personalized with names or graduation years. The snap of the firm icing followed by the buttery crumble of the shortbread underneath provides a satisfying crunch that makes them a staple of any high-end dessert board.
Ingredients
- Baked sugar cookies (diploma or gown shapes)
- Royal icing (stiff and flood consistencies)
- Gel food coloring (school colors)
- Fine-tipped piping bags
- Scribe tool or toothpick
How to make it
- Divide your royal icing into bowls and tint them with gel colors to match the graduate’s school colors, keeping one portion white for highlights.
- Transfer the stiff-consistency icing to a piping bag with a small round tip and outline the perimeter of the cookie to create a “dam” that will hold the thinner icing.
- Fill a second bag with flood-consistency icing (which should disappear back into itself within 10 seconds when stirred) and fill the center of the outlined area.
- Use a scribe tool or toothpick to pop any air bubbles and gently nudge the icing into the corners for a perfectly smooth surface.
- Allow the base layer to dry completely (usually 6-8 hours or overnight) before adding decorative details like the year or a tassel using the stiff icing.
- For a diploma cookie, pipe a thin line of black icing to represent the ribbon and use a gold luster dust mixed with vodka to paint the seal for a metallic pop.
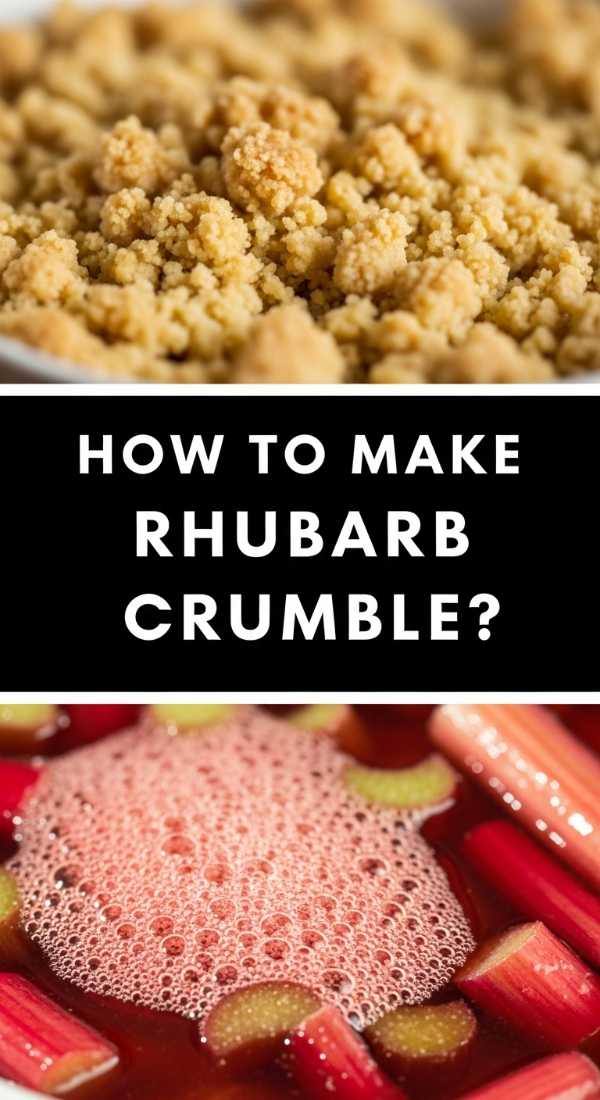
How to make rhubarb crumble?

Why we love this
Rhubarb crumble is the ultimate comfort food, offering a delightful play of temperatures and textures that feels like a warm embrace. The topping is a buttery, cinnamon-spiked mixture of oats and brown sugar that bakes into a crunchy, golden lid over a bed of softened, tangy rhubarb. As you dig in, the juices mingle with the buttery crumbs, creating a rich sauce that perfectly complements the sharp, bright notes of the fruit, making it the perfect ending to a summer dinner party.
Ingredients
- 6 cups rhubarb, chopped
- 3/4 cup granulated sugar
- 1 cup old-fashioned oats
- 1 cup all-purpose flour
- 1 cup packed brown sugar
- 1/2 cup cold unsalted butter, cubed
- 1 tsp ground cinnamon
How to make it
- Toss the chopped rhubarb with the granulated sugar in a 9×9 inch baking dish until the fruit is well-coated, then spread it out into an even layer.
- In a separate medium bowl, combine the oats, flour, brown sugar, and cinnamon, stirring to mix the dry ingredients thoroughly.
- Use a pastry cutter or your fingertips to work the cold, cubed butter into the oat mixture until it resembles coarse crumbs with some pea-sized pieces of butter remaining.
- Sprinkle the crumble topping evenly over the rhubarb, ensuring you cover the fruit completely to trap the steam.
- Bake in a preheated oven at 375°F (190°C) for 35-45 minutes; you are looking for the topping to be a deep golden brown and the fruit juices to be bubbling vigorously at the edges.
- Let the crumble stand for at least 15 minutes before serving to allow the juices to thicken slightly, ensuring every scoop has the perfect ratio of fruit to crunch.
How to brew coffee drinks?

Why we love this
A perfectly brewed coffee drink is the sophisticated anchor of any brunch-style food board, offering an aromatic boost that cleanses the palate between sweet bites. Whether it is a velvety latte or a crisp cold brew, the deep, roasted notes of the coffee beans provide a grounded contrast to the sugary treats. The ritual of watching the milk swirl into the dark liquid creates a beautiful visual movement that enhances the overall aesthetic of your gathering.
Ingredients
- High-quality coffee beans (medium or dark roast)
- Filtered water
- Milk or oat milk
- Vanilla or simple syrup
- Ice cubes
How to make it
- For a classic cold brew, coarsely grind your coffee beans (the texture of sea salt) and combine with cold filtered water in a 1:4 ratio in a large jar.
- Steep the mixture in the refrigerator for 12-18 hours; this slow extraction process results in a smooth, low-acid coffee that is naturally sweet.
- Strain the concentrate through a fine-mesh sieve lined with a coffee filter to remove all sediment, resulting in a crystal-clear liquid.
- To assemble a signature board drink, fill a glass with large ice cubes (which melt slower and prevent dilution).
- Pour the coffee concentrate over the ice, filling the glass about three-quarters of the way.
- Slowly pour your choice of milk over the top, allowing it to marble through the coffee for a beautiful visual effect, and sweeten with a splash of vanilla syrup to taste.
How to style graduation boards?

Why we love this
Styling a graduation board is where food truly becomes art, allowing you to tell a story through placement, color, and texture. A well-styled board feels abundant and intentional, drawing the eye toward focal points like a central cake or a cluster of vibrant cookies. It is the visual heartbeat of the party, inviting guests to graze and mingle while admiring the cohesive theme that celebrates the graduate’s incredible journey.
Ingredients
- Large wooden board or slate
- Small bowls for jams or nuts
- Fresh greenery (eucalyptus or mint)
- Themed napkins and picks
- Assorted treats (cookies, cupcakes, fruit)
How to make it
- Start by placing your largest items—like the graduation cake or a bowl of rhubarb crumble—on the board first to act as anchors; these should be slightly off-center for a more dynamic look.
- Place small bowls of rhubarb jam or coffee condiments next to the anchors to create varying heights and textures.
- Arrange the graduation cupcakes and frosted cookies in sweeping curves around the bowls, filling in the larger gaps with school-colored candies or fresh fruit.
- Use the “rule of three” for small items, grouping them in odd numbers to create a sense of natural balance and abundance.
- Tuck sprigs of fresh mint or eucalyptus into the smallest remaining spaces to add a pop of organic green and a fresh scent to the board.
- Finish by scattering a few themed graduation picks or edible flowers across the surface to tie the whole aesthetic together and ensure no “dead space” remains.
How to design graduation cakes?

Why we love this
Designing a graduation cake is about capturing the essence of an achievement in sugar and flour, making it the crowning jewel of your dessert spread. When a design comes together—whether it’s an elegant ombre frosting or a clean, modern geometric pattern—it evokes a sense of pride and professional finish. The visual impact of a tall, beautifully designed cake creates a focal point that anchors the entire food board and serves as the perfect backdrop for photos.
Ingredients
- Crumb-coated cake
- Italian meringue buttercream
- Gel food colors
- Gold leaf or luster dust
- Fresh flowers or custom cake topper
How to make it
- Begin with a chilled, crumb-coated cake to ensure a stable surface that won’t shed crumbs into your final layer of frosting.
- Apply a thick layer of buttercream using an offset spatula, then use a bench scraper held at a 45-degree angle to the cake while spinning the turntable to create perfectly smooth, sharp edges.
- For an ombre effect, tint three shades of the same color and pipe them in rings around the cake, blending them together with the scraper for a seamless transition.
- If using gold leaf, apply it sparingly with a dry paintbrush to the edges of the cake while the frosting is still slightly tacky for a luxurious, high-end shimmer.
- Place your custom cake topper (like the graduate’s name or year) slightly to one side to allow room for a cluster of fresh, food-safe flowers or macarons.
- Chill the cake for at least 30 minutes before serving to ensure the design stays crisp and the buttercream maintains its structure in a warm room.
How to decorate summer cookies?
[IMAGE_10]
Why we love this
Summer cookies bring a burst of joy and brightness to the table, using citrusy flavors and vibrant colors to celebrate the season of sun. There is a playful lightness to decorating with bright yellows, pinks, and greens, creating treats that look like they belong at a garden party. The combination of a zesty lemon glaze and a crisp shortbread base provides a refreshing finish that cuts through the heat of a summer afternoon.
Ingredients
- Baked lemon shortbread cookies
- Powdered sugar glaze (lemon juice + powdered sugar)
- Dried edible flower petals
- Lemon zest
- Pastel sanding sugar
How to make it
- Whisk together 2 cups of sifted powdered sugar with 2-3 tablespoons of fresh lemon juice until you reach a thick but pourable consistency that holds its shape for a few seconds when drizzled.
- Dip the top of each cooled shortbread cookie directly into the glaze, allowing the excess to drip off before turning it upright.
- Place the cookies on a wire rack set over parchment paper to catch any further drips.
- While the glaze is still wet, sprinkle a small pinch of dried edible flower petals (like pansies or marigolds) onto one side of the cookie for a sophisticated botanical look.
- Add a light dusting of lemon zest for an extra aromatic punch and a bit of pastel sanding sugar for a subtle, summery crunch.
- Allow the cookies to air dry for at least 2 hours until the glaze is completely firm to the touch before stacking or placing them on your food board.
Celebrating the Season One Bite at a Time
Creating a viral food board isn’t about perfection; it’s about the joy of sharing something handmade and heart-centered with the people you love. By combining the celebratory spirit of graduation with the fresh, tangy flavors of summer rhubarb, you create a sensory experience that lingers long after the last crumb is gone. I hope these recipes and styling tips inspire you to clear off your kitchen island, gather your ingredients, and build a board that tells your own unique story of celebration. Happy baking, and here’s to a summer filled with sweetness!