

There is something almost magical about the way a simple board of food can bring people together. Whether it’s a lazy Sunday afternoon on the porch or a Friday night gathering with your closest friends, the food we share becomes the centerpiece of our most cherished memories. I remember the first time I set out a rustic wooden board piled high with seasonal treats; the room instantly filled with laughter and the sound of crusty bread being torn apart. It wasn’t about being a professional chef; it was about the art of the assembly and the love baked into every component.
The secret to a viral food board isn’t fancy gadgets or expensive ingredients. It’s about balance—pairing something sweet with something salty, something crunchy with something creamy, and always choosing ingredients that feel like summer in a bite. This lifestyle isn’t just about eating; it’s about celebrating the abundance of the season and finding joy in the simple act of preparation. Today, I’m sharing my favorite secrets to help you master that maximum impact with minimal stress.
How to make homemade dandelion jelly

Why we love this
There is nothing quite like the golden, honey-like essence of dandelion jelly to make you feel connected to the earth. This jelly captures the very soul of spring and summer, offering a delicate floral aroma that reminds one of a sun-drenched meadow. When you spread it over a warm, buttered biscuit, the texture is silky and light, melting into the bread with a sweetness that is deep but never cloying. It’s a conversation starter and a true labor of love that turns a common backyard flower into a gourmet delicacy.
Ingredients
- 4 cups of yellow dandelion petals (green parts removed)
- 4 cups boiling water
- 1/4 cup lemon juice
- 1 package powdered pectin
- 4 cups granulated sugar
How to make it
- Begin by foraging for fresh dandelions in a clean, pesticide-free area. Carefully pluck only the yellow petals, discarding every bit of the green sepals to avoid a bitter taste. This takes patience but is essential for the sweet, honey flavor.
- Place your cleaned petals in a large heat-proof bowl and pour 4 cups of boiling water over them. Let this steep for at least 8 hours, or overnight, to create a potent dandelion tea. The liquid should turn a vibrant, deep yellow.
- Strain the liquid through a fine-mesh sieve or cheesecloth, squeezing the petals to extract every drop of flavor. Measure out exactly 3 cups of this dandelion infusion into a large heavy-bottomed pot.
- Whisk in the lemon juice and the powdered pectin. Bring the mixture to a full rolling boil over high heat, stirring constantly so the pectin dissolves completely and doesn’t scorch.
- Once boiling, pour in the sugar all at once. Return the mixture to a full rolling boil that cannot be stirred down. Boil hard for exactly one minute. This precise timing ensures the jelly sets to a perfect, spreadable consistency.
- Skim off any foam from the surface, ladle into sterilized jars leaving 1/4 inch headspace, and process in a water bath canner for 10 minutes to seal.
How to make the best summer pasta salad

Why we love this
A great pasta salad is the backbone of any successful summer food board. It’s a symphony of textures: the chewy bite of al dente rotini, the crisp snap of fresh cucumbers, and the creamy richness of feta cheese. The aroma of fresh basil and oregano wafting from the bowl instantly signals that dinner is served. It’s the ultimate crowd-pleaser because it stays fresh in the heat and actually tastes better as the flavors meld together over time, making it the perfect make-ahead dish for busy hosts.
Ingredients
- 1 lb rotini or fusilli pasta
- 1 cup cherry tomatoes, halved
- 1 English cucumber, diced
- 1/2 red onion, finely minced
- 1/2 cup Kalamata olives, sliced
- 1/2 cup crumbled feta cheese
- Homemade vinaigrette (olive oil, red wine vinegar, dried oregano, garlic)
How to make it
- Boil a large pot of water and salt it heavily—it should taste like the sea. Cook the pasta for one minute less than the package directions specify. This “al dente” texture is crucial because the pasta will absorb the dressing and soften slightly as it sits.
- While the pasta cooks, whisk your vinaigrette in a small bowl until emulsified. Using fresh garlic and high-quality olive oil makes a world of difference in the final depth of flavor.
- Drain the pasta and immediately rinse it under cold water to stop the cooking process and remove excess starch. This prevents the salad from becoming gummy.
- In a large mixing bowl, combine the cooled pasta with the tomatoes, cucumbers, red onion, and olives. Pour the dressing over the top while the pasta is still slightly damp to help it adhere.
- Gently fold in the feta cheese and fresh herbs. Use a light hand so the cheese doesn’t break down into a paste.
- Chill in the refrigerator for at least two hours before serving. This resting period allows the pasta to soak up the acidity of the vinegar and the fragrance of the herbs.
How to prep easy camping meals

Why we love this
Camping food shouldn’t just be about survival; it should be about the smoky, charred magic of a campfire. Preparing meals for the great outdoors brings a sense of rustic adventure to your food board concept. Imagine the sizzle of foil packets over glowing coals and the earthy scent of pine needles mixing with grilled steak. It’s about the simplicity of eating with your hands and the satisfaction of a meal that feels earned after a day of hiking, all while keeping cleanup to a bare minimum.
Ingredients
- Heavy-duty aluminum foil
- Pre-marinated chicken or steak bites
- Sliced bell peppers and onions
- Baby potatoes, parboiled and halved
- Olive oil and Montreal steak seasoning
How to make it
- At home, before you leave, cut all your vegetables and meats into uniform 1-inch pieces. This ensures that everything in the foil packet cooks at the same rate, preventing raw meat or mushy veggies.
- Parboil your baby potatoes for about 5 minutes until they are just starting to soften. Potatoes take much longer to cook than meat over a fire, so this “head start” is the secret to a perfectly timed camping meal.
- Toss the ingredients in a large bowl with olive oil and generous seasoning. Divide the mixture into individual portions and place each portion onto a large square of heavy-duty aluminum foil.
- Fold the foil over the food and crimp the edges tightly to create a sealed pouch. Double-wrap them if you’re worried about leaks. This seal traps the steam, which keeps the meat incredibly juicy.
- Store the packets in your cooler. When the campfire has burned down to a bed of hot coals (not active flames), place the packets directly on the grate or the edge of the coals.
- Cook for about 15-20 minutes, flipping once halfway through using tongs. Open the packets carefully—the steam will be very hot—and check that the meat is browned and the veggies are tender.
How to make creative summer salad recipes
Why we love this
A creative salad is the crown jewel of a modern food board, breaking the monotony of basic greens. We love this because it plays with the unexpected—pairing succulent stone fruits like peaches with salty prosciutto or spicy arugula with sweet honey-roasted nuts. The visual impact of vibrant colors layered on a platter is breathtaking. Each bite offers a different sensory experience, from the juicy burst of fruit to the crunch of toasted seeds, making salad the most exciting part of the meal.
Ingredients
- Mixed baby greens or arugula
- Fresh peaches or nectarines, sliced
- Thinly sliced prosciutto
- Toasted walnuts or pecans
- Burrata cheese or fresh mozzarella balls
- Balsamic glaze and extra virgin olive oil
How to make it
- Start with a wide, shallow platter rather than a deep bowl. This allows you to showcase the ingredients without them getting buried at the bottom. Lay down a bed of greens as your canvas.
- Slice your stone fruit into thin wedges. For an extra layer of flavor, you can quickly sear the fruit on a grill pan for 60 seconds per side to caramelize the sugars and add beautiful grill marks.
- Artfully drape ribbons of prosciutto over the greens. The saltiness of the cured meat is the perfect foil for the sweetness of the fruit.
- Place a large ball of Burrata in the center of the platter and break it open slightly with a knife so the creamy interior spills out. This creates a decadent “dressing” naturally.
- Scatter the toasted nuts and a few fresh mint leaves over the top for texture and aromatic freshness.
- Just before serving, drizzle the entire board with high-quality balsamic glaze in a zig-zag pattern. This adds both a hit of acid and a professional, viral-worthy aesthetic.
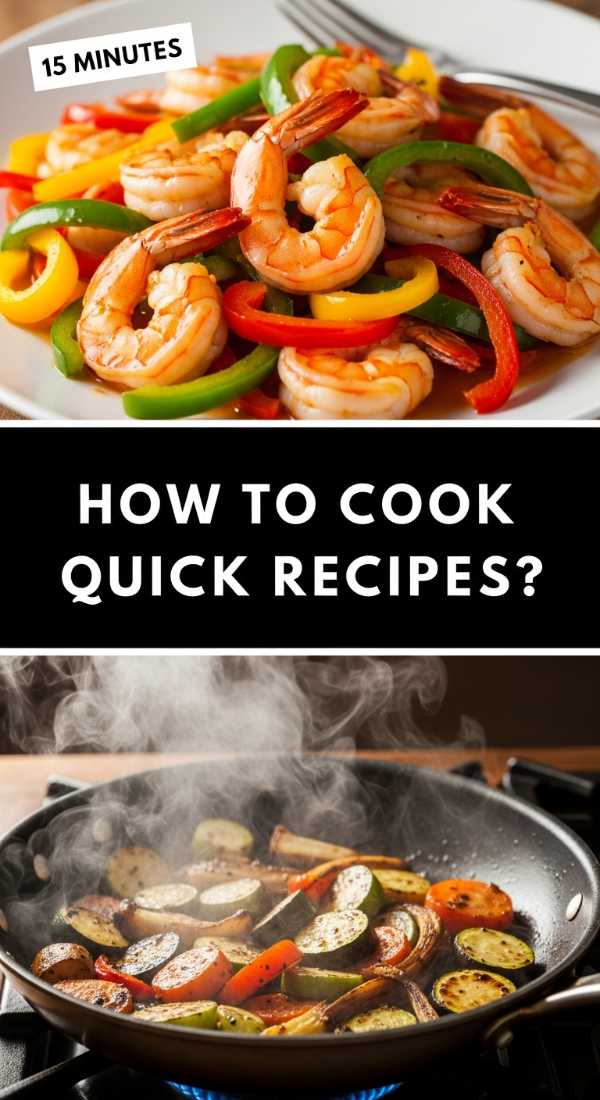
How to cook quick summer recipes

Why we love this
When the sun is shining, the last place you want to be is standing over a hot stove for hours. Quick summer recipes are all about efficiency without sacrificing the gourmet feel of a food board. We love the vibrant, zesty energy of a meal that comes together in fifteen minutes—think seared shrimp with lime or quick-charred corn salad. It’s light, refreshing, and leaves you with plenty of time to enjoy the golden hour with a glass of chilled rose in hand.
Ingredients
- 1 lb large shrimp, peeled and deveined
- 2 tablespoons unsalted butter
- 3 cloves garlic, minced
- Fresh parsley and lime wedges
- Red pepper flakes for a hint of heat
How to make it
- Pat the shrimp completely dry with paper towels. This is the professional secret to getting a good sear; moisture on the surface of the shrimp will cause them to steam instead of brown.
- Heat a large skillet over medium-high heat. Add the butter and wait until it stops foaming and starts to smell slightly nutty.
- Add the shrimp in a single layer. Do not overcrowd the pan; cook in two batches if necessary. Let them sear undisturbed for 2 minutes until they develop a pink, opaque edge.
- Flip the shrimp and immediately add the minced garlic and red pepper flakes. Garlic burns quickly, so adding it toward the end of the cooking process ensures it stays sweet and fragrant.
- Toss the shrimp for another 1-2 minutes until they are just cooked through and curled into a “C” shape. If they curl into an “O,” they are overcooked and will be rubbery.
- Remove from heat, squeeze fresh lime juice over the pan to deglaze the brown bits, and garnish with chopped parsley. Serve immediately on your board with crusty bread.
How to master your summer meal prep

Why we love this
Mastering meal prep is like giving a gift to your future self. It turns the chaotic “what’s for dinner?” scramble into a serene, organized experience. There is a deep satisfaction in seeing your fridge lined with colorful glass containers filled with prepped ingredients ready to be assembled into a stunning food board at a moment’s notice. It’s about reclaimed time and the peace of mind that comes from knowing you have healthy, delicious options ready to fuel your summer adventures.
Ingredients
- Assorted seasonal vegetables (bell peppers, zucchini, carrots)
- Pre-cooked grains (quinoa, farro, or brown rice)
- Grilled chicken breasts or baked tofu
- A variety of homemade dressings in small jars
- Fresh berries and washed greens
How to make it
- Dedicate a two-hour window on Sunday morning to “component cooking.” Instead of making full recipes, cook individual building blocks that can be mixed and matched.
- Roast a large sheet pan of seasonal vegetables with olive oil, salt, and pepper at 400°F until the edges are caramelized. This concentrated flavor holds up well in the fridge for 4-5 days.
- Cook a large batch of grains in vegetable broth instead of water. Once cooled, fluff them with a fork and store them in airtight containers. Grains provide the satisfying base for any board or bowl.
- Wash and dry your leafy greens thoroughly using a salad spinner. Store them in a container lined with a damp paper towel to keep them crisp and prevent wilting.
- Prepare two distinct dressings—one creamy (like a tahini lemon) and one vinaigrette (like a balsamic). Having these ready means you can change the entire flavor profile of your prep in seconds.
- Organize your fridge by “type” so you can easily grab a protein, a starch, and a veggie. This modular approach is the key to never getting bored with your meal prep.
How to cook healthy summer recipes for dinner

Why we love this
Healthy summer dinners are all about honoring the ingredients in their purest form. We love this approach because it leaves you feeling light and energized rather than weighed down. The aroma of citrus-marinated fish or grilled asparagus seasoned with sea salt is incredibly appetizing. It proves that “healthy” doesn’t mean “bland.” By focusing on high-quality proteins and an abundance of garden-fresh produce, you create a food board that is as nourishing for the body as it is beautiful for the eyes.
Ingredients
- White fish fillets (like cod or tilapia)
- Lemon slices and fresh dill
- Asparagus spears, trimmed
- Cherry tomatoes on the vine
- Olive oil, sea salt, and cracked black pepper
How to make it
- Preheat your oven to 375°F. Prepare a large baking sheet by lining it with parchment paper for easy cleanup and to prevent the delicate fish from sticking.
- Place the fish fillets in the center of the sheet. Drizzle with olive oil and top each fillet with two thin slices of lemon and a sprig of fresh dill. The lemon steams the fish from the top down, infusing it with bright acidity.
- Arrange the asparagus spears and tomato vines around the fish. Drizzle the vegetables with olive oil and a generous pinch of flaky sea salt.
- Roast for 12-15 minutes. You’ll know the fish is done when it is opaque throughout and flakes easily with a fork at the thickest part. The tomatoes should just be starting to burst their skins.
- For a professional touch, switch the oven to “broil” for the final 60 seconds to give the asparagus a slightly charred, smoky finish.
- Transfer everything carefully to a wooden board, garnishing with extra fresh herbs. The colors of the green asparagus and red tomatoes against the white fish are stunning.
How to make a fresh summer salad fast

Why we love this
The speed-demon of the food board world, this fresh salad is for those moments when guests arrive unexpectedly or when the heat makes you crave something instantly cooling. We love the crisp, watery crunch of cucumbers and the sharp bite of red onion tempered by a quick vinegar soak. It’s a revitalizing dish that acts as a palate cleanser, bringing a sharp, bright contrast to grilled meats or heavy cheeses. It’s simplicity at its most sophisticated.
Ingredients
- 3 large Persian cucumbers, thinly sliced
- 1/2 small red onion, shaved into rings
- 1 tablespoon rice vinegar
- 1 teaspoon honey or agave
- Fresh dill and a pinch of chili flakes
How to make it
- Use a mandoline slicer for the cucumbers and onions if you have one. Getting the slices paper-thin allows the dressing to penetrate instantly, which is the secret to making this salad “fast” without needing a long marination.
- In a medium bowl, whisk together the rice vinegar, honey, and a pinch of salt. The honey balances the sharp acidity of the vinegar without making the salad taste “sweet.”
- Toss the sliced onions in the dressing first and let them sit for 3 minutes. This quick pickling technique mellows the harsh raw onion flavor and turns them a beautiful bright pink.
- Add the cucumbers to the bowl and toss vigorously to ensure every slice is coated. The salt will begin to draw out some of the cucumber juice, creating its own light broth.
- Finely chop a handful of fresh dill—don’t be shy, use both the leaves and the tender stems for maximum aroma.
- Transfer to a chilled bowl or add as a vibrant heap on your food board, finishing with a sprinkle of red chili flakes for a tiny pop of heat.
How to cook the best summer dinner ideas

Why we love this
The “best” summer dinner is one that feels like an event, even if it’s just for your family. We love the concept of “sheet pan fajitas” or “deconstructed tacos” served on a board because it encourages interaction. There’s something so satisfying about the smell of sizzling peppers and seasoned meat filling the kitchen. It turns dinner into a DIY craft project where everyone can build their own perfect bite, making it the ultimate viral-style dining experience that is both social and delicious.
Ingredients
- 1.5 lbs flank steak or chicken breast, sliced into strips
- 3 bell peppers (multi-colored), sliced
- 1 large yellow onion, sliced
- 2 tablespoons taco seasoning (cumin, chili powder, garlic powder)
- Corn or flour tortillas, warmed
- Toppings: Avocado, cilantro, lime, sour cream
How to make it
- Preheat your oven to 425°F. High heat is essential here to mimic the sear of a traditional cast-iron fajita skillet.
- Toss the meat strips, peppers, and onions in a large bowl with oil and your seasoning blend. Ensure every piece is thoroughly coated so the spices form a delicious crust during roasting.
- Spread the mixture in a single layer on a large baking sheet. If the pan is too crowded, the vegetables will steam instead of roasting, so use two pans if needed.
- Roast for 15-18 minutes. For steak, check for an internal temperature of 135°F for medium-rare; for chicken, ensure it reaches 165°F. The peppers should have slightly charred edges.
- While the meat rests, wrap your tortillas in foil and warm them in the oven for 5 minutes. Steam-warming makes them pliable and prevents them from tearing.
- Arrange the meat and veggies on a large board, surrounded by small bowls of toppings. This “deconstructed” look is what makes it a viral-worthy dinner idea.
How to prep quick meals for summer
[IMAGE_10]
Why we love this
Quick meal prep is the ultimate lifestyle hack for the person who wants to spend more time at the beach and less time in the pantry. We love this because it relies on high-quality, pre-cooked staples that can be transformed with fresh herbs and citrus. It’s the “no-cook” approach to the food board—assembling smoked salmon, store-bought rotisserie chicken, and pre-washed veggies into a spread that looks like it took hours but really took ten minutes. It’s smart, stylish, and incredibly practical.
Ingredients
- 1 rotisserie chicken, shredded while warm
- Pita bread or naan, lightly toasted
- Hummus and Tzatziki (store-bought or homemade)
- Sliced cucumbers, radishes, and olives
- Fresh parsley and lemon wedges
How to make it
- Start with a rotisserie chicken. The secret to making it taste gourmet is to shred it while it’s still warm and toss it with a tablespoon of olive oil, a squeeze of lemon, and some fresh herbs like parsley or dill. This rehydrates the meat and masks that “store-bought” smell.
- Briefly toast your pita or naan bread on a dry pan for 30 seconds per side. This simple step revives the bread, giving it a soft, pillowy texture and a pleasant warmth.
- Choose a large, flat board and place three small bowls on it for your dips (hummus, tzatziki, and maybe some olive tapenade). Using bowls creates structure and prevents the liquids from running into your other ingredients.
- Arrange the shredded chicken in a neat pile and surround it with the sliced vegetables. Arrange the vegetables by color for the most viral-worthy visual appeal.
- Tuck the warm, cut pita triangles into the gaps on the board. The bread acts as a natural separator between the different components.
- Finish the entire board with a final sprinkle of sea salt and a few lemon wedges scattered around. This allows guests to customize the acidity levels of their individual wraps or bites.
The Secret to Maximum Impact Every Time
The journey to creating a viral food board isn’t about perfection; it’s about the joy of the process. By focusing on these simple, high-quality ingredients and using the techniques we’ve discussed, you turn a standard meal into an experience. Remember, the best boards are the ones that reflect your personality—don’t be afraid to add your own twist or a flower from your garden. Summer is fleeting, but the memories you create around a shared table will last a lifetime.
Frequently Asked Questions
What is the best board to use for a food spread?
A large, food-safe wooden cutting board or a slate platter works best. Look for something with a bit of texture to provide a rustic background for your ingredients.
How do I keep my summer salads from getting soggy?
Always salt your watery vegetables (like cucumbers) and let them drain before adding them to the salad. Also, keep the dressing on the side until the very last minute before serving.
Can I make these boards ahead of time?
Most components can be prepped in advance, but for the best visual impact, assemble the board no more than 30 minutes before your guests arrive to keep everything looking fresh and vibrant.