

Vibrant & Bold: The Ultimate Guide to Colorful 3D Acrylic Nails
Hey there, my loves! Welcome back to our cozy little corner of the internet. You know those days when you just need a little extra sparkle to brighten up your soul? I’ve always found that the simplest way to manifest a little joy is by looking down and seeing a masterpiece right at my fingertips. There is something so incredibly healing about the way a fresh, colorful set of nails can change your entire mood, like a warm, cloud-soft embrace for your spirit.
Today, I’m so excited to walk you through the magical world of 3D acrylics and vibrant colors. Whether you’re a minimalist trying to find your voice or a maximalist ready to shout from the rooftops, these ‘recipes’ for nail art are designed to make you feel like the goddess you truly are. Grab a cup of tea, wrap yourself in your favorite blanket, and let’s dive into this rainbow journey together.
5 Simple Steps for Two Color Nails

Why to love this recipe:
This look is the ultimate gentle transition for those who want to dip their toes into the world of color without feeling overwhelmed. It’s soft, romantic, and reminds me of a summer sunset fading into a starry night. It’s the perfect way to harmonize two of your favorite moods on a single canvas.
Essential Ingredients:
- Two contrasting acrylic powders (e.g., Pastel Pink and Deep Plum)
- Acrylic liquid monomer
- A fine-grit nail file
- Lint-free wipes
- High-shine top coat
How to Prepare:
- Prep your natural nail by gently pushing back cuticles and buffing the surface.
- Apply the lighter shade to the bottom half of the nail, thinning it out toward the center.
- Apply the darker shade to the tip, blending it softly into the light shade while wet.
- File the surface until smooth to ensure a seamless color transition.
- Seal the magic with a glossy top coat and let it shine!
Budget Range
- Saviland Acrylic Powder Set – $15.99
- Mia Secret Liquid Monomer – $12.50
- Beetles No Wipe Top Coat – $7.99
7 Ways to Style Color Street Nails

Why to love this recipe:
For my busy loves who are always on the go but still want that salon-quality glow, this is your secret weapon. Color Street strips are like a soft whisper of convenience, giving you intricate designs without the hours spent in a chair. It’s about reclaiming your time while staying vibrant.
Essential Ingredients:
- Color Street nail strips (various patterns)
- Small nail scissors
- Rubber cuticle pusher
- Alcohol prep pads
- Clear overlay strips
- Nail buffer block
- Cuticle oil
How to Prepare:
- Cleanse each nail thoroughly with an alcohol prep pad to remove oils.
- Select the strip size that best matches your nail width.
- Peel the clear cover and the backing, then center the strip on your nail.
- Smooth the strip from the center outward to avoid any tiny bubbles.
- Fold the excess over the tip and gently file it away in a downward motion.
- Layer a glitter strip over a solid one for a custom ‘mixed mani’ look.
- Finish with cuticle oil for that fresh-from-the-salon hydration.
Budget Range
- Color Street Real Nail Polish Strips – $11.00 – $14.00
- Cuccio Revitalize Cuticle Oil – $8.00
- Flowery Blue Buffer Block – $2.50
4 Tricks for Nails Colorful Perfection

Why to love this recipe:
Perfection isn’t about being flawless; it’s about the joy of the process. These tricks are designed to give you that crisp, professional finish that makes you feel like you’ve just stepped out of a high-end boutique. It’s all in the tiny details that celebrate your unique beauty.
Essential Ingredients:
- Clean-up brush (angled)
- Pure acetone
- Nail primer
- White base polish
How to Prepare:
- Always start with a white base coat to make your neon or bright colors truly ‘pop.’
- Use a primer to ensure the acrylic bonds perfectly, preventing any lifting.
- Dip an angled brush in acetone to clean up edges immediately for a sharp look.
- Apply a thin layer of builder gel over your color to add depth and protection.
Budget Range
- Modelones Nail Primer – $6.99
- Kolinsky Sable Clean-up Brush – $10.00
- Pure Acetone Professional Grade – $5.00
6 Techniques for Multicolor Nails
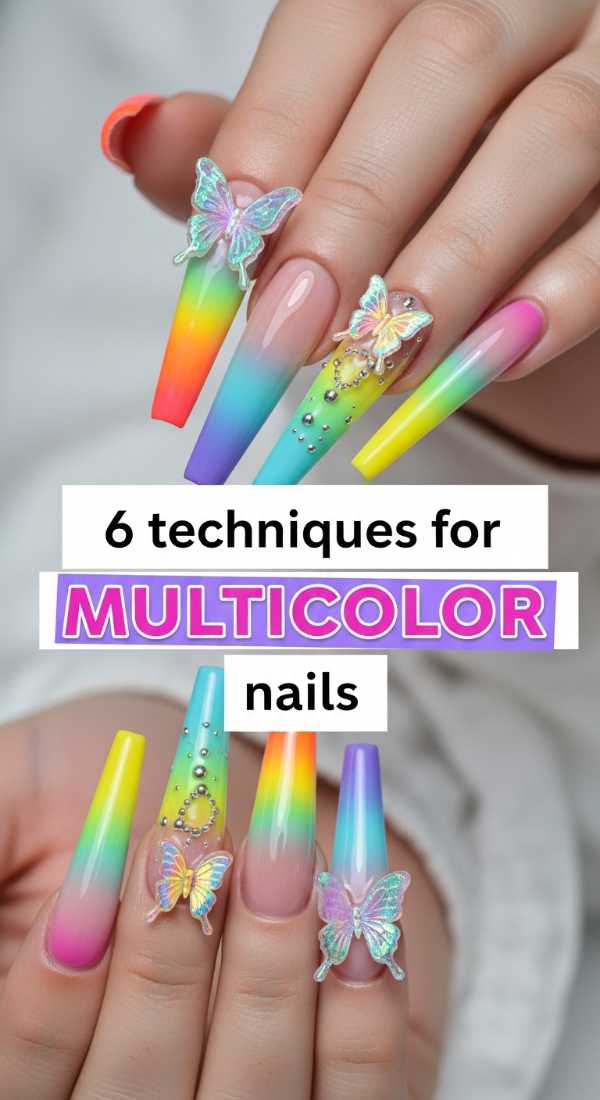
Why to love this recipe:
Why choose one color when you can have them all? This technique is for the dreamers who see the world in Technicolor. It’s a playful, ‘Skittles-inspired’ approach that reminds us that life is too short to stay within the lines. Each finger tells a different part of your beautiful story.
Essential Ingredients:
- 5-10 different acrylic powder shades
- Damping dish
- Size 8 acrylic brush
- Nail forms
- Dehydrator
- Buffing oil
How to Prepare:
- Apply a dehydrator to ensure the surface is ready for the multi-colored journey.
- Pick a different color for each nail, following a rainbow or ombré sequence.
- Use a ‘dry bead’ technique for the 3D elements to keep colors from running.
- Sculpt small 3D hearts or dots in contrasting colors on top of the base.
- Shape the nails into a cohesive silhouette (like oval or almond) to tie the colors together.
- Finish with a nourishing oil to keep the colors looking rich and deep.
Budget Range
- Morovan 12 Color Acrylic Set – $19.99
- Pana Size 8 Acrylic Brush – $14.00
- Young Nails Protein Bond – $13.50
3 Secrets for Colorful Nail Inspo

Why to love this recipe:
Sometimes the hardest part is just starting. This ‘recipe’ isn’t about the application, but about nourishing your creativity. It’s like a warm hug for your imagination, helping you find beauty in the unexpected places of your daily life.
Essential Ingredients:
- A Pinterest mood board
- Nature walks
- Fabric swatches
How to Prepare:
- Look at the colors in your favorite scarf or a blooming garden for natural palettes.
- Screenshot textures you love—like marble or velvet—to translate into 3D acrylic.
- Create a ‘color wheel’ on a practice hand to see how shades interact before applying.
Budget Range
- Practice Training Hand – $12.00
- Digital Mood Board (Pinterest) – Free
- Color Wheel Tool – $4.00
8 Methods for Colourful Acrylic Nails
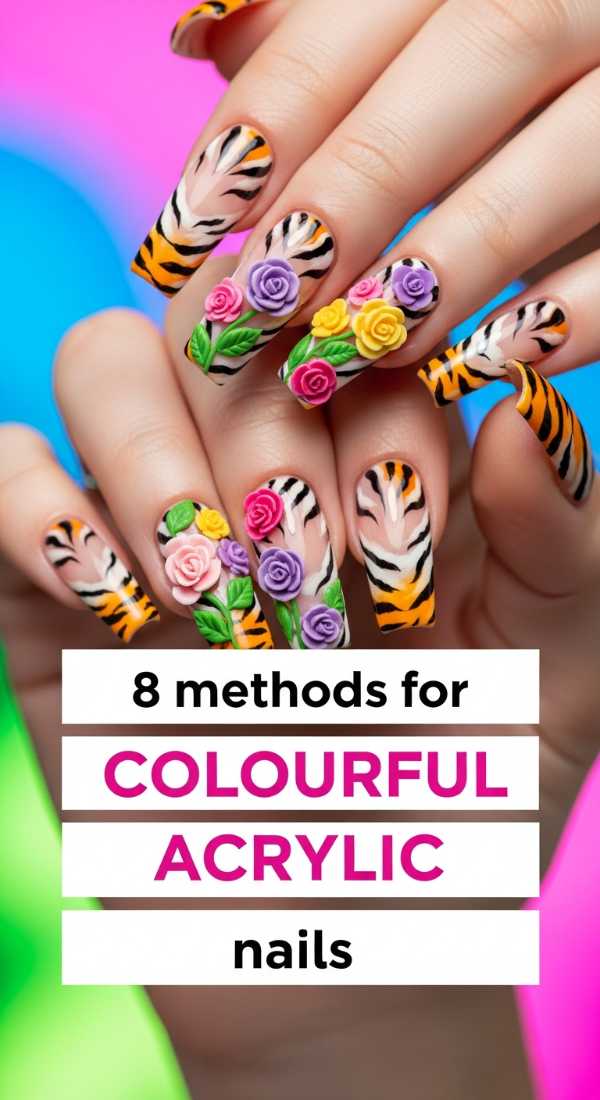
Why to love this recipe:
This is the heart of 3D artistry. These methods allow you to build texture and height, turning your nails into a tactile experience. It’s bold, it’s vibrant, and it’s a total conversation starter. You’re literally wearing your art on your sleeve… well, your nails!
Essential Ingredients:
- 3D sculpting powder
- Silicone nail molds
- Small rhinestones
- Nail glue
- Tweezers
- UV lamp (for gel accents)
- Gold leaf flakes
- Matte top coat
How to Prepare:
- Create the base acrylic nail in a vibrant, solid color.
- Use silicone molds to create 3D flowers or bows with acrylic powder.
- Attach the 3D charms using a bead of wet acrylic for a permanent hold.
- Place tiny rhinestones in the center of the flowers using tweezers.
- Apply gold leaf flakes around the edges for a touch of luxury.
- Mix matte and glossy finishes for a high-fashion textured look.
- Ensure all edges are smooth so they don’t snag on your favorite knit sweater.
- Final cure under the lamp if using gel-based top coats.
Budget Range
- Born Pretty 3D Flower Molds – $5.99
- Nail Art Rhinestone Kit – $9.00
- Makartt Strong Nail Glue – $7.50
5 Tips for Colorful Stiletto Nails
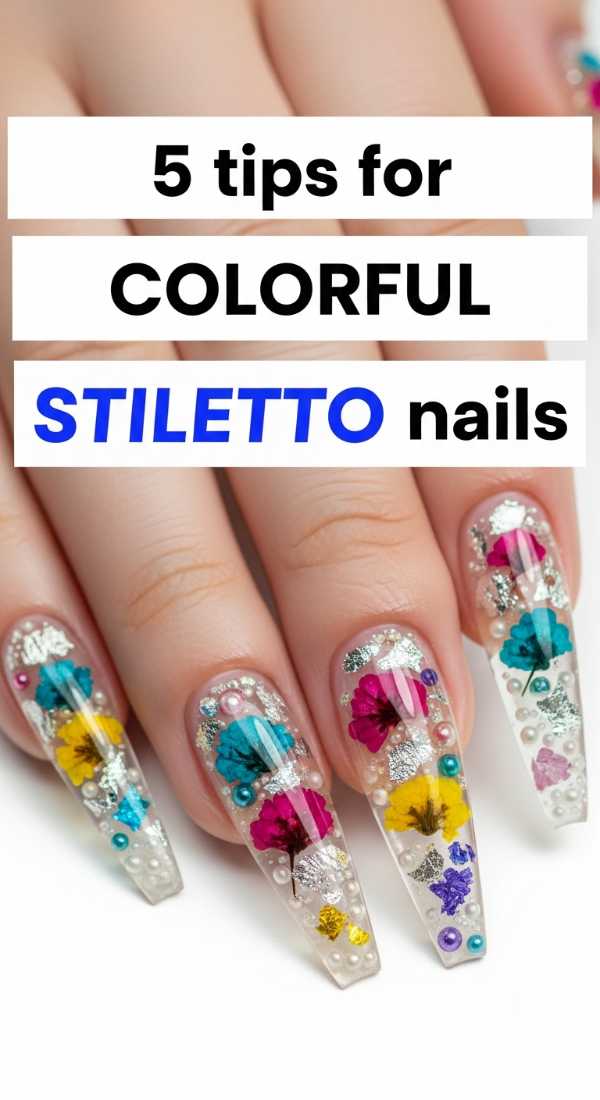
Why to love this recipe:
Stiletto nails are the ultimate ‘it-girl’ shape—fierce, long, and undeniably bold. When combined with bright colors, they become a powerful statement of self-confidence. It’s about owning your space and feeling sharp, literally and figuratively!
Essential Ingredients:
- Stiletto nail tips
- Heavy-duty nail clippers
- Extra-long nail files
- Pigment powders
- Strength-building clear acrylic
How to Prepare:
- Apply the extra-long tips and clip them to your desired ‘stiletto’ point.
- File the sidewalls straight to ensure the point is centered and balanced.
- Apply a ‘core’ strength layer of clear acrylic before adding your vibrant colors.
- Rub pigment powders into a tacky gel layer for a holographic finish.
- Structure the ‘apex’ of the nail carefully to prevent breakage at this length.
Budget Range
- Apres Gel-X Stiletto Tips – $25.00
- Arrtx Extra Long Nail Files – $6.00
- Holographic Pigment Powder Set – $12.00
6 Steps to Blend Your Two Color Nails

Why to love this recipe:
Blending is an art of patience and softness. It’s like watching watercolor paint spread on a wet canvas. This technique creates a dreamy, ethereal look that feels like a soft cloud of color on your hands.
Essential Ingredients:
- Makeup sponges (wedge shaped)
- Liquid latex (for skin protection)
- Blending gel
- Two complementary gel polishes
- Detail brush
- LED Lamp
How to Prepare:
- Apply liquid latex around your cuticles to make clean-up a breeze.
- Paint the two colors side-by-side on a makeup sponge.
- Dab the sponge onto the nail repeatedly until the colors blur together.
- Use a detail brush to smooth out any tiny air bubbles from the sponge.
- Cure under the LED lamp for 60 seconds.
- Peel off the latex to reveal a perfectly clean, blended masterpiece.
Budget Range
- Pueen Liquid Latex – $9.99
- Wedge Makeup Sponges (50pk) – $5.00
- SUNUV LED Nail Lamp – $23.00
4 Easy Hacks for Multicolor Nails
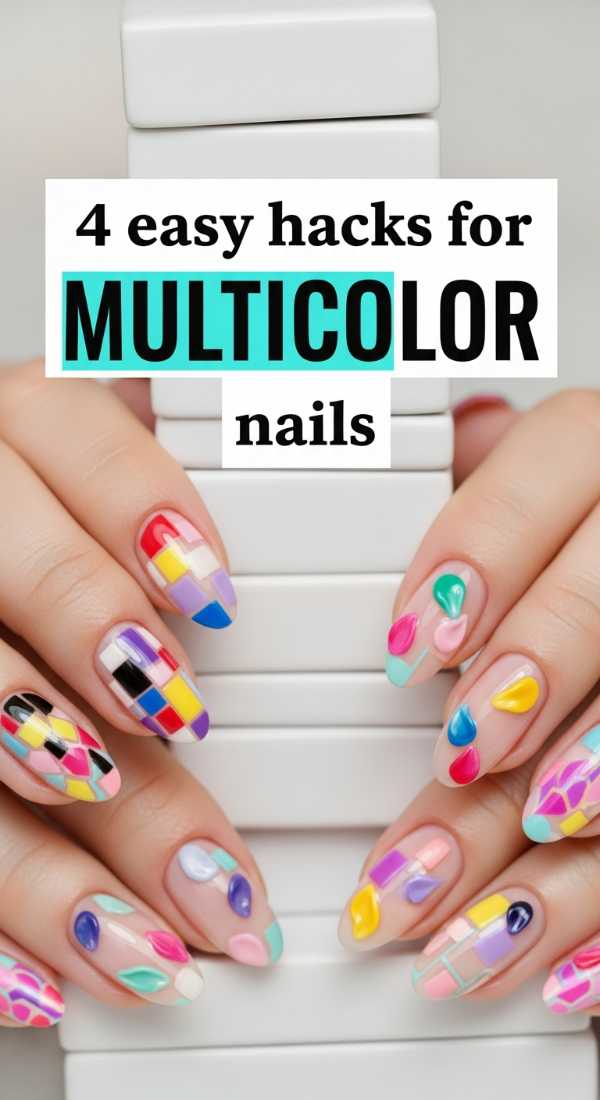
Why to love this recipe:
We all love a good shortcut, don’t we? These hacks are for those days when you want the complexity of a multicolor look without the complexity of the work. It’s all about working smarter, not harder, to achieve your colorful dreams.
Essential Ingredients:
- Dotting tools
- Striping tape
- Multi-pack of mini polishes
- Cornstarch (for matte DIY)
How to Prepare:
- Use striping tape to create perfect geometric sections for different colors.
- Create ‘easy’ multicolor patterns by using dotting tools in various sizes.
- Dip your brush in a mix of three colors for a ‘marbled’ one-stroke effect.
- Mix a tiny bit of cornstarch into any polish to instantly turn it matte.
Budget Range
- Nail Dotting Tool Set – $4.99
- Line Art Striping Tape – $3.50
- OPI Mini 4-Pack – $15.00
9 Guides to Master Colourful Acrylic Nails

Why to love this recipe:
Mastery is a journey, not a destination. These guides are for my loves who want to take their passion to the next level. It’s about understanding the science behind the art so your vibrant creations last as long as your spirit stays bright.
Essential Ingredients:
- High-quality Kolinsky brush
- Temperature-controlled workspace
- Professional grade monomer
- Acid-free primer
- C-curve clips
- Electric nail file (E-file)
- Dust collector
- Safety goggles
- Sanitization spray
How to Prepare:
- Maintain a consistent room temperature to ensure your acrylic sets at the right speed.
- Invest in a high-quality Kolinsky brush; it is the most important tool you will own.
- Use acid-free primer to protect the health of your natural nail bed.
- Master the ‘bead ratio’—not too wet, not too dry—for perfect color clarity.
- Use C-curve clips while the acrylic is semi-set to create a slim, professional profile.
- Practice your E-file technique to decrease bulk without heat spikes.
- Always use a dust collector to keep your creative space clean and healthy.
- Sanitize all tools between every single use for safety and care.
- Keep a ‘color journal’ of which brands and shades blend best together.
Budget Range
- MelodySusie Portable E-File – $29.99
- Kupa Mani-Pro Passport – $199.00 (Pro Level)
- Nail Dust Collector Station – $35.00
Embrace Your Most Vibrant Self
Darlings, I hope this guide makes you feel inspired to pick up a brush and play. Remember, your nails are just a small reflection of the beautiful, colorful soul you carry inside every single day. There’s no right or wrong way to do this—there is only your way. Whether you choose a simple blend or a 3D masterpiece, do it with love and a little bit of magic. I can’t wait to see what you create. Stay vibrant, stay bold, and most importantly, stay uniquely you!