

I remember the first time I set down a massive, overflowing food board in the center of my dining table. The room went quiet for a split second before erupting into laughter, reaching hands, and the clinking of glasses. There is something truly magical about communal eating that strips away the stuffy formality of a dinner party and turns a simple Tuesday night into a lifelong memory. It is about the connection found in shared textures and the ease of a meal where everyone finds exactly what they crave.
In a world of curated perfection and stress-filled hosting, these rustic, “grab-what-you-want” boards are the ultimate hack for effortless entertaining. They represent a shift toward slow living—where the food is vibrant, the preparation is mindful, and the cleanup is minimal. Whether you are hosting a backyard bash or a cozy indoor gathering, these elements will make your feed (and your belly) incredibly happy.
The Ultimate Creamy Rotel Dip

Why we love this
There is nothing quite like the nostalgic, molten warmth of a classic Rotel dip. As you dip a salty, crunchy tortilla chip into the bowl, the cheese stretches and clings, carrying with it the savory, spicy depth of green chilies and browned sausage. The aroma is instantly comforting, filling the kitchen with a smoky, Tex-Mex fragrance that signals the party has officially started. It is the perfect balance of creamy texture and a subtle kick that keeps everyone coming back for just one more bite.
Ingredients
- 16 oz Velveeta cheese, cubed
- 1 can (10 oz) Ro-Tel Diced Tomatoes and Green Chilies
- 1 lb ground breakfast sausage or lean ground beef
- 1/2 cup heavy cream (optional for extra silkiness)
- Fresh cilantro for garnish
How to make it
- Begin by browning your choice of protein (sausage or beef) in a large skillet over medium-high heat. Use a wooden spoon to break the meat into very small, uniform crumbles to ensure even distribution in the dip.
- Once the meat is fully cooked and no pink remains, drain the excess grease thoroughly. This is a critical step to prevent the dip from becoming oily or separating.
- Turn your stovetop heat down to low. Add the cubed Velveeta cheese to the skillet. Cubing the cheese into 1-inch pieces ensures it melts quickly and evenly without scorching.
- Pour in the entire can of Ro-Tel, including the liquid. The juices from the tomatoes provide the essential acidity and spice that cut through the richness of the cheese.
- Stir constantly with a heat-resistant spatula. If the dip feels too thick, whisk in the heavy cream one tablespoon at a time until you reach a silky, pourable consistency.
- Once the mixture is smooth and bubbling gently, transfer it to a warmed serving bowl or a small slow cooker on the ‘warm’ setting to maintain its texture throughout the evening.
The Easiest Summer Tossed Salad

Why we love this
A summer salad should feel like a breath of fresh air on a plate. We love this version because it celebrates the peak of the season—the snap of a cold cucumber, the burst of a sun-ripened cherry tomato, and the delicate, earthy crunch of fresh spring greens. When tossed correctly, every leaf is lightly lacquered in a zesty vinaigrette that awakens the palate without wilting the greens. It provides a crisp, hydrating contrast to the heavier elements on your food board, making the entire meal feel balanced and light.
Ingredients
- 5 oz fresh spring mix or arugula
- 1 English cucumber, thinly sliced
- 1 pint cherry tomatoes, halved
- 1/4 red onion, paper-thinly sliced
- 1/4 cup extra virgin olive oil
- 2 tbsp red wine vinegar
- 1 tsp Dijon mustard
- Salt and cracked black pepper to taste
How to make it
- Start by washing your greens in ice-cold water. Use a salad spinner to dry them completely; any moisture left on the leaves will prevent the dressing from sticking and lead to a soggy salad.
- In a small glass jar, combine the olive oil, red wine vinegar, Dijon mustard, salt, and pepper. Shake vigorously for 30 seconds until the mixture is fully emulsified and looks creamy.
- Place the dried greens in a very large wooden bowl, giving them plenty of room to move. Add the sliced cucumbers, halved tomatoes, and red onions on top.
- Drizzle the dressing around the edges of the bowl rather than directly onto the center. This allows you to control the distribution as you toss.
- Using clean hands or large salad tongs, use a “lift and fold” motion to gently coat the ingredients. Avoid pressing down on the leaves to maintain their loft and volume.
- Finish with a final crack of black pepper and serve immediately to ensure the maximum crispness of the vegetables.
Perfectly Rolled Chicken Wraps

Why we love this
There is a tactile satisfaction in a perfectly rolled wrap—the way the soft, pliable flour tortilla yields to a center of juicy, seasoned chicken and crisp lettuce. These wraps are the ultimate “hand-held” addition to any board, offering a complete meal in every bite. The combination of cool ranch or creamy sauce against the warm, savory protein creates a flavor profile that is universally loved. They look stunning when sliced on a bias, showing off the colorful layers of ingredients tucked neatly inside.
Ingredients
- 4 large flour tortillas (burrito size)
- 2 cups cooked chicken breast, shredded or sliced
- 1 cup shredded iceberg lettuce
- 1/2 cup shredded cheddar cheese
- 1/4 cup ranch dressing or garlic aioli
- Optional: sliced avocado or crispy bacon bits
How to make it
- Place your flour tortillas on a plate and cover them with a damp paper towel. Microwave for 15-20 seconds until they are warm and very pliable. Cold tortillas will crack and ruin the structural integrity of the wrap.
- Lay a tortilla flat on a clean cutting board. Spread a tablespoon of ranch or aioli in a thin layer across the center, leaving a 2-inch border around the edges.
- Layer the shredded chicken in a horizontal line across the lower third of the tortilla. Top the chicken with the shredded cheese and then the lettuce. Do not overstuff; leaving room is the secret to a tight roll.
- Fold the left and right sides of the tortilla inward about 2 inches over the filling.
- While holding the side folds in place, grab the bottom edge of the tortilla and tuck it tightly over the filling. Roll upward, using your fingers to keep the contents compressed as you go.
- Place the wrap seam-side down on the board. Use a sharp serrated knife to cut diagonally through the center, which creates an attractive presentation and makes them easier to handle.
Refreshing Watermelon and Feta Salad

Why we love this
This dish is the personification of a summer breeze. The shocking contrast between the icy, sugary sweetness of the watermelon and the sharp, salty tang of crumbled feta cheese is a culinary revelation. Each bite is punctuated by the cooling scent of fresh mint and the acidic zing of lime, creating a sensory experience that is as beautiful to look at as it is to eat. It is incredibly hydrating and serves as a sophisticated palate cleanser that keeps your guests feeling refreshed even in the afternoon heat.
Ingredients
- 6 cups seedless watermelon, cubed
- 1/2 cup high-quality feta cheese, crumbled
- 1/4 cup fresh mint leaves, chiffonade
- 1 lime, juiced
- Optional: 1 tbsp balsamic glaze
How to make it
- Start with a chilled watermelon. The temperature is key here—the colder the fruit, the more refreshing the salad. Cube the melon into uniform 1-inch squares for a clean aesthetic.
- Place the watermelon cubes in a large, shallow serving platter rather than a deep bowl. This prevents the weight of the fruit from crushing the cubes at the bottom.
- Juice one lime directly over the watermelon. The acid helps to heighten the natural sugars of the fruit. Gently toss with your hands to distribute the juice.
- Sprinkle the crumbled feta cheese evenly over the top. Use a block of feta packed in brine for the best texture and saltiness.
- Stack the mint leaves, roll them into a cigar shape, and slice them thinly (chiffonade). Scatter these vibrant green ribbons over the melon and cheese.
- If using, drizzle a high-quality balsamic glaze in a zig-zag pattern just before serving. This adds a beautiful visual contrast and a deep, syrupy finish.
The Secret to Juicy Marinated Grilled Chicken

Why we love this
The smell of chicken hitting a hot grill is the quintessential scent of a summer cookout. We love this preparation because the marinade works wonders to ensure the meat remains incredibly tender and bursting with herbal notes. The exterior develops those coveted, charred grill marks that provide a slight smoky bitterness, while the inside remains glistening and juicy. It is a versatile protein that anchors the food board, providing a satisfying, hearty element that pairs perfectly with every side dish.
Ingredients
- 1.5 lbs chicken thighs or breasts
- 1/3 cup olive oil
- 3 cloves garlic, minced
- 2 tbsp fresh rosemary or thyme, chopped
- Juice and zest of 1 lemon
- 1 tsp sea salt and 1/2 tsp black pepper
How to make it
- In a large bowl or a gallon-sized zip-top bag, whisk together the olive oil, minced garlic, herbs, lemon zest, lemon juice, salt, and pepper.
- Add the chicken to the marinade, ensuring every piece is thoroughly coated. For the best flavor, let it marinate in the refrigerator for at least 2 hours, though overnight is ideal for maximum tenderness.
- Preheat your grill to medium-high heat (about 400°F). Clean the grates and lightly oil them to prevent the chicken skin or flesh from sticking.
- Place the chicken on the grill. If using breasts, cook for 6-8 minutes per side. If using thighs, cook for 5-7 minutes per side. The goal is an internal temperature of 165°F.
- Professional Tip: Resist the urge to flip the chicken constantly. Let it sear undisturbed for the first 5 minutes to develop a beautiful crust and release naturally from the grates.
- Remove the chicken from the grill and let it rest on a cutting board for at least 5-10 minutes before slicing. This allows the juices to redistribute back into the meat.
Slow-Brewed Southern Sun Tea

Why we love this
Sun tea is more than just a drink; it is a nostalgic ritual that uses the gentle power of the sun to create a smooth, mellow brew. Unlike boiled tea, which can sometimes turn bitter or astringent, sun tea develops a soft, rounded flavor profile that is incredibly easy to drink. Watching the clear water slowly transform into a deep amber hue throughout the afternoon is a visual reminder to slow down and enjoy the pace of the day. Served over mountains of ice, it is the ultimate thirst-quencher.
Ingredients
- 4 to 6 family-size black tea bags
- 1 gallon of cold, filtered water
- Fresh lemon slices
- Fresh mint sprigs
- Optional: Simple syrup or honey for sweetness
How to make it
- Fill a very clean one-gallon glass jar with cold, filtered water. Using glass is essential to avoid any plastic-leached flavors and to allow the sun’s rays to penetrate the liquid effectively.
- Add the tea bags to the water, leaving the strings hanging outside the jar so they are easy to remove later.
- Place the lid on the jar and set it in a spot that receives direct, consistent sunlight for at least 3 to 5 hours. Avoid placing it on a surface that gets too hot, like asphalt.
- Keep an eye on the color. Once the tea has reached a rich, dark amber color, bring the jar inside. Do not leave it out for more than 5 hours to prevent any bacterial growth.
- Remove the tea bags immediately and discard them. Do not squeeze the bags, as this can release bitter tannins into your perfect brew.
- Stir in your sweetener while the tea is still slightly warm from the sun, then refrigerate until ice-cold. Serve over ice with plenty of lemon and mint for a classic look.
Mastering the Blackstone Grill for Big Batches
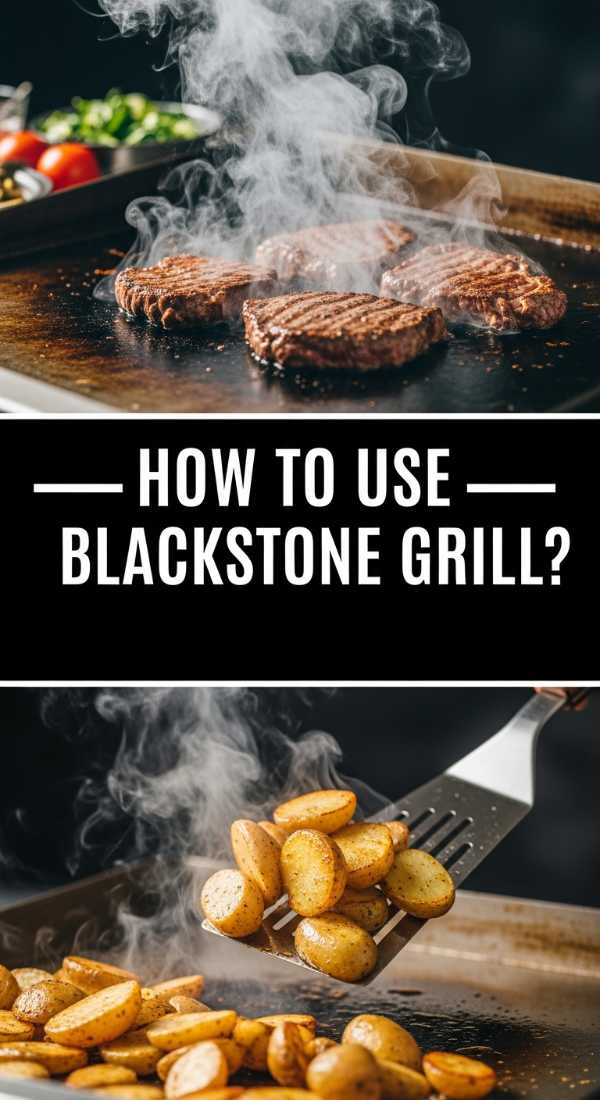
Why we love this
The Blackstone grill is a game-changer for large gatherings because it offers a massive, flat cooking surface that acts like a professional hibachi. We love the sizzle and the speed—you can cook your proteins, sauté your veggies, and even toast your buns all at the same time. The flat top creates an even sear that locks in moisture while adding a distinct, griddled flavor that a traditional grate simply can’t match. It turns cooking into a performance, drawing guests to gather round and watch the magic happen.
Ingredients
- High smoke-point oil (like avocado or vegetable oil)
- Selection of proteins (shrimp, steak strips, or bacon)
- Sliced bell peppers and onions
- Salt, pepper, and garlic powder
- Unsalted butter for finishing
How to make it
- Preheat your Blackstone to medium-high. You want the surface to be hot enough that a drop of water dances and evaporates instantly.
- Apply a thin layer of oil across the surface using a squeeze bottle. Use a bench scraper to spread it evenly.
- Create heat zones by keeping one side of the grill on high and the other on low. This allows you to sear meat on the hot side and move it to the cool side to stay warm.
- Layout your vegetables first, as they typically take longer to soften. Season them liberally and use your spatulas to toss them frequently.
- Add your proteins to the hottest zone. For shrimp or thin steak, only 2-3 minutes per side is needed to get a perfect sear without overcooking.
- During the last minute of cooking, toss a knob of butter onto the griddle and mix it into the food for a rich, restaurant-quality finish. Scrape the griddle clean immediately after use while it is still warm.
Golden-Crusted Classic Banana Bread
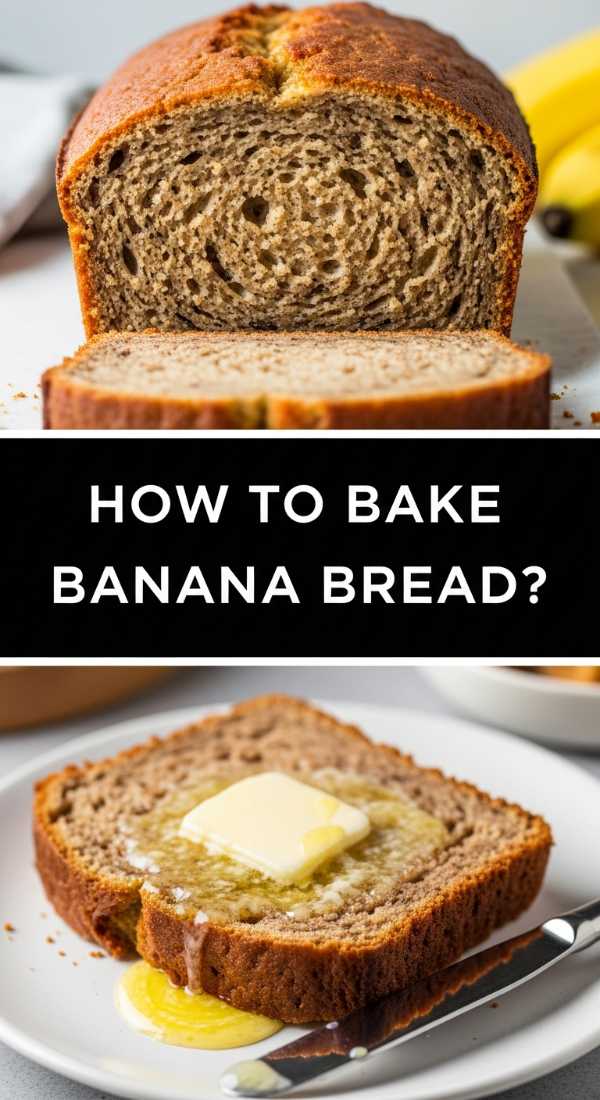
Why we love this
Every food board needs a touch of sweetness, and a slice of moist banana bread is the ultimate comfort addition. The aroma of cinnamon and caramelized sugar wafting from the oven is enough to make any house feel like a home. This bread features a tight, tender crumb and a slightly crusty, golden top that shatters perfectly when bitten into. It is the best way to use up those freckled, overripe bananas, transforming them into a dense, sweet treat that pairs beautifully with a cup of sun tea.
Ingredients
- 3 very ripe bananas, mashed
- 1/3 cup melted unsalted butter
- 3/4 cup granulated sugar
- 1 large egg, beaten
- 1 tsp vanilla extract
- 1.5 cups all-purpose flour
- 1 tsp baking soda and a pinch of salt
How to make it
- Preheat your oven to 350°F (175°C) and grease a 4×8-inch loaf pan thoroughly with butter or non-stick spray.
- In a large mixing bowl, mash the ripe bananas with a fork until they are almost liquid with only a few small chunks remaining for texture.
- Stir in the melted butter, followed by the sugar, beaten egg, and vanilla extract. Whisk until the mixture is smooth and pale.
- Sift the flour, baking soda, and salt directly into the wet ingredients. This ensures there are no lumps and the leavening agent is evenly distributed.
- Use a spatula to fold the dry ingredients into the wet. Stop as soon as you see no more streaks of flour. Over-mixing will lead to a tough, rubbery loaf.
- Pour the batter into the prepared pan and bake for 50-60 minutes. Test for doneness by inserting a toothpick into the center; it should come out clean or with just a few moist crumbs attached. Let it cool in the pan for 10 minutes before transferring to a wire rack.
Zesty Lemonade Dessert Bars

Why we love this
These lemonade bars are like a burst of sunshine in dessert form. We love the architectural layers: a thick, buttery shortbread crust topped with a vibrant, tart lemon curd that sets into a silky, translucent yellow. They are the perfect balance of sweet and sour, providing a bright finish to a savory food board. When dusted with a snowfall of powdered sugar, they look elegant and inviting, making them a viral favorite for a reason—they are as photogenic as they are delicious.
Ingredients
- Crust: 1 cup butter (softened), 2 cups flour, 1/2 cup sugar
- Filling: 4 eggs, 1.5 cups sugar, 1/4 cup flour, 1/2 cup fresh lemon juice
- Zest of 2 lemons
- Powdered sugar for dusting
How to make it
- Preheat your oven to 350°F. Line a 9×13 inch baking pan with parchment paper, leaving an overhang on the sides for easy removal.
- In a medium bowl, blend the softened butter, 2 cups of flour, and 1/2 cup of sugar until a crumbly dough forms. Press this mixture firmly and evenly into the bottom of the pan.
- Bake the crust for 18-20 minutes or until the edges are just barely starting to turn a light golden brown.
- While the crust bakes, whisk together the eggs, 1.5 cups sugar, 1/4 cup flour, lemon juice, and lemon zest in a bowl. Whisk until the mixture is frothy and the sugar has begun to dissolve.
- Pour the lemon mixture directly over the hot crust as soon as it comes out of the oven. This helps the layers bond together.
- Return to the oven and bake for another 20-25 minutes until the filling is set and doesn’t jiggle in the center. Let the bars cool completely at room temperature, then refrigerate for at least 4 hours. Dust with powdered sugar just before slicing into squares.
Savory Sourdough Discard Crackers

Why we love this
If you are a sourdough baker, you know the guilt of throwing away discard. These crackers are the perfect solution, offering a deep, fermented tang that you just can’t get from store-bought snacks. They are incredibly thin and crisp, flecked with herbs and sea salt, making them the ideal vessel for dipping into Rotel or pairing with cheese. The satisfying snap of a homemade cracker adds a professional, artisanal touch to your food board that will leave your guests asking for the recipe.
Ingredients
- 1 cup sourdough discard (unfed)
- 1/4 cup unsalted butter, melted
- 1 cup all-purpose flour
- 1/2 tsp fine sea salt
- 2 tsp dried herbs (like rosemary or herbes de Provence)
- Flaky sea salt for topping
How to make it
- In a medium bowl, combine the sourdough discard, melted butter, flour, sea salt, and dried herbs. Mix until a cohesive, slightly stiff dough forms.
- Divide the dough into two equal portions. Place one portion on a large sheet of parchment paper and flatten it slightly with your hand.
- Place another sheet of parchment on top and use a rolling pin to roll the dough out until it is paper-thin (about 1/16th of an inch). The thinner the dough, the crispier the cracker.
- Remove the top sheet of parchment. Use a pizza cutter or a sharp knife to score the dough into 1-inch squares. Sprinkle the surface with a generous pinch of flaky sea salt.
- Transfer the parchment paper directly onto a baking sheet. Bake at 325°F for 20-25 minutes. You are looking for a deep golden brown color across the entire sheet.
- Allow the crackers to cool completely on the pan; they will continue to crisp up as they reach room temperature. Snap them along the scored lines and store in an airtight container.
Conclusion: The Joy of the Shared Board
Creating a food board isn’t just about the recipes; it’s about the intention behind the gathering. By mixing these vibrant salads, juicy proteins, and artisanal snacks, you create a tapestry of flavors that invites people to linger longer and talk deeper. These dishes are designed to be accessible yet impressive, proving that you don’t need a culinary degree to host a viral-worthy spread. So, grab a board, start prepping, and watch as your table becomes the heart of your home.