
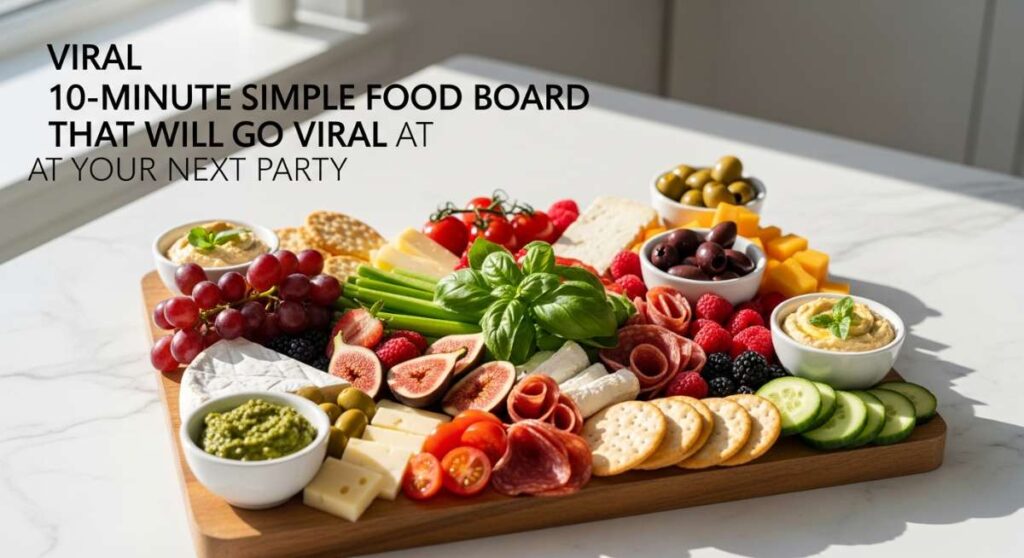
We’ve all been there—the doorbell rings in ten minutes, your living room is a sea of pillows, and you haven’t even thought about what to put on the table. But here’s the secret: hosting doesn’t have to mean hours of sweat in the kitchen. There is a certain magic in the ‘thrown-together’ aesthetic that guests absolutely adore, and that’s exactly where the viral food board comes into play.
Food boards are more than just a trend; they are a lifestyle. They encourage guests to linger, to pick at a bit of brie, or to grab a handful of fresh berries while sharing a laugh. It’s about creating an edible landscape that feels abundant and effortless. Today, I’m sharing my favorite ways to transform simple ingredients into stunning, party-ready boards that will have everyone reaching for their phones to snap a photo before the first bite.
How to bake graduation cakes
Why we love this
There is nothing quite like the scent of a fresh vanilla sponge wafting through the house to signal a true celebration. These mini graduation cakes are designed to be the centerpiece of a dessert board, offering a soft, velvety crumb that melts against a rich, silky buttercream frosting. The contrast between the light, airy cake and the structured, sweet topping creates a decadent experience that feels both nostalgic and sophisticated, making every graduate feel like the star of the show.
Ingredients
- 2 1/4 cups all-purpose flour
- 1 1/2 cups granulated sugar
- 3 1/2 tsp baking powder
- 1 cup whole milk, room temperature
- 1/2 cup unsalted butter, softened
- 1 tbsp vanilla extract
- 2 large eggs
How to make it
- Preheat your oven to 350°F (175°C) and grease a multi-cavity mini cake pan or a standard cupcake tin to ensure the cakes release cleanly.
- In a large mixing bowl, sift together the flour and baking powder to aerate the dry ingredients, which ensures a lighter texture.
- Using a stand mixer with a paddle attachment, cream the softened butter and sugar on medium-high speed for about 3-5 minutes until the mixture is pale and fluffy.
- Add the eggs one at a time, beating well after each addition to fully emulsify the fats and liquids.
- Alternate adding the dry ingredients and the milk in three batches, starting and ending with the flour mixture; stir just until combined to avoid overworking the gluten.
- Fill each cavity about two-thirds full and bake for 18-22 minutes, or until a toothpick inserted into the center comes out clean and the tops spring back when lightly pressed.
- Allow the cakes to cool in the pan for 10 minutes before transferring them to a wire rack to cool completely before any frosting is applied.
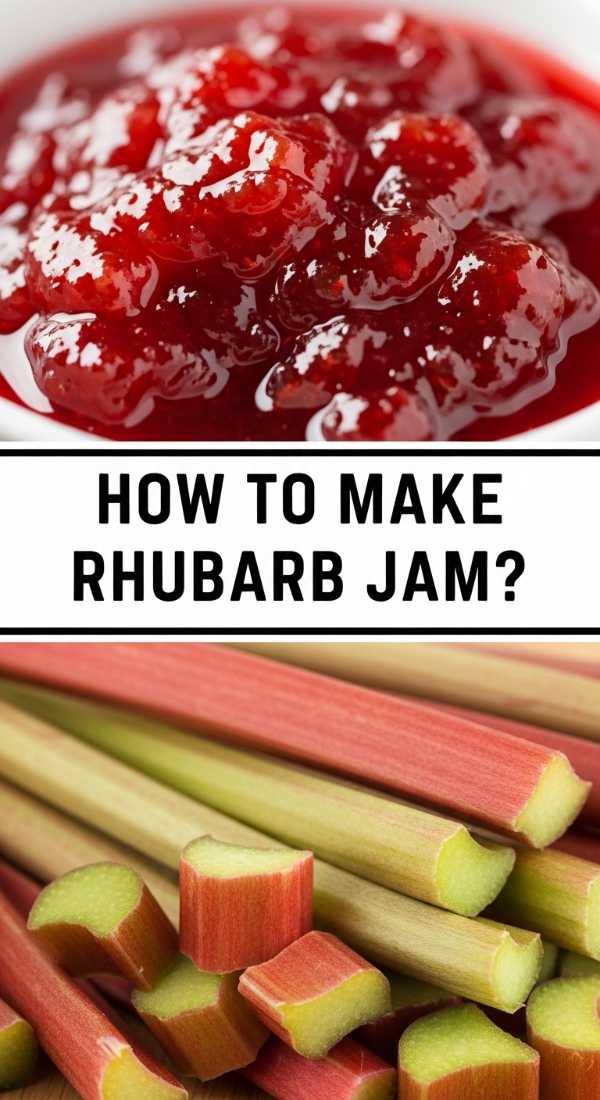
How to make rhubarb jam

Why we love this
Rhubarb jam is the ultimate ‘secret weapon’ for any food board, providing a sharp, tangy counterpoint to creamy cheeses and buttery crackers. Its vibrant, ruby-red hue adds a stunning pop of color to your spread, while the texture is thick and luscious, clinging perfectly to a toasted baguette. The aroma is a delightful mix of tart fruit and caramelized sugar, evoking memories of sunny afternoons in a summer garden and adding a sophisticated edge to your party spread.
Ingredients
- 4 cups chopped rhubarb (1-inch pieces)
- 1 1/2 cups granulated sugar
- 1 tbsp lemon juice
- 1 tsp lemon zest
- 1/2 tsp vanilla bean paste
How to make it
- Combine the chopped rhubarb and sugar in a heavy-bottomed saucepan, stirring well to coat the fruit thoroughly.
- Let the mixture sit at room temperature for about 30 minutes; this ‘macerating’ process draws out the natural juices and creates a built-in syrup.
- Place the saucepan over medium heat and bring the mixture to a gentle boil, stirring frequently with a wooden spoon to prevent the sugar from scorching.
- Add the lemon juice and zest, which provides the necessary acidity to help the natural pectin set.
- Reduce the heat to low and simmer for 15-20 minutes, skimming off any foam that rises to the surface with a metal spoon.
- Test for doneness by placing a small spoonful of jam on a chilled plate; if it wrinkles when pushed with a finger, it has reached the setting point (approximately 220°F).
- Stir in the vanilla bean paste, remove from heat, and allow to cool before transferring to sterilized glass jars.
How to design funny cakes
Why we love this
Humor is the best ingredient for a viral party moment, and these small ‘funny cakes’ are designed to spark conversation. Whether it’s a witty quote in shaky handwriting or a derpy-looking buttercream animal, these cakes bring a sense of playfulness to your food board. The texture of the piped frosting adds a tactile element that guests love, while the whimsical designs break the ice and turn your dessert spread into a memorable, Instagrammable experience.
Ingredients
- 6-inch round cake layers (pre-baked)
- 4 cups stiff vanilla buttercream
- Gel food coloring (various colors)
- Piping bags and small round tips
- Offset spatula
How to make it
- Place your first cake layer on a rotating cake stand and apply a thin layer of buttercream using an offset spatula to create a smooth ‘crumb coat.’
- Chill the cake for 20 minutes to set the crumb coat, which ensures no stray crumbs ruin your final design.
- Apply a thick, final layer of colored buttercream, smoothing the sides with a bench scraper for a professional, clean finish.
- Sketch your funny design or text lightly onto the top of the cake using a toothpick as a guide.
- Fit your piping bags with small round tips and fill them with high-contrast colors of buttercream to make the jokes or drawings pop.
- Steady your hand by resting your elbow on the table and pipe the design with consistent pressure, pulling away quickly at the end of each stroke.
- Add small decorative borders or ‘sprinkle’ accents to frame the humor and make the cake look intentionally chaotic yet polished.
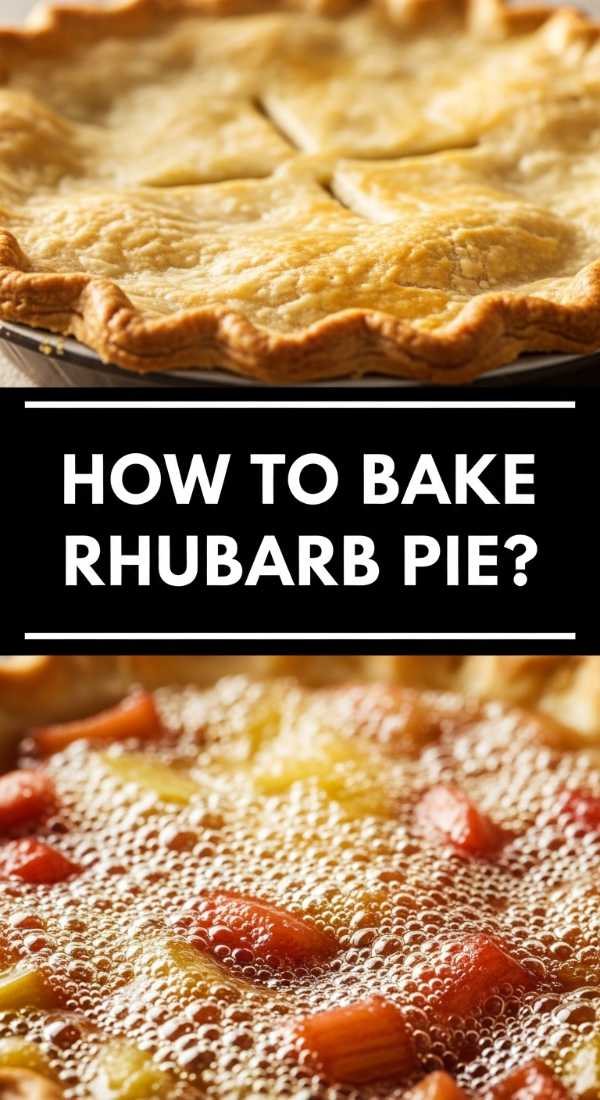
How to bake rhubarb pie

Why we love this
Rhubarb pie is the quintessential comfort food, offering a flaky, buttery crust that shatters beautifully with every forkful. The filling is a masterclass in balance, where the aggressive tartness of the rhubarb is tempered by a sweet, jammy glaze that bubbles over the edges of the pastry. The warm, earthy aroma of toasted flour and baked fruit creates an inviting atmosphere that makes guests feel instantly at home, especially when served as mini slices on a shared board.
Ingredients
- Double pie crust pastry (chilled)
- 5 cups sliced rhubarb
- 1 1/4 cups sugar
- 1/4 cup cornstarch
- 1/2 tsp cinnamon
- 1 tbsp cold butter (cubed)
- 1 egg (for wash)
How to make it
- Preheat your oven to 425°F (220°C) and place a baking sheet on the bottom rack to catch any juices that might bubble over.
- In a large bowl, toss the sliced rhubarb with sugar, cornstarch, and cinnamon until the fruit is evenly coated; the cornstarch is vital for thickening the juices.
- Roll out the bottom pastry disc on a floured surface and fit it into a 9-inch pie plate, leaving an inch of overhang.
- Pour the rhubarb mixture into the crust and dot the top with the small cubes of cold butter to add richness and shine to the filling.
- Roll out the second pastry disc and either place it over the top as a full lid (with vents cut in) or cut into strips for a lattice design.
- Crimp the edges tightly to seal the pie and brush the entire top with a beaten egg wash for a golden-brown finish.
- Bake at 425°F for 15 minutes, then reduce the heat to 375°F and bake for another 40-50 minutes until the crust is deep golden and the filling is bubbling thick.
How to decorate graduation cookies
Why we love this
Graduation cookies are the perfect edible keepsakes, offering a crisp, buttery snap followed by the smooth, sweet crunch of royal icing. Decorating them is an art form that adds a personal touch to your food board, allowing you to incorporate school colors and tiny mortarboards. The precision of the icing creates a visually stunning array of treats that feel high-end and celebratory, providing a satisfying sweet finish to any festive gathering.
Ingredients
- Sugar cookie cutouts (caps and diplomas)
- Royal icing (flooding and piping consistency)
- Gel food colors
- Scribe tool or toothpick
- Edible gold luster dust (optional)
How to make it
- Outline the edge of your cooled sugar cookies with the stiff piping-consistency icing to create a ‘dam’ that will hold the thinner icing in place.
- Fill the center of the outline with the thinner flooding-consistency icing, using a scribe tool to move the icing into the corners and pop any air bubbles.
- Allow the base layer of icing to dry completely for at least 6-8 hours; this prevents the colors from bleeding when you add the second layer of detail.
- Use a small piping tip to add details like the tassel on the graduation cap or the ribbon on the diploma using a contrasting color.
- For a metallic touch, mix a tiny drop of vodka with gold luster dust and paint it onto the tassels once the icing is firm.
- Work in a low-humidity environment to ensure the icing dries with a high-shine, professional finish.
- Store the finished cookies in an airtight container between layers of parchment paper until you are ready to assemble your board.
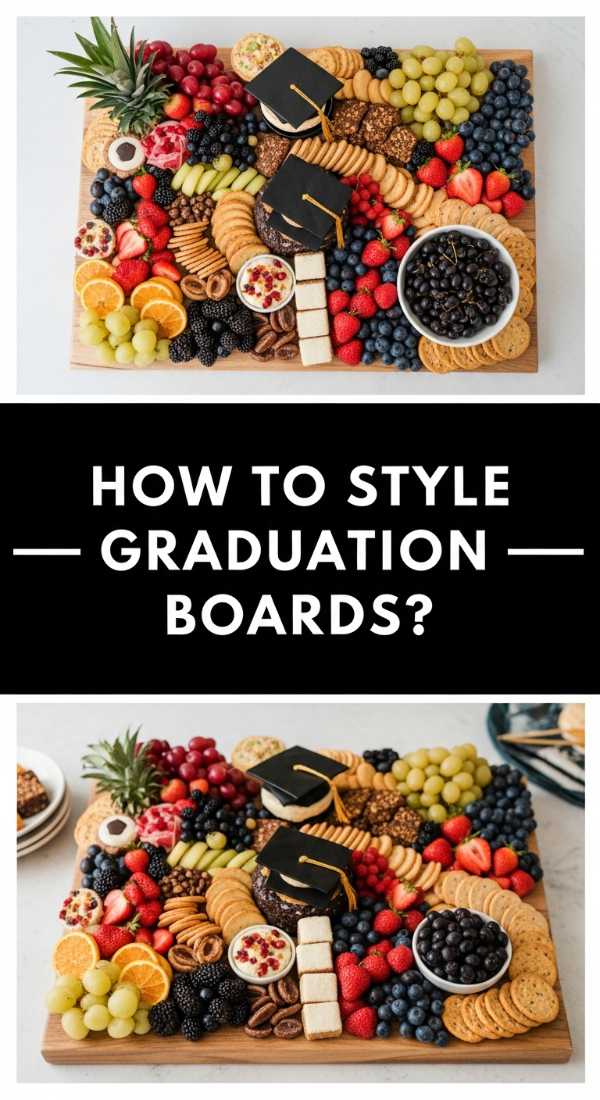
How to style graduation boards
Why we love this
Styling a graduation board is about telling a story of achievement through textures and colors. We love this approach because it moves away from traditional plated desserts and encourages a communal, grazing experience. The mix of soft cakes, crunchy cookies, and fresh, glistening fruit creates a visual feast that feels abundant. It’s the perfect way to display all your hard work in the kitchen in a way that feels modern, accessible, and totally viral-worthy.
Ingredients
- Mini graduation cakes
- Decorated cookies
- Fresh strawberries and grapes
- Small bowls of rhubarb jam
- Assorted nuts or chocolates
- Sprigs of mint for garnish
How to make it
- Select a large wooden board or marble slab as your canvas, ensuring it is clean and food-safe.
- Start by placing your largest items first—the mini cakes and bowls of jam—to create ‘anchor points’ that provide structure to the board.
- Arrange the graduation cookies in a sweeping ‘S’ shape or a fan pattern around the anchor points to create a sense of movement.
- Fill the larger gaps with clusters of fresh fruit, like bunches of grapes or sliced strawberries, to add organic shapes and bright colors.
- Tuck small handfuls of nuts or chocolates into the remaining tiny spaces to ensure the board looks completely full and lush.
- Garnish with fresh mint sprigs or edible flowers to add a touch of green and a fresh, herbal fragrance to the display.
- Check the board from multiple angles and heights, adjusting pieces to ensure a balanced distribution of color and texture before serving.
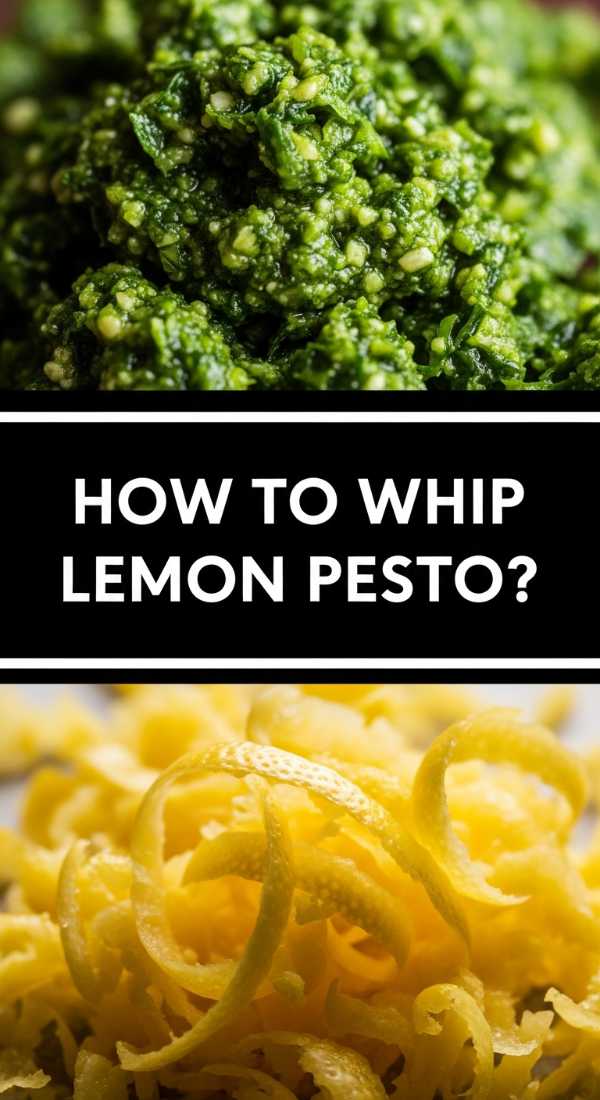
How to whip lemon pesto

Why we love this
This lemon pesto is a bright, zesty revelation that cuts through the richness of a cheese board like a ray of sunshine. The aroma is an intoxicating blend of fresh basil and sharp citrus, while the texture is slightly chunky and rustic, providing a satisfying mouthfeel. It’s a versatile spread that feels incredibly fresh, making it the perfect dip for crackers or a topping for soft goat cheese, ensuring your food board has a sophisticated, savory edge.
Ingredients
- 2 cups fresh basil leaves, packed
- 1/2 cup grated Parmesan cheese
- 1/3 cup toasted pine nuts
- 2 cloves garlic, peeled
- 1/2 cup extra virgin olive oil
- Zest and juice of 1 large lemon
- Pinch of sea salt
How to make it
- Toast the pine nuts in a dry skillet over medium heat for 2-3 minutes until they are golden and fragrant; this releases their natural oils and deepens the flavor.
- Place the basil, toasted nuts, garlic, and Parmesan in a food processor and pulse 5-7 times until the ingredients are coarsely chopped.
- With the processor running on low, slowly drizzle in the olive oil in a steady stream to create a creamy, emulsified texture.
- Stop and scrape down the sides of the bowl with a rubber spatula to ensure every leaf is incorporated.
- Add the lemon zest and juice, then pulse 2-3 more times; the acid in the lemon will brighten the color and sharpen the flavor profile.
- Season with a pinch of sea salt to taste, but be cautious as the Parmesan is already naturally salty.
- Transfer to a small ramekin and drizzle a thin layer of olive oil over the top to prevent oxidation and keep the pesto vibrant green.
How to make fancy coffee
Why we love this
A fancy coffee station is the ultimate ‘pro-host’ move that turns a simple party into an experience. The smell of freshly ground beans and steamed milk creates a cozy, cafe-like ambiance that guests find irresistible. We love the velvety, micro-foam texture of a well-poured latte and the rich, complex notes of a high-quality espresso. Serving elevated coffee alongside your food boards adds a layer of warmth and hospitality that keeps the conversation flowing long into the evening.
Ingredients
- Freshly roasted espresso beans
- Filtered water
- Whole milk or oat milk
- Vanilla or caramel syrup (optional)
- Cocoa powder for dusting
How to make it
- Grind your espresso beans to a fine, sandy consistency just before brewing to ensure maximum flavor extraction and a rich crema.
- Tamp the coffee grounds into the portafilter with firm, even pressure (about 30 lbs of force) to ensure the water flows through the grounds evenly.
- Pull a double shot of espresso (about 2 ounces) into a pre-warmed glass, aiming for a 25-30 second extraction time for the perfect balance of sweetness and acidity.
- Purge your steam wand and then submerge the tip just below the surface of the milk, creating a ‘tsh-tsh’ sound for about 3-5 seconds to aerate.
- Submerge the wand deeper and tilt the pitcher to create a vortex, heating the milk to 150°F (65°C) until the pitcher is almost too hot to touch.
- Tap the pitcher on the counter and swirl to remove large bubbles, creating a glossy ‘wet paint’ texture in the foam.
- Pour the steamed milk into the espresso, starting high to go under the crema and then lowering the pitcher to create a heart or leaf pattern on the surface.
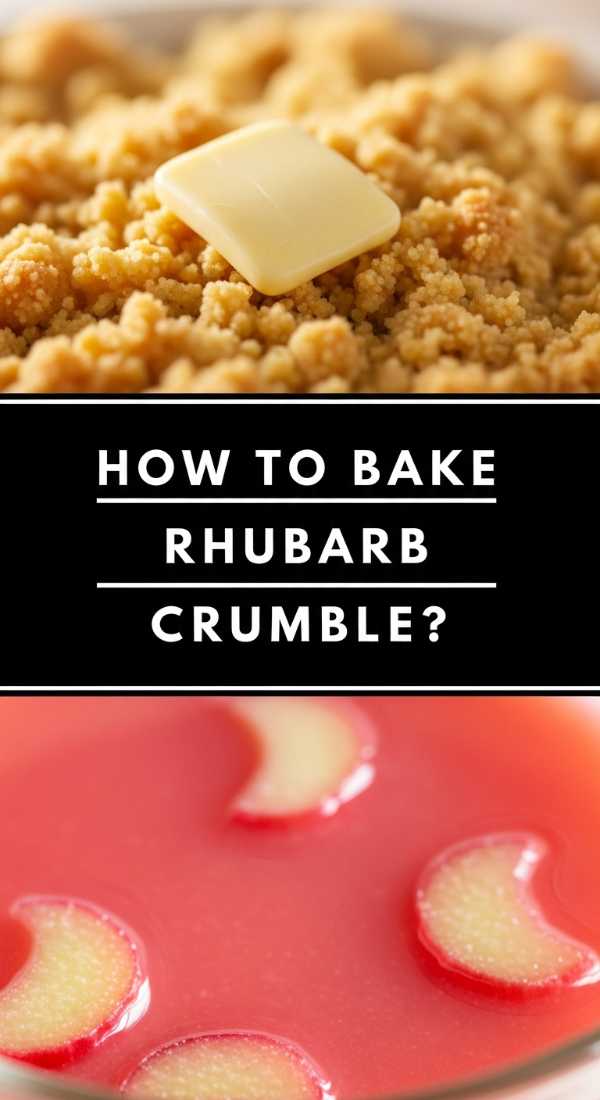
How to bake rhubarb crumble
Why we love this
Rhubarb crumble is all about the glorious contrast between the crunchy, buttery oat topping and the soft, melting fruit beneath. When baked, the rhubarb releases its juices to create a thick, tart sauce that is perfectly offset by the sweetness of the crumble. The aroma of cinnamon and toasted oats is pure comfort, making this a fantastic addition to a ‘warm’ food board where guests can scoop portions into small bowls with a dollop of cold cream.
Ingredients
- 4 cups chopped rhubarb
- 3/4 cup granulated sugar
- 1 cup rolled oats
- 1 cup all-purpose flour
- 1/2 cup packed brown sugar
- 1/2 cup cold unsalted butter (cubed)
- 1 tsp cinnamon
How to make it
- Preheat your oven to 375°F (190°C) and lightly butter a 9×9 inch baking dish to prevent the fruit from sticking.
- Toss the rhubarb with the granulated sugar in the bottom of the baking dish, spreading it out into an even layer.
- In a medium bowl, combine the flour, oats, brown sugar, and cinnamon, stirring to distribute the spices evenly.
- Use your fingertips or a pastry cutter to rub the cold, cubed butter into the dry ingredients until the mixture resembles coarse, pea-sized crumbs.
- Sprinkle the crumble mixture generously over the rhubarb, ensuring you don’t press it down; keeping it loose allows for more crunch.
- Bake for 35-40 minutes until the fruit juices are bubbling up around the edges and the topping is a deep, golden brown.
- Let the crumble rest for 10-15 minutes before serving to allow the juices to thicken slightly, making it easier to serve.
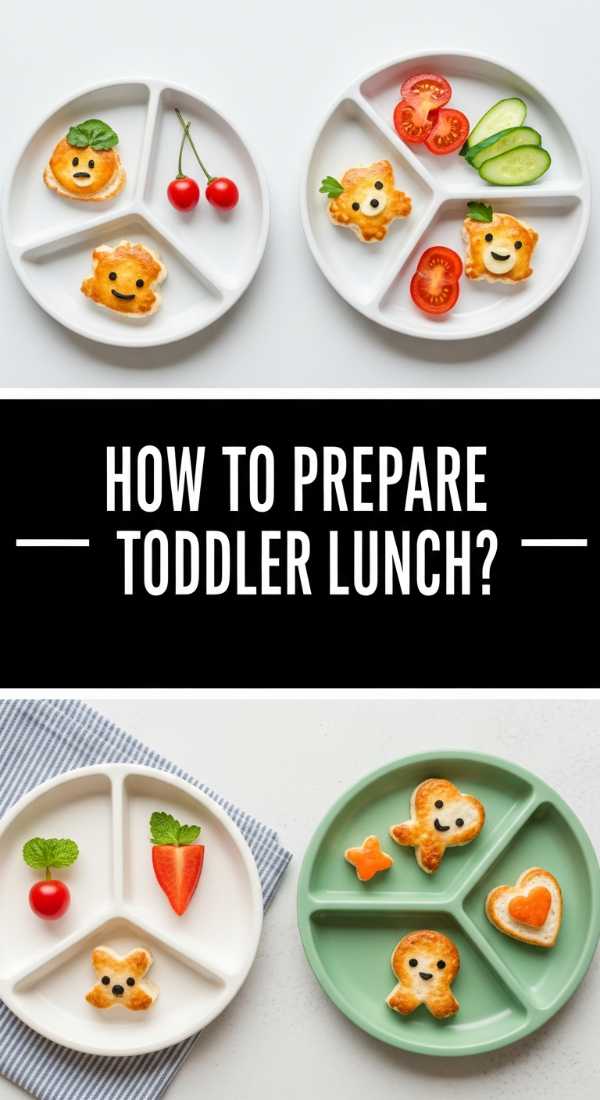
How to prepare toddler lunch
[IMAGE_10]
Why we love this
Preparing a toddler-friendly food board is about making healthy eating fun and accessible. We love this approach because it uses bright colors, interesting shapes, and varied textures to pique a child’s curiosity. The soft cheeses, crunchy veggie sticks, and sweet fruit bits provide a balanced meal that toddlers can explore at their own pace. It removes the ‘battle’ of mealtime and replaces it with a playful, grazing experience that keeps little hands busy and bellies full.
Ingredients
- Mild cheddar cheese cubes
- Cucumber slices and carrot sticks
- Whole grain crackers
- Turkey slices (rolled up)
- Blueberries and apple slices
- Hummus for dipping
How to make it
- Select a durable, BPA-free tray or a small wooden board that is easy for a child to reach across.
- Use small cookie cutters to turn cucumber slices or cheese into fun shapes like stars or hearts, which makes them instantly more appealing to toddlers.
- Arrange the items in distinct sections or ‘nests’ to keep the different flavors and textures separate, as many toddlers prefer their food not to touch.
- Peel and slice apples into thin wedges, dipping them in a bit of lemon water to prevent browning if the board will be sitting out for a while.
- Roll the turkey slices into tight cylinders that are easy for small hands to grip and dip into the hummus.
- Place a small, colorful bowl of hummus in the corner of the tray to act as a ‘dipping station.’
- Ensure all items are cut into safe, bite-sized pieces and serve at room temperature for the best palatability.
Conclusion
Hosting a party shouldn’t feel like a chore, and with these food board ideas, it never will. Whether you are celebrating a big graduation or just trying to get a toddler to eat their lunch, the key is in the presentation and the love you put into the details. From the tart zing of rhubarb jam to the playful humor of a funny cake, these elements bring people together. So, grab your favorite board, start assembling, and watch as your creation becomes the talk of the night!
FAQ
Can I make these boards ahead of time? Yes! Most components like the jam, cookies, and pesto can be made days in advance. However, assemble the fresh fruit and crunchy elements just before serving to keep them at their best.
How do I keep my rhubarb jam from being too runny? Ensure you cook it until it reaches 220°F or passes the ‘plate test.’ The lemon juice is also crucial as it helps the natural pectin set properly.
What is the best board for serving? Wooden boards are classic, but marble is excellent for keeping cheeses and chocolates cool. Just make sure whatever you use is food-grade and easy to clean.