

The 10-Minute Viral Food Board That’s Taking Over My Feed
There is something undeniably magical about a gathering that centers around a beautifully curated spread. I remember the first time I set out a massive board for my friends; the room instantly filled with the sounds of laughter, the clinking of glasses, and the shared joy of discovering a new flavor combination. It wasn’t just about the food; it was about the atmosphere of effortless elegance that a well-styled board creates, making every guest feel special and every moment feel like a celebration.
Lately, my social media feed has been dominated by these ‘viral food boards’ that seem to elevate the simplest ingredients into works of art. Whether it’s a graduation celebration, a cozy summer brunch, or just a Tuesday afternoon pick-me-up, these boards are the ultimate way to serve a crowd without spending all day in the kitchen. Today, I’m sharing my favorite elements to include, ranging from sweet treats to savory snacks, to help you build your own show-stopping display.
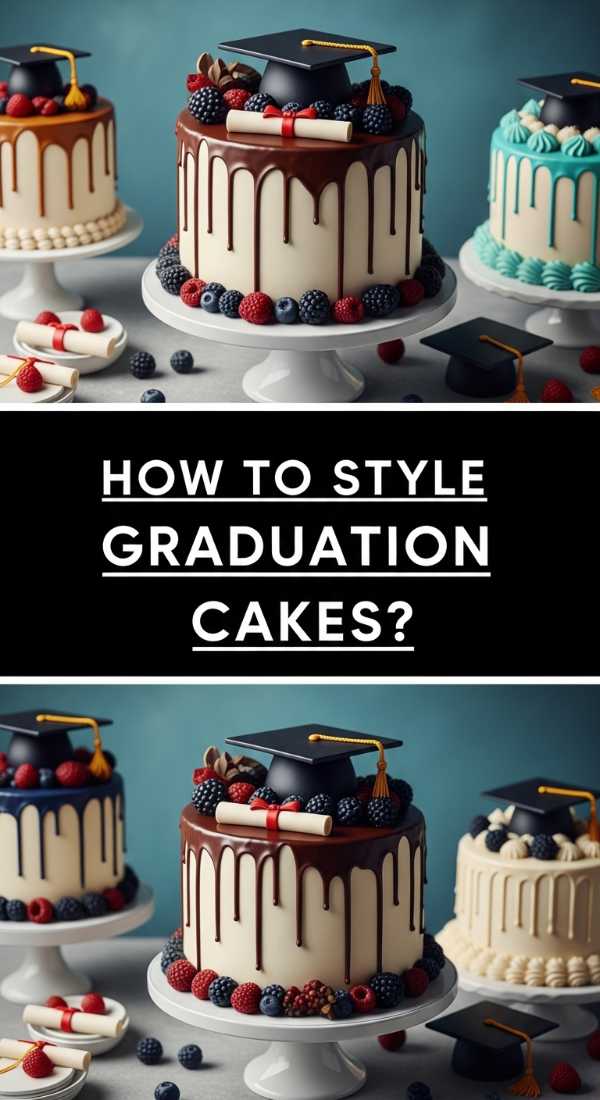
How to style graduation cakes?
Why we love this
A graduation cake is more than just a dessert; it is a centerpiece that captures the essence of achievement and the sweet taste of success. We love the way a perfectly styled cake glows under the party lights, with its velvety smooth frosting providing a canvas for elegant gold leaf accents or whimsical mortarboard toppers. There is a deep sense of satisfaction in slicing through layers of moist sponge and rich filling, the aroma of vanilla and sugar filling the air while friends and family gather around to toast to the future.
Ingredients
- Pre-baked multi-layer round cakes
- Batch of silky Swiss meringue buttercream
- Edible gold leaf or metallic sprinkles
- Fresh, organic flowers or custom cake toppers
- Offset spatula and a revolving cake stand
How to make it
- Begin by placing your first cake layer onto a sturdy cardboard round or a rotating cake stand, securing it with a small dollop of frosting to prevent sliding.
- Apply an even layer of buttercream using your offset spatula, ensuring it reaches the very edges to create a level foundation for the next layer.
- Repeat the process until all layers are stacked, then apply a thin ‘crumb coat’ of frosting over the entire cake to trap any loose crumbs; refrigerate for 30 minutes until firm to the touch.
- Apply the final thick layer of frosting, using a bench scraper held at a 90-degree angle to the cake while slowly rotating the stand for a perfectly smooth, professional finish.
- Add your decorative elements by gently pressing gold leaf onto the sides with a dry brush or arranging fresh blooms in a sweeping crescent shape across the top for a modern, sophisticated look.
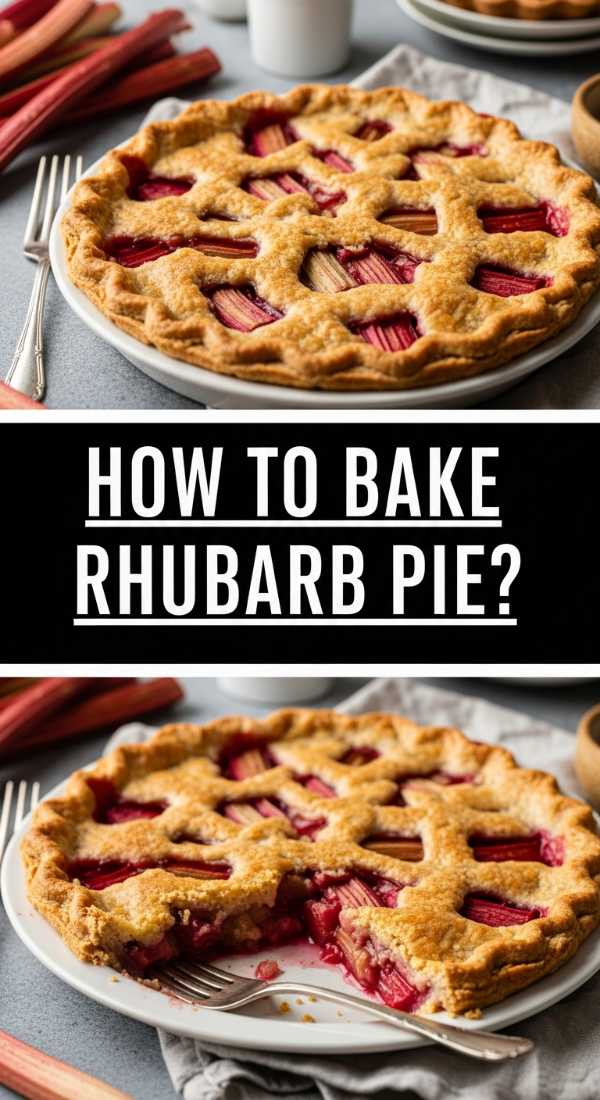
How to bake rhubarb pie?
Why we love this
Rhubarb pie is the quintessential taste of early summer, offering a delightful contrast between the aggressive tartness of the stalks and the buttery, flaky embrace of a homemade crust. As it bakes, the kitchen transforms into a sanctuary of warmth, smelling of caramelized sugar and earthiness that only fresh rhubarb can provide. There is a visceral joy in seeing the bright ruby juices bubbling through the lattice top, promising a bite that is both crisp on the outside and wonderfully jammy and tender on the inside.
Ingredients
- Double pie crust dough (chilled)
- 4 cups fresh rhubarb, sliced into 1-inch pieces
- 1 1/4 cups granulated sugar
- 3 tablespoons cornstarch
- 1 tablespoon unsalted butter (cubed)
- 1 egg wash (1 egg beaten with 1 tablespoon water)
How to make it
- Preheat your oven to 400°F (200°C) and position a rack in the lower third of the oven to ensure the bottom crust becomes golden and crisp rather than soggy.
- In a large mixing bowl, toss the sliced rhubarb with sugar and cornstarch until every piece is thoroughly coated; let this sit for 15 minutes to allow the natural juices to draw out.
- Roll out your bottom crust on a floured surface until it is 12 inches in diameter, then gently drape it into your pie plate, trimming any excess to a 1-inch overhang.
- Pour the rhubarb mixture into the shell, dot the top with small cubes of butter for extra richness, and cover with the second crust or a woven lattice design.
- Brush the top generously with the egg wash for a glossy finish, then bake for 45-50 minutes, or until the crust is a deep golden brown and the filling is thick and bubbling aggressively.
How to decorate graduation cookies?

Why we love this
Decorating graduation cookies is an exercise in creativity and celebration, allowing you to personalize every bite with school colors and symbols of success. We adore the satisfying ‘snap’ of a well-baked sugar cookie paired with the smooth, matte finish of royal icing that melts on the tongue. The process of piping intricate tassels and diplomas is almost meditative, resulting in a platter of treats that are as visually stunning as they are delicious, evoking a sense of pride in every detail.
Ingredients
- Chilled sugar cookies cut into graduation shapes
- Royal icing in various school colors
- Piping bags with small round tips (#1 or #2)
- Scribe tool or toothpick for smoothing
- Edible markers for fine details
How to make it
- Outline your cookie shapes using a high-consistency ‘piping’ icing, creating a firm border that will act as a dam for the more fluid icing to follow.
- Fill the center of the outlined areas with a thinner ‘flood’ consistency icing, using a scribe tool to gently nudge the icing into every corner and pop any small air bubbles.
- Allow the base layer to dry completely—usually 6 to 12 hours depending on humidity—before adding secondary layers like tassels or year ‘2024’ lettering to prevent color bleeding.
- For a professional touch, use metallic edible paint to highlight the tassels or the edges of the diploma, applying it with a very fine food-safe brush once the icing is bone-dry.
- Let the cookies set in a cool, dry place until the icing is hard enough to stack, ensuring the designs remain pristine for the big celebration.
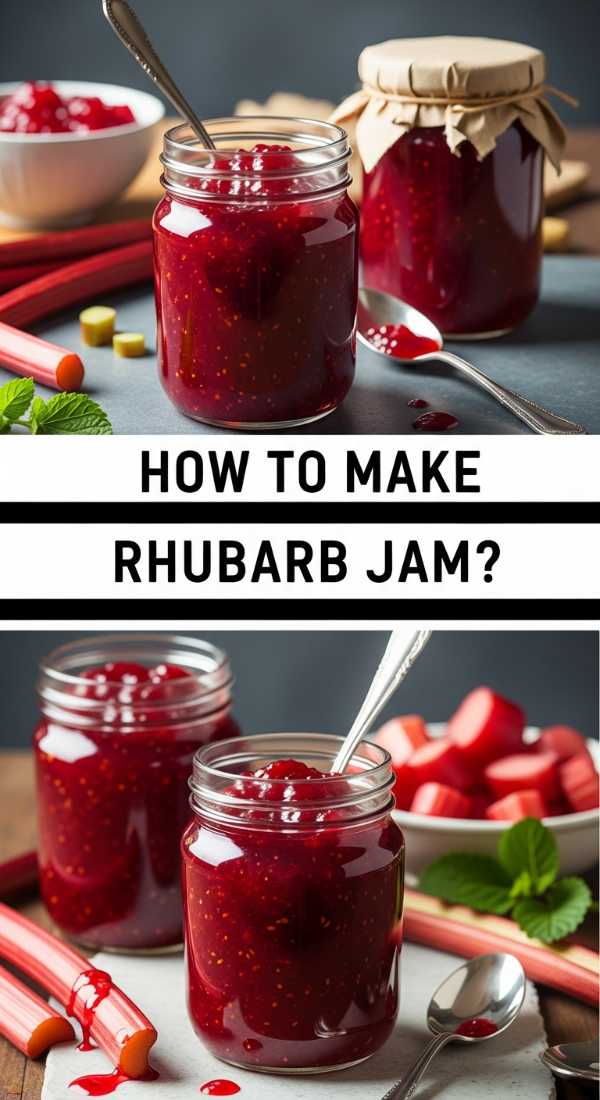
How to make rhubarb jam?
Why we love this
Making rhubarb jam is like capturing sunshine and spring in a jar, resulting in a vibrant, jewel-toned spread that brightens any breakfast table. The aroma of simmering rhubarb and citrus zest is intoxicating, filling the home with a scent that is both sharp and sweet. We love the way the thick, textured jam glides over warm toast, providing a concentrated burst of tart flavor that lingers on the palate and pairs beautifully with creamy butter or sharp cheeses.
Ingredients
- 2 lbs fresh rhubarb, chopped into small bits
- 3 cups granulated sugar
- 1 tablespoon lemon juice
- 1 teaspoon lemon zest
- 1/2 teaspoon pure vanilla bean paste
How to make it
- Combine the chopped rhubarb and sugar in a heavy-bottomed pot and let it macerate for at least 2 hours at room temperature until the sugar has completely dissolved into a syrup.
- Place the pot over medium heat and bring the mixture to a steady, rolling boil, stirring frequently with a wooden spoon to prevent the bottom from scorching.
- Incorporate the lemon juice and zest, which provide the natural pectin needed for the jam to set properly without artificial thickeners.
- Continue to simmer for 15-20 minutes, using a candy thermometer to reach 220°F (104°C), which is the ‘gel point’ where the jam will thicken as it cools.
- Stir in the vanilla bean paste at the very end for a sophisticated floral note, then ladle the hot jam into sterilized jars, leaving a 1/4 inch headspace before sealing.
How to frost graduation cupcakes?

Why we love this
Graduation cupcakes offer a playful and portable way to celebrate, featuring clouds of silky frosting that beckon guests to take just one more. There is a specific delight in the way a perfectly piped swirl holds its shape, reflecting the light and providing a luscious, creamy texture that complements a light, airy cake base. Topped with miniature caps or edible glitter, these cupcakes become tiny monuments to achievement that bring a smile to everyone’s face with their festive charm.
Ingredients
- Freshly baked cupcakes (cooled completely)
- Crusty American buttercream or silky Swiss meringue
- Large piping bag fitted with a 1M or 2D star tip
- School-themed sprinkles or fondant graduation caps
- Gel food coloring in school colors
How to make it
- Ensure your cupcakes are 100% cool to the touch; even a hint of warmth will cause the delicate fats in the frosting to melt and slide off the cake.
- Fit your piping bag with a large star tip and fill it halfway with frosting, squeezing out any air pockets to ensure a continuous, smooth flow of icing.
- Hold the bag vertically over the center of the cupcake, starting at the outer edge and piping in a circular motion, moving inward and upward to create a tall, elegant spiral.
- Apply a steady, even pressure throughout the motion, ending with a quick ‘flick’ of the wrist at the center peak to create a clean, professional point.
- Immediately add your sprinkles or fondant toppers while the frosting is still tacky so they adhere properly and won’t fall off during transport.
How to prepare rhubarb crumble?

Why we love this
Rhubarb crumble is the ultimate comfort food, striking a perfect balance between the tender, tart fruit and a crunchy, buttery topping that shatters with every spoonful. We love the rustic, unpretentious nature of this dish, especially when served warm from the oven with a melting scoop of vanilla bean ice cream. The way the topping absorbs just enough of the pink rhubarb juice to become slightly chewy on the bottom while staying toasted on top is a textural masterpiece that feels like a warm hug.
Ingredients
- 5 cups rhubarb, cut into 1/2-inch pieces
- 3/4 cup sugar (for the fruit)
- 1 cup old-fashioned rolled oats
- 1 cup all-purpose flour
- 1 cup brown sugar, packed
- 1/2 cup cold unsalted butter, cubed
- 1 teaspoon cinnamon
How to make it
- Preheat your oven to 375°F (190°C) and grease a 9-inch square baking dish with butter to prevent the fruit from sticking to the sides.
- Toss the rhubarb pieces with the white sugar in the baking dish, spreading them into an even layer so they cook at a consistent rate.
- In a separate bowl, combine the oats, flour, brown sugar, and cinnamon, then use a pastry cutter or your fingers to rub the cold butter into the dry ingredients.
- Continue mixing the topping until it resembles coarse crumbs with some pea-sized chunks of butter remaining; this creates the signature ‘crunch’ after baking.
- Sprinkle the crumble mixture evenly over the rhubarb and bake for 35-40 minutes until the fruit is tender and the topping has turned a deep, toasted golden brown.
How to design sheet cakes?

Why we love this
Sheet cakes are the unsung heroes of large celebrations, offering a vast, flat canvas for stunning artistic designs that can feed a whole neighborhood. We love the modern aesthetic of a sheet cake adorned with ‘palette knife’ flowers or sleek, minimalist piping that emphasizes clean lines and vibrant colors. There’s something incredibly satisfying about the uniform, rectangular slices that reveal a perfect ratio of cake to frosting, ensuring every guest gets a bite of the beautiful design and the delicious interior.
Ingredients
- 13×18 inch sheet cake (baked and leveled)
- Large batch of medium-consistency buttercream
- Gel colors and palette knives
- Piping bags with various tips (leaf, petal, round)
- Fresh fruit or edible gold flakes for garnish
How to make it
- Level your cake with a long serrated knife once it is cool to ensure a perfectly flat surface for your design work; this prevents ‘doming’ which can distort patterns.
- Apply a smooth base layer of frosting across the entire surface using a large offset spatula, focusing on making the top as level as possible from edge to edge.
- For a floral design, take small amounts of colored frosting on the tip of a palette knife and ‘swipe’ them onto the cake in short, overlapping strokes to create textured petals.
- Add depth by using different shades of the same color, layering the frosting to create a 3D effect that mimics a real bouquet of flowers across the cake.
- Use a small round piping tip to add delicate ‘stems’ or ‘vines’ between the floral elements, and finish with a scattering of edible gold flakes to add a touch of luxury.
How to mix coffee drinks?

Why we love this
The art of mixing coffee drinks is a sensory journey that starts with the rich, roasted aroma of freshly brewed espresso and ends with a beautifully layered masterpiece. We love the science behind the perfect foam—silky, micro-bubbled milk that creates a creamy mouthfeel and a delicate sweetness that balances the bitterness of the coffee. Watching the dark espresso swirl into the white milk to create a marbling effect is visually mesmerizing and promises a sophisticated caffeine kick that feels like a luxury cafe experience at home.
Ingredients
- 2 shots of high-quality espresso or 1/2 cup cold brew concentrate
- 1 cup milk or oat milk (chilled for frothing)
- 1-2 tablespoons flavored syrup (vanilla, caramel, or lavender)
- Ice cubes (if making a cold drink)
- Cocoa powder or cinnamon for dusting
How to make it
- Brew your espresso or prep your cold brew concentrate first; for a hot drink, ensure your cup is pre-warmed to maintain the optimal drinking temperature.
- If making a latte, steam your milk to between 140°F and 155°F (60-68°C), focusing on creating a ‘whirlpool’ in the pitcher to incorporate air and create that velvet microfoam.
- For an iced drink, fill a tall glass with large ice cubes, pour in your syrup first, followed by the milk, leaving about an inch of space at the top.
- Slowly pour the espresso over the back of a spoon into the glass to create distinct, beautiful layers between the white milk and the dark coffee.
- Finish with a light dusting of cocoa or a drizzle of extra syrup, and serve immediately to enjoy the contrast in temperatures and the evolving flavors as the layers mix.
How to blend lemon pesto?

Why we love this
Lemon pesto is a vibrant, zesty twist on the classic Italian sauce, offering a bright acidity that cuts through the richness of pasta or roasted meats. We love the intoxicating scent of fresh basil being pulverized with garlic and toasted pine nuts, but the addition of lemon zest elevates the aroma to something truly ethereal and summery. The texture is a beautiful balance of coarse nuts, leafy herbs, and silky olive oil, creating a condiment that tastes like a garden in full bloom with a refreshing citrus finish.
Ingredients
- 2 cups fresh basil leaves (packed)
- 1/2 cup freshly grated Parmesan cheese
- 1/3 cup toasted pine nuts or walnuts
- 2 cloves garlic, peeled
- 1/2 cup extra virgin olive oil
- Zest and juice of 1 large organic lemon
- Sea salt and cracked black pepper to taste
How to make it
- Place the basil leaves, pine nuts, and garlic in a food processor and pulse several times until the ingredients are coarsely chopped but not yet a paste.
- Add the Parmesan cheese and the lemon zest, pulsing again briefly to incorporate the dry flavors while keeping some texture in the nuts.
- With the processor running on low, slowly drizzle in the olive oil in a thin, steady stream to emulsify the sauce and create a glossy, cohesive finish.
- Add the lemon juice at the very end and pulse one last time; the acid in the lemon can cause the basil to brown if added too early, so timing is key for a bright green color.
- Taste the pesto and adjust the seasoning with salt and pepper, then store in a jar with a thin layer of olive oil on top to preserve that vibrant, fresh hue.
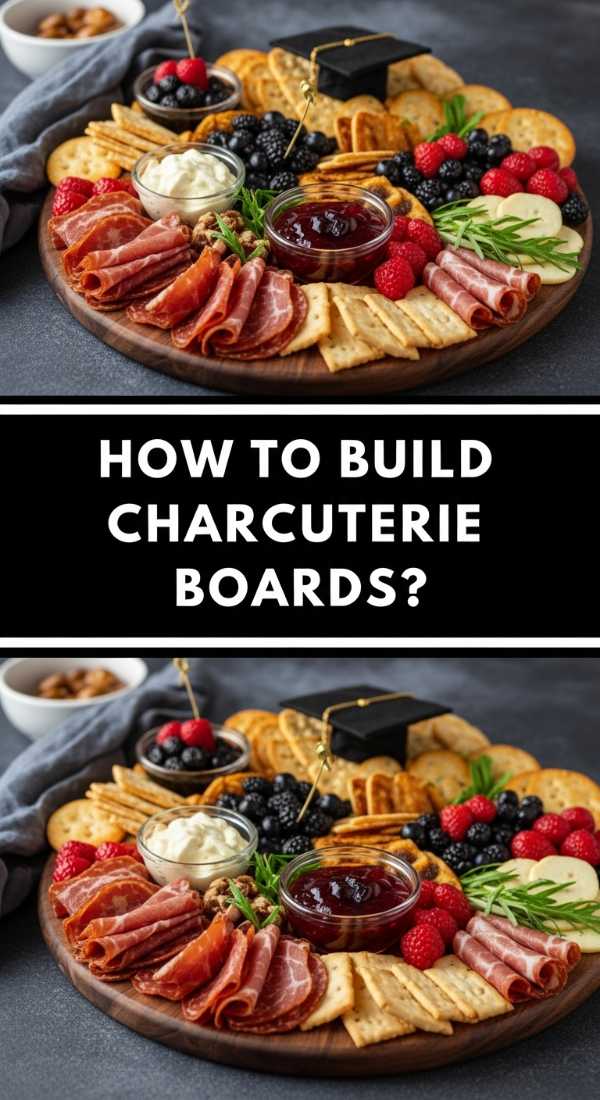
How to build charcuterie boards?
Why we love this
Building a charcuterie board is the ultimate act of hospitality, a visual feast that invites guests to linger, graze, and explore a variety of textures and flavors. We love the interplay between the salty, cured meats, the creamy or sharp cheeses, and the sweet pop of fresh fruit or honey. There is a profound beauty in the organized chaos of a well-piled board, where every nook is filled with almonds or olives, creating a tapestry of color that signals a relaxed and generous spirit, perfect for any social occasion.
Ingredients
- 3 types of cheese (e.g., Brie, Sharp Cheddar, Gorgonzola)
- 3 types of cured meat (e.g., Prosciutto, Salami, Soppressata)
- Assorted crackers and a sliced baguette
- Fresh fruits (grapes, berries, sliced apples)
- Nuts, olives, and a small jar of honey or fig jam
How to make it
- Start by placing your ‘anchors’—the small bowls of olives, honey, or jam—on the board first to create a structural framework for the other ingredients.
- Arrange your cheeses next, spacing them out across the board; cut some into wedges and leave others whole to provide visual variety and ease of serving.
- Add the meats by folding the salami into ‘roses’ or loosely draping the prosciutto in ribbons to add height and organic movement to the display.
- Fill the larger remaining gaps with piles of crackers and bread slices, following the natural curves of the meat and cheese to create a flowing, abundant look.
- Finally, ‘tuck and fill’ the tiny holes with nuts, berries, and sprigs of fresh herbs like rosemary or thyme to ensure the board looks lush, full, and professionally styled.
The Art of the Modern Spread
Creating these viral food boards isn’t just about following a recipe; it’s about the joy of assembly and the pride of presentation. From the tart snap of a rhubarb pie to the elegant swirl on a graduation cupcake, each element we’ve explored today adds a layer of sophistication to your hosting repertoire. I hope these tips inspire you to clear off your counter, grab a beautiful wooden board, and start building something that is as delicious as it is beautiful. Happy hosting!
Frequently Asked Questions
How long can a charcuterie board sit out?
Ideally, a charcuterie board should not sit out for more than two hours at room temperature, especially if it contains soft cheeses and cured meats. If your party is longer, consider refreshing the board with smaller batches from the fridge.
Can I make rhubarb jam without a candy thermometer?
Yes! You can use the ‘plate test.’ Place a small spoon of jam on a chilled plate; if it wrinkles when you push it with your finger, it has reached the setting point.
How do I stop my graduation cookies from spreading?
The secret is to chill your dough thoroughly before cutting and again for 15 minutes after cutting but before baking. This ensures the butter is cold and the shapes stay sharp.