

There is something inherently magical about a kitchen filled with the aroma of butter, sugar, and fresh fruit. We’ve all seen those stunning food boards scrolling through our social feeds—the ones that look like they belong in a high-end magazine but somehow feel like home. Whether you are celebrating a massive milestone like a graduation or just trying to survive a Tuesday with a hungry toddler, the art of the ‘food board’ is about more than just aesthetics; it is about bringing people together around a table filled with love and creativity.
When I first started styling my kitchen creations into these curated spreads, I realized that the secret isn’t just in the expensive ingredients, but in the small, thoughtful details. It’s the way a sprig of mint sits against a tart rhubarb crumble or the giggle you get from a perfectly piped ‘meme’ cake. These are the moments that go viral—not just on the internet, but in the hearts of your family and friends. Join me as we dive into ten incredible ways to elevate your kitchen game with everything from seasonal rhubarb treats to graduation-themed masterpieces.
How to decorate graduation cakes?

Why we love this
A graduation cake is more than just a dessert; it’s a centerpiece of achievement that demands attention. We love this approach because it combines the elegance of smooth buttercream with the symbolic prestige of gold leaf and miniature mortarboards. Imagine the velvety texture of the frosting melting on your tongue, contrasted by the satisfying snap of a chocolate graduation cap topper. The subtle scent of vanilla bean wafts through the air as you slice into layers of celebration, making every guest feel the weight of the accomplishment being honored.
Ingredients
- Tiered sponge cake (pre-baked and cooled)
- Swiss meringue buttercream
- Gold leaf sheets
- Chocolate graduation cap molds
- Black and gold food coloring
- Edible glitter
How to make it
- Begin by applying a ‘crumb coat’ of buttercream to your chilled cake layers. Use an offset spatula to spread a thin layer, sealing in crumbs, and refrigerate for 30 minutes until firm.
- Prepare your final coat of buttercream, tinting a portion of it in your school’s primary color. Apply a thick layer and use a bench scraper held at a 45-degree angle to create a perfectly smooth, sharp-edged finish.
- Melt dark chocolate wafers at 30-second intervals in the microwave, stirring until glossy. Pour into mortarboard molds and tap against the counter to remove air bubbles; freeze for 10 minutes before popping them out.
- Carefully apply gold leaf using a dry, soft-bristled brush. Touch the leaf to the frosting and gently pull away; the static and moisture will bond it to the cake.
- Place your chocolate caps on top and finish with a dusting of edible glitter for that viral, high-shine effect.
How to bake rhubarb pie?

Why we love this
There is nothing quite like the rustic charm of a rhubarb pie cooling on a windowsill. The contrast between the bracingly tart, ruby-red stalks and the buttery, flaky crust is a culinary masterpiece. As it bakes, the rhubarb softens into a jam-like consistency, releasing a bright, floral aroma that fills the entire house. The first bite offers a crunch of sugar-dusted pastry followed by a burst of tangy warmth that perfectly captures the transition from spring to summer.
Ingredients
- Double pie crust dough
- 4 cups fresh rhubarb, sliced into 1-inch pieces
- 1.25 cups granulated sugar
- 3 tablespoons cornstarch
- 1 tablespoon cold butter, cubed
- 1 egg (for wash)
How to make it
- Roll out your bottom crust on a floured surface until it is 1/8 inch thick. Drape it over a 9-inch pie plate, gently pressing into the corners without stretching the dough, which prevents shrinking.
- In a large bowl, toss the sliced rhubarb with sugar and cornstarch. Let it macerate for 15 minutes; this allows the juices to draw out and prevents a soggy bottom.
- Pour the mixture into the crust and dot with the cold butter cubes. This adds a rich silkiness to the fruit filling as it bubbles.
- Lay the top crust over the filling, trim the edges, and crimp with a fork or your fingers to seal. Cut three large slits in the center to allow steam to escape during the bake.
- Brush with a beaten egg and bake at 400°F (200°C) for 20 minutes, then reduce heat to 350°F (175°C) for another 30-40 minutes until the crust is golden brown and the filling is bubbling thickly.
How to frost graduation cupcakes?
Why we love this
Cupcakes are the ultimate board-friendly treat because they offer individual portions of joy. We love frosting graduation cupcakes with a dual-tone swirl that mimics the school colors, topped with a tiny ‘tassel’ made of sour candy. The visual impact of a dozen perfectly piped cupcakes is undeniable, offering a creamy, whipped texture that feels light as air. The scent of sweet almond extract and the sight of vibrant colors make these an instant favorite for any graduation party spread.
Ingredients
- Baked cupcakes
- American buttercream (stiff consistency)
- Gel food coloring (two shades)
- Sour straw candies (for tassels)
- Small square chocolate pieces
How to make it
- Divide your buttercream into two bowls and tint them with concentrated gel colors. Stir vigorously to ensure no streaks remain, aiming for a deep, saturated hue.
- Lay out a piece of plastic wrap and pipe a thick line of each color side-by-side. Roll the plastic into a log, snip one end, and drop it into a piping bag fitted with a large star tip (like a 1M).
- Hold the bag vertically over the cupcake. Start in the center, spiral outward to the edge, and then back up into a peak, applying steady pressure for a uniform ‘rose’ swirl.
- Place a small chocolate square on top of the frosting peak to represent the graduation cap.
- Cut a 1-inch piece of sour straw candy, fray the end with a knife to look like a tassel, and ‘glue’ it to the chocolate with a dot of leftover frosting.
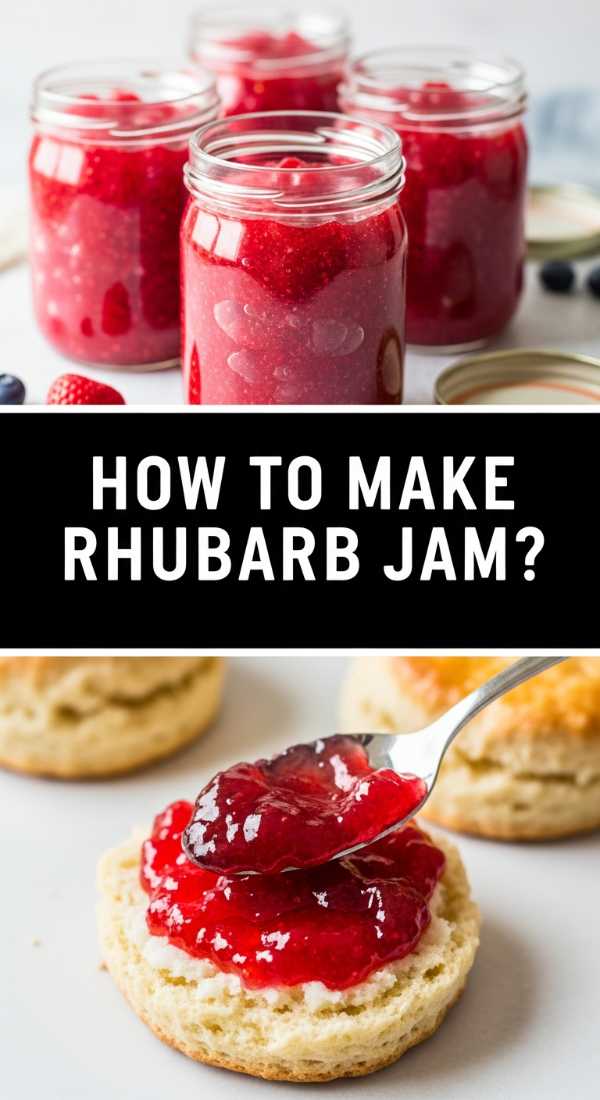
How to make rhubarb jam?

Why we love this
Rhubarb jam is like capturing sunshine in a jar. We love this recipe because it transforms a fleeting seasonal vegetable into a pantry staple that glows with a brilliant pink hue. The texture is thick and spreadable, with just enough fruit fiber to give it a homemade, artisanal feel. Opening a jar months later releases a concentrated scent of spring, and the taste—a sophisticated balance of sharp acidity and mellow sweetness—is incredible on a warm scone or a piece of sourdough toast.
Ingredients
- 5 cups chopped rhubarb
- 4 cups granulated sugar
- 1/4 cup lemon juice
- 1 teaspoon vanilla bean paste
- Optional: 1 teaspoon orange zest
How to make it
- Combine the chopped rhubarb, sugar, and lemon juice in a heavy-bottomed Dutch oven. Let the mixture sit for 2 hours at room temperature until the rhubarb is swimming in its own syrup.
- Place the pot over medium-high heat and bring to a rolling boil, stirring constantly with a wooden spoon to prevent the sugar from scorching on the bottom.
- Once boiling, reduce the heat to medium. Use a potato masher to gently break down the larger chunks of rhubarb as they soften into a pulp.
- Cook for 15-20 minutes, or until the mixture reaches 220°F (104°C) on a candy thermometer. The jam should look glossy and coat the back of a spoon.
- Stir in the vanilla bean paste and orange zest. Pour into sterilized jars, leaving 1/4 inch of headspace, and process in a boiling water bath for 10 minutes to seal.
How to design funny cakes?

Why we love this
In the world of social media, ‘funny’ is the new ‘fancy.’ We love designing cakes that feature witty puns, relatable memes, or ‘intentionally ugly’ vintage piping. These cakes break the ice at any party and serve as a hilarious conversation starter. The joy comes from the contrast between a professional-looking, multi-layered cake and a snarky message written in shaky script. It’s a way to show personality and humor, making the dessert experience as entertaining as it is delicious.
Ingredients
- 8-inch round cake
- Brightly colored buttercream
- Writing tip (Size 2 or 3)
- Multi-colored sprinkles
- Fondant for small accents
How to make it
- Frost your cake with a vibrant, ‘loud’ color like neon pink or electric blue. Smooth the sides, but feel free to leave the top slightly rustic for a ‘homemade with attitude’ look.
- Practice your ‘messy-chic’ handwriting on a piece of parchment paper first. The goal is to make it look effortless and slightly ironic.
- Fill a small piping bag with a contrasting color of buttercream. Pipe your joke or meme phrase across the top of the cake, keeping the letters bold and legible.
- Add ‘over-the-top’ borders using a leaf or star tip, layering different colors to create a chaotic but aesthetically pleasing vintage look.
- Throw on a handful of mismatched sprinkles as if they were tossed there by accident, completing the playful, viral aesthetic.
How to decorate graduation cookies?

Why we love this
Graduation cookies are the perfect canvas for storytelling. We love these because they allow for intricate details like ‘Class of 2024’ lettering and tiny diploma ribbons. When arranged on a food board, they create a visual narrative of success. The crisp snap of a sugar cookie paired with the smooth, sweet crunch of royal icing is a textural delight. They are easy to grab, easy to gift, and absolutely stunning when photographed under natural light.
Ingredients
- Chilled sugar cookies (cap and diploma shapes)
- Royal icing (flooding and piping consistency)
- Edible ink markers
- Gold sanding sugar
How to make it
- Outline your cookies using piping-consistency icing (think the thickness of toothpaste). This creates a ‘dam’ that prevents the thinner icing from running off the edges.
- Fill the centers with flooding-consistency icing (thickness of honey). Use a toothpick or scribe tool to pop any tiny air bubbles and move the icing into the corners.
- Let the base layer dry completely—at least 6 to 8 hours—in a cool, dry place. This prevents ‘bleeding’ when you add the next layer of detail.
- Use your edible ink markers to write the graduate’s name or school on the diploma cookies. The marker works best on a completely matte, dried surface.
- For the caps, pipe a small dot in the center, attach a tassel made of icing, and sprinkle gold sanding sugar over it while wet for a shimmering finish.
How to make rhubarb crumble?

Why we love this
Rhubarb crumble is the cozy, effortless cousin of the pie. We love it because it’s nearly impossible to mess up and delivers a massive payload of flavor and texture. The topping is a buttery, oat-filled blanket that turns deeply golden and crunchy in the oven, providing the perfect foil to the soft, bubbling, tart fruit underneath. Served warm with a scoop of melting vanilla bean ice cream, it creates a sensory experience of hot and cold that is pure comfort in a bowl.
Ingredients
- 6 cups sliced rhubarb
- 3/4 cup sugar
- 1 cup old-fashioned oats
- 1 cup all-purpose flour
- 1 cup brown sugar
- 1/2 cup cold butter, cubed
- 1 teaspoon cinnamon
How to make it
- Toss the rhubarb with granulated sugar and spread it evenly into a 9×13 inch baking dish. The fruit will shrink as it cooks, so don’t be afraid to pile it high.
- In a separate bowl, combine oats, flour, brown sugar, and cinnamon. Stir until the mixture is uniform in color.
- Add the cold butter cubes. Using your fingers or a pastry cutter, work the butter into the dry ingredients until the mixture resembles coarse crumbs with some pea-sized pieces of butter remaining.
- Sprinkle the crumble topping generously over the rhubarb. Do not pack it down; keep it loose to ensure a crispy texture.
- Bake at 375°F (190°C) for 35-45 minutes. Watch for the fruit juices to bubble up around the edges—that’s your visual cue that the rhubarb is tender and the sugars have caramelized.
How to decorate sugar cookies?

Why we love this
Sugar cookie decorating is a therapeutic art form. We love it because it allows for endless seasonal variations, from floral spring shapes to geometric modern designs. The process of ‘wet-on-wet’ decorating creates mesmerizing marble effects that look like professional marble or watercolor paintings. The scent of vanilla and almond in the air as you work is incredibly calming, and the end result is a tray of cookies that look almost too beautiful to eat.
Ingredients
- Standard sugar cookies (various shapes)
- Royal icing in multiple colors
- Squeeze bottles or piping bags
- Toothpicks
- Pearl sprinkles
How to make it
- Ensure your cookies are completely flat and cooled. If they have humps, gently shave them down with a microplane while warm for a level decorating surface.
- Flood the cookie with a base color of icing. While the icing is still wet, pipe small dots or lines of a contrasting color directly into the base.
- Take a toothpick and drag it through the wet dots to create hearts, or swirl it around for a marbled look. This ‘wet-on-wet’ technique must be done quickly before the icing ‘sets.’
- For a 3D effect, let the base dry for an hour, then pipe details on top (like flower petals or borders). This creates depth and shadow.
- Add pearl sprinkles using tweezers for precise placement while the top layer of icing is still tacky, then allow to dry overnight.
How to prepare toddler lunches?

Why we love this
Toddler lunches don’t have to be a struggle; they can be a colorful ‘snack board’ that encourages exploration. We love this method because it focuses on variety and ‘finger food’ accessibility. By cutting ordinary sandwiches into fun shapes and arranging colorful fruits and veggies like a rainbow, you turn mealtime into a sensory adventure. The sight of a bright, organized plate reduces ‘food neophobia’ and makes healthy eating feel like a game for little ones.
Ingredients
- Whole grain bread and deli meat/cheese
- Cucumber slices and baby carrots
- Berries and grapes (cut lengthwise)
- Yogurt or hummus for dipping
- Small star-shaped cookie cutters
How to make it
- Use your cookie cutters to punch shapes out of sandwiches and cheese slices. Removing the crusts and making ‘stars’ or ‘hearts’ makes the food more appealing to picky eaters.
- Slice cucumbers into rounds and use a small tool to cut ‘V’ shapes out of the edges, making them look like little flowers.
- Arrange the items in a muffin tin or a partitioned plate. This keeps different textures separate, which is often a preference for toddlers.
- Create a ‘dip station’ in the center with hummus or Greek yogurt, topped with a few sprinkles or a dash of cinnamon to make it look special.
- Add a few ‘fun’ items like goldfish crackers or a small piece of dark chocolate to balance the meal and make the board look abundant and exciting.
How to style graduation boards?
[IMAGE_10]
Why we love this
The graduation board is the ultimate ‘Grand Finale’ of celebration food. We love this because it combines savory snacks with sweet graduation-themed treats, creating a massive, bountiful spread that caters to every palate. The visual impact of seeing diplomas (rolled tortillas) next to caps (chocolate squares) and school-colored fruits is breathtaking. It creates a ‘wow’ factor that guests will be talking about long after the party ends, providing the perfect backdrop for photos and shared memories.
Ingredients
- Graduation cookies and cupcakes (from previous sections)
- Rolled deli meats (tied with chives to look like diplomas)
- Cubed cheeses and crackers
- Seasonal fruits (grapes, berries)
- Nuts and chocolates
- Gold-themed decor (stars, tassels)
How to make it
- Start with your largest items first—place the graduation cake or a large bowl of rhubarb crumble in the center or at one end to act as an anchor.
- Create ‘movement’ by placing the graduation cupcakes and cookies in a curving ‘S’ shape across the board. This leads the eye through the display.
- Fill the large gaps with savory items. Use ‘diploma’ wraps (tortillas filled with cream cheese and ham, rolled tight and tied with a green onion string) for a clever thematic touch.
- Add clusters of grapes and piles of bright berries to add height and pops of natural color. The fruit acts as a palate cleanser between the sweet and salty items.
- Tuck in small gold stars or real graduation tassels in the tiny remaining gaps. Ensure no part of the board is visible for that viral, ‘overflowing’ aesthetic.
The Final Flourish
Creating these viral food boards and treats is more than just a kitchen project; it’s a way to celebrate life’s biggest wins and smallest joys. Whether you’re crafting a sophisticated rhubarb pie or a hilarious ‘funny’ cake, remember that the most important ingredient is the heart you put into it. These recipes and styling tips are designed to help you shine, but the real magic happens when you share these creations with the people you love. So, grab your rolling pin, dust off your piping bags, and let’s make something beautiful today!
Frequently Asked Questions
How do I keep my rhubarb pie from being too runny?
The key is to use a thickener like cornstarch or flour and to let the fruit macerate with sugar for at least 15 minutes before baking. Also, ensure the pie is completely cooled before slicing; the filling sets as it reaches room temperature.
Can I make the royal icing for cookies in advance?
Yes! You can make royal icing up to 3 days in advance. Keep it in an airtight container with a piece of plastic wrap touching the surface of the icing to prevent a crust from forming. Give it a good stir before using as it may separate slightly.
What is the best way to transport a graduation board?
It is best to assemble the board on-site if possible. If you must transport it, use a rimmed baking sheet or a board with a lip, wrap it tightly in plastic wrap, and keep it on a flat surface in your vehicle. Pack the more delicate items, like cupcakes with tall frosting, separately and add them at the venue.