

The Ultimate Cheat Sheet for Creating the Viral Simple Food Board
There is something truly magical about the way food brings people together, especially during those whirlwind weeks of graduation season and the first whispers of summer. I remember sitting at my kitchen island last year, surrounded by a mountain of fresh rhubarb and graduation invitations, feeling that familiar spark of creativity. We all want to host that perfect, effortless-looking gathering, and that is exactly where the ‘Viral Simple Food Board’ comes into play. It is about more than just food; it is about creating a visual story that celebrates the milestones we have worked so hard to reach.
The secret to a viral board isn’t just expensive ingredients; it is the heart you put into the presentation and the intentional pairing of flavors. Whether you are honoring a high school senior or just looking to elevate your Sunday brunch, these tips are designed to make you feel like a professional stylist in your own home. Let’s dive into the textures, the scents, and the simple joy of assembling something beautiful together.
How to decorate graduation cakes?

Why we love this
There is nothing quite as breathtaking as a tall, stately cake that screams ‘celebration’ without being over-the-top. Imagine a velvety smooth vanilla buttercream finish that catches the light, accented by delicate edible gold leaf that shimmers as you carry it to the table. The aroma of Madagascar vanilla and sweet cream fills the room, making every guest eager for that first slice. It is the centerpiece that holds all the weight of the achievement, looking both sophisticated and deeply sentimental.
Ingredients
- Freshly baked round sponge cakes (cooled completely)
- Batch of stiff Swiss meringue buttercream
- Edible gold leaf or metallic sprinkles
- Small graduation cap topper or custom acrylic sign
- Fresh, organic flowers (optional)
- Offset spatula and bench scraper
How to make it
- Begin by leveling your cake layers using a serrated knife to ensure a perfectly flat surface; this prevents the cake from leaning or cracking as you stack.
- Apply a generous ‘crumb coat’ of buttercream—a thin layer that seals in any loose crumbs—and chill the cake in the refrigerator for at least 30 minutes until it is firm to the touch.
- Apply the final layer of frosting using an offset spatula, then hold a metal bench scraper at a 45-degree angle against the side of the cake, spinning the turntable slowly to achieve a crisp, professional ‘straight edge’ finish.
- Carefully apply edible gold leaf using a dry, clean paintbrush, pressing it lightly onto the frosting in organic, scattered clusters to create a modern, high-end aesthetic.
- Position your graduation cap topper slightly off-center for visual interest, and if using flowers, wrap the stems in floral tape before inserting them into the cake to maintain food safety.
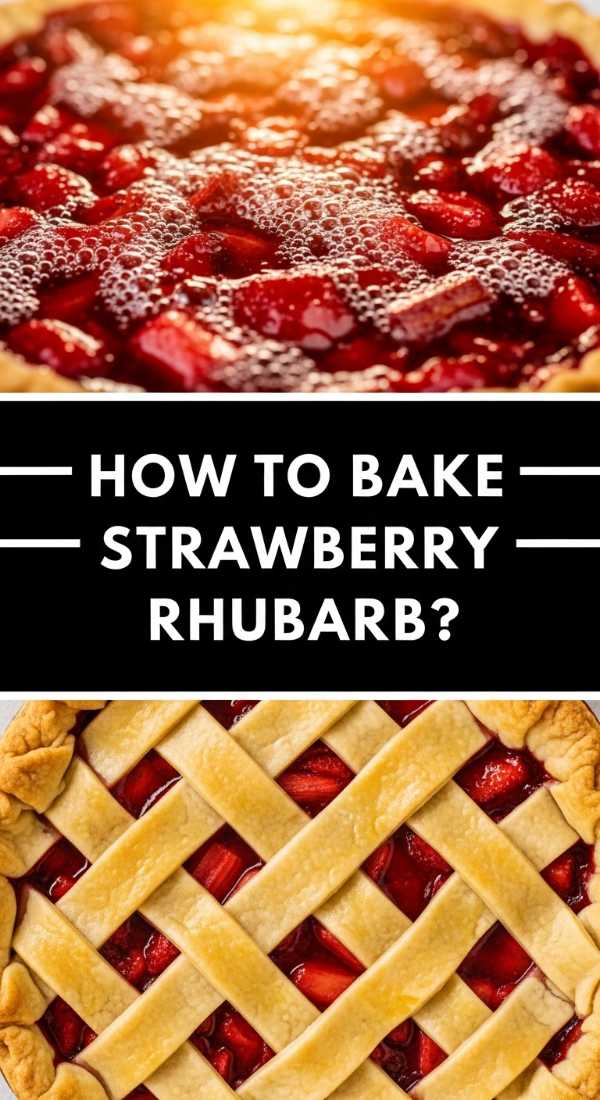
How to bake strawberry rhubarb?
Why we love this
The combination of strawberry and rhubarb is the ultimate herald of the warm months, offering a nostalgic balance of intense sweetness and sharp, mouth-puckering tartness. As it bakes, the kitchen transforms into a sanctuary of fruity fragrance, with the juices bubbling into a thick, ruby-red syrup that coats the back of a spoon. The contrast between the softened, jammy fruit and a flaky, buttery crust provides a sensory experience that feels like a warm hug on a plate. It is bright, vibrant, and perfectly rustic.
Ingredients
- 2 cups fresh strawberries (hulled and halved)
- 2 cups rhubarb stalks (cut into 1-inch pieces)
- 3/4 cup granulated sugar
- 2 tablespoons cornstarch
- 1 teaspoon vanilla extract
- Pre-made or homemade pie crust
- 1 egg (for egg wash)
How to make it
- Preheat your oven to 400°F (200°C) and place a baking sheet on the bottom rack to catch any overflow of fruit juices during the baking process.
- In a large mixing bowl, toss the strawberries and rhubarb with the sugar, cornstarch, and vanilla, letting the mixture sit for 10 minutes to allow the fruit to macerate and release its natural juices.
- Roll out your chilled pie dough on a floured surface to about 1/8-inch thickness, ensuring it is wide enough to overhang your pie dish by at least an inch.
- Pour the fruit mixture into the crust, then fold the edges over to create a rustic galette or top with a lattice crust, sealing the edges firmly with a fork or by crimping with your fingers.
- Brush the crust with a beaten egg wash and sprinkle with coarse sugar, then bake for 35-45 minutes until the crust is a deep golden brown and the fruit filling is bubbling vigorously in the center.
How to frost graduation cupcakes?

Why we love this
Cupcakes are the perfect vessel for creativity because they allow you to play with individual designs that collectively make a massive impact on your food board. We love the way a swirl of dark chocolate or bright white frosting creates a canvas for ‘tassel’ decorations made of sour candy or fondant. The texture is light and airy, providing a sweet contrast to the dense, rich cake beneath. Every bite is a celebration of detail, making your guests feel like each treat was crafted specifically for them.
Ingredients
- Standard cupcakes (flavor of choice)
- Piping bag and a large star tip (like 1M or 2D)
- Fondant or square chocolate pieces (for the ‘cap’)
- Sour string candy or pull-apart licorice (for the ‘tassel’)
- Miniature chocolate candies (to act as the button on the cap)
How to make it
- Fit your piping bag with a large star tip and fill it with buttercream, ensuring there are no air pockets by squeezing a small amount back into the bowl first.
- Hold the bag vertically over the center of the cupcake, squeeze with even pressure while moving in a clockwise spiral from the outside edge inward to create a high-domed swirl.
- To create the graduation cap topper, place a small square of dark chocolate or a square-cut piece of fondant on top of the frosting swirl, pressing gently so it adheres.
- Cut a 1-inch piece of sour string candy, fray one end slightly with a knife to look like a tassel, and attach it to the center of the square using a tiny dot of frosting.
- Finish the look by placing a small round chocolate candy or a sugar pearl directly over the end of the tassel on top of the square to mimic the cap’s button.
How to make rhubarb jam?

Why we love this
Rhubarb jam is a hidden gem in the pantry, offering a sophisticated, tangy spread that elevates even the simplest slice of sourdough toast. It has a beautiful, translucent pink hue that looks like stained glass when held up to the light. The flavor is a sophisticated dance of tartness tempered by sugar, with a thick, spreadable consistency that feels luxurious on the tongue. It captures the very essence of the harvest, preserving that fleeting seasonal flavor for weeks of enjoyment.
Ingredients
- 4 cups chopped rhubarb (about 1/2-inch pieces)
- 2 cups granulated sugar
- 1 tablespoon lemon juice
- 1 teaspoon lemon zest
- Optional: 1 teaspoon grated fresh ginger
How to make it
- In a heavy-bottomed non-reactive saucepan, combine the chopped rhubarb, sugar, lemon juice, and zest; stir well and let the mixture sit for 2 hours (or overnight in the fridge) to draw out the liquid.
- Place the pot over medium-high heat and bring the mixture to a full rolling boil, stirring constantly with a wooden spoon to prevent the sugar from scorching on the bottom.
- Reduce the heat to medium and continue to simmer for about 15-20 minutes, skimming off any foam that rises to the surface with a metal spoon.
- Test for ‘set’ by placing a small spoonful of jam on a chilled plate; let it sit for a minute, then push it with your finger—if it wrinkles, it is ready.
- Remove from heat, stir in the ginger if using, and ladle the hot jam into sterilized glass jars, leaving 1/4 inch of headspace before sealing tightly.
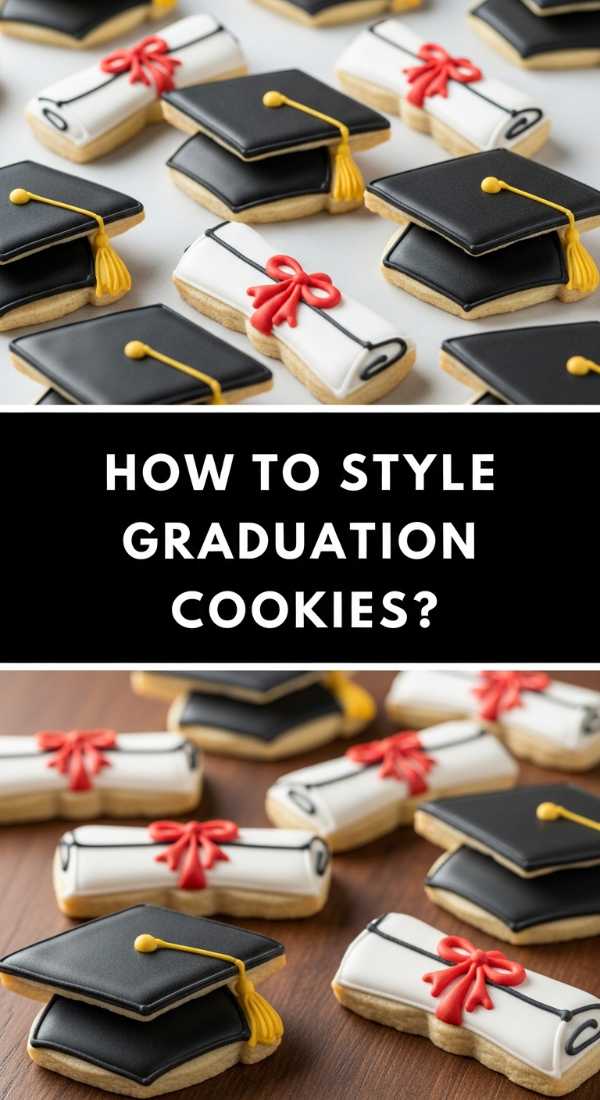
How to style graduation cookies?
Why we love this
Styling cookies for a graduation board is all about the ‘wow’ factor of clean lines and personalized touches. We love the satisfying ‘snap’ of a perfectly baked sugar cookie paired with the smooth, matte finish of royal icing. When styled correctly—perhaps as rolled diplomas tied with ribbons—they become more than just dessert; they become edible keepsakes. The visual of a platter filled with these uniform, elegant shapes adds a level of polish to your food board that is impossible to ignore.
Ingredients
- Sugar cookies cut into rectangles or diploma shapes
- Royal icing (stiff and flood consistencies)
- Fine-tipped piping bags or squeeze bottles
- Edible ink markers (optional)
- Thin ribbon in school colors (if making non-edible ties)
How to make it
- Outline your rectangular cookies with ‘stiff’ consistency royal icing to create a border, then ‘flood’ the center with a thinner icing, using a toothpick to pop any tiny air bubbles for a glass-smooth surface.
- Allow the base layer of icing to dry completely—usually 6 to 12 hours—in a cool, dry place before attempting any detail work.
- To create a ‘diploma’ look, pipe two thin horizontal lines near one end of the cookie to represent the ribbon, or use an edible marker to write ‘Class of 2024’ in elegant calligraphy.
- If you want a 3D effect, pipe a small ‘seal’ in a contrasting gold or red icing and let it dry until it stands out from the cookie’s surface.
- Arrange the cookies on your board in a fan pattern or stacked neatly with real ribbon accents to create depth and a professional bakery-style display.
How to mix lemon pesto?

Why we love this
Lemon pesto is like a burst of sunshine in a bowl, bringing a zesty, herbaceous brightness that cuts through the richness of a food board’s cheeses and meats. The fragrance of fresh basil leaves being crushed with toasted pine nuts is intoxicating, and the addition of lemon zest adds a high note that traditional pesto lacks. It is vibrant green, textured, and incredibly versatile, whether you are dipping a cracker or drizzling it over fresh mozzarella. It feels light, modern, and completely refreshing.
Ingredients
- 2 cups fresh basil leaves (packed)
- 1/3 cup toasted pine nuts or walnuts
- 1/2 cup freshly grated Parmesan cheese
- 2 cloves garlic (peeled)
- 1/2 cup extra virgin olive oil
- Zest and juice of 1 large lemon
- Salt and pepper to taste
How to make it
- Place the pine nuts in a dry skillet over medium heat and toast them for 2-3 minutes, tossing constantly until they are fragrant and golden brown; let them cool completely.
- In a food processor, pulse the basil, cooled nuts, garlic, and Parmesan cheese together until coarsely chopped, being careful not to over-process into a paste yet.
- With the processor running on low, slowly drizzle in the extra virgin olive oil in a steady stream to emulsify the sauce into a smooth but slightly textured consistency.
- Add the lemon zest and lemon juice, then pulse 2-3 more times to combine; this ensures the acid doesn’t turn the basil brown too quickly.
- Season with a pinch of sea salt and cracked black pepper, then transfer to a small serving bowl and top with an extra drizzle of oil to keep it fresh and bright.
How to whip fun coffee?

Why we love this
Whipping up a ‘fun’ coffee—like the viral Dalgona or a decadent cold foam—adds a whimsical, café-quality element to your brunch board that guests always obsess over. The sight of a thick, velvety foam sitting perfectly atop a glass of chilled milk is incredibly satisfying. It has a rich, concentrated coffee flavor and a texture that feels like drinking a cloud. It’s an interactive drink that looks as good as it tastes, turning a standard caffeine fix into a visual highlight of the morning.
Ingredients
- 2 tablespoons instant coffee or espresso powder
- 2 tablespoons granulated sugar
- 2 tablespoons hot water
- 1 cup milk of choice (dairy or oat works best)
- Ice cubes
- Optional: Cinnamon or cocoa powder for dusting
How to make it
- In a medium-sized glass bowl, combine the instant coffee, granulated sugar, and hot water; ensure the water is near-boiling to help the sugar dissolve and the coffee proteins stabilize.
- Using a handheld milk frother or an electric hand mixer, whisk the mixture on high speed for about 3-5 minutes until it transforms from a dark liquid to a thick, pale beige foam with stiff peaks.
- Fill a tall clear glass halfway with ice cubes and pour in your chilled milk, leaving about two inches of space at the top of the glass.
- Carefully dollop the whipped coffee foam on top of the milk using a spoon, smoothing it out or creating decorative peaks as you would with meringue.
- Serve with a straw or a long spoon so guests can stir the foam into the milk, and finish with a light dusting of cinnamon or cocoa powder for an extra touch of elegance.
How to build graduation charcuterie?

Why we love this
A graduation-themed charcuterie board is the ultimate expression of abundance and celebration, allowing you to mix savory treats with festive motifs. We love the interplay of textures—the crunch of salty crackers against the creaminess of brie and the chew of cured meats. When you use cheese cutouts to spell out ‘GRAD’ or the graduation year, it transforms the board into a personalized tribute. It is a social way to eat, encouraging guests to graze and mingle while admiring the beautiful layout you’ve curated.
Ingredients
- 3 types of cheese (e.g., Sharp Cheddar, Brie, Manchego)
- Cured meats (Prosciutto, Salami, Soppressata)
- Fresh fruits (Grapes, berries, sliced apples)
- Nuts and olives
- Alphabet or number cookie cutters
- Small bowls for jams or honey
How to make it
- Select a large wooden board or marble slab and start by placing your ‘anchors’—the small bowls of jam, honey, or olives—to create a sense of balance across the surface.
- Slice your block of Sharp Cheddar into 1/4 inch thick slices and use your alphabet cutters to punch out the letters for the graduate’s name or the year ‘2024’; set these aside to place at the very end.
- Fold your meats into ‘roses’ by overlapping slices and rolling them tightly, or fan them out in a ‘S’ shape to create movement and flow across the board.
- Fill in the large gaps with clusters of grapes and sliced cheeses, then use smaller items like almonds and dried cranberries to fill every remaining ‘white space’ for a look of lush plenty.
- Place your cheese letters in the center of the board on top of a bed of crackers or meat so they are the focal point, ensuring they are clearly visible to everyone who approaches the table.
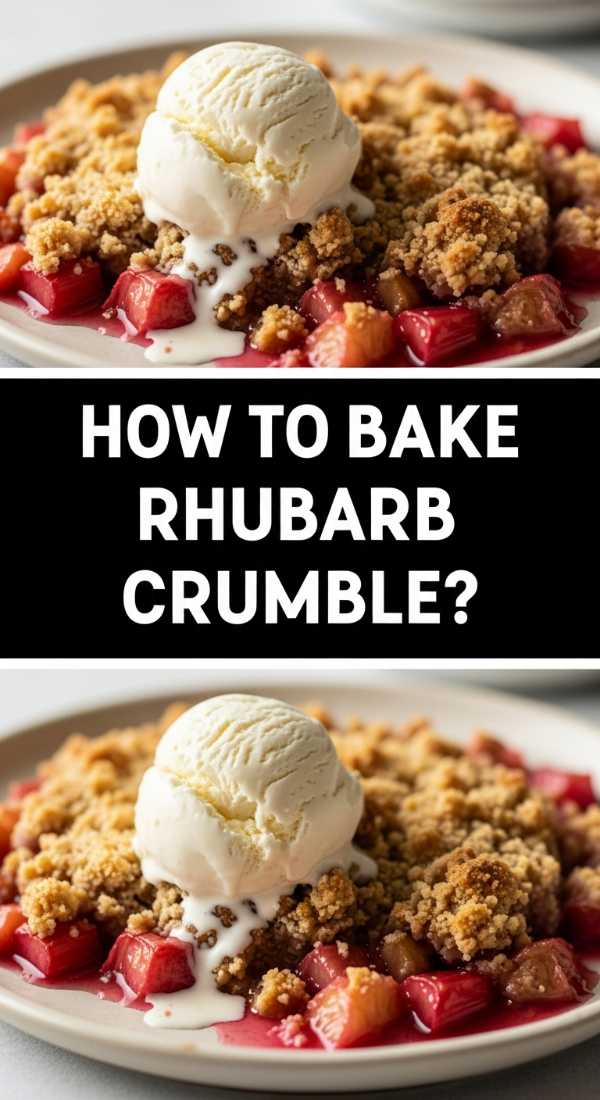
How to bake rhubarb crumble?
Why we love this
Rhubarb crumble is the unpretentious, cozy cousin of the fancy tart, and we love it for its contrast of ‘gooey’ and ‘crunchy’. The tart rhubarb breaks down into a soft, tangy compote that hides beneath a golden, buttery blanket of toasted oats and brown sugar. The scent of cinnamon and nutmeg wafting from the oven is pure comfort, promising a dessert that is as homey as it is delicious. It’s the kind of dish that begs for a melting scoop of vanilla bean ice cream to pull everything together.
Ingredients
- 5 cups fresh rhubarb (cut into 1-inch pieces)
- 1/2 cup granulated sugar (for the fruit)
- 1 cup old-fashioned rolled oats
- 1 cup all-purpose flour
- 1 cup brown sugar (packed)
- 1/2 cup cold unsalted butter (cubed)
- 1 teaspoon cinnamon
How to make it
- Preheat your oven to 375°F (190°C) and lightly grease a 9×9 inch baking dish with butter or non-stick spray to prevent the fruit sugars from sticking.
- Toss the rhubarb pieces with the granulated sugar directly in the baking dish, spreading them out into an even layer so they cook consistently.
- In a separate bowl, combine the oats, flour, brown sugar, and cinnamon; use a pastry cutter or your fingertips to rub the cold butter cubes into the dry ingredients until the mixture resembles coarse crumbs.
- Sprinkle the crumble topping generously over the rhubarb, ensuring you don’t pack it down—you want the air to circulate through the crumbs to create a crisp texture.
- Bake for 35-40 minutes until the fruit juices are bubbling through the edges and the topping is a deep, crispy golden brown; let it cool for 10 minutes before serving to allow the juices to thicken.
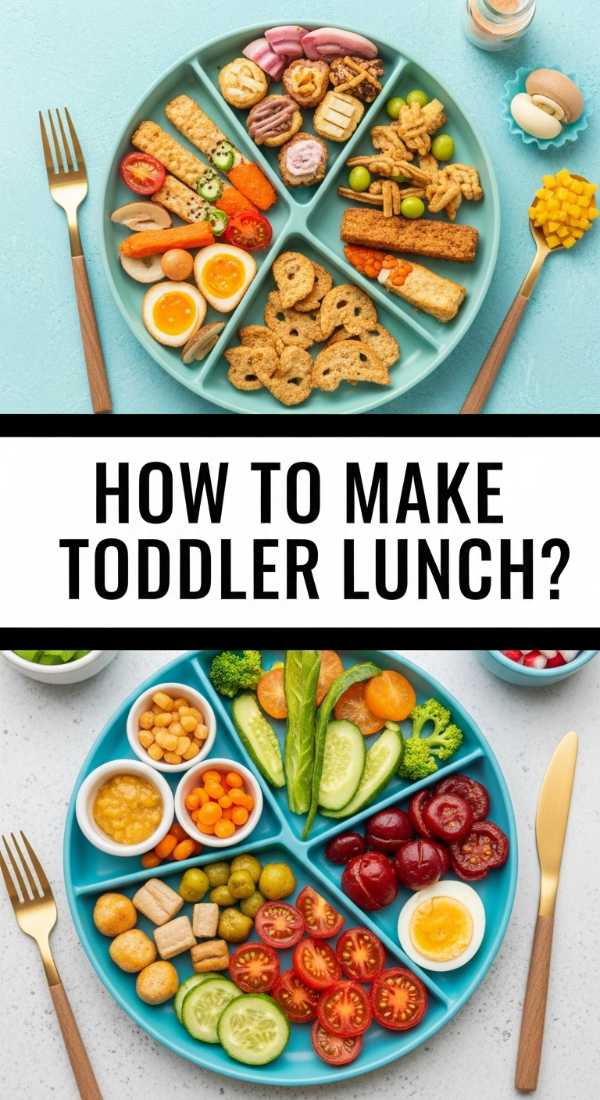
How to make toddler lunch?
Why we love this
Making a toddler lunch for a food board is about finding the magic in the mundane, turning simple nutrients into a playful adventure. We love using bright colors—orange carrots, green cucumbers, and purple grapes—to catch a little one’s eye and encourage healthy choices. The textures are kept soft and manageable, but the presentation is pure fun, featuring shapes and ‘dip-able’ components that make mealtime less of a chore and more of a game. It’s a way to include the youngest guests in the viral food board trend in a way that’s safe and engaging.
Ingredients
- Whole grain bread and turkey/cheese
- Cucumber slices and baby carrots
- Mild hummus or yogurt dip
- Fruit (strawberries, blueberries)
- Miniature star or animal-shaped cookie cutters
- Small bento-style silicone liners
How to make it
- Prepare a simple sandwich with soft whole-grain bread and mild fillings, then use a star-shaped cookie cutter to remove the crusts and create fun, bite-sized shapes that are easy for small hands to hold.
- Peel the cucumbers and slice them into thick rounds, then use a small circular cutter to remove the seeds, creating ‘donuts’ that can be filled with a tiny dollop of hummus.
- Cut strawberries into halves and use a small ‘V’ notch at the top to make them look like hearts, ensuring all fruit is cut into safe, age-appropriate sizes to prevent choking.
- Place colorful silicone liners onto the corner of your main food board to act as a dedicated ‘toddler zone,’ filling them with the shaped sandwiches, veggies, and fruit.
- Include a small, spill-proof container of yogurt or mild dip in the center of the toddler section to encourage ‘dipping,’ which is a sensory experience most toddlers find irresistible.
The Final Touches: Bringing It All Together
Creating a viral food board is a labor of love that rewards you with the best kind of feedback: empty plates and happy memories. By mixing these seasonal rhubarb delights with festive graduation touches, you create a spread that feels curated, thoughtful, and deeply personal. Remember that perfection is not the goal—connection is. So, take a deep breath, pour yourself a whipped coffee, and enjoy the process of hosting. Your guests will feel the warmth you’ve put into every detail.
Frequently Asked Questions
Q: Can I make the rhubarb jam ahead of time?
A: Absolutely! In fact, the flavors develop beautifully over 24-48 hours. Just keep it in a sealed jar in the fridge if you aren’t using traditional canning methods.
Q: How do I keep the graduation cookies from getting soft on the board?
A: Ensure the royal icing is completely dry (hard to the touch) before placing them on the board. Avoid placing them directly next to ‘wet’ items like cut fruit or dips.
Q: What if I can’t find fresh rhubarb?
A: Frozen rhubarb works just as well for crumbles and jams! Just be sure to thaw it and drain the excess liquid before using it in your recipes.