

10-Minute Viral Food Boards: The Ultimate Lazy Host’s Guide
We’ve all been there: the doorbell rings in twenty minutes, your living room is a semi-controlled disaster zone, and you haven’t even thought about what to feed your guests. In the past, this was the moment of pure hosting panic. But today, we are embracing the ‘Viral Simple Food Board’—a lifestyle hack that transforms humble ingredients into a centerpiece that looks like it belongs on a high-end magazine cover. It’s about the art of the assembly, the joy of grazing, and the secret thrill of knowing it only took you ten minutes to look like a culinary genius.
Food boards aren’t just about cheese and crackers anymore; they are a canvas for your creativity and a celebration of seasonal flavors. Whether you’re celebrating a big milestone like a graduation or just trying to get a toddler to eat something green, the ‘board’ approach simplifies the service and maximizes the aesthetic. Let’s dive into how you can elevate your hosting game with these stunning, themed components that bring a touch of viral magic to your table.
How to style graduation cakes?

Why we love this
There is something incredibly nostalgic and triumphant about a graduation cake sitting at the center of a celebration board. We love the way the smooth, velvety buttercream provides a blank canvas for sophisticated decorations like edible gold leaf and miniature fondant tassels. The aroma of rich vanilla bean and sweet sugar fills the air, promising a celebratory bite that is both light and indulgent. When styled on a wooden board surrounded by fresh berries and silver spoons, it turns a simple dessert into a momentous occasion that captures the essence of achievement.
Ingredients
- Pre-baked round sponge cake
- Vanilla Swiss meringue buttercream
- Black fondant for ‘caps’
- Gold luster dust
- Fresh blackberries and raspberries for garnish
- Thin gold ribbon
How to make it
- Begin by chilling your pre-baked cake layers for at least 30 minutes to ensure a crumb-free frosting experience. This makes the cake firmer and easier to handle.
- Apply a thin ‘crumb coat’ of buttercream using an offset spatula. Smooth it out until the cake is sealed, then chill for another 15 minutes until the frosting is firm to the touch.
- Apply the final layer of frosting. Use a bench scraper held at a 45-degree angle to the cake while spinning your turntable to create a perfectly smooth, professional finish.
- Roll out your black fondant to a 1/8-inch thickness. Cut small squares for the mortarboard and tiny cylinders for the cap base. Use a drop of water to adhere the square to the base.
- Mix a tiny amount of gold luster dust with lemon extract or vodka to create a ‘paint.’ Use a fine-tip brush to paint delicate tassels onto your fondant caps.
- Place the cake on the center of your board. Surround the base with clusters of dark berries to provide a color contrast against the white frosting and add an organic, lush feel.
How to bake rhubarb pie?
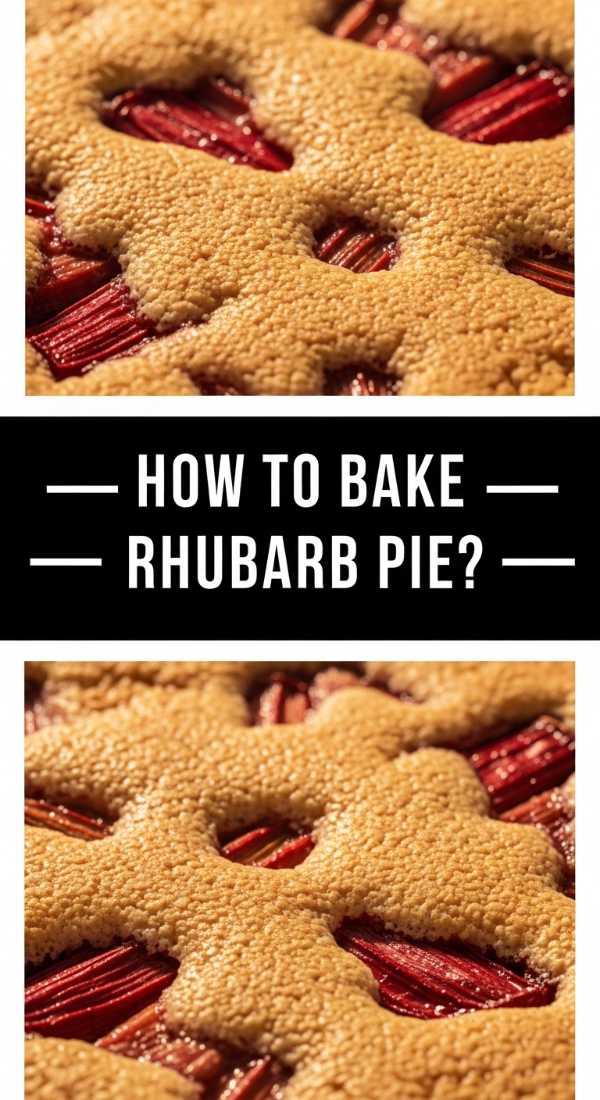
Why we love this
Rhubarb pie is the ultimate herald of spring and summer, offering a sharp, bracing tartness that cuts through a buttery, flaky crust like nothing else. We love the sensory experience of the bubbling, ruby-red filling peeking through a golden-brown lattice, releasing a scent of cooked fruit and warm cinnamon. The texture is a masterclass in contrasts: the crunch of the sugar-dusted pastry giving way to the soft, jammy interior. Enjoyed slightly warm with a scoop of melting vanilla bean ice cream, it feels like a cozy, sun-drenched afternoon in every bite.
Ingredients
- Double pie crust dough (chilled)
- 5 cups chopped fresh rhubarb (1-inch pieces)
- 1 1/4 cups granulated sugar
- 1/4 cup cornstarch
- 1 tablespoon lemon juice
- 1 teaspoon vanilla extract
- Egg wash (1 egg beaten with 1 tbsp water)
- Coarse sparkling sugar
How to make it
- Preheat your oven to 400°F (200°C). Place a baking sheet on the bottom rack to catch any juices that might bubble over during the baking process.
- In a large mixing bowl, toss the chopped rhubarb with sugar, cornstarch, lemon juice, and vanilla. Let it macerate for 15 minutes; the sugar will draw out the juices, creating a thick syrup that prevents a soggy bottom.
- Roll out your bottom crust and fit it into a 9-inch pie plate. Trim the edges so there is a 1-inch overhang. Pour the rhubarb mixture (and all the liquid) into the shell.
- Roll out the second piece of dough and cut into 1-inch strips. Interweave the strips over the filling to create a lattice pattern, pressing the edges to seal them with the bottom crust.
- Brush the entire lattice and the crimped edges with the egg wash. This provides that professional, high-gloss golden finish. Sprinkle generously with coarse sugar for extra crunch.
- Bake at 400°F for 20 minutes, then reduce the heat to 375°F (190°C). Continue baking for 35-45 minutes until the crust is deep golden and the filling is bubbling thick, slow bubbles in the center.
How to host summer dinner?

Why we love this
A summer dinner board is the epitome of effortless elegance, bringing the bounty of the garden directly to your guests without the formality of a plated meal. We love the vibrant colors of heirloom tomatoes, charred corn, and grilled stone fruits laid out in a cascading rainbow of seasonal freshness. The air is filled with the scent of woodsmoke from the grill and the refreshing aroma of torn mint and basil leaves. It’s a tactile, communal way of eating that encourages lingering conversations and second helpings as the sun slowly dips below the horizon.
Ingredients
- Grilled chicken skewers or halloumi cheese
- Sliced heirloom tomatoes
- Charred corn on the cob (cut into rounds)
- Burrata cheese balls
- Toasted sourdough slices
- Extra virgin olive oil and flaky sea salt
- Fresh peach slices
How to make it
- Start by prepping your grilled items. Cook chicken skewers or halloumi over medium-high heat until deep sear marks appear, roughly 4-5 minutes per side. Keep them warm under foil.
- Prepare your corn by grilling it directly on the grates until charred. Slice them into small ‘ribs’ or rounds that are easy for guests to grab with their fingers.
- Select a very large wooden board or even a clean butcher paper runner. Place the ‘heavy’ items—the proteins and the burrata—at opposite ends of the board to create visual balance.
- Fill the gaps with the sliced tomatoes and peaches. Arrange them in a ‘S’ shape curve across the board to lead the eye through the different textures.
- Nestle the toasted sourdough into the remaining spaces. Drizzle the entire board with a high-quality olive oil and a heavy sprinkle of flaky sea salt to make the colors ‘pop.’
- Finish by tucking fresh herbs like basil or mint into any small holes, ensuring the board looks lush and overflowing before serving immediately while the grilled items are still warm.
How to make lemon pesto?

Why we love this
Lemon pesto is a bright, zesty reimagining of the classic Italian sauce that feels like pure sunshine in a bowl. We love how the high notes of fresh lemon zest dance against the earthy, savory depth of toasted pine nuts and aged parmesan cheese. The texture is intentionally rustic—velvety oil punctuated by the grit of nuts and the fibrous snap of fresh basil leaves. It carries an intoxicating aroma of citrus and herb that can wake up any board, whether used as a dip for crusty bread or a dressing for roasted vegetables.
Ingredients
- 2 cups fresh basil leaves (packed)
- 1/2 cup freshly grated Parmesan cheese
- 1/3 cup toasted pine nuts or walnuts
- 2 large lemons (zested and juiced)
- 2 cloves garlic, smashed
- 1/2 cup high-quality extra virgin olive oil
- Salt and cracked black pepper to taste
How to make it
- Toast your pine nuts in a dry skillet over medium-low heat for 3-5 minutes. Shake the pan constantly; they turn from golden to burnt very quickly. Let them cool completely before blending.
- In a food processor, pulse the basil leaves and garlic until coarsely chopped. Do not over-process at this stage, or the basil will oxidize and turn brown.
- Add the toasted nuts, lemon zest, and lemon juice. Pulse another 5-7 times until the nuts are broken down into small, uniform pieces but not a paste.
- With the processor running on low, slowly drizzle in the olive oil in a steady stream. This creates an emulsion, resulting in a creamier, more cohesive pesto.
- Stir in the Parmesan cheese by hand using a spatula. This maintains the texture of the cheese and prevents the pesto from becoming gummy.
- Taste and season with salt and pepper. Serve in a small ceramic bowl in the center of a vegetable board, topped with an extra dusting of lemon zest for visual flair.
How to brew fun coffee?

Why we love this
Brewing ‘fun’ coffee is all about transforming a morning ritual into an aesthetic experience that delights the senses before the caffeine even hits. We love the visual drama of dark, rich espresso swirling into a cloud of cold, frothed milk, creating marble-like patterns that are almost too pretty to drink. The smell is a comforting mix of roasted beans and whatever syrup you choose—perhaps toasted marshmallow or lavender. It’s a playful way to host a brunch board, offering guests a customizable beverage that feels like a treat from a boutique cafe.
Ingredients
- 2 shots of strong espresso or 1/2 cup cold brew concentrate
- 1 cup milk of choice (oat milk froths beautifully)
- 1 tablespoon flavored syrup (e.g., salted caramel or rose)
- Ice cubes (try freezing coffee into cubes for extra fun)
- Optional: Dried rose petals or cocoa powder for dusting
How to make it
- If using espresso, brew it fresh and let it cool slightly so it doesn’t immediately melt your ice. If using cold brew, ensure it is chilled to maintain the ‘layers’ of the drink.
- Fill a tall glass with ice cubes. For a viral ‘aesthetic’ look, use large clear spheres or coffee-shaped ice cubes. Pour your syrup over the ice.
- Pour your milk into a handheld milk frother or a french press. Pump the frother vigorously for 20-30 seconds until the milk has doubled in volume and has a thick, micro-foam consistency.
- Slowly pour the frothed milk over the ice and syrup, filling the glass about 3/4 of the way full.
- The ‘magic’ step: Gently pour the espresso or cold brew concentrate directly into the center of the milk. The density difference will cause the coffee to sit between the milk and the foam, creating a tiered effect.
- Top with a light dusting of cocoa or a few dried flower petals. Serve on a small tray with a long gold spoon for the guest to stir the layers together.
How to make rhubarb jam?
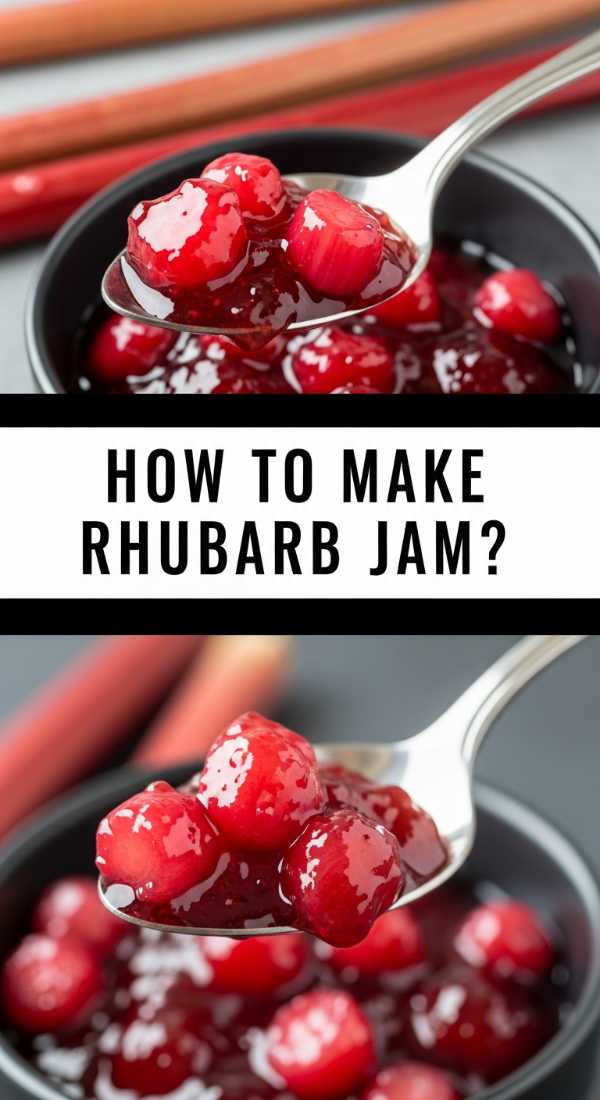
Why we love this
Rhubarb jam is a jewel-toned spread that captures the fleeting essence of early summer in a jar. We love its thick, glossy consistency and the way it balances an aggressive tartness with a sophisticated sweetness that never feels cloying. The aroma as it simmers on the stove is nostalgic and homey, filling the kitchen with scents of cooked fruit and sugar. When spread onto a board with sharp white cheddar or creamy brie, it provides a punchy, acidic counterpoint that makes the flavors of the cheese truly sing.
Ingredients
- 4 cups chopped rhubarb (1/2 inch pieces)
- 1 1/2 cups granulated sugar
- 1 tablespoon lemon zest
- 2 tablespoons lemon juice
- 1/2 teaspoon pure vanilla paste
- Pinch of salt
How to make it
- Combine the rhubarb, sugar, lemon zest, and lemon juice in a heavy-bottomed saucepan. Let it sit at room temperature for 30 minutes until the rhubarb begins to release its liquid.
- Place the pan over medium heat and bring the mixture to a gentle boil, stirring frequently with a wooden spoon to prevent the sugar from scorching on the bottom.
- Reduce the heat to medium-low and simmer. Use the spoon to mash some of the rhubarb pieces against the side of the pot to create a variegated texture—some chunks, some smooth syrup.
- Continue cooking for 15-20 minutes. To check for doneness, place a small spoonful on a chilled plate. If the jam wrinkles when you push it with your finger, it has reached its setting point.
- Remove from heat and stir in the vanilla paste and salt. The salt is crucial as it heightens the natural tartness of the rhubarb.
- Transfer to clean glass jars. Let it cool completely before sealing. Serve on a cheese board in a small glass ramekin with a dedicated wooden spreader.
How to decorate graduation cookies?

Why we love this
Decorated graduation cookies are the perfect edible keepsakes that add a personalized touch to any celebration board. We love the satisfying ‘snap’ of the royal icing and the way the intricate designs—like tiny diplomas or year-stamped stars—showcase a high level of care. The color palette can be customized to school colors, making them pop against a dark slate board. There is a meditative quality to the process of piping, and the result is a tray of cookies that look like professional bakery art but taste like buttery, home-baked goodness.
Ingredients
- Batch of firm sugar cookies (cut into caps, stars, and diplomas)
- Royal icing (stiff and flood consistencies)
- Gel food coloring (school colors)
- Fine-tip piping bags
- Scribe tool or toothpick
- Edible silver or gold pearls
How to make it
- Outline your cookies using the ‘stiff’ consistency icing. Use a #2 piping tip and keep your hand steady, about half an inch above the cookie, letting the icing ‘fall’ onto the outline.
- Let the outlines dry for 10 minutes. Then, fill the center with ‘flood’ consistency icing (this should be the consistency of heavy cream). Use a scribe tool to pop any air bubbles and push the icing into the corners.
- For a ‘wet-on-wet’ look (like polka dots or stripes), immediately pipe a different color of flood icing onto the base while it is still wet. For distinct layers, let the base dry for at least 4 hours.
- To create a graduation tassel, pipe a small dot of stiff icing at the top of the cap and drag the piping bag down in a quick motion to create a ‘tail.’ Repeat 3-4 times to create a fringe effect.
- Use a tiny amount of edible glue or icing to attach silver pearls to the center of the ‘cap’ for a 3D effect.
- Allow the cookies to dry completely (8-12 hours) before stacking them on your board. Arrange them in clusters or use them to border a central cake for a cohesive look.
How to prep toddler lunch?

Why we love this
A toddler lunch board is a game-changer for picky eaters, turning a meal into an interactive discovery session rather than a chore. We love how the ‘snack board’ style presents small, manageable portions that don’t overwhelm a child, allowing them to explore different textures like crunchy cucumbers, soft cheeses, and juicy berries. The visual appeal of bright colors and fun shapes makes the food enticing, and the aroma of fresh fruit and toasted bread is universally appealing. It’s a low-stress way to ensure variety while making the toddler feel like they are part of the ‘grown-up’ grazing culture.
Ingredients
- Mild cheddar cheese cubes
- Cucumber slices (cut into star shapes)
- Whole grain crackers or pita triangles
- Turkey roll-ups or chickpeas
- Blueberries and sliced strawberries
- Hummus or yogurt dip
How to make it
- Start with a small, unbreakable board or a compartmentalized tray. This helps keep the ‘wet’ foods (like fruit) from touching the ‘crunchy’ foods (like crackers), which is often a toddler preference.
- Use small metal vegetable cutters to transform cucumber slices or cheese slices into fun shapes like stars or hearts. This tiny effort significantly increases the ‘fun’ factor for a child.
- Roll deli turkey tightly and slice into 1-inch ‘sushi’ rounds. This makes them the perfect size for little hands to pinch and grab.
- Place a small, colorful silicone cupcake liner in the middle of the board to hold the hummus or yogurt dip. This prevents the dip from spreading across the board.
- Arrange the items in ‘rainbow’ order. Start with red berries, moving to orange cheese, then green cucumbers. The visual organization is very appealing to young children.
- Keep the portions small—3 or 4 of each item. It’s easier for a child to finish a small pile and ask for more than to be intimidated by a large portion.
How to frost graduation cupcakes?

Why we love this
Graduation cupcakes offer the perfect individual portion of celebration, and we love how a high-swirl frosting technique can make them look like works of art. The sensation of biting through a thick, stable peak of buttercream into a moist, tender crumb is the ultimate dessert experience. We love the versatility of cupcakes on a board—they can be moved around to fill gaps and provided in various flavors to suit every guest. The sight of a dozen perfectly frosted cupcakes, topped with miniature tassels, creates an instant ‘wow’ factor that anchors the entire party spread.
Ingredients
- 12 baked cupcakes (room temperature)
- 3 cups stiff American buttercream
- Large open-star piping tip (like Wilton 1M)
- Piping bags
- Chocolate squares and sour belt candies (to make DIY caps)
- School-colored sprinkles
How to make it
- Ensure your cupcakes are completely cool. If they are even slightly warm, the buttercream will lose its structure and slide off the cake.
- Fit your piping bag with the large star tip. Fill the bag only halfway; the heat from your hands can melt the frosting if the bag is too full and you handle it for too long.
- Hold the piping bag vertically, about half an inch above the center of the cupcake. Squeeze with steady pressure, starting in the center, moving to the edge, and then spiraling back up toward the middle.
- As you reach the top of the swirl, release the pressure and pull the bag up quickly to create a crisp, professional point.
- To make the cap topper: Place a small square of dark chocolate on top of the frosting. Use a tiny dot of frosting to attach a thin strip of sour belt candy or a pull-apart licorice string to act as the tassel.
- Add a final flourish of sprinkles around the base of the frosting swirl. Place the finished cupcakes on the board in a staggered, diagonal line to create a sense of movement.
How to bake rhubarb scones?
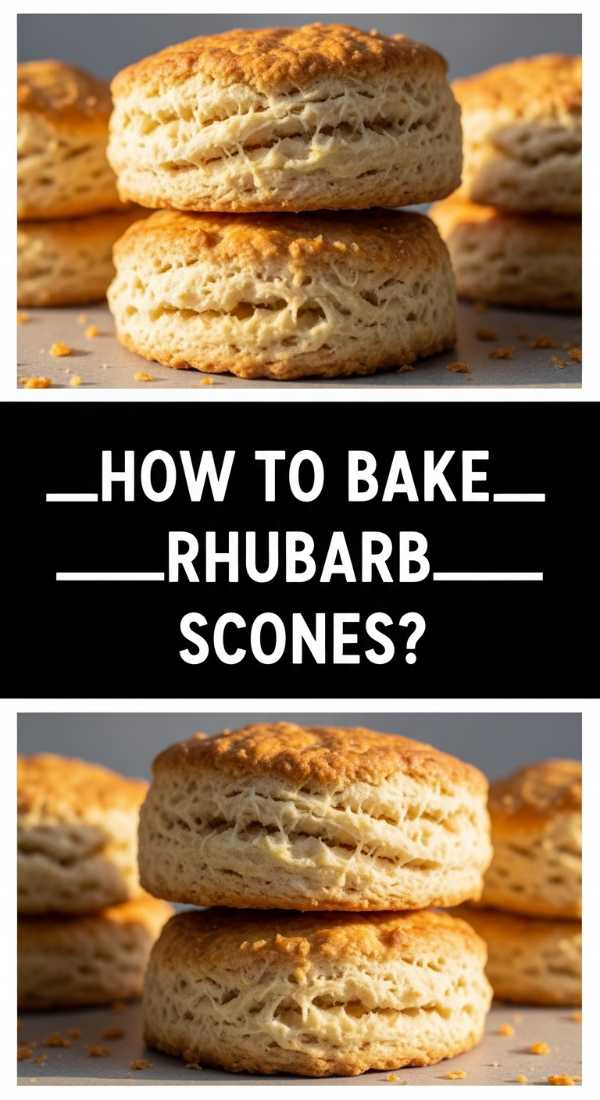
Why we love this
Rhubarb scones are the sophisticated cousin of the traditional biscuit, offering a crumbly, buttery interior dotted with tart, molten pockets of fruit. We love the way the heavy cream and cold butter create a rich, melt-in-the-mouth texture that is balanced by the sharp acidity of the rhubarb. The scent of browning butter and caramelizing sugar as they bake is absolutely irresistible. Served on a board with a side of clotted cream and extra rhubarb jam, they make for an elegant addition to a morning brunch or an afternoon tea-themed food board.
Ingredients
- 2 cups all-purpose flour
- 1/3 cup granulated sugar
- 1 tablespoon baking powder
- 1/2 teaspoon salt
- 1/2 cup cold unsalted butter (cubed)
- 1 cup fresh rhubarb (finely diced)
- 1/2 cup heavy cream (plus extra for brushing)
- 1 large egg
- 1 teaspoon vanilla extract
How to make it
- Whisk the flour, sugar, baking powder, and salt in a large bowl. Using a pastry cutter or two knives, ‘cut’ the cold butter into the flour until the mixture resembles coarse crumbs with some pea-sized pieces of butter remaining.
- Gently fold in the finely diced rhubarb. The small dice ensures that every bite has a bit of fruit without making the dough too wet.
- In a separate small bowl, whisk together the heavy cream, egg, and vanilla. Pour this into the flour mixture and stir with a fork just until a shaggy dough forms. Do not overwork the dough!
- Turn the dough out onto a floured surface and gently pat into an 8-inch disc. Use a sharp knife to cut the disc into 8 equal wedges.
- Place the wedges on a parchment-lined baking sheet and freeze them for 15 minutes. This ‘shocks’ the butter, ensuring the scones rise tall and flaky in the oven.
- Preheat oven to 400°F (200°C). Brush the tops of the cold scones with a little extra heavy cream and sprinkle with sugar. Bake for 18-22 minutes until the edges are golden brown and the centers are set.
Conclusion: The Art of the Board
Hosting doesn’t have to be a high-stress performance. By mastering these individual components—from the tart zing of rhubarb jam to the perfect swirl of a graduation cupcake—you can assemble food boards that are as delicious as they are photogenic. The beauty of the board lifestyle is its flexibility; it allows you to mix homemade treats with store-bought staples, creating a lush, communal experience that invites people to gather and share. So next time you’re expecting company, skip the formal three-course meal and reach for your biggest wooden board. Your guests (and your stress levels) will thank you.